Apollo 13

Day 1, part 3: Transposition, Docking and Extraction
Corrected Transcript and Commentary Copyright ©2014-2020 by W. David Woods, Johannes Kemppanen, Alexander Turhanov and Lennox J. Waugh. All rights reserved.
Last updated 2020-04-21
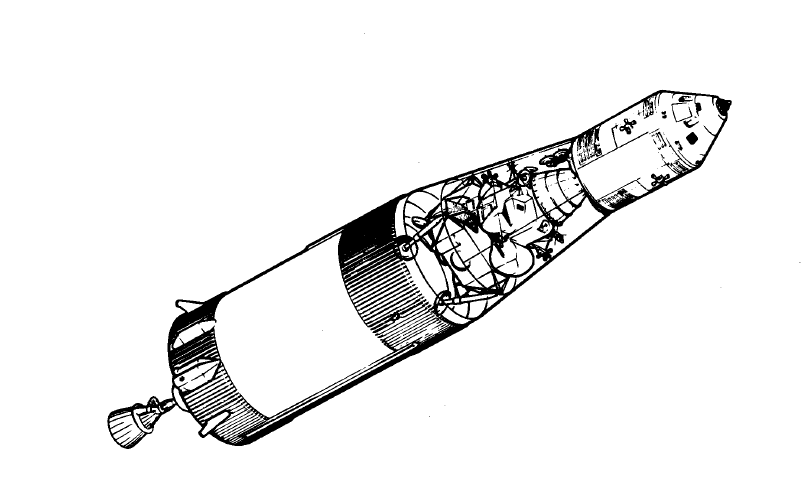
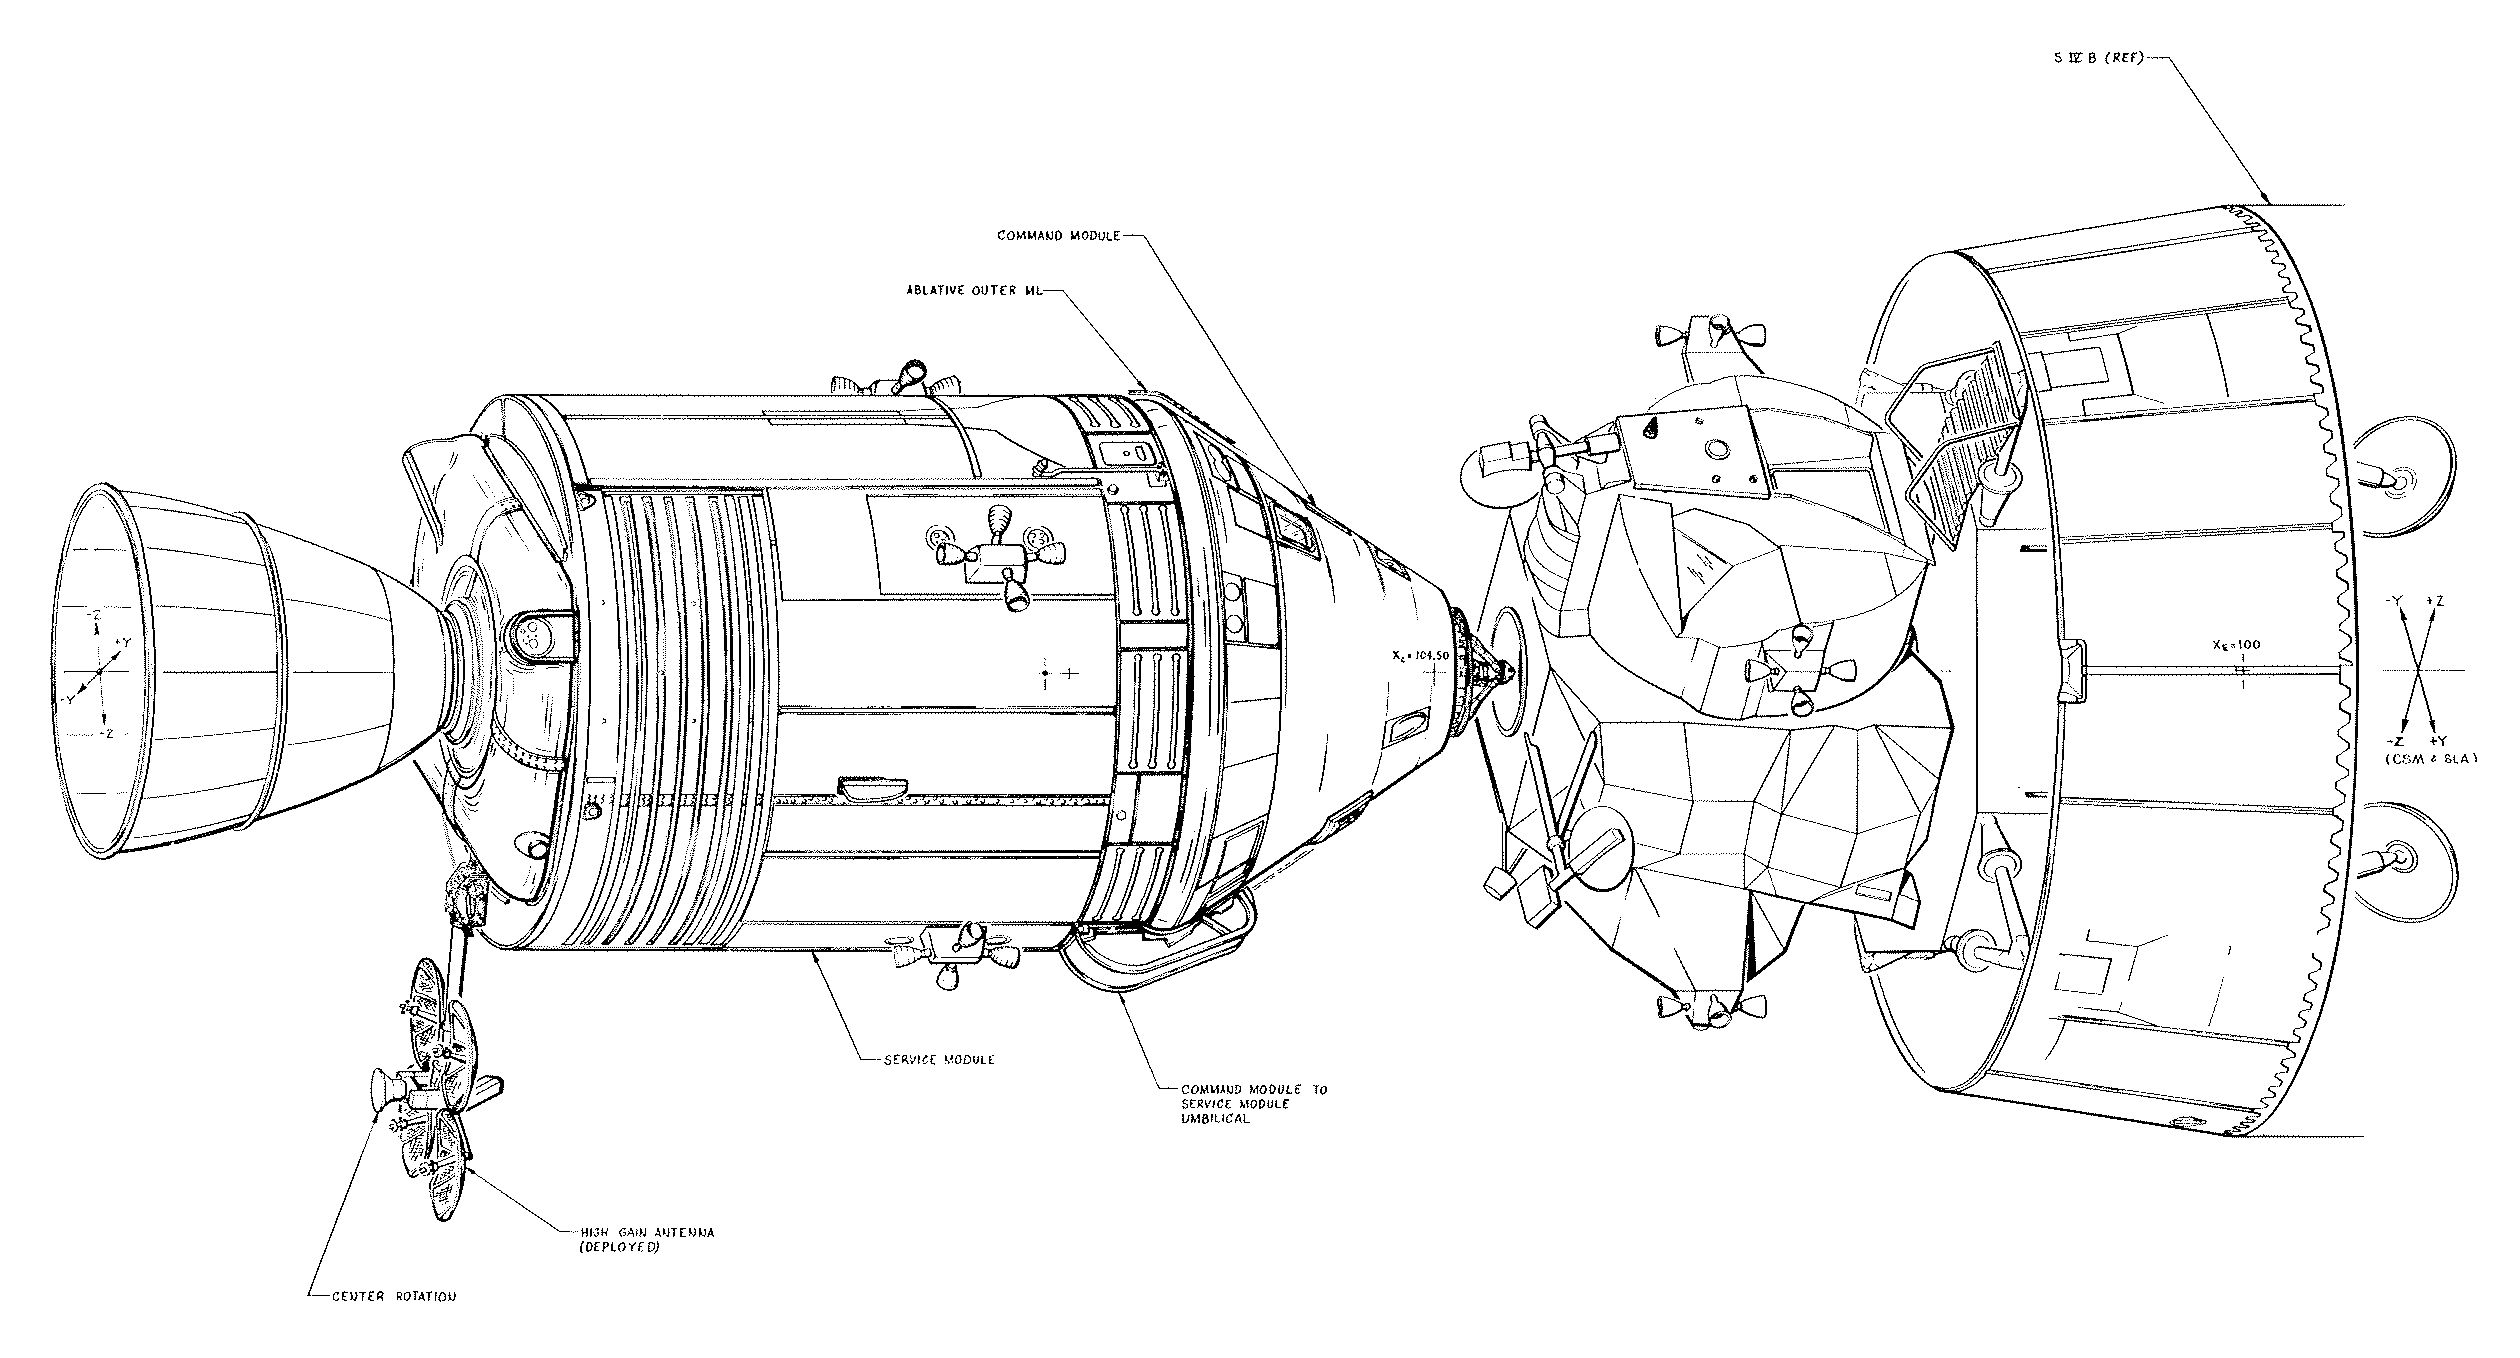
Present Saturn V-Apollo configuration. The LM is still inside the SLA section.
002:48:34 Kerwin: Apollo 13, Houston.
002:48:38 Lovell: Roger, Houston; 13 here.
002:48:39 Kerwin: Okay. We have the S-IVB maneuver to Sep attitude commencing at 2 plus 56 plus 37. Duration of the maneuver: 4 minutes. Sep time, 3 plus 06 plus 37. Over. [Long pause.]
002:49:15 Haise: Okay. If I heard those right, Joe, that the S-IVB maneuver was 2 plus 56 plus 57, and Sep time is 3 plus 06 plus 27.
002:49:25 Kerwin: Correction on the seconds; 2 plus 56 plus 37, and 3 plus 06 plus 37. [Long pause.]
002:49:43 Haise: Okay. 2 plus 56 plus 37 with the maneuver time; and the Sep time, 3 plus 06 plus 27?
002:49:53 Kerwin: That's plus 37, too. Exactly 10 minutes later, Fred.
002:50:05 Haise: Okay; 37.
This is Mission Control; we're now at 2 hours, 54 minutes with the crew, and preparing for the CSM separation from the S-IVB; the subsequent docking with the Lunar Module and the ejection of the LM and Command Module from the Saturn third stage. The times of all of those events are almost precisely as indicated in the Flight Plan. The separation maneuver scheduled to occur at Ground Elapsed Time of 3 hours, 6 minutes, 37 seconds; and the docking would come then with the LM at 3 hours, 16 minutes Ground Elapsed Time. Our displays in Mission Control are showing the effects of the Translunar Injection burn; we currently show the spacecraft at an altitude of 1,183 nautical miles [2,191 km], traveling at a velocity of 31,406 feet per second [9,573 metres/second].
002:57:52 Kerwin: Apollo 13, Houston.
002:57:54 Lovell: Go ahead.
002:57:57 Kerwin: We see the booster doing all the right things, and FIDO says your trajectory looks good, and it looks like we'll stick with a pretty close to nominal midcourse, too. We'll have some numbers for you later.
002:58:02 Lovell: Okay. And we concur. The S-IVB is maneuvering at this time.
002:58:13 Kerwin: Roger. [Long pause.]
002:58:32 Kerwin: And, Apollo 13, Houston. We'd like Omni Alpha. Over.
002:58:36 Lovell: Omni Alpha, coming up.
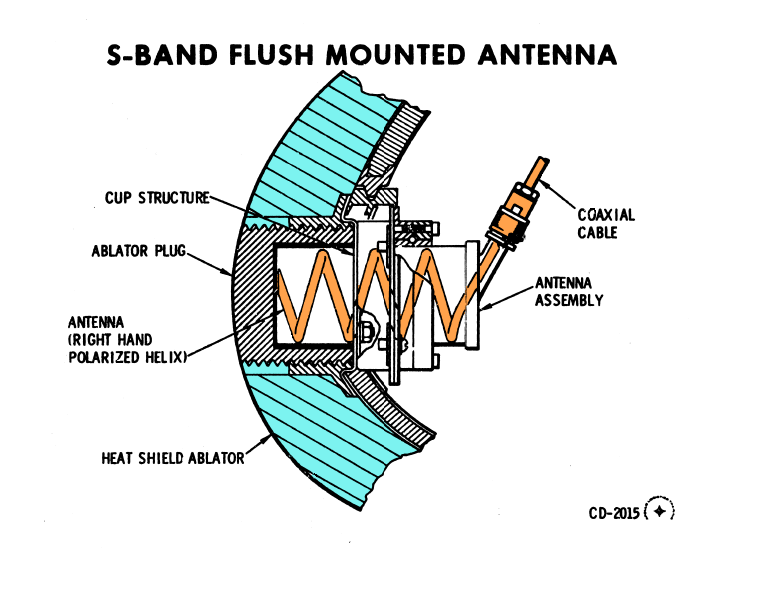
Diagram of an omni antenna.
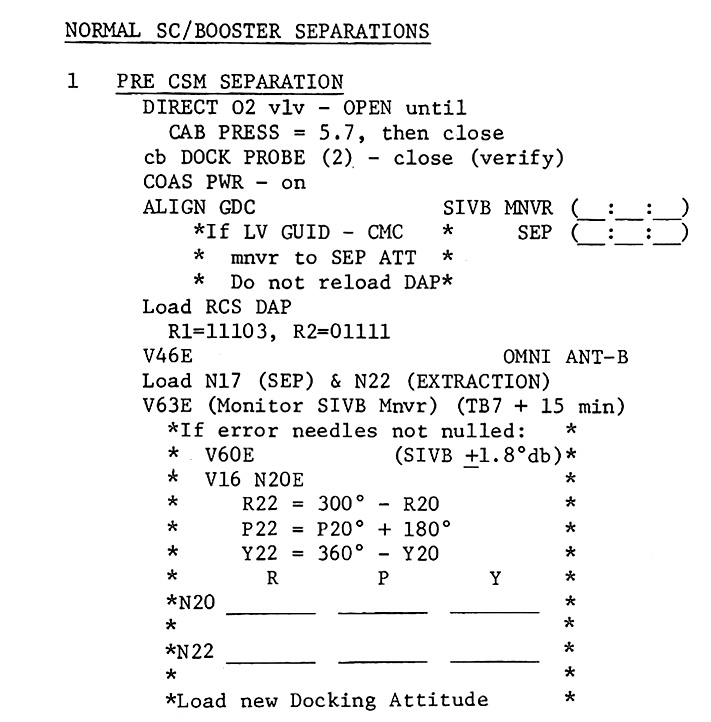
Step 1 of the booster separation and docking checklist.
002:59:54 Kerwin: 13, Houston. Now request Omni Charlie.
002:59:56 Lovell: Roger. Going Charlie. [Pause.]
003:00:06 Kerwin: And, 13, we'll be doing a handover, now.
And our booster engineer reports the S-IVB is nearly in the proper attitude. We're about 5½ minutes from the scheduled time of separation, and we are expecting that the crew will have the television transmitter and camera on, beginning at a Ground Elapsed Time of about 3 hours, 15 minutes for television coverage of the docking.
003:01:33 Kerwin: Apollo 13, Houston. You are Go for T&D.
003:01:37 Swigert: Okay, Joe. Thank you.
003:01:44 Kerwin: And, 13, Houston. Check your Noun 17 for extraction pitch attitude. It should be 319 degrees. Over.
003:01:52 Lovell: Okay. We'll look at it.
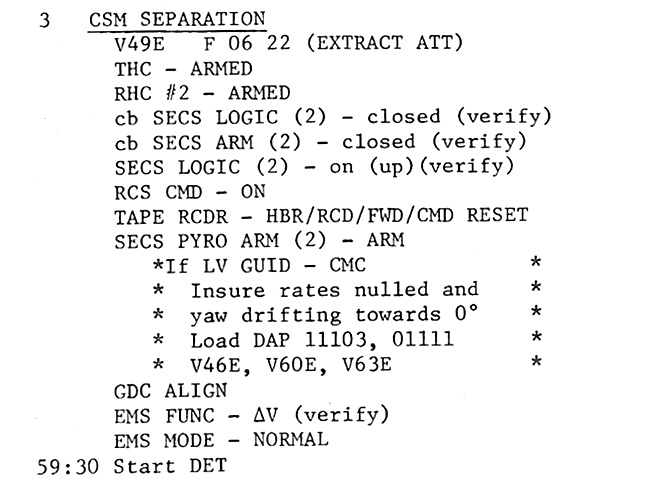
Step 3
003:05:20 Swigert: Okay, Houston; 13. Do we have a Go for pyro arm? [Pause.]
003:05:31 Kerwin: 13, Houston. Affirmative. You're Go for pyro arm, and recommend you secure the cabin pressurization.
003:05:39 Swigert: We did. We closed the waste management vent valve, there. Or waste stowage valves...
003:05:48 Kerwin: Okay. We're reading 6 psi on the cabin, Jack. [Pause.]
003:05:55 Swigert: Roger, Joe. Thank you very much.
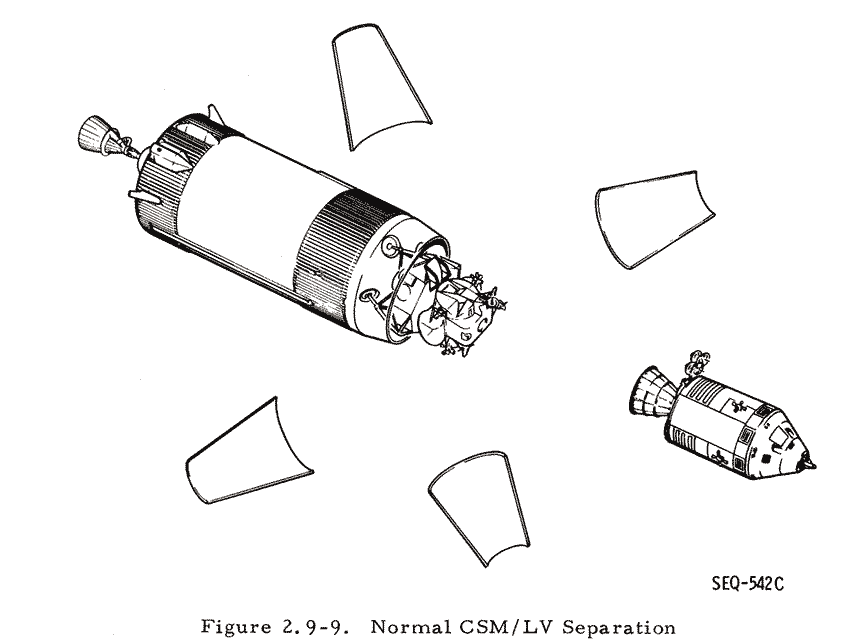
Diagram of the separation maneuver.
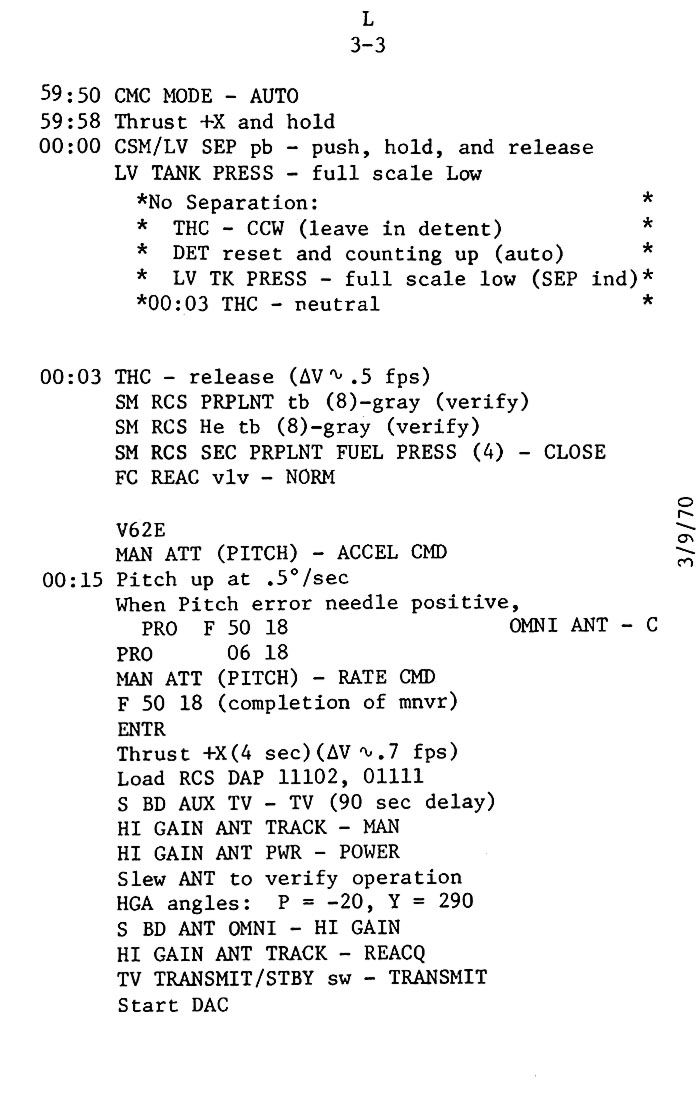
Step 3, second part
Telemetry data, here on the ground, indicates that the spacecraft has separated from the S-IVB. Astronaut Jack Swigert at this time would be in the commander's couch, the left-hand couch, at the controls of the spacecraft during the transposition and docking maneuvers. And we should be getting television transmissions from the spacecraft, beginning at about 3 hours, 15 minutes Ground Elapsed Time.
003:07:38 Swigert: Yeah, that's quite a bang, Joe. We've separated, and we've pitched around about 60 degrees now.
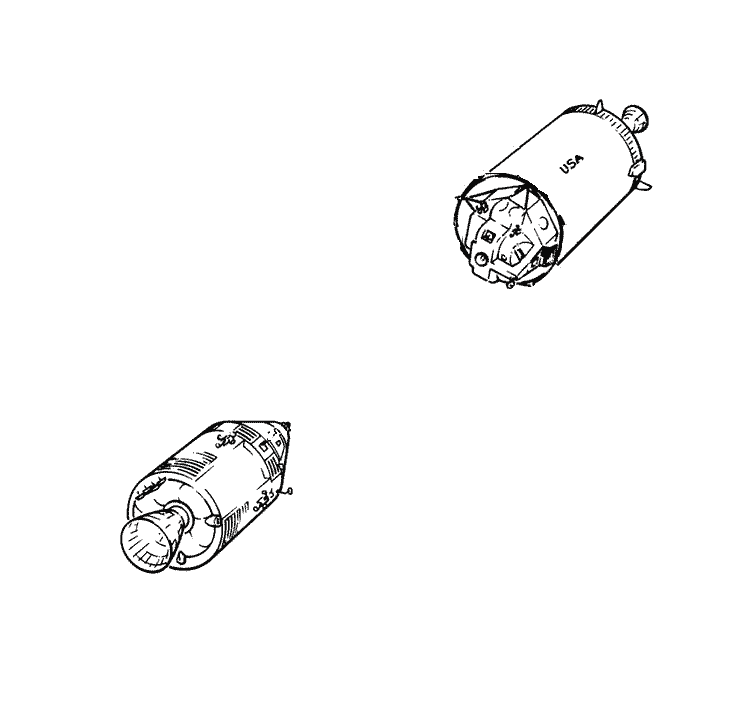
Pitch around for docking. Modification of original NASA art by JK.
003:07:44 Kerwin: Roger, Jack. We see you pitching.
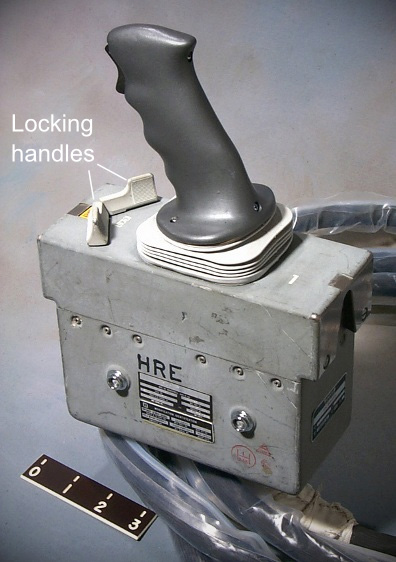
Command Module Rotational Hand Controller - RHC.
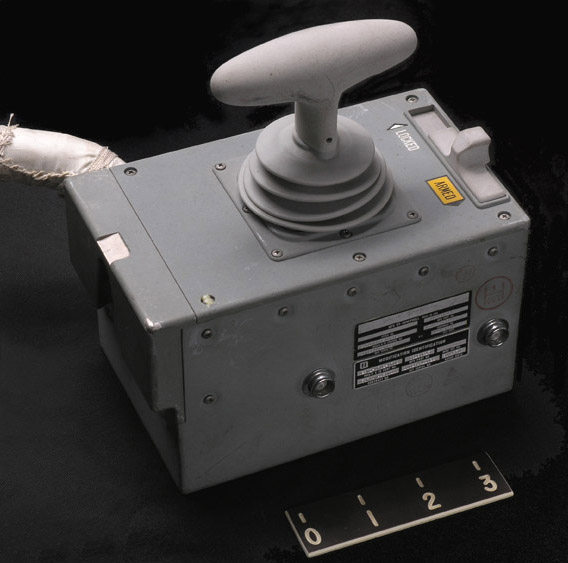
Command Module Translational Hand Controller - THC.
003:07:47 Swigert: Okay. We got the SLA panels; one of them is out front now.
003:07:52 Kerwin: Ah, so. [Long pause.]
Swigert reporting that the SLA panels on the S-IVB are coming into view.
003:08:38 Swigert: Got the S-IVB. I guess we're about 80 feet.
003:08:42 Kerwin: Good deal. [Long pause.]
003:09:01 Haise: Okay. I'm going to come on with the TV now, Joe.
003:09:03 Kerwin: Okay, Fred. We're waiting for it. [Long pause.]
The network controller reports we're getting television signals now from the spacecraft, a bit earlier than expected and the crew is apparently somewhat ahead of the timeline in the Transposition and Docking maneuver. We'll stand by for a television picture.
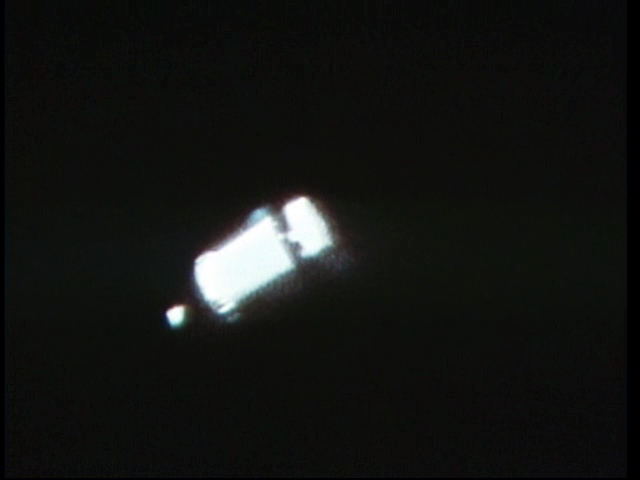
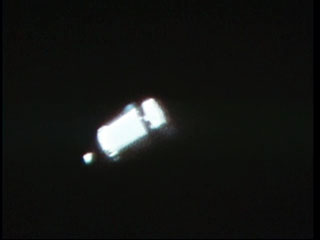
003:09:52 Kerwin: 13, Houston. We've got a groovy TV picture.
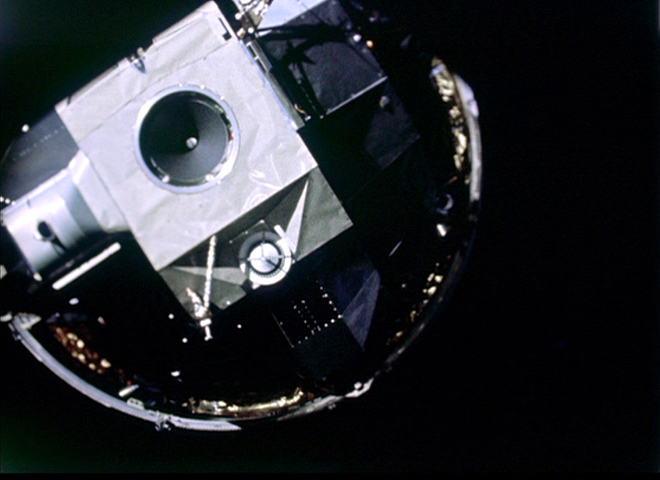
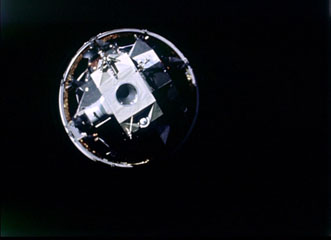
"Groovy TV picture" as the S-IVB comes into view. NASA TV capture.
003:09:58 Lovell: Sounds good.
We're looking down the nose of the S-IVB minus its SLA panels at this time, the top view of the LM. That last report Swigert said they were 80 feet away from the S-IVB and that distance should be closing.
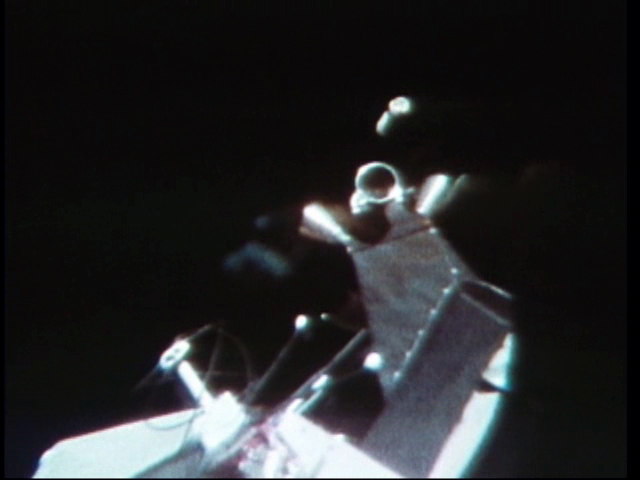
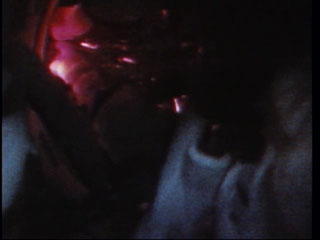
16mm film capture of the docking at initiation.
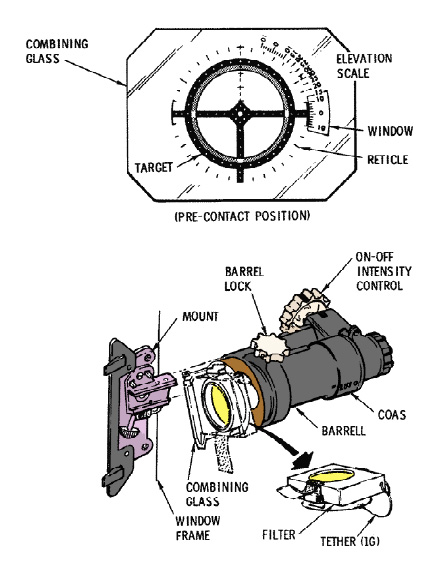
COAS - Crewman Optical Alignment Sight diagram

Line-up of the CSM and the LM for docking, with line of sight explained.
003:11:25 Haise: Is the focus good enough, Joe, that you can see all the glittering debris?
003:11:33 Kerwin: We've seen some debris, Fred. The booster itself is a little bit bright. What's your f-stop?
003:11:40 Haise: Okay. I'm at 22.
003:11:41 Kerwin: Why don't you go up a click and let us have a look at that. [Pause.]
003:11:50 Haise: Okay. You're at 44 now.
003:11:55 Kerwin: Okay. Let's stay there for now and I assume you're in peak.
003:11:58 Haise: Affirmed. [Long pause.]
003:12:17 Kerwin: 13, Houston. Recommend Rate 2 on the BMAGs.
003:12:23 Haise: Thank you. [Long pause.]
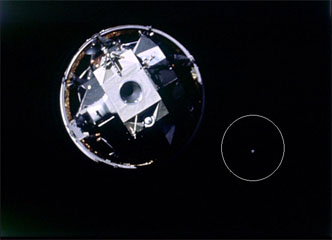
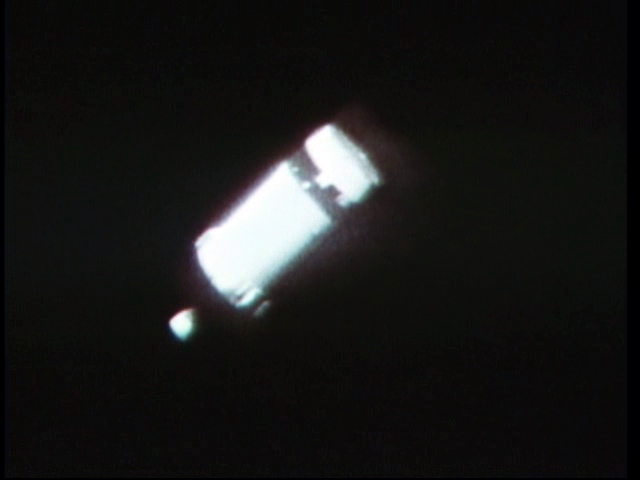
Docking continues. One of the pieces of debris is visible as a shiny white spot and highlighted.
Fred Haise is manipulating the TV camera. We haven't determined yet which window of the Command Module we're looking out of. Jack Swigert in the left hand couch maneuvering the spacecraft, the Command Module, into position for the docking.
The view of the Lunar Module veers more and more to one side as they approach to it, making the view angle of the camera more obvious.
003:13:23 Kerwin: It's getting bigger. [Long pause.]
003:13:42 Lovell: As you might know, Joe, I've got the center seat, again and I can't see a thing.
003:13:47 Kerwin: Too bad.
003:13:49 Lovell: I gave him the TV monitor.
This view of the Saturn third stage and the Lunar Module is coming to us from about 5,000 [nautical] miles [9,000 km] beyond Earth. The spacecraft and S-IVB travelling at a speed of about 22,900 feet per second [7,000 m/s] at this time.
Capture from the TV image.
003:15:04 Haise: Okay, I'm going to be moving the TV directly. I'm going to pull it out of this bracket, Jim.
003:15:10 Kerwin: 13, Houston. Did you call?
003:15:12 Haise: Rog. I'll be moving the TV to get a better shot here; moving it out of this bracket.
003:15:18 Kerwin: Okay, Fred. It's just beginning to cut off at the bottom, but it's still a very good picture.
003:16:30 Kerwin: That's a good picture, Fred.
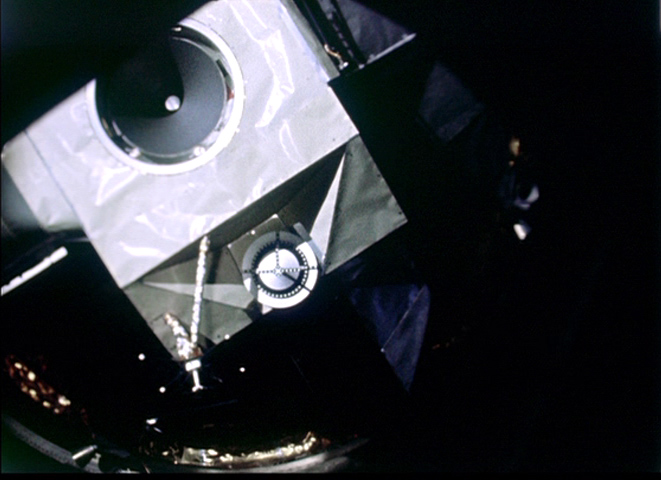
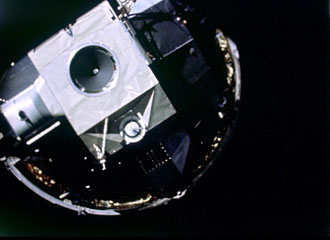
The white docking target becomes more visible with their approach.
003:16:36 Haise: And we're just about there. About 10 - 10 more feet now.

Just as they come to a final approach, the probe casts its shadow against the backdrop of the LM.
003:16:43 Haise: Everything looks pretty good down in the S-IVB, too. The shroud still looks intact down there.
003:16:50 Kerwin: Good deal. There's really quite a bit of detail in this picture. [Long pause.]

Docking approach.
003:17:07 Swigert: Okay. We've - we've got two barber poles.
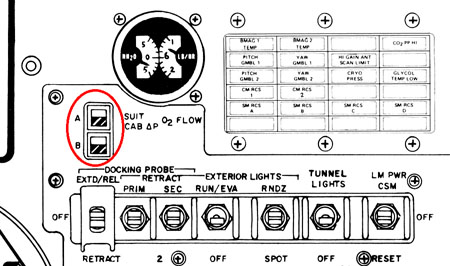
Control switches and indicators for the docking system. Scan via heroicrelics.org
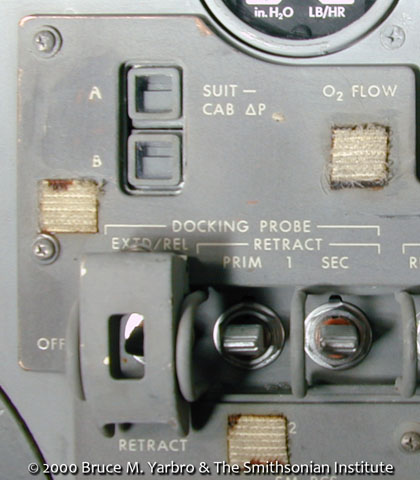
The same portion of the panel, photographed onboard Odyssey.
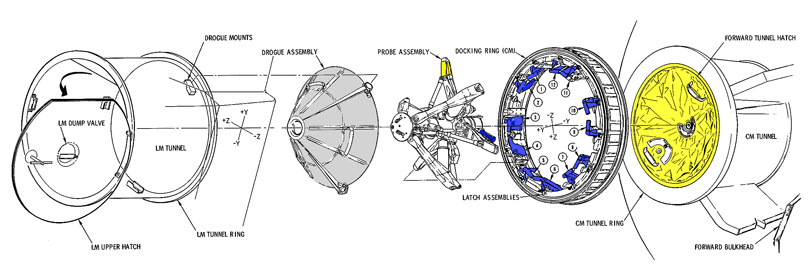
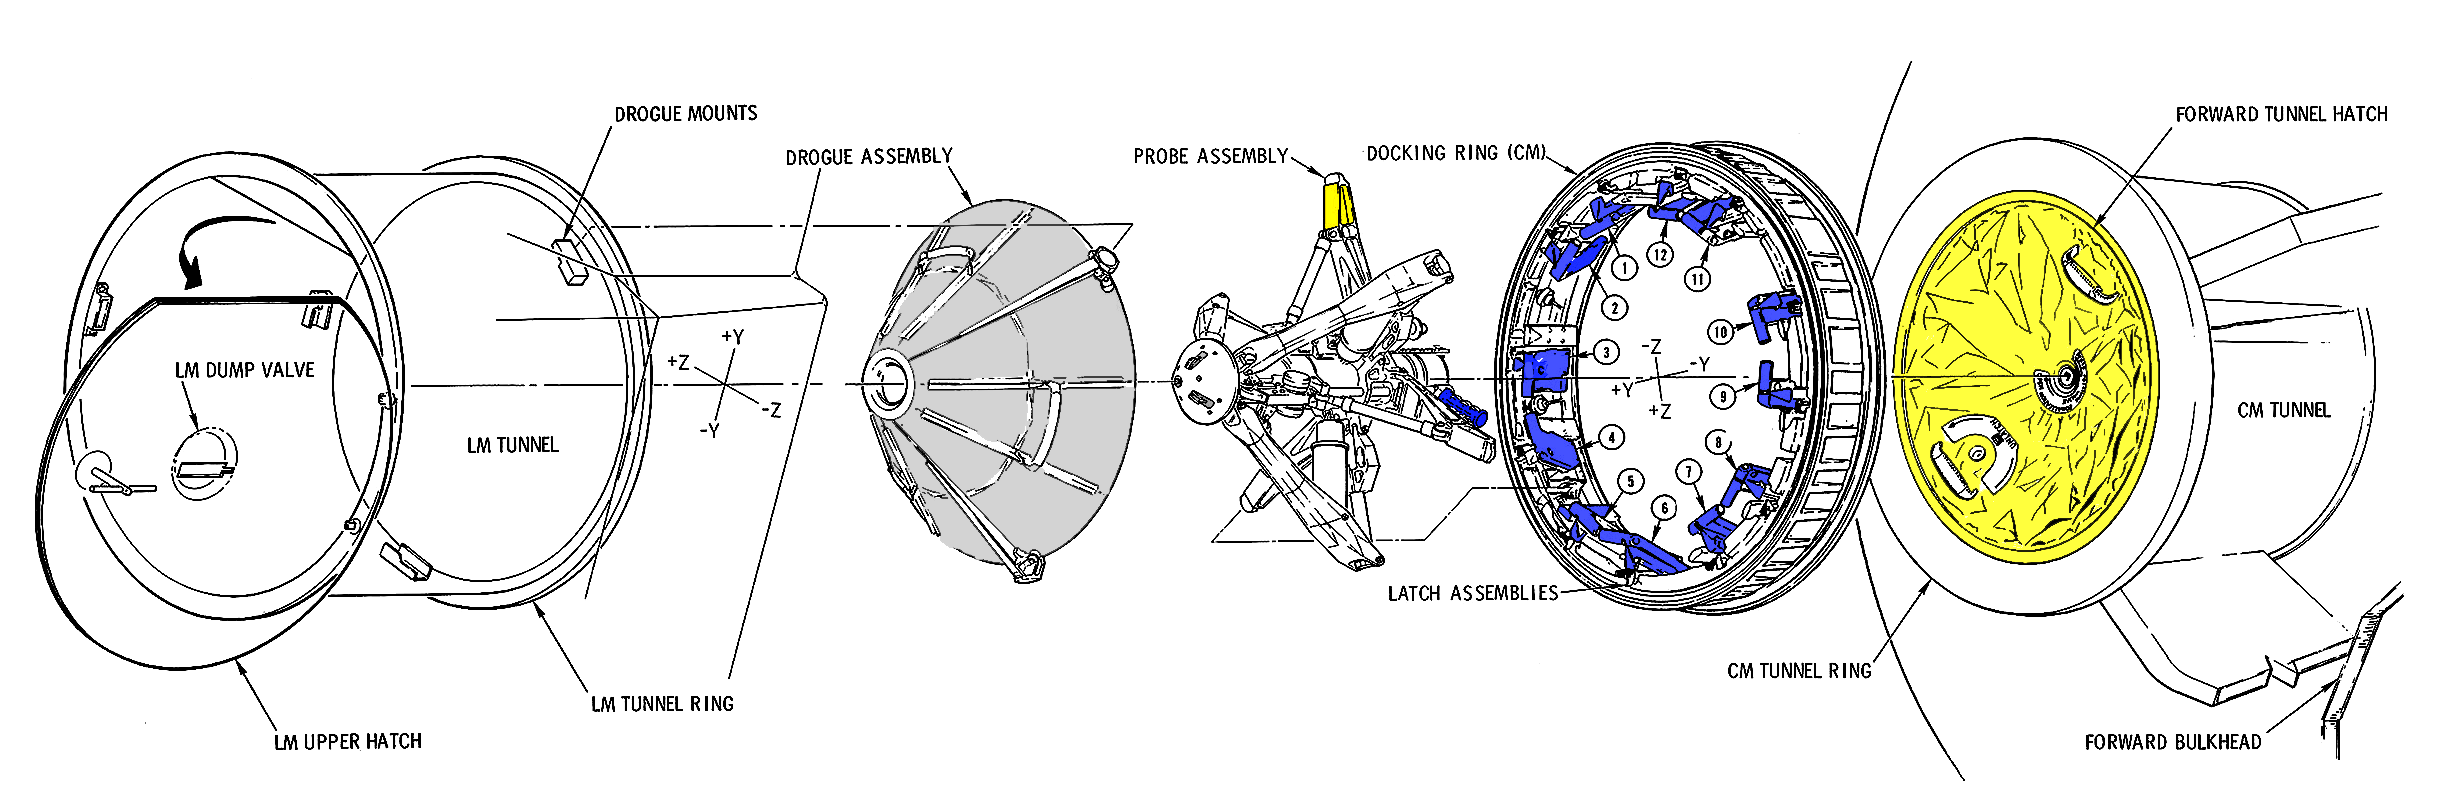
The Apollo Docking System
003:17:11 Kerwin: Houston; Roger. [Long pause.]
003:18:10 Haise: Okay. You should be able to see down into the portion of the IU right now, Joe. [Pause.]
003:18:21 Kerwin: Fred, Houston. We'd like to try going to Average on the TV for a minute or so.
003:18:29 Haise: Okay. You've got Average, and a little yellow dust cap just floated by in front of us.
003:18:36 Kerwin: Yeah. We see it at the top of the screen.
003:18:41 Kerwin: And, Fred, after a few minutes of this, at your convenience, we could use some interior shots if you get the time and if the lighting is good.
003:18:52 Kerwin: And, 13, Houston. The S-IVB vent times are nominal as in the Flight Plan within a few seconds. [Long pause.]
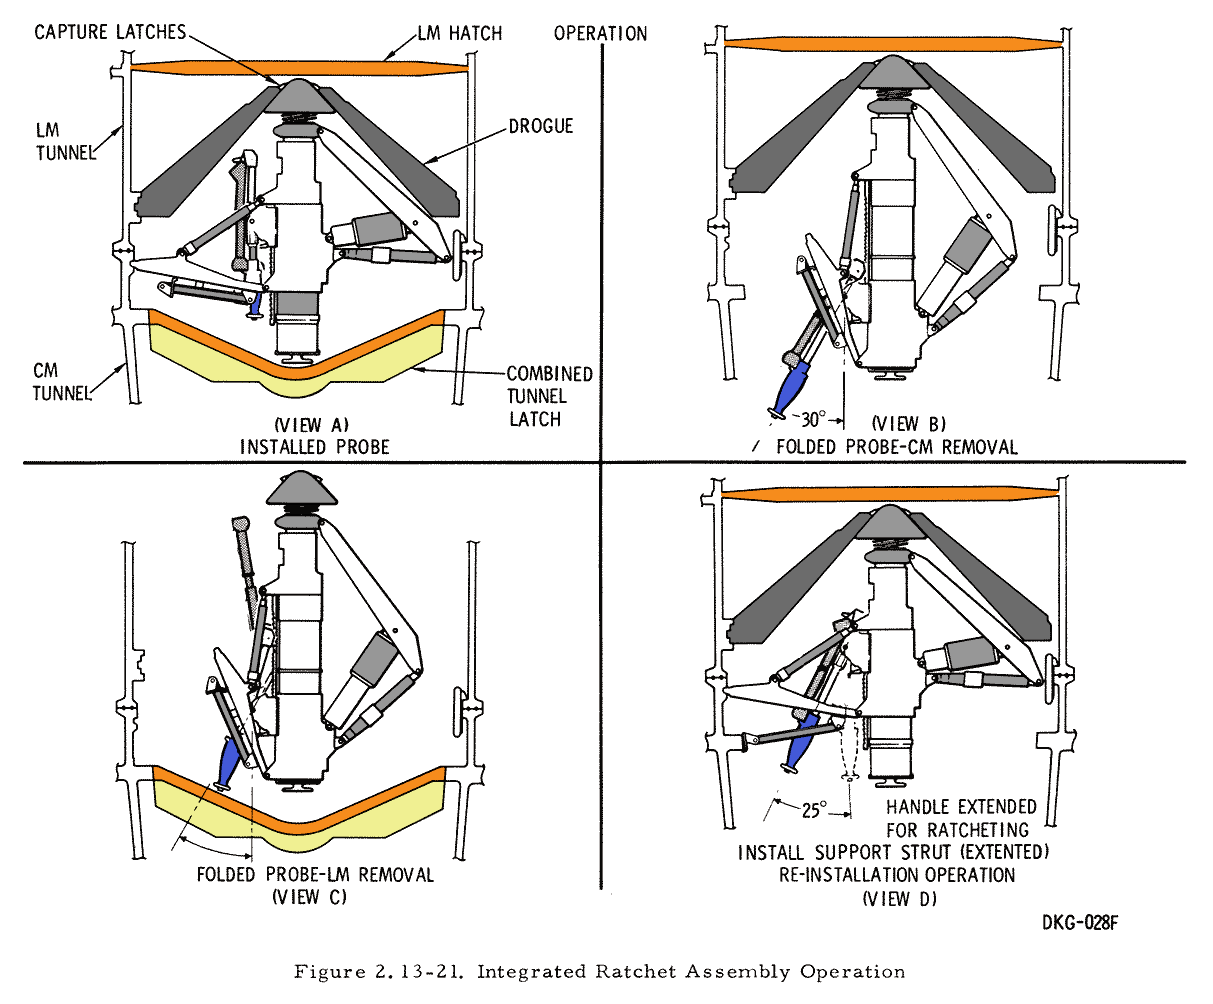
The various configurations of the LM/CM hatches the drogue and the probe.
003:19:18 Lovell: We're hard docked, Houston.
003:19:21 Kerwin: Roger. Understand. Hard docked. Good deal. Fred, one more thing on the TV. If you could come down to f:22 again.
003:19:32 Haise: Okay. You've got f:22 again. [Long pause.]
003:20:22 Lovell: And, Houston, Fred will handle the camera as we go through the postdocking checklist.
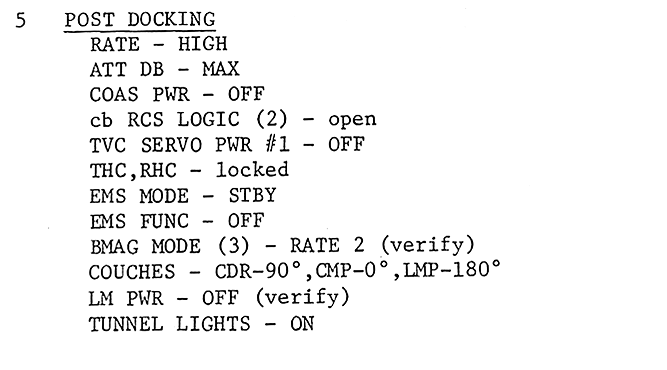
Step 5 - Post-Docking Checklist
003:20:26 Kerwin: Okay, Jim. Real good.
Haise is apparently maneuvering the camera inside the spacecraft for an interior view at this point and we'll stand by to see if we've got enough light inside the spacecraft to get a useable picture.
003:21:38 Haise: Okay, Joe. I am pointing it over toward Jack, and it's pretty bright with the Earth out that window. Is that sort of washing out the picture here?
003:21:49 Kerwin: No, Fred, it's not. We've got a bright spot where the window is. The rest of you are semi-silhouetted. It's a pretty impressive picture. [Long pause.]
003:22:36 Kerwin: Apollo 13, Houston.
003:22:38 Swigert: Go ahead, Joe.
003:22:40 Kerwin: For Fred. The IOS [?] has caught you with the fuel cell reactant valves in latch again. [Pause.]
003:22:52 Lovell: Touché.
003:22:54 Kerwin: And we have word that the propellant usage for T&D was nominal.
003:23:01 Swigert: Okay, what is nominal, please?
003:23:02 Kerwin: Well, I didn't ask that yet, Jack; stand by one.
003:23:07 Swigert: That's okay (laughter).
003:24:20 Kerwin: Fred, this is Houston. Over.
003:24:22 Haise: Go ahead.
003:24:24 Kerwin: Okay. With the direct sunlight from the window, out of the TV camera field as it is now, we'd like you to open it up an f-stop or so and, if convenient, try to keep that bright spot out of the window.
003:26:14 Kerwin: 13, Houston. I guess we think we could stand one more click down on the f-stop.
003:26:24 Swigert: Okay, Joe. He's going to do it.
003:26:26 Kerwin: That is, we want you to open it up. Looks like a very interesting book you're reading.
003:26:33 Swigert: I've got two of them.
003:30:11 Kerwin: Hey, that's pretty, Fred.
003:30:17 Haise: Okay. I hope you got more detail than I have on the monitor here.
003:30:21 Kerwin: No. We probably don't, but it's kind of a neat picture anyway. [Long pause.]
003:30:39 Swigert: Houston, we're now going to finish repressurizing the tunnel.
003:30:46 Kerwin: Houston; Roger.
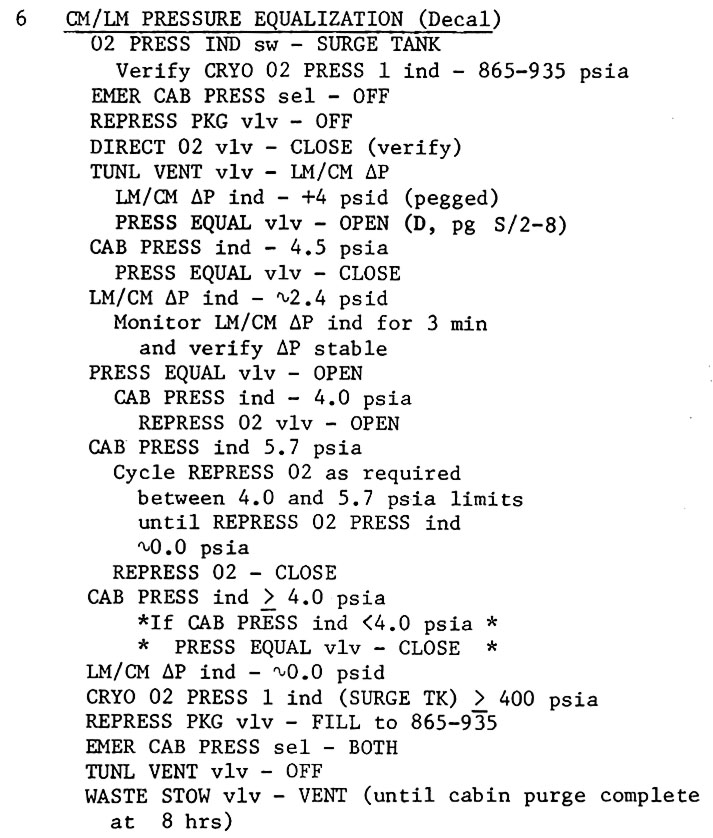
Step 6 - Pressurization
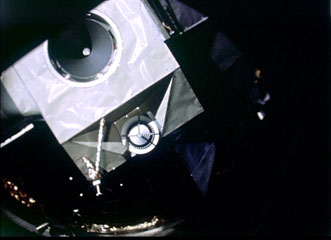
This view is looking up into the docking tunnel of the Command Module with the tunnel light showing toward the top of the tunnel.
003:31:47 Haise: [garbled] probably hear, Joe, we're just finishing pumping up Aquarius here.
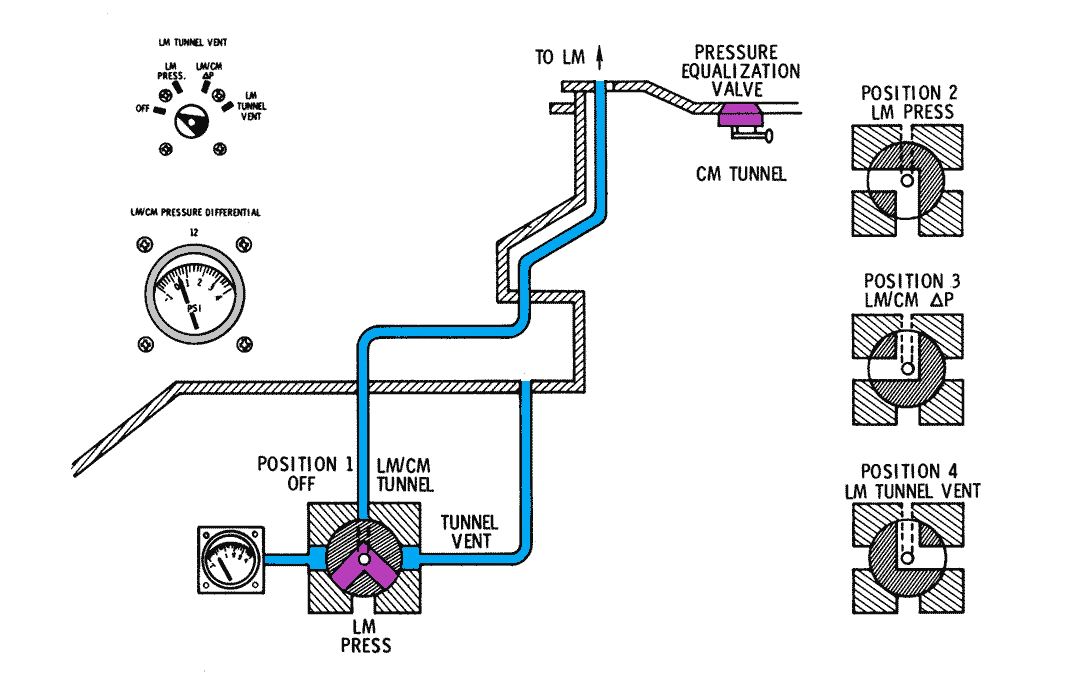
LM pressurization control.
003:31:54 Kerwin: Okay. About all we see on this picture, Fred, are the bright spots with the lights around the tunnel area. The hatch itself is pretty dark.
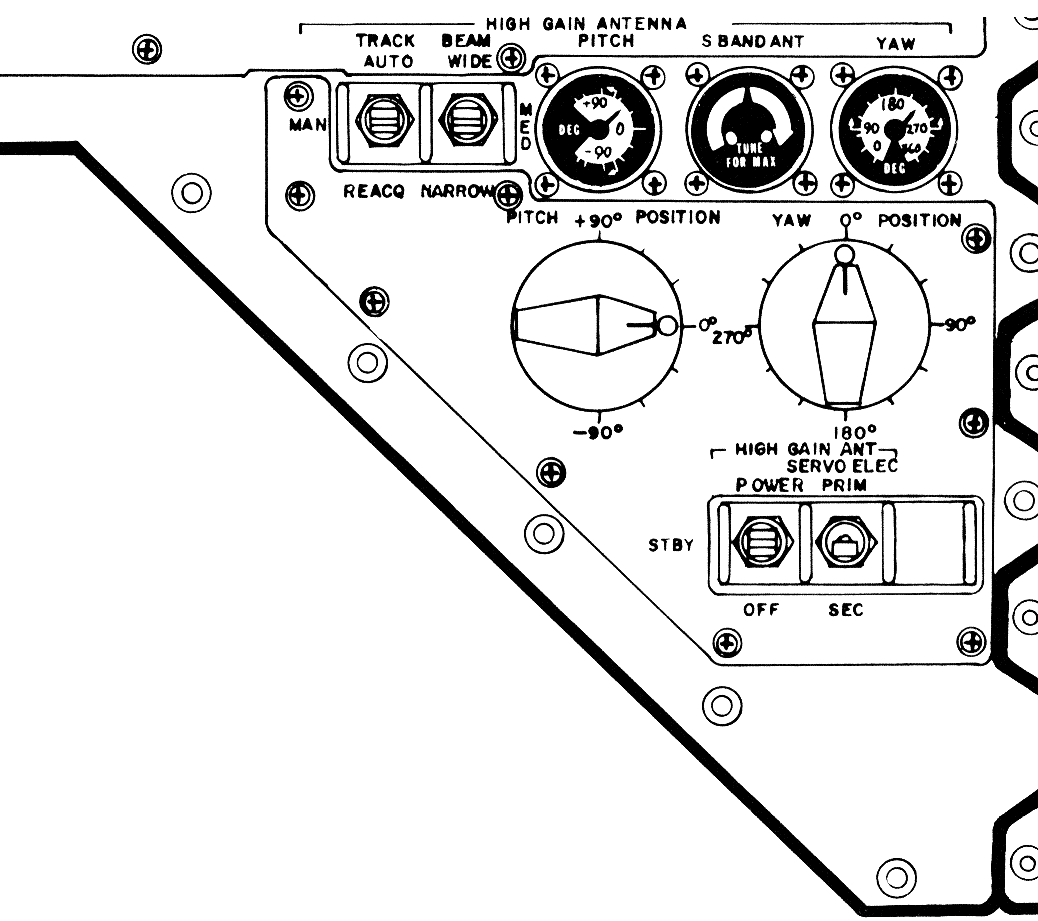
003:32:57 Kerwin: 13, Houston. By the way, we'd like to know how the High Gain Antenna lockup worked. Our signal strength is a little bit lower than we thought it would be.
003:33:06 Swigert: It looked just the way I expected it to, Joe. I had her sitting there in Reacq with the numbers cranked in and soon as we got pretty much through the rotation, I just threw it down to High Gain and it appeared to lock right up.
003:33:24 Kerwin: Okay. Good deal. See that flashlight beam wandering around there.
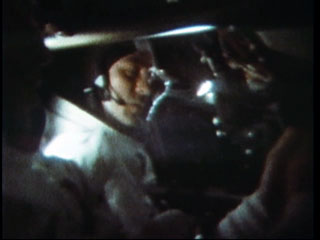
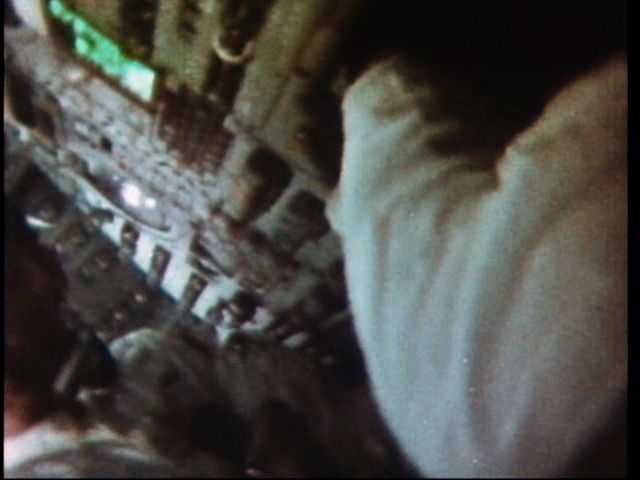
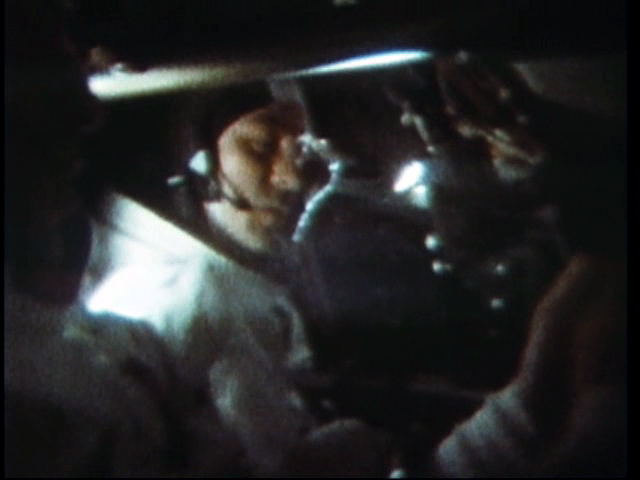
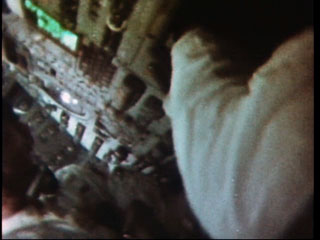
Jack Swigert still in his spacesuit, works at the Commander's position.
At this point, we're getting a good view of Jack Swigert in the left hand seat of the Command Module.
003:35:45 Haise: Houston, 13.
003:35:47 Kerwin: 13, Houston. Go ahead.
003:35:50 Haise: We'd kind of like to hold off on the - start the venting again until we get the things pumped back up inside here. Wonder if you might give us a call to remind us when to initiate that.
003:36:06 Kerwin: Okay, 13; will do. [Long pause.]
003:36:26 Haise: And we'll try to shift her up to look up into the tunnel here.
003:36:31 Kerwin: Okay. Real good. [Long pause.]
003:36:54 Kerwin: Okay, 13; Houston. I think we could use an f-stop lower. What f-stop are you in now?
003:37:03 Haise: I'm about as low as you can go, Joe. I'm sitting on 4.4.
003:37:06 Kerwin: Okay. [Pause.]
003:37:18 Haise: What you're looking at, Joe, is the commander has removed the hatch and is proceeding to stow it. [Long pause.]

The docking tunnel from the Command Module's side.
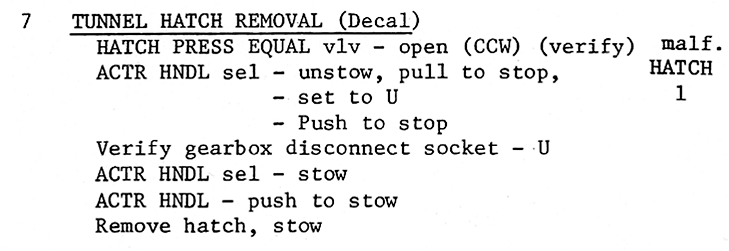
Step 7
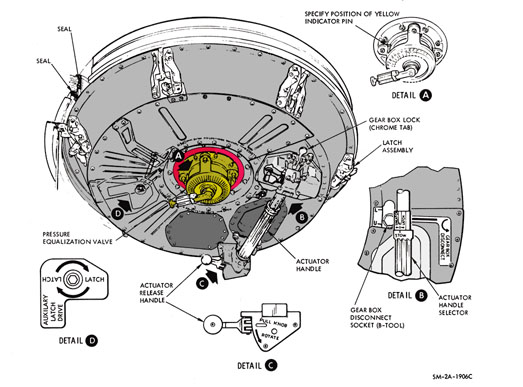
Diagram of the Command Module docking hatch.
003:38:06 Kerwin: Okay, 13. That's a pretty good picture there.
003:38:14 Haise: The CDR is verifying the docking latches now.
003:38:17 Kerwin: Rog. [Pause.]

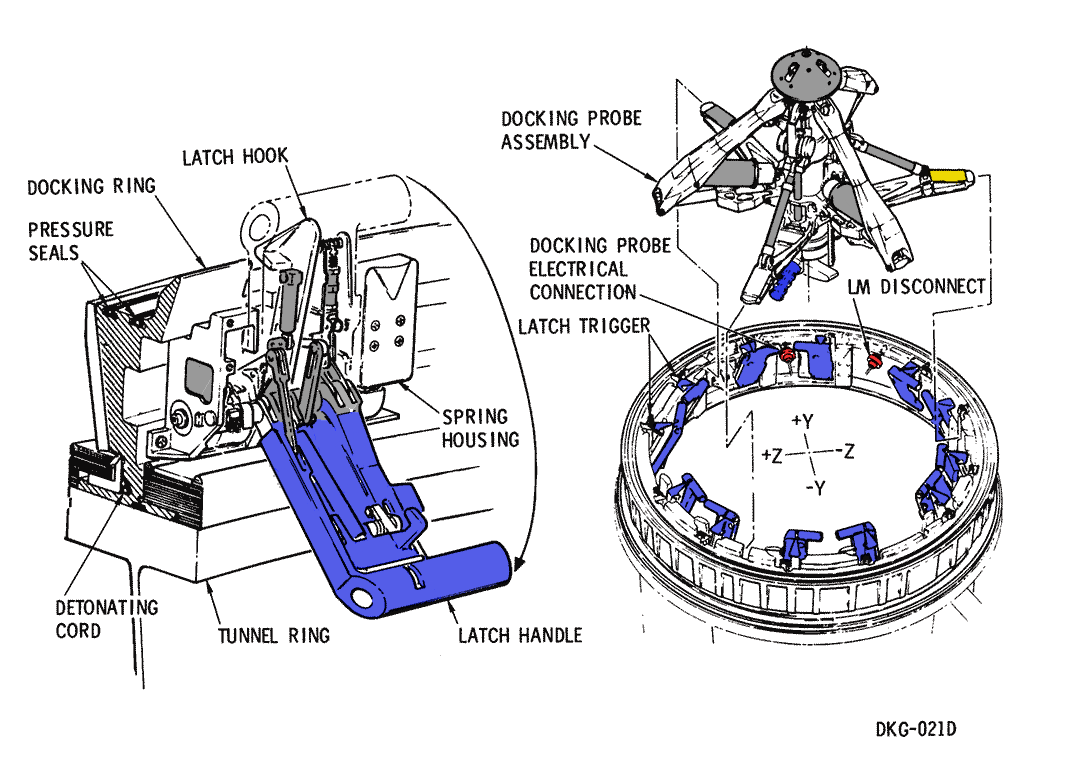
Diagram view of the docking latches.
003:38:25 Swigert: Hey, Joe. Jim reports that there's a slight, you know, burn smell up in the tunnel area, as been reported on previous flights.
003:38:34 Kerwin: Okay. We copy that. [Long pause.]
003:39:06 Swigert: Okay. The commander reports all docking latches latched.
003:39:11 Kerwin: Houston; Roger.
Although we have a rather dim picture at this time, we can see Jim Lovell working in the tunnel area. Lovell has removed the hatch cover, inspected the docking latches and reported that everything was in order in the tunnel. He should be shortly attaching the umbilical to the Lunar Module which will provide power to the heaters and some of the critical LM guidance equipment, and then reinstalling the tunnel hatch.
003:42:08 Kerwin: 13, Houston. For your information, the S-IVB vent is proceeding on schedule.
003:42:15 Swigert: Okay, Joe.
003:42:20 Haise: Yeah, Joe. That's - That's concurring with all the thousands of particles I see going by outside here.
003:42:30 Kerwin: Yes. I guess I didn't need to tell you.
Particles visible in the TV image during the TDE maneuvers.
Lovell working in the docking tunnel. NASA TV capture.

Step 9
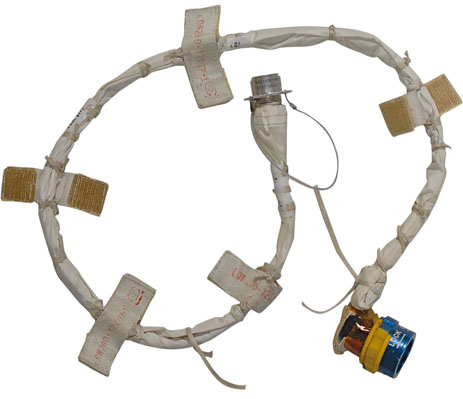
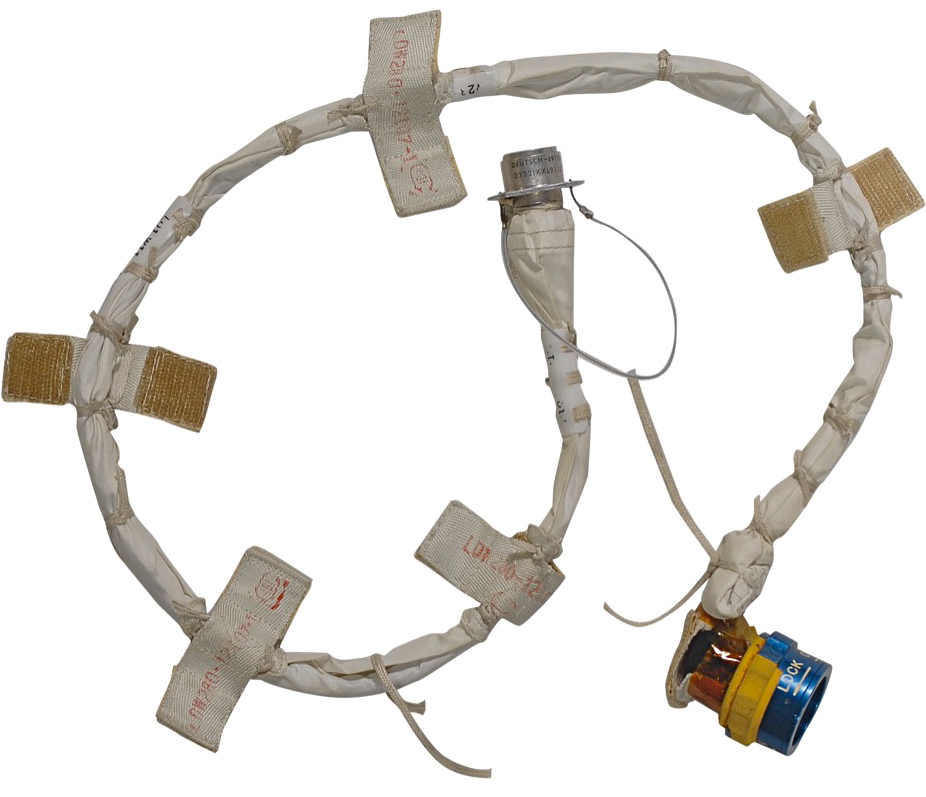
A photograph of the LM umbilical cable flown onboard Apollo 15. Photo courtesy of Steve Jurvetson.
003:44:16 Kerwin: 13. Looks like Jim is connecting the umbilical at this time. Is that right?
003:44:21 Haise: Yeah, that's affirm - affirm, Joe. Do you have any detail up in there at all? On the monitor it looks like I can - I can make out the drogue - the drogue a little bit, but not much else.
003:44:34 Kerwin: We can see the probe pretty well, and we can see his hands quite well there.
003:45:59 Swigert: Okay. We're powering the LM now, Joe.
003:46:03 Kerwin: Okay, Roger that. [Long pause.]
003:46:19 Kerwin: And the voltage looks good there, 13.
003:46:23 Swigert: Roger. [Long pause.]
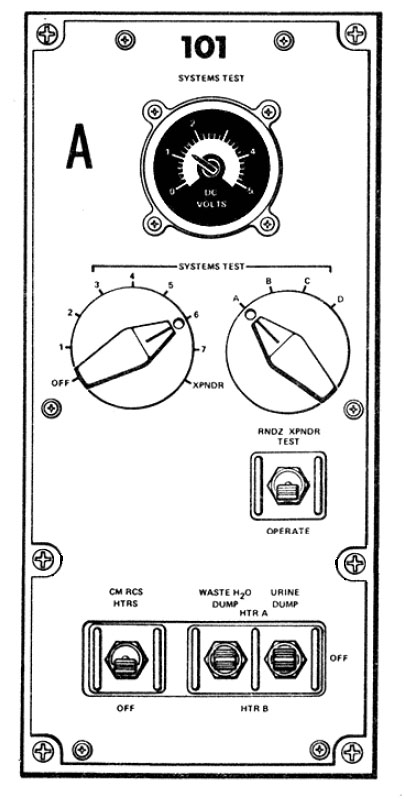
Systems Test Meter, aka Panel 101
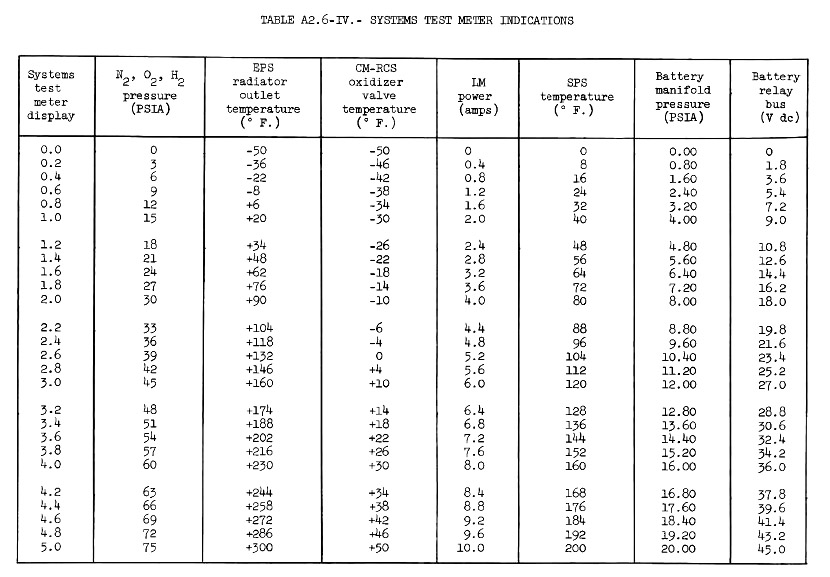
Systems Test Meter interpretation chart. Click picture for larger image.
003:47:04 Haise: Okay. We're going to take an outside view now, out the left side, Joe.
003:47:07 Kerwin: Okay, Fred. Real good. [Long pause.]
This television transmission has being going on now for about forty minutes, and during that period of time, the spacecraft has covered more than five thousand miles. We currently show an altitude of 10,481 nautical miles [19,411 km].
003:48:03 Haise: Okay. You making out the picture up there, Joe?
003:48:07 Kerwin: Yeah. Is that the world? [Pause.]
003:48:19 Kerwin: Okay, Fred. That's a pretty nice looking picture. We'd like to know what settings you used to get that.
003:48:28 Haise: Okay. I think Jim's holding it now and - it - Okay, it should be in about f:22, infinity, and I think the 50-millimeter. And Jim says he thinks he has Baja in the picture now.
003:48:50 Kerwin: Okay. I think we could stand to go to f:44 on that. The clouds are pretty bright.
003:48:56 Haise: Okay. We're going to have to press on here, Joe, so we're back inside.
003:49:00 Kerwin: Okay. Thanks a lot.
003:54:04 Haise: Okay. How's that picture looking back outside now, Joe? Getting ready for LM extraction.
003:54:13 Kerwin: Okay. That looks pretty good, Fred. [Long pause.]
003:55:14 Lovell: Houston, this is 13. Do we have a Go for pyro arm?
003:55:20 Kerwin: 13, Houston. Affirmative. You're Go for pyro arm. [Long pause.]
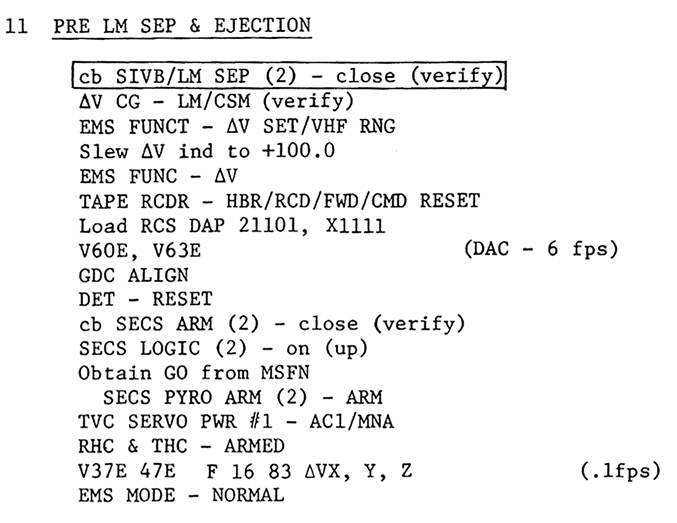
Step 11
003:55:50 Swigert: Hey, Joe, when we went back up and rechecked the tunnel there, we found two latches that weren't cocked and we reset them.
003:56:02 Kerwin: Ah, Roger that, Jack. [Long pause.]
003:56:56 Swigert: Joe, I've got a beautiful view of the Earth out window 1.
003:57:03 Kerwin: Roger, Jack.
003:57:04 Haise: By the way, the windows came through in real good shape. Window 5 looks real clean, so I'm kind of hopeful that Hycon stuff will be pretty good.
003:57:14 Kerwin: Good deal. [Pause.]
003:57:22 Haise: I meant window 3, Joe. [Long pause.]
003:57:58 Kerwin: Okay, 13; Houston. You're Go for LM SEP whenever you're ready.
003:58:06 Lovell: Roger. [Pause.]
003:58:18 Kerwin: Okay, 13; Houston. Correction on that. You're Go for LM SEP at the nominal time and - or later. We don't want it early.
003:58:27 Lovell: Okay, Joe. We'll do it at 04:01:00.
We're now about two minutes away from the scheduled CSM LM ejection time. At that time, the crew will activate a switch which separates the - which fires pryotechnics separating tie-down straps and the spring actuators at the attach points of the LM landing gear. It will eject the LM and the Command and Service Module at a velocity of about eight-tenths of a foot a second [25 cm/s]. This will be coupled then with a short burn with the Reaction Control System jets adding another four tenths of a foot per second [12 cm/s] to the separation velocity, giving them a total separation velocity of 1.2 feet per second [37 cm/s].
004:00:54 Swigert: Okay. We're about ready to pull the LM out, Joe.
004:00:59 Kerwin: Okay, 13.

Separation switches under the DSKY. Scan via heroicrelics.org
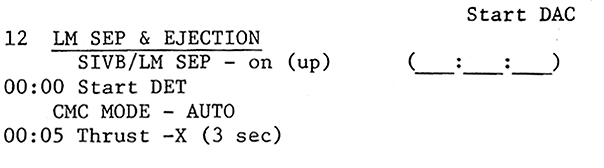
Step 12
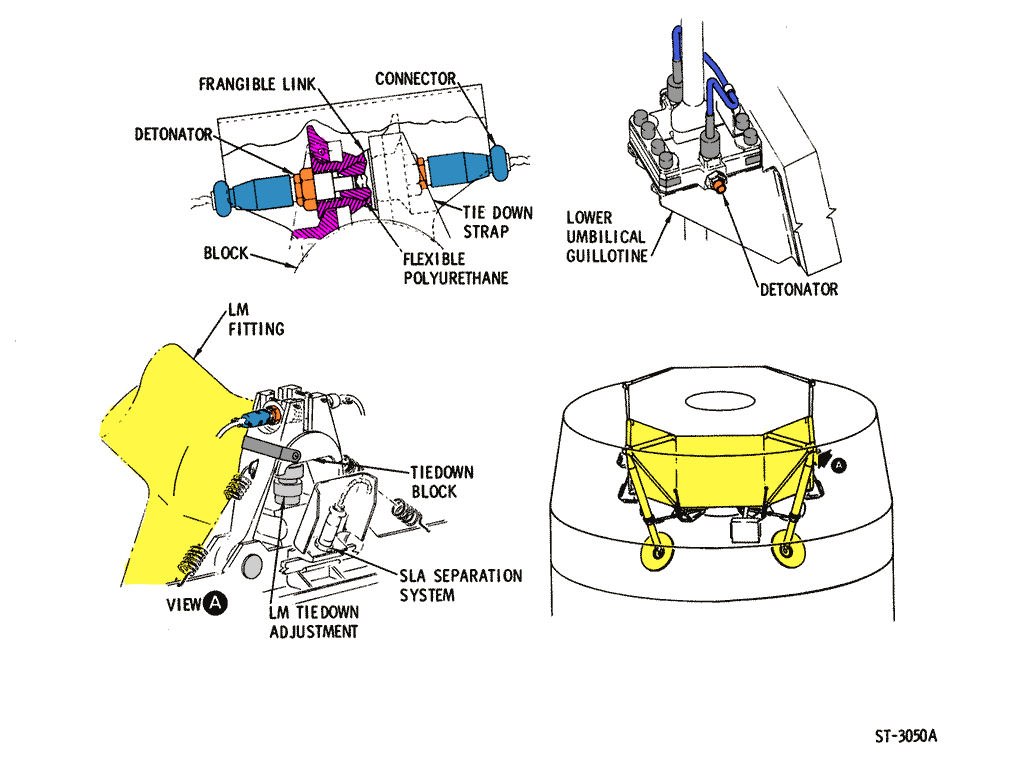
Diagram of the Lunar Module-SLA interface and the jettison pyrotechnics
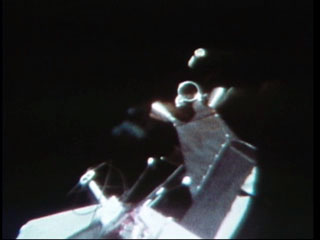
004:01:03 Swigert: Here she comes. [Pause.]
004:01:15 Swigert: Okay. It looks like we're clear, Joe.
004:01:19 Kerwin: Okay. Looks good. It's weird because we get the TV about 10 seconds after you call it.

Step 13
We've been advised that within a few minutes we'll have to recycle the converter which converts the television picture we're receiving from sequential black and white to color. This would require the converter to be down for a couple of minutes, while it's reloaded with tape and in that interim period of time we would expect the picture to be down.
004:02:45 Kerwin: Apollo 13, Houston.
004:02:52 Lovell: Go ahead.
004:02:53 Kerwin: Okay. We'll be waiting for you to tell us that you feel you're safely clear of the booster, and give us the Go to command the booster in its yaw maneuver.
004:04:39 Kerwin: 13, Houston. Did you - did you copy my last about giving us a Go for the yaw?
004:04:46 Haise: Yeah, we're maneuvering, Joe, and we hadn't picked her back up again yet.
004:04:55 Kerwin: Okay. Do you want to wait till you acquire it before we yaw it?
004:05:03 Lovell: How much time do you have, Houston? Can you wait, or do you want to do it right now?
004:05:09 Kerwin: We can wait if you want us to, Jim. [Pause.]
004:05:11 Lovell: Why don't you wait just a little bit.
004:05:13 Kerwin: Okay. [Long pause.]
004:06:02 Swigert: Joe, did they ever get an idea of what that - the TD and E fuel was?
004:06:09 Kerwin: Jack, they're not willing to pin it down to a specific number right now because they say the tanks will warm up later on and the apparent consumption will go down. But it was nominal.
004:08:26 Swigert: Okay, Houston. We have the S-IVB in sight. You're Go to maneuver the S-IVB.
004:08:31 Kerwin: Houston, Roger that. [Long pause.]
004:09:04 Swigert: We'll try to give you a - Houston, we're going to try to give you a shot of the S-IVB with the TV out window number 3.
004:09:11 Kerwin: Okay. Real good, Jack. Our S-band signal strength has been fluctuating. Does it seem to be going all right up there in the Auto Track mode ?
004:09:24 Haise: Yeah. Right now; yes, it's dropped off to about the 70-percent point, Joe, and it was before up about 85.
004:09:34 Kerwin: Okay. [Long pause.]
004:09:54 Lovell: And, Houston, do you have a TV picture?
004:09:57 Kerwin: Not at the moment, Jim. We had a garbled one there for a few seconds, and we don't have one at this moment.
004:10:05 Lovell: Okay. I can see the S-IVB now out the hatch window and it's...
004:10:11 Kerwin: Okay, Jim. Suddenly we have a very good picture.
004:10:13 Lovell: Okay. [Long pause.]
The S-IVB comes into view as the two spacecraft move apart, and the TV camera sees it above the LM RCS quad.
004:10:50 Lovell: And, Houston, I can see the gold shroud around the IU, and it looks that it's all intact.
004:10:56 Kerwin: Roger, Jim. We copy that. Incidentally, the APS evasive maneuver will be about 4 minutes late. It'll be at about 04 plus 18.
004:11:09 Lovell: Roger. [Long pause.]
004:11:37 Kerwin: 13, Houston. Wonder if you could zoom in on that S-IVB for us a little bit?
004:11:42 Lovell: Okay. [Long pause.]
004:12:19 Kerwin: Yeah, yeah. More like that. [Pause.] That's nice. [Pause.] It's off our screen to the right, now. [Long pause.]
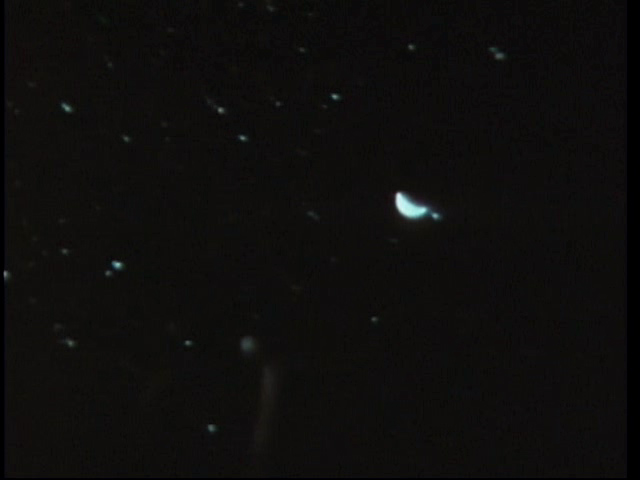
The S-IVB continues on its way.
004:13:08 Kerwin: Oh, that's very nice, very nice. [Long pause.]
004:13:55 Swigert: Okay, Joe. Is EECOM monitoring the O
2 Flow High light again? We - we haven't yet started the venting yet.
004:14:04 Kerwin: Okay. Stand by. I'll check. [Long pause.]
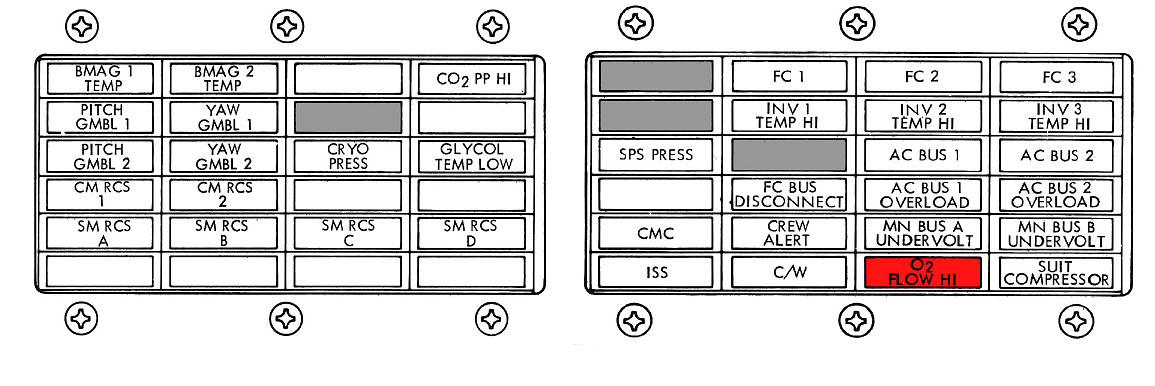
The red warning light for oxygen flow in the Caution and Warning light panel.
004:14:35 Kerwin: 13, Houston.
004:14:38 Swigert: Go ahead.
004:14:39 Kerwin: Jack, your cabin Regs are still making up, but you're Go to open the waste management vent again at this time, and we'll delta the time to close it by the appropriate amount for you.
004:14:52 Swigert: Okay. Real fine. Well, we'll wait till the S-IVB does its maneuver here.
We've just had a dropout in signal as the spacecraft maneuvered out of the field of view of the High Gain Antenna. At this point, the crew should be switching shortly to the Omni antennas and we'd expect to reacquire signal lockon.
004:16:53 Haise: Okay, Joe. We just had a momentary drop off in signal strength again there.
004:16:59 Kerwin: Roger, Fred. We had an LOS for a minute and we lost our TV picture. It looks like - yeah, we just got it back. It looks great again.
004:17:15 Kerwin: 13, Houston. You might stop the f-stop down one more notch, if you got any left. [Long pause.]
004:17:41 Kerwin: And, 13, Houston. We'll be commanding the evasive maneuver in about 17 seconds. [Long pause.]
004:18:41 Swigert: Okay, Joe. We can see it start to move. However, it doesn't seem to be a lot of debris or vapor coming out of it.
004:18:48 Kerwin: Roger that, Jack. Booster says that's great. He says the booster's doing its thing normally. Concur. We don't see much on the television at all. [Long pause.]
004:19:16 Kerwin: And, Apollo 13, Houston. We'd like to change the S-band antenna configuration. Like you to go Omni Delta. Like you to go Manual mode on the High Gain with pitch of minus 60 and yaw of 90. Over.
004:19:37 Haise: Okay. You want us to Omni Delta and Manual on the High Gain to minus 60 and plus 90. Is that correct?

Antenna control switches on the bottom of Panel 2. Scan via heroicrelics.org
004:19:44 Kerwin: That's affirmative. [Long pause.]
004:20:06 Swigert: Okay, Houston. How much longer would you like the television?
004:20:10 Kerwin: Stand by on that. We'll get a word.
004:20:21 Kerwin: Okay, 13; this is Houston. You can turn the TV off anytime you're ready. We've enjoyed the show. [Long pause.]
004:20:40 Kerwin: 13, Houston. Before you secure the TV, we'd like to know whether that was in maximum zoom, just for information.
004:20:48 Haise: That's affirm. Jim had it in Max zoom.
004:20:51 Kerwin: Okay. Good deal. That was a real good picture. [Long pause.]
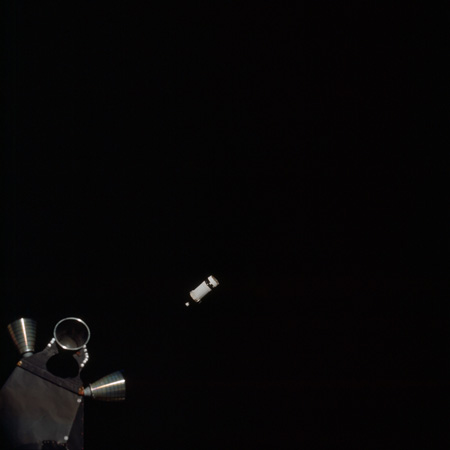
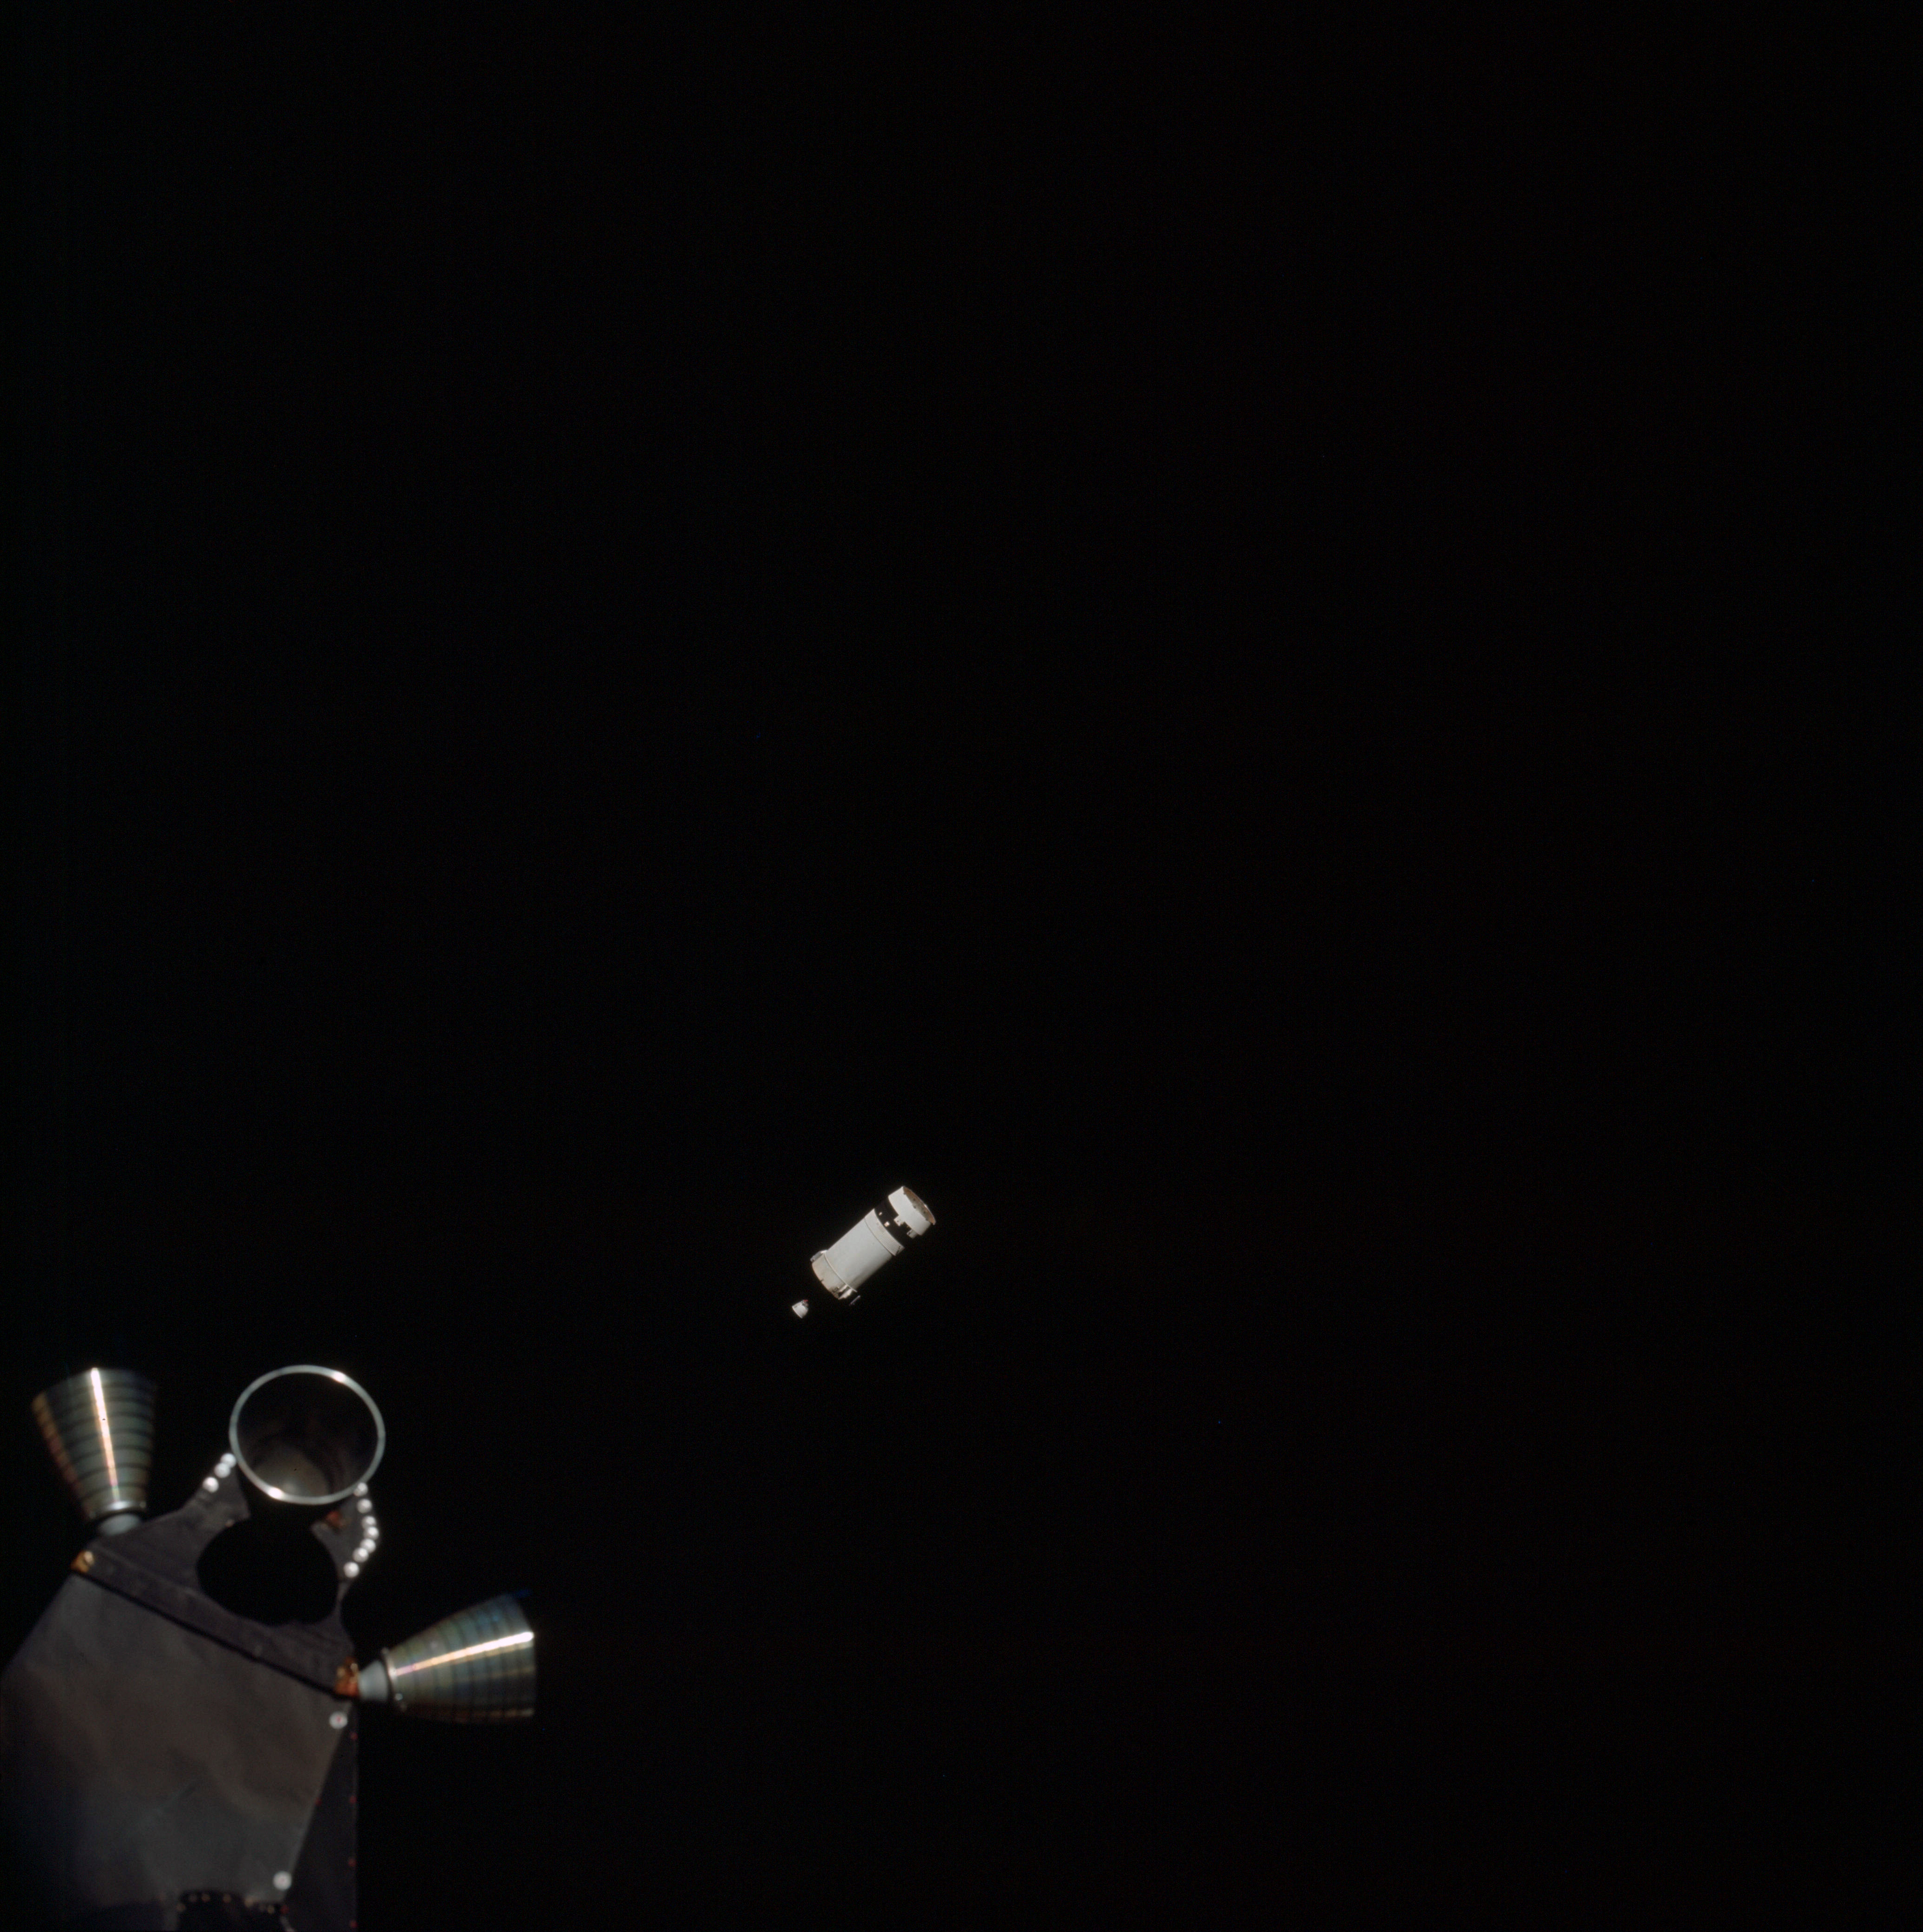
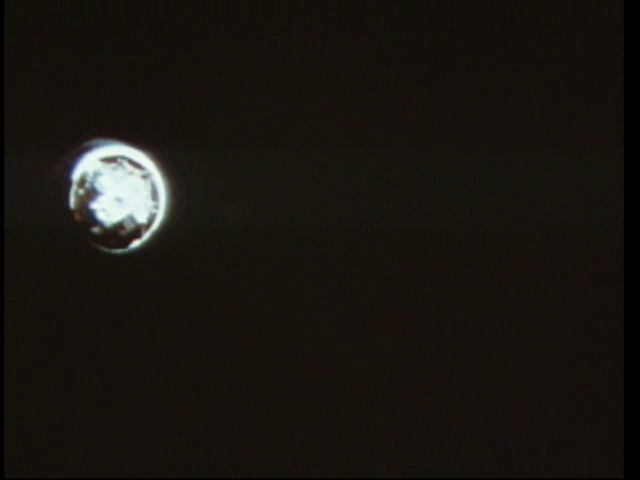
AS13-60-8585 - Apollo 13's spent S-IVB stage drifting away after separation. Color correction by David Woods. Image credit: Image Science and Analysis Laboratory, NASA-Johnson Space Center.
004:21:24 Kerwin: And, 13, Houston. The APS evasive maneuver appeared to be nominal. The LOX dump time is now 4 plus 39 plus 20, about 3 minutes late.
The booster engineer reports the preliminary indications are that our Saturn S-IVB evasive maneuver was successful. The Flight Dynamics Officer will be evaluating the trajectory to assure that we've got the kind of separation from the spacecraft that we were looking for and also to determine to what extent we are heading toward the trajectory which would impact the S-IVB on the Moon. At 6 pm Central Standard Time, there will be a press conference in the news center auditorium. This is the small auditorium in Building 1, with Ken Mattingly. Astronaut Mattingly, until a few days ago, was the prime Command Module Pilot for the mission and due to exposure to measles, was replaced by Jack Swigert. Mattingly has been in the control center and is currently in the control center observing the progress of the mission. I have to repeat that press conference with astronaut Mattingly is scheduled for 6 pm Central Standard Time in the news center auditorium.
004:24:24 Swigert: Okay, Joe. We're right now opening the Waste Stowage Vent.
004:24:29 Kerwin: Okay, Jack. We copy. [Long pause.]
004:25:00 Swigert: Okay, Houston. We're charging battery B.
004:25:05 Kerwin: Roger, 13. We see it. Looks good.
004:30:47 Kerwin: Apollo 13, Houston. Request Omni Alpha now. Over.
This is Apollo Control at 4 hours, 37 minutes. We're now about 3 minutes away from the scheduled LOX dump, the propulsive vent of liquid oxygen through the engine nozzle of the S-IVB. The Saturn Instrument Unit will command this maneuver or command the LOX dump and the LOX will flow out the engine bell for 48 seconds or until the tank is empty whichever comes first. The preliminary plan would be for the LOX dump to produce a change in velocity of about 28 feet per second [8.5 m/s] which would contribute to the trajectory change placing the S-IVB on an impacting trajectory with the Moon and subsequent midcourse corrections using the two 70-pound thrust [311-newton] Auxiliary Propulsion System units on the S-IVB would be intended to correct this trajectory and bring it into the precisely preplanned limits.
004:39:01 Young: Apollo 13, Houston.
004:39:04 Haise: Go ahead, Joe.
004:39:07 Young: Roger. They are having trouble verifying that the High Gain is doing its thing. Like to verify that the pitch is minus 10, the Y is plus 350, you're in Wide Beam Width and Auto. [Pause.]
004:39:29 Haise: Okay. Minus 10 pitch, plus 350 yaw, and Wide Beam Width and going into Auto. You want High Gain, John?
004:39:41 Young: That's affirm.
004:39:44 Haise: Okay. Here, it's coming at you.
Astronaut John Young, who was backup commander for Apollo 13, is now serving as Capsule Communicator in place of astronaut Joe Kerwin.