Apollo 13

Day 5, part 2: Feeling the Cold
Corrected Transcript and Commentary Copyright ©2020 by W. David Woods, Johannes Kemppanen, Alexander Turhanov and Lennox J. Waugh. All rights reserved.
Last updated 2020-04-21
101:05:53 Brand: That's affirm. [Pause.]
101:06:03 Brand: And, Jim, we have a lengthy procedure here for powering up the CSM and turning on instrumentation so we can check the TM, and this will take a large piece of scratch paper whenever you're ready to copy.
101:06:22 Lovell: This is to power up the CSM?
101:06:24 Brand: That's affirm.
101:06:27 Lovell: Okay. I'll tell you what, I'll have Jack get configured. He can copy that down and I'll have him ... we'll get the stuff. Stand by.
101:07:35 Swigert: Okay, Vance, how do you read the Aquarius?
101:07:39 Brand: Okay, read you loud and clear, Aquarius. Is it cool in there now?
101:07:44 Swigert: Okay. Yes, it's pretty cool. This is the third officer on this LM crew here. Ready to copy.
101:07:55 Brand: Okay. Jack, this is a lengthy procedure, take probably two or three pages. It assumes that you are in your nominal configuration, which was sent up ... or in your day-flying configuration, which was sent up to you earlier today.
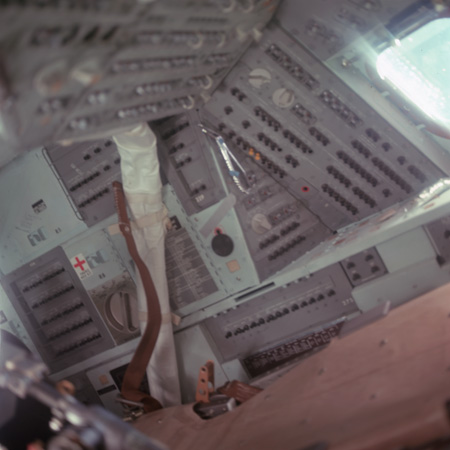
AS11-36-5387 - from Apollo 11's CM Columbia, showing the corner of the cockpit with the circuit breaker panels Jack will need to operate now. Image credit: Image Science and Analysis Laboratory, NASA-Johnson Space Center.
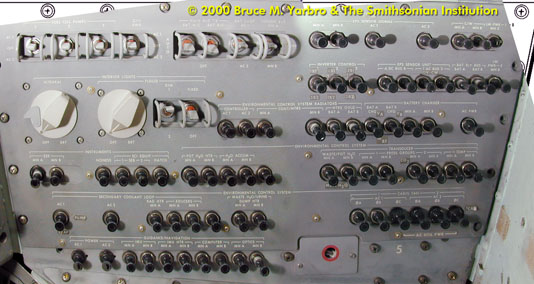
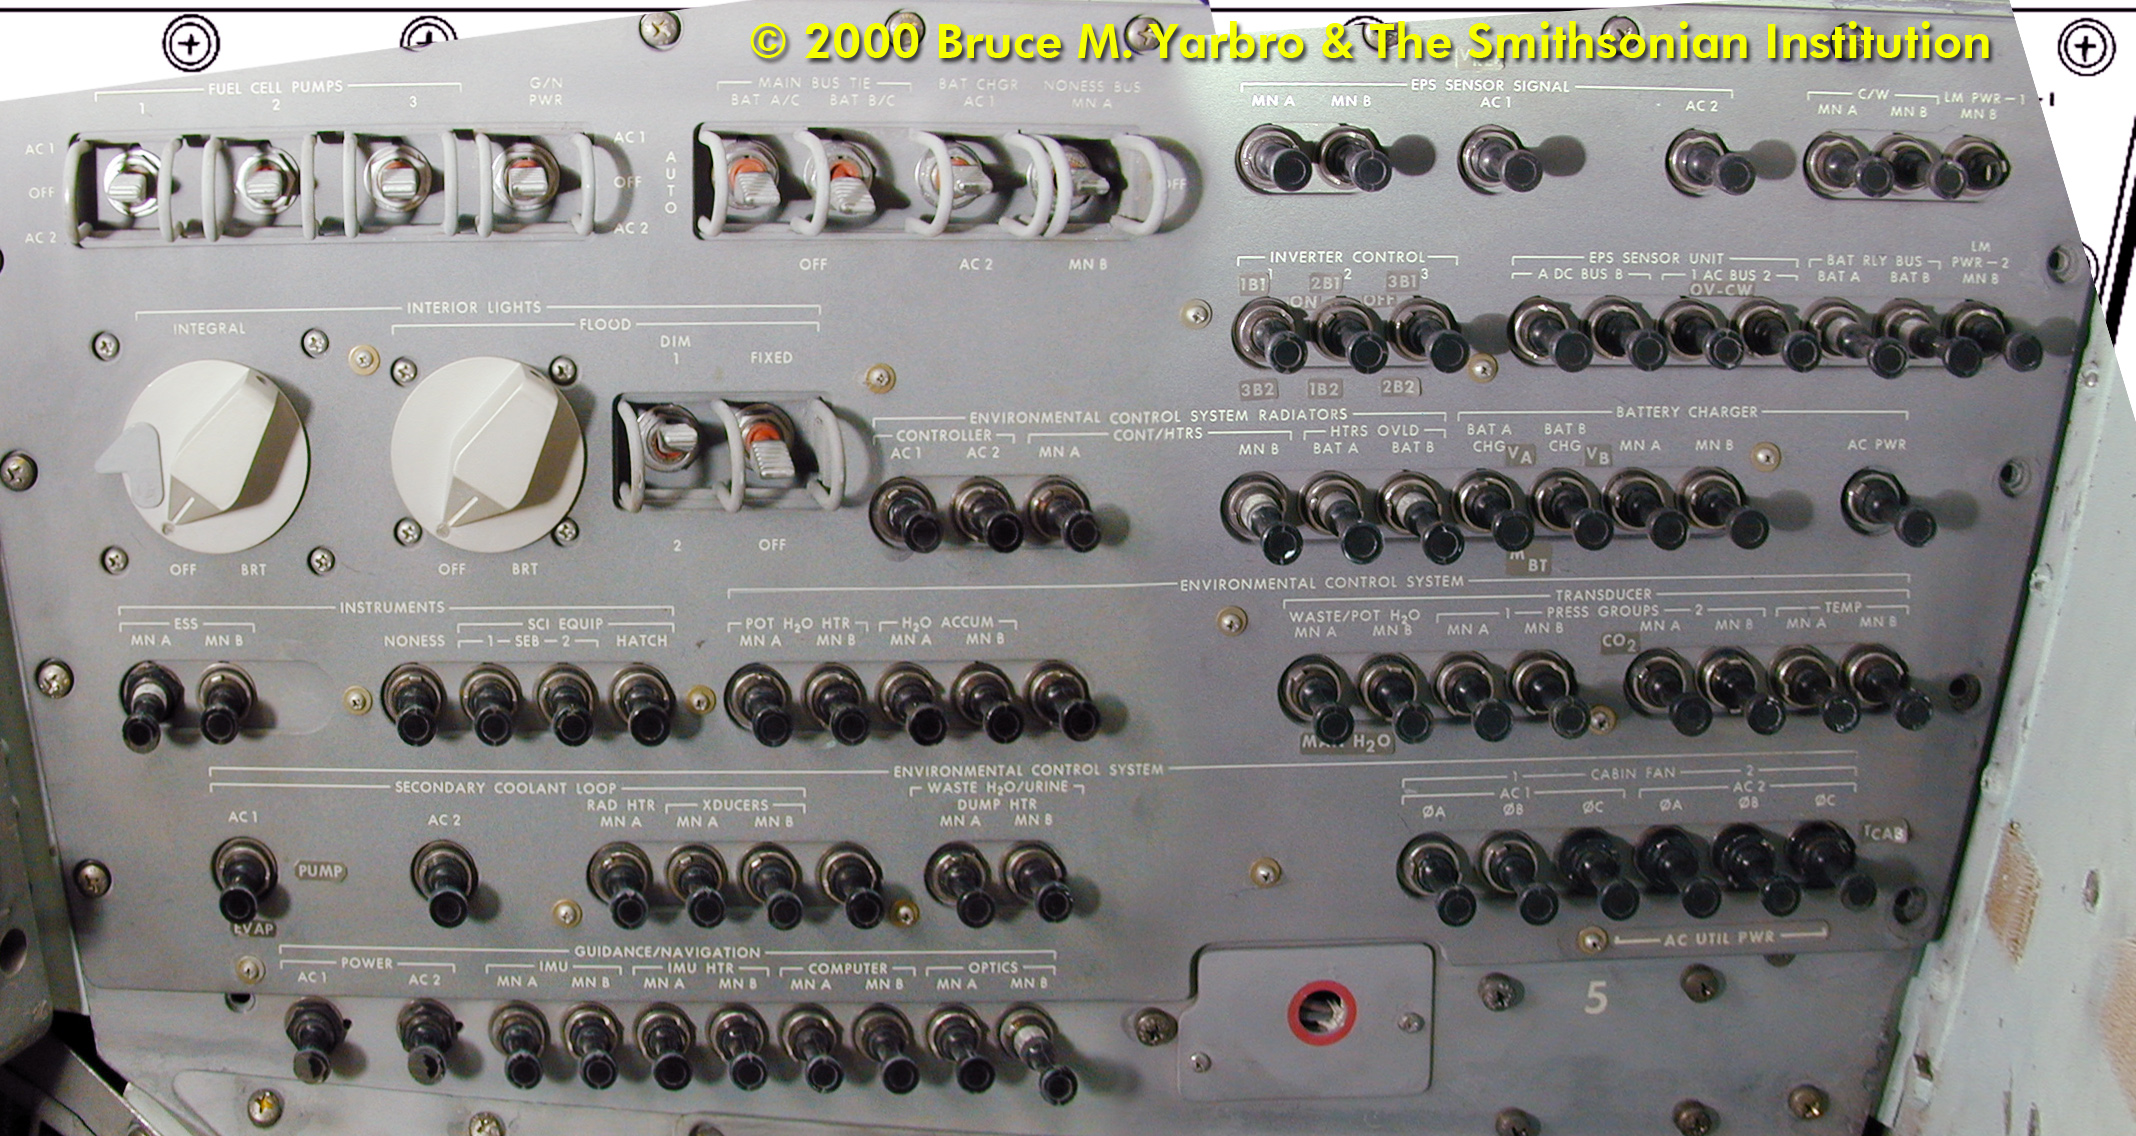
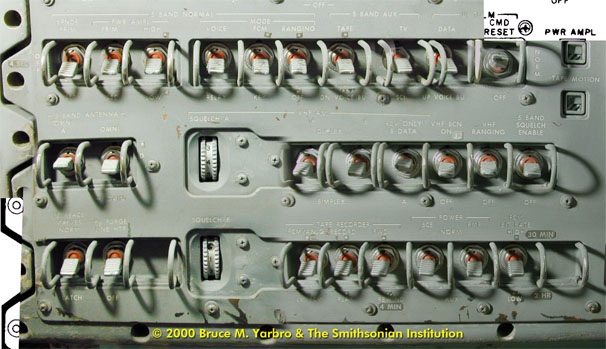
Panel 5 in Odyssey. The image is constructed from two images taken in the spacecraft 30 years after the flight, each rectified to match the panel drawing below. Image credit: Bruce M. Yarbro & The Smithsonian Institution. Composition by David Woods.
101:08:15 Swigert: Okay. I can verify that we are in that configuration with the exception of panel 382, the water accumulator, which I've left off in case we wanted to get some more drinking water out of the Command Module, and I'll put those in the proper configuration before we do anything.
101:08:38 Brand: Okay. Ready to copy?
101:08:43 Swigert: Okay. Go ahead.
101:08:45 Brand: Okay. Panel 4: Telcomm, Group 1, to AC1. Panel 5: close the following circuit breakers: ECS, Press Group 1, Main B; ECS, Press Group 2, Main B; ECS, Temp, Main B; ECS, Secondary Loop Transducer, Main B; ECS Rad, Control/Heaters, Main B; Bat Relay Bus, Bat B; Bat Charger, Bat B, Charge ... or to B, Charge; Inverter Control, 2; Inverter Control, 1; EPS Sensor Signal, AC1; EPS Sensor Signal, Main B; EPS Sensor Unit, AC Bus 1; Waste/Potable Water, Main B; Instruments, ESS, Main B; that's Essential, Main B. Are you with me? [Long pause.]
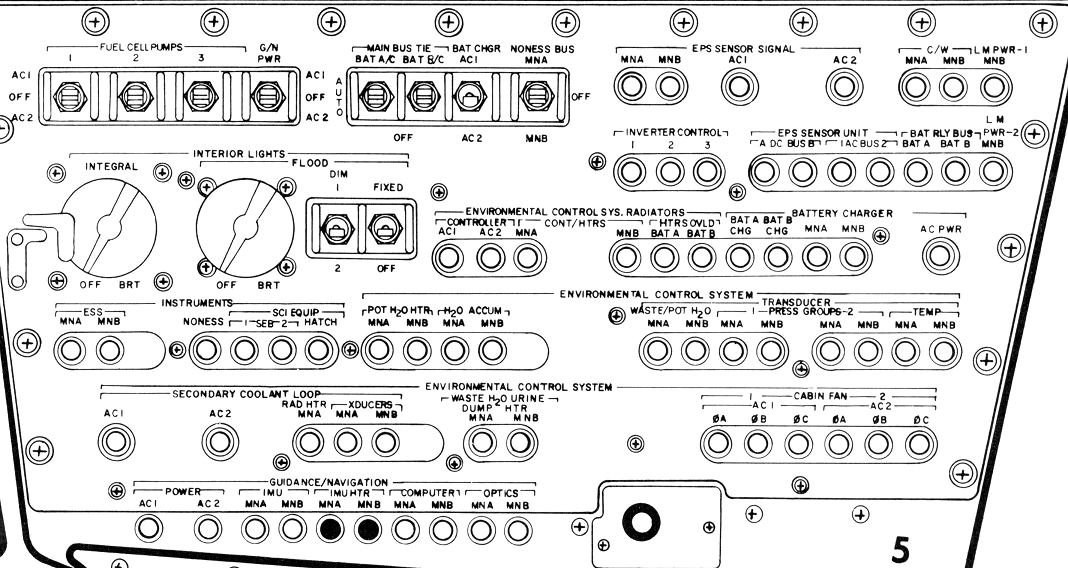
Panel 5 circuit breakers. Scan via heroicrelics.org
101:11:32 Swigert: Okay, Vance. Are you with me?
101:11:34 Brand: Roger. Why don't you read that group back, and then we'll proceed on.
101:11:39 Swigert: Okay, sounds good. Because I don't know where I ... how far I lost you. Okay, panel 4; Telcomm, Group 1, to AC1. On panel 5, close the following circuit breakers: ECS, Pressure Group 1, Main B; ECS, Pressure Group 2, Main B; ECS, Temp, Main B; ECS, Secondary Loop Transducer, Main B; ECS Rad, Control/Heaters, Main B; Bat Relay Bus, Bat B; Bat Charger, Bat B; Inverter Control, 2; Inverter Control, 1; EPS Sensor Signal, AC1; EPS Sensor Signal, Main B; EPS Sensor Unit, AC1; Waste/Potable H
2O, Main B; Instrumentation, Essential, Main B.
101:12:41 Brand: Okay; That's all correct. Is that reading rate okay for you?
101:12:48 Swigert: Yes, that's fine.
101:12:50 Brand: Okay, and leave a little space if you can to the right of these because when we talk about the backup procedure, why then we can just use the same listing, and I'll ... I'll tell you open instead of close these circuit breakers, or at least most of them. Over.
101:13:14 Brand: Okay. Next, panel 3: Transponder, Primary; Power Ampl, to Primary, that's a verify; Power Ampl, High; Mode, Voice, to Off; Power, SCE, to Normal; PMP to Normal; S-Band Antenna, Omni D, that's Delta. Okay, why don't you read that one back? [Pause.]
101:14:16 Swigert: Okay. On panel 3: Transponder to Primary; Power Amplifier to Primary; Power Ampl, High; Mode, Voice, to Off; Power, SCE, to Normal; PMP to Normal; S-Band Antenna, Omni D, D as in Doggy.
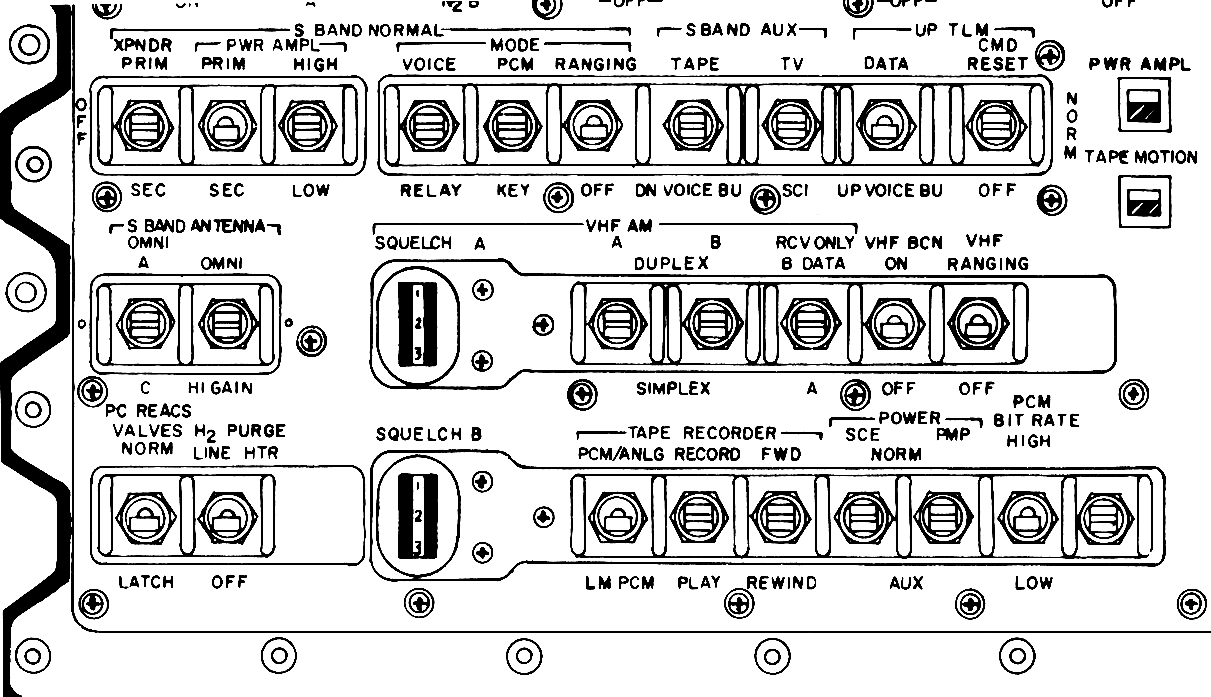
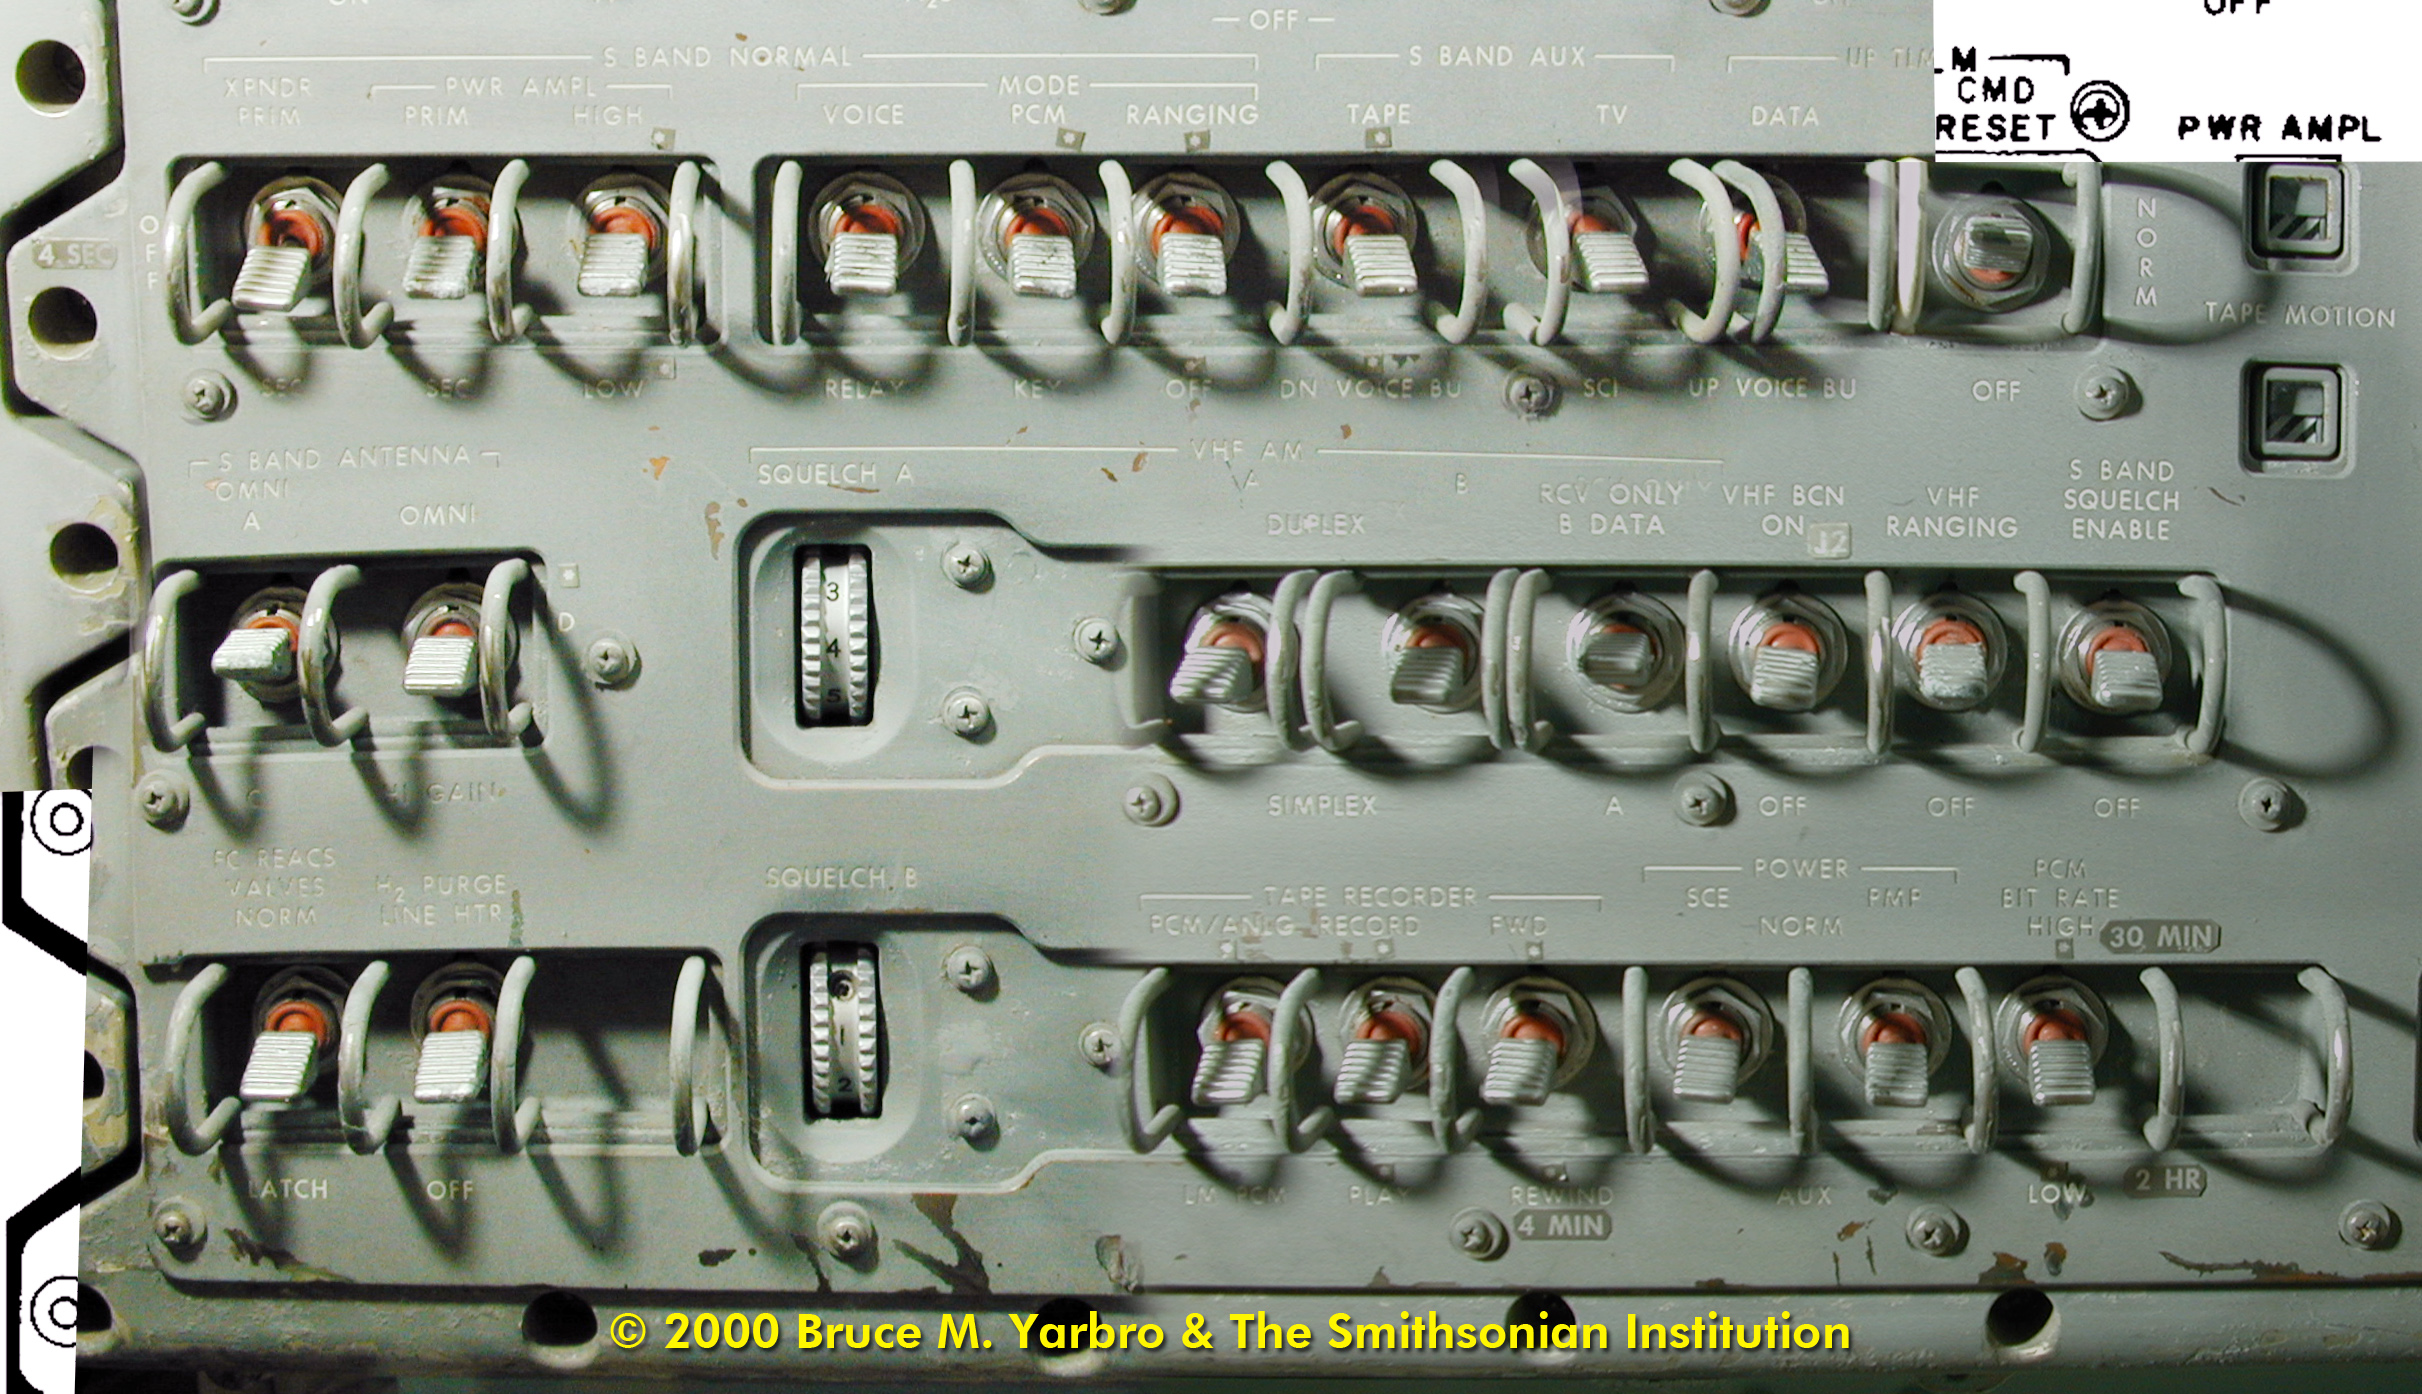
Comms control switches on the bottom of panel 3. Original scan via heroicrelics.org
Panel 3 in Odyssey. The image is constructed from three images taken in the spacecraft 30 years after the flight, each rectified to match the panel drawing below. Image credit: Bruce M. Yarbro & The Smithsonian Institution. Composition by David Woods.
101:14:37 Brand: Hey, very good. Okay, panel 225: circuit breaker Flight Bus, Main B, to close; circuit breaker CTE, Main B, to close. Panel 250: CB Bat C Bat Charger/EDS 2 to close.
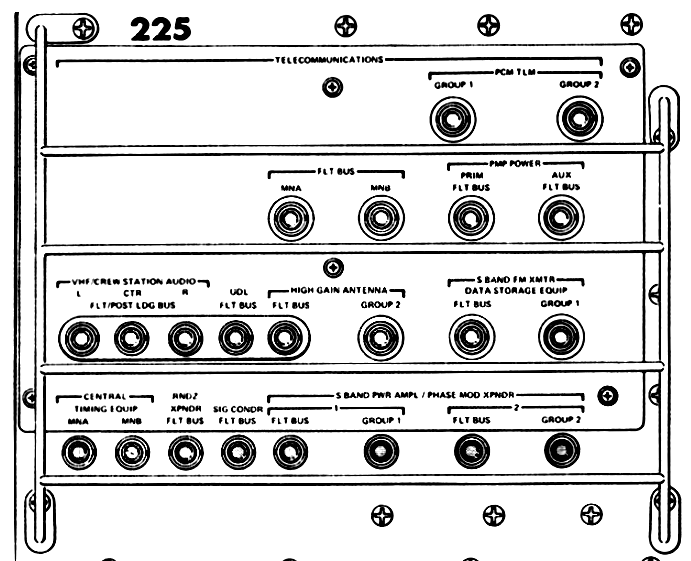
Panel 225 - telecommunications system circuit breakers
101:15:18 Swigert: Hey, Vance, just a minute. Slow down, would you?
101:15:24 Swigert: Okay. I got distracted here. On panel 225: CB Flight Bus, Main B, close; and then I lost you after that.
101:15:37 Brand: Okay. After that, CB CTE, Main B, to close. Next, panel 250: CB Bat C Bat Charge/EDS2 to close; CB Bat C Power Entry/Postlanding to close. Next, panel 275: CB Main B, Bat Bus B, to close; CB Inverter Power 2, Main B, to close. Okay. Incidentally, anything that I've given you up until now is not sequence critical, but from now on, it should be ... you should be sure to do it in the sequence we give you. Why don't you read that back, Jack? [Pause.]
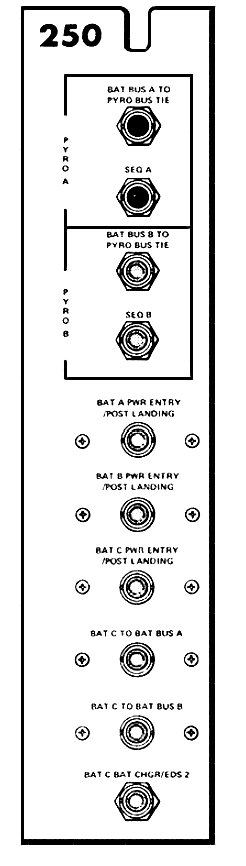
Panel 250
101:17:38 Swigert: Okay. Let me give you all of panel 225 again. CB Flight Bus, Main B, close; CB CTE, Main B, close. On panel 250: CB Bat ... B Bat Charge, that should be Bat C, Charlie, isn't it? Bat Charge/EDS2 closed?
101:18:01 Brand: That's right. That's ...
101:18:02 Swigert: CB Bat B Power Entry ...
101:18:06 Brand: Okay. That should be Bat Charlie.
101:18:08 Swigert: Let me finish. Okay. That's what I thought. Bat Charlie Bat Charge/EDS2, close; Bat Baker Power Entry/Postlanding, closed. On panel 275: CB Main B, Bat Bus B, closed; CB Inverter Power 2, Main B, closed.
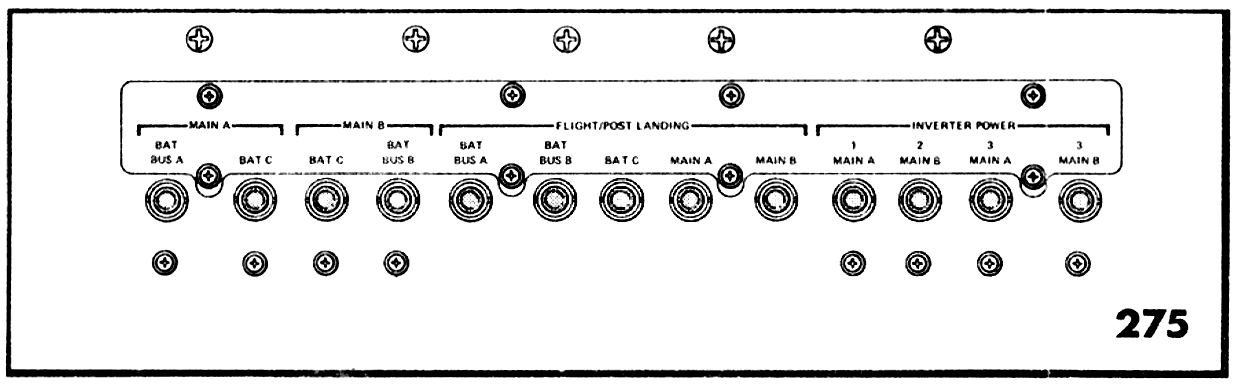
Panel 275
101:18:32 Brand: Okay. That's correct except for the second circuit breaker on panel 250, which is CB Bat Charlie Power Entry slash Postlanding, close.
101:18:50 Swigert: Okay. Bat Charlie Power Entry/Postlanding.
101:18:57 Brand: Okay, now back to panel 250. CB Bat Bravo Power Entry/Postlanding, close. Next, MDC 3, AC Inverter 2 to Main B. AC Inverter 2, AC Bus 1, on up. Next, panel 5: AC Inverter AC Bus 1 to Reset and then center. Panel 3: Up Tlm to Command Reset then Off. Then select best Omni. Readback, please. [Long pause.]
101:20:48 Swigert: Okay, Vance. The following steps are sequence critical. Panel 250: CB Bat B Power Entry/Postlanding, closed. That's Bat Baker. MDC 3, AC Inverter 2, to Main B; AC Inverter 2, AC1, on [Garbled]. [Pause.]
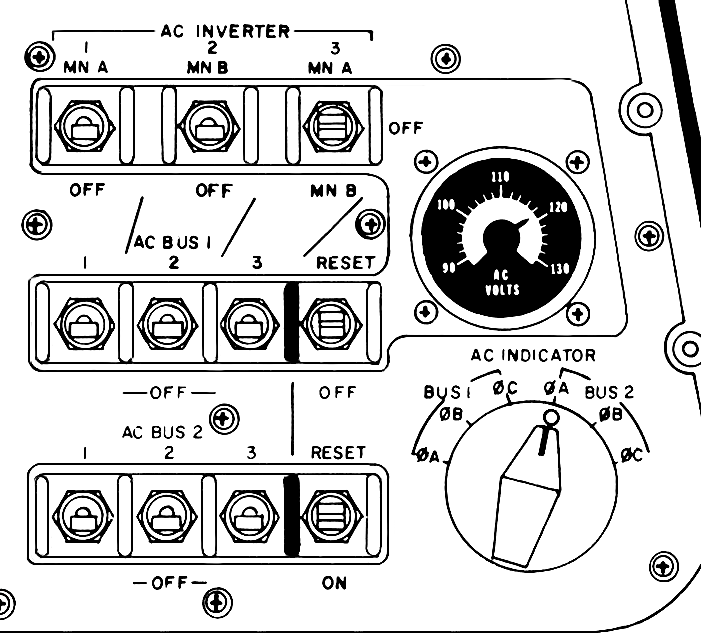
Panel 3 Inverter selection controls. Original scan via heroicrelics.org
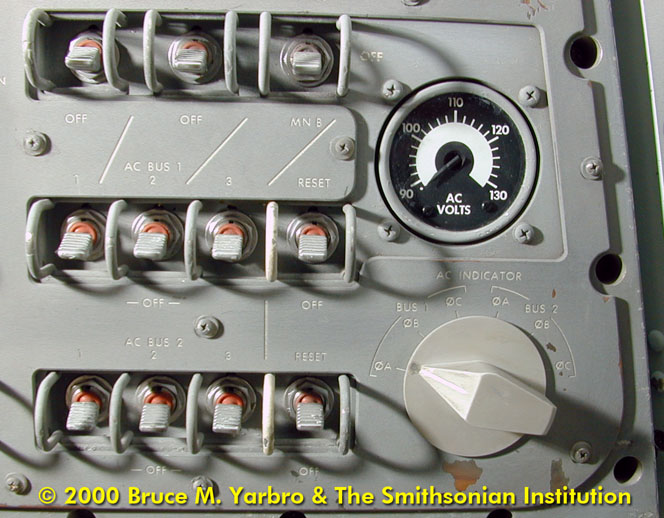
Panel 3 AC section in Odyssey. Image credit: Bruce M. Yarbro & The Smithsonian Institution.
101:21:27 Brand: How do you read now, Jack?
101:21:31 Swigert: Okay, Vance. Did you ... how far did you ... did you copy any of my steps there?
101:21:37 Brand: Okay, I heard you through AC Inverter 2, AC Bus 1 to on, and you were cut out by noise. Go ahead.
101:21:48 Swigert: Okay, Now comes to one I didn't understand. You said go over to MDC 5 and A in ... AC Inverter, AC Bus 1, Reset, then center, and then back to MDC 3; Up Telemetry, Command Reset then Off, and then select best Omni.
101:22:10 Brand: Roger. The readback's correct, but let me recheck that. Stand by. [Long pause.]
101:22:31 Brand: Jack, we were incorrect on panel 5; that should have been panel 3.
101:22:39 Swigert: Okay, that's good. I got it.
101:22:44 Brand: Okay. Now, when you're in this configuration, the following onboard readouts are required. Panel 3: Bat C voltage, Pyro Bat A voltage, Pyro Bat B voltage, SPS Helium Pressure. And the following readouts on panel 101: CM RCS injector temperatures, those are positions 5 Charlie, 5 Delta, 6 Alpha, 6 Bravo, 6 Charlie, 6 Delta; and the battery manifold pressure, which is 4 Alpha. And standing by for readback. [Long pause.]
101:24:40 Swigert: Okay. You want me to read out on MDC 3: Bat B voltage, Pyro A voltage, Pyro B voltage, SPS Helium Pressure. On panel 101: Command Module RCS injector temperatures; 5 Charlie, 5 Dog, 6 Alpha, 6 Baker, 6 Charlie, 6 Dog. The battery manifold pressure, 4 Alpha.
101:25:09 Brand: Okay. Now ... that was correct but I want to recheck the very first one, that was Bat Charlie voltage. Is that what you read back?
101:25:18 Swigert: Okay. Okay, Bat Charlie voltage. Seems like we're having a difference ... I can't understand Bat Charlie from Bat Dog.
101:25:30 Brand: Okay. Now, that ... that complete procedure for getting into it, as far as getting into it's concerned. What I will give you now is how to back out of it after you're through with your readings. Are you ready to copy?
101:25:55 Brand: Okay. Now you'll back out fairly quickly after you go into this procedure. All we'll need is about 5 minutes of TM, and so if you're ready to copy, here it comes.
101:26:11 Swigert: Go ahead.
101:26:13 Brand: Panel 3: Power Ampl to Off. Incidentally, copy this down on a piece of scratch paper as I read it, and then later I'll refer back to your first list where you can write things in the righthand margin.
101:26:41 Brand: Okay ...
101:26:42 Swigert: Go ahead. You want ... Repeat the one on panel 3 again, Vance.
101:26:48 Brand: Okay. Power Ampl, Off. [Pause.]
101:26:59 Swigert: Okay. Go ahead.
101:27:01 Brand: Transponder, Off. AC Inverter, 2, to Off. Okay. Next, panel 250: CB Bat Bravo, Power Entry/ Postlanding to open. Stand by 1. [Long pase]
101:28:22 Brand: Okay, Jack. What I just gave you now on the backout is the only thing that's order critical. From here on, you can go to the steps for initiating the procedure, and backtrack. In other words, you should go to each of the panels that I read up and put the circuit breakers back to the base-line configuration ... or the switches. Over.
101:28:56 Swigert: Okay, now here's ... to accent, here's the sequence-critical steps: Power AMFL, Off; Transponder Off; AC Inverter, 2, Off; and the last one on panel 250, CB Bat Baker Power Entry/Postlanding, open; and then hit the steps in reverse order that you gave them to me, and back out, like then I would start on MDC 3 Up Telemetry, Off ... to Off; and then AC Inverter ... AC1 Bus 1 to Off; and then AC Inverter, 2, Off; AC Inverter, 2, Main B to Off. Is that the type of order that you want to back out of?
101:29:59 Brand: That's affirm, but ... just for kicks, let's go through these panels again, and I'll give you the ... the position, just to make sure there can be no doubt. [Pause.]
101:30:18 Swigert: Okay. Go ahead.
101:30:20 Brand: Okay. And once again in the ... in the area where I said order was not critical, it's still not critical when you back out. But now I'll go ahead. Okay, panel 4: Telcomm, Group 1, AC1, it will not be AC1, it'll go to Off. Panel 5: all circuit breakers on that panel which were positioned will now come to opened. Over.
101:31:01 Swigert: Okay. Panel 4: Telcomm, Group 1 will go Off. Panel 5: all the circuit breakers that we closed will go back to open.
101:31:12 Brand: Okay. Panel 3: the first three lines have been taken care of already in my beginning in the backout procedure, so starting with Mode, Voice, that should go back to Voice. Power, SCE, Off; PMP, Off; S-Band Antenna, Omni Bravo. Panel 225: CB Flight Bus, Main B, open; CB CTE, Main B, open. Read back. [Long pause.]
101:32:19 Swigert: Okay, Vance. I'm going to have to switch Omnis. I'm starting to get some static here.
101:32:23 Brand: Okay. [Pause.]
101:32:34 Swigert: Okay. How do you read on Aft Omni?
101:32:37 Brand: Loud and clear.
101:32:44 Swigert: Okay. On panel 3: the first three steps we took care of; Mode, Voice, to Voice; Power, SCE, Off; Power PMP to Off; and S-Band Omni would go back to Bravo. Panel 225: Flight Bus, Main B, will go open; and CB CTE, Main B, will go open.
101:33:11 Brand: That's affirm. The two circuit breakers on panel 250 will go open; the two circuit breakers, panel 275, will go open. Okay, the circuit breakers on panel 250, we took care of already. Panel 3: AC Inverter, 2, we took care of. AC Inverter 2, AC Bus 1 should now go Off. And the remaining two switches on panel 3 we took care of. And "Select best Omni" remains the same. Okay. Read back. [Pause.]
101:34:25 Swigert: Okay. The two switches ... two circuit breakers on panel 250 will go back to open; the two circuit breakers on panel 275 back to open; the Power Entry/Postlanding circuit breaker, we already took care of earlier; AC Inverter 2; we took care of earlier; AC Inverter 2 to AC Bus 1 will go to Off; and AC Inverter, AC Bus 1, we took care of ... No, that'll go to Off; and Up Telemetry, Command Reset will go Off.
101:35:14 Brand: That's correct, Jack. Okay, that's it. And I think we're about ready to go with this procedure whenever you are. [Long pause.]
101:35:28 Swigert: Okay. First we got to go through that procedure to power the CSM from the LM, is that Charlie?
101:35:35 Brand: No. No, this is independent of power from the LM. This is a ... this is purely a CSM ...
101:35:42 Swigert: Oh, okay.
101:35:43 Brand: This is purely a CSM powerup so we can take a look at your telemetry and see how cold the vehicle is and that sort of thing.
101:35:55 Swigert: Okay. It's going in work. [Pause.]
101:36:03 Swigert: Okay, now I won't ... I won't have any voice with you, so ... Is that right? You don't want me to get connected up ... you want me to just take these readings and come back and tell you what I have, huh?
101:36:17 Brand: That's affirm. There'll be no voice. And ...
101:36:22 Swigert: Okay. Okay. In work.
101:36:27 Brand: I ... we presume, though, that there'll be somebody in the LM that we can call if we have to get word to you.
101:36:35 Swigert: Oh, yes. There'll be somebody to be standing by, they'll run up into the bedroom and tell me to stop what I'm doing.
101:36:44 Brand: Okay, and let us know when you start.
101:36:51 Swigert: Okay. I'm going to start right now, Vance.
101:36:54 Brand: Okay. [Long pause.]
101:37:12 Brand: Aquarius, Houston. [Long pause.]
101:37:30 Brand: Aquarius, Houston. Over.
101:37:36 Lovell: Okay, Houston; Aquarius. Switching watches, and Jack's going up into the Command Module.
101:37:43 Brand: Okay, Jim. We have four steps here to give you to request that you get back on Down Voice Backup, if you're ready to copy? [Long pause.]
101:38:03 Lovell: Ready to copy.
101:38:04 Brand: Okay. Bit rate to Lo bit rate. Voice, Function switch to Down Voice Backup. Power Amps CB, open; Range Function switch in Ranging; that's verify. [Pause.]
101:38:47 Lovell: Okay. Bit rate, Lo; Voice Function, Down Voice Backup; Power Amp S-Band, open; and Range Function to Range; and that's a verify. And I still have the Biomed on Right here, so we don't have hot mike.
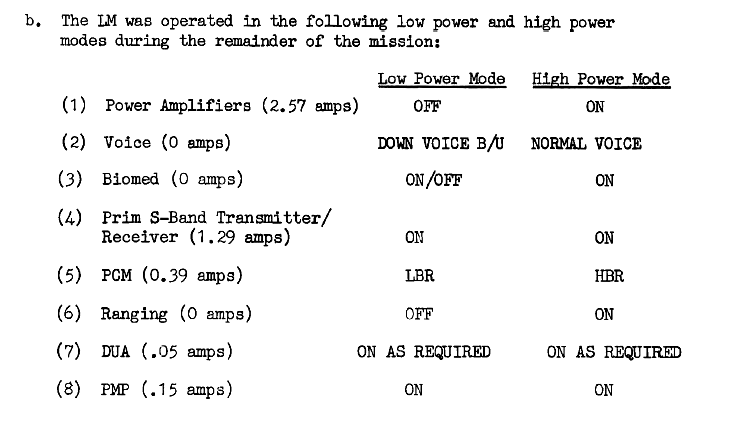
Lunar Module comm modes illustrated for low and high power utilization.
101:39:08 Brand: Okay. Thank you.
101:39:12 Lovell: And, you want that in work, now?
101:39:14 Brand: That's affirm,
101:39:17 Lovell: Okay. [Long pause.]
101:39:50 Lovell: Okay. Houston, Aquarius. How do you read?
101:39:53 Brand: Loud and clear, Jim.
101:39:57 Lovell: Okay. I have a question for you, Houston, if you have time,
101:40:00 Brand: Sure, go ahead.
101:40:05 Lovell: And I'm copying down the reestablishing ... PTC maneuver that Charlie gave me. Step 5 was, "When rates are less than 0.05 degrees per second, Attitude Control Yaw to Pulse." And just how am I to get my rates down to 0.05 degrees per second. My ... My rate indicator, at the best, is 0.1 of a degree.
101:40:37 Brand: Stand by.
101:41:38 Brand: Aquarius, Houston.
101:41:43 Lovell: Go ahead.
101:41:44 Brand: Jim, this has been tried in the simulator by Charlie and others, and what they recommend is that you null your rates on the error needles until you see no movement whatsoever, and then wait another couple of minutes, and that should do it. That's the only way we can tell. Over.
101:42:09 Lovell: Okay. I'll give it the old college try.
101:42:12 Brand: Okay. And if you can't attain that, why, of course, just the best you can do. We'll have to give it a try. Maybe it won't be quite like the simulator.
101:48:43 Swigert: Okay, Houston; Aquarius.
101:48:47 Brand: Go ahead, Aquarius.
101:48:50 Swigert: Okay, Vance. I've gone all the way through your procedure ... all the way down to "Select best Omnis," but I'm not getting any Main Bus B voltage and this I don't understand.
101:49:04 Swigert: I can read ... I can read Bat ... Bat Bus B voltage at 36.5 [Garble]. [Long pause.]
101:49:43 Brand: Okay, Jack. Do you read now?
101:49:48 Swigert: I am not sure, Vance.
101:49:51 Brand: Okay. You faded out due to noise in the orientation. If you close the Power Amp circuit breaker, we can hear you better. Over. [Pause.]
101:50:07 Brand: That's panel 16.
101:50:13 Brand: Okay. You faded out at the very beginning, so please go through that again. We understand you don't get anything on Main B. [Long pause.]
101:50:39 Swigert: Okay, Vance. How are you reading now?
101:50:43 Brand: Okay. We're hearing you better. Stand by 1.
101:52:24 Brand: Okay, Jack. Please, repeat back now your conversation. You were cut out for ... a while ago.
101:52:36 Swigert: I don't have any idea where we cut out, Vance. I just said that we performed the procedure exactly as you say. We're down into the SEP critical portion to where I said, "select best Omni." However, we're not getting any Main Bus B voltage reading. I can read Bat Bus B, Baker, at 36.5; Bat Charlie at 37.0, but I have negative Main Bus B readings.
101:53:08 Brand: Okay. Stand by. [Long pause.]
101:53:24 Brand: Okay, Jack. There are two ... There's a switch and a circuit breaker that were positioned this morning that we'd like to have you check ... Correction, just the switch. Panel 5, check your bus tie. Main Bus Tie Bat B/C on.
101:53:47 Swigert: That is verified on. I checked that.
101:55:22 Brand: Okay, Jack; this is Houston. Over. [Pause.]
101:55:29 Swigert: Go ahead, Vance.
101:55:31 Brand: Okay. We're getting data from you, Jack, so that much looks good. On panel 5, request verification that EPS Sensor Signal circuit breaker is Main B. Over.
101:55:48 Brand: Or it's ...
101:55:49 Swigert: ... Stand by. ...
101:55:50 Brand: ... that Main B is closed.
101:55:53 Swigert: Okay. [Long pause.]
101:56:10 Brand: Okay, Jack. And, we see your Main Bus B voltage at 28½.
101:56:17 Swigert: Okay. You can see it. Good. Okay then. Okay, Vance. That circuit breaker is in.
101:56:28 Brand: Copy. [Long pause.]
101:56:42 Swigert: Well, Vance, if you're getting data from them, let me go back up there and finish the [Garble]. [Pause.]
101:56:52 Brand: Okay, Jack. Please repeat, you're cutting out.
101:56:54 Swigert: Okay, Vance. Okay. We just changed Omnis here. I say, if you're getting data from us, that's the important thing. Let me go back up into the bedroom there and get the readings you wanted, so we can get this stuff powered down. Is that okay?
101:57:10 Swigert: Okay, we'll get ...
101:57:11 Brand: ... by all means and ...
101:57:12 Swigert: ... down there ...
101:57:13 Brand: ... select best Omni ...
101:57:14 Swigert: ... and then go back up. [Pause.]
101:57:22 Swigert: Okay, Vance. We'll go back up ... We've got voltage now, and we'll go back up and take the readings that you want.
101:57:34 Brand: Okay. And select best Omni. [Pause.]
101:57:44 Swigert: Okay. I'm going back up into the bedroom, Vance. How do you read?
101:57:47 Brand: Loud and clear.
101:57:51 Swigert: Okay. I'm going back up to the bedroom. We'll select best Omni and continue on with the procedure.
101:57:58 Brand: Roger. [Long pause.]
101:58:47 Lovell: Okay, Vance. Jim's up. How do you read?
101:58:50 Brand: Reading you loud and clear, Jim.
101:58:54 Lovell: Okay. [Long pause.]
101:59:07 Lovell: And, Houston, I noticed through the AOT and through the overhead docking window that we are venting again.
101:59:16 Brand: Okay, Jim. Understand; the service module is venting.
101:59:22 Lovell: That's affirm.
102:01:17 Brand: Aquarius, Houston.
102:01:22 Lovell: Go ahead, Houston.
102:01:24 Brand: Jim, would you holler into the bedroom and tell Jack that when he has his onboard readouts that we wish he'd back ... use the backout procedure and shut down again ... per the procedure we gave him.
102:01:39 Lovell: Roger. As soon as he ... As soon as he gets his onboard readouts to use the powerdown procedure and shut down. Is that right? [Pause.]
102:01:47 Brand: That's affirm.
102:01:49 Lovell: Okay. Jack just ... Jack just told me that he's through, and he's going to go through the backout procedures again, the first one he's got is the shutdown.
"This is Apollo Control at 102 hours, 6 minutes. We've got 7 minutes, 37 seconds worth of telemetry data on the Command Service Module during this power up of the Command Module. We powered up just enough to enable us to get telemetry signals and for the flight controllers to take a quick telemetry snapshot of the Command Module. They appear to like what they've seen. G and C reports propulsions systems, pressure and temperature all look good on the CSM. Apollo 13 is 160,331 nautical miles from Earth. Velocity 4,295 feet per second."
102:08:19 Lovell: Houston, Aquarius.
102:08:24 Brand: Go ahead, Aquarius.
102:08:28 Lovell: Jack's ready to give you the readings if you are ready to copy them.
102:08:31 Brand: Stand by. [Pause.]
102:08:40 Brand: Okay. Go ahead. [Pause.]
102:08:51 Swigert: Okay, Vance. The readings that you wanted; are you ready?
102:08:57 Brand: Ready to copy, Jack.
102:09:01 Swigert: Bat Charlie, 37.0; pyro A, 37.0; pyro B, 37.0; SPS helium pressure, 3450; and just for kicks, nitrogen A, 2300; nitrogen B, 2400; CM RCS injector temperatures: 5 Charlie, 4.5; 5 Dog, 3.5; 6 Alpha, 4.0; 6 Baker, 4.6; 6 Charlie, 4.0; 6 Dog, 3.8; battery manifold pressure, 4 Alpha, 1.4. [Pause.]

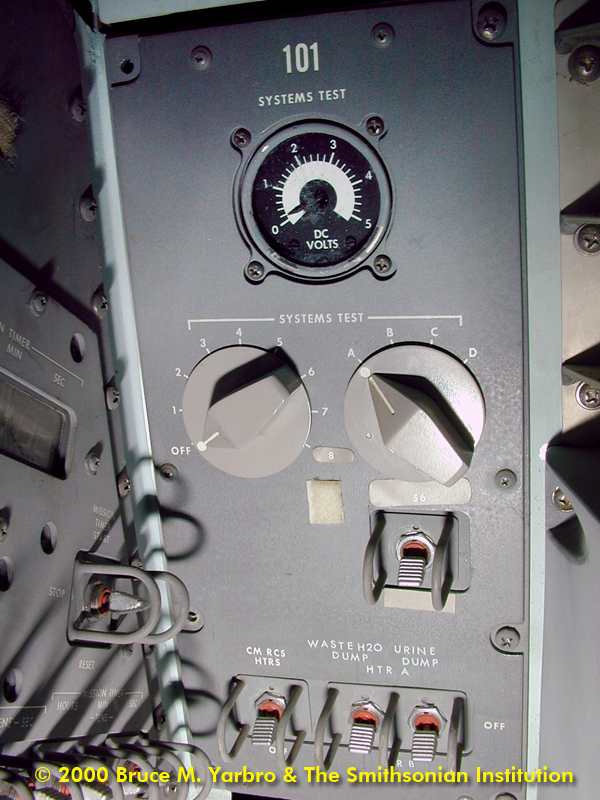
The Systems Test Meter, photographed in Odyssey's LEB. Image credit: Bruce M. Yarbro & The Smithsonian Institution.
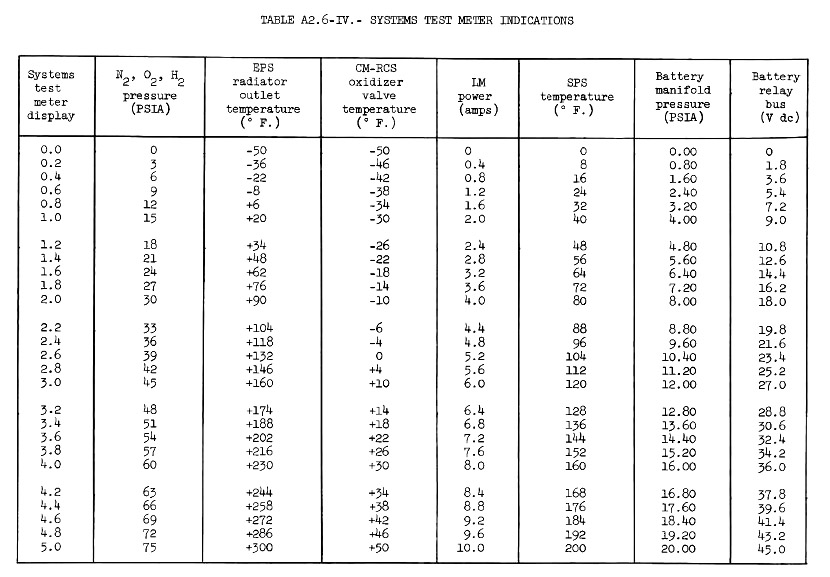
The Systems Test Meter interpretation chart
102:10:11 Brand: Okay, Jack. We got it. Thank you very much.
102:10:17 Swigert: Okay. How does the telemetry look on our ... on the old Odyssey?
102:10:21 Brand: It doesn't look too cold. Looks pretty good.
102:10:27 Swigert: Okay. Thank you very much.
102:10:30 Brand: You bet.
102:10:31 Swigert: We're going to need him.
102:10:37 Slayton: How does it feel, Jack?
102:10:42 Swigert: I'll tell you, Deke, it's cold up in there. I don't know whether we'll be able to sleep up there tonight; it must be about 35 or 40 degrees.
102:10:52 Slayton: Roger. That's just what I was worrying about.
102:10:59 Swigert: Right now, we're getting two sets of CWGs on. [Pause.]
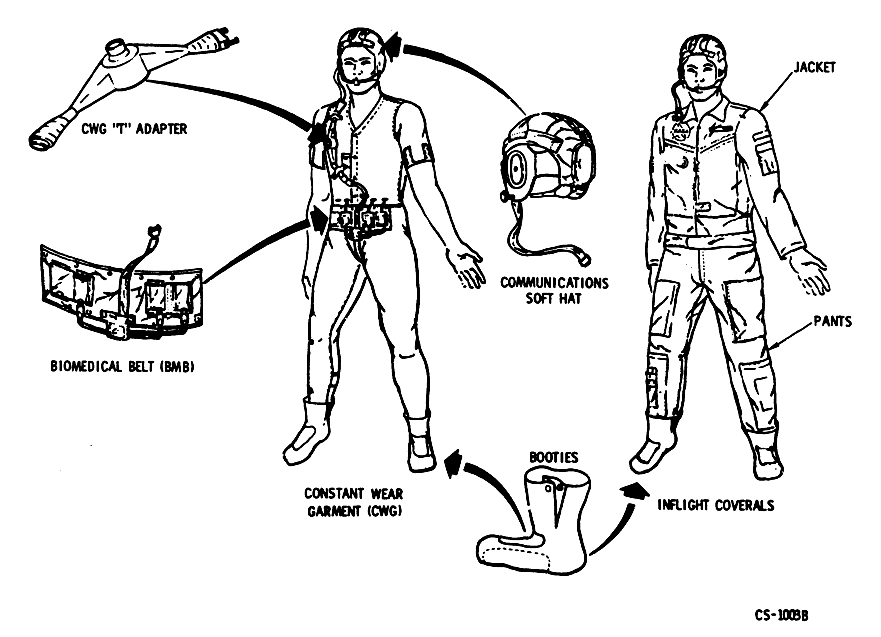
Apollo training illustration of in-flight clothing items.
102:11:12 Swigert: It's not uncomfortable at all in Aquarius, but it definitely is cold in Odyssey.
102:11:18 Slayton: Roger. [Long pause.]

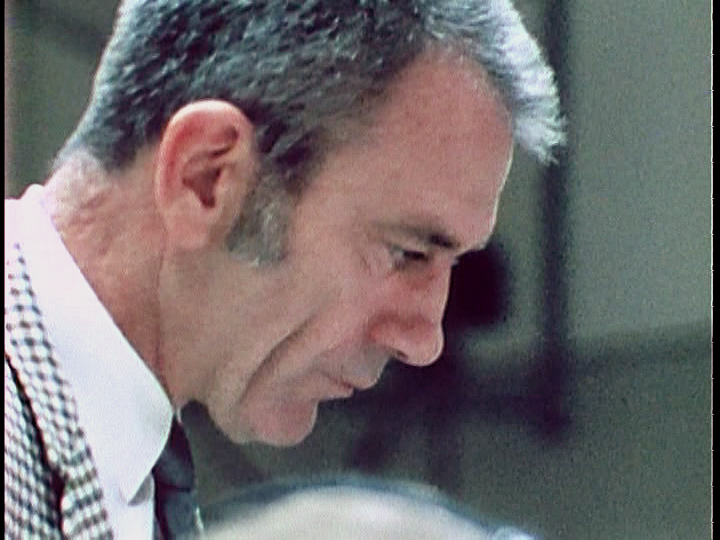
A pondrous Deke Slayton captured on NASA 16mm film. NASA/NARA.
102:11:45 Lovell: Okay, Vance. Jim's back on.
102:11:50 Brand: Go ahead, Jim.
102:11:54 Lovell: We just had a change in watch; that's all.
102:14:38 Brand: Aquarius, Houston, Over.
102:14:44 Lovell: Go ahead, Houston.
102:14:46 Brand: Jim, two items: in the Command Module, we wish to verify that the Pyro Battery selector was left in the main position. And we're ready to have the Power Amp circuit breaker on panel 16 pulled, whenever you are ready. [Long pause.]
102:15:43 Lovell: Okay, Vance. Fred just tells me that he put it there, and we're checking that again about the Pyro Battery selector in the main position.
102:15:54 Brand: Okay. Understand that you are checking it.
102:15:59 Lovell: And I will pull the Power Amp circuit breaker.
102:25:49 Lovell: Houston, Aquarius.
102:25:54 Brand: Go ahead, Jim.
102:25:57 Lovell: How does number 2 battery look to you now? [Pause.]
102:26:07 Brand: Stand by. [Long pause.]
102:26:48 Brand: Aquarius, Houston.
102:26:53 Lovell: Go ahead.
102:26:55 Brand: Jim, it looks like it was probably a sensor problem; the battery number 2 is load-sharing well. And we see no indications of higher temperatures in the glycol loop or anything that would make us think that it is heating up.
102:27:14 Lovell: Okay. Thank you.
102:51:18 Lovell: Houston, Aquarius.
102:51:24 Brand: Roger. Go ahead.
102:51:30 Lovell: I just want to talk over a little philosophy here. Fred told me that at one time you came up and told him that we were a little steep on the entry angle, and now our burn is going to make us ... give us a steeper angle. I just want to make sure that we're all talking about the same thing, that, in essence, at this particular situation, we're shallow, are not steep, and we are going to increase the angle. [Pause.]
102:52:08 Brand: Jim, the situation is that, at the moment, we're a little bit shallow, and retrograde midcourse is going to put us more in the center of the corridor. Over. [Pause.]
102:52:27 Lovell: Okay; Fine. I just, wanted to make sure. Fred had written down, some time ago, that ... that our angle now was about 71 and we were going to do a midcourse of 7 feet per second because it appears that we're going to shallow it out. I think we're all talking the same language now.
102:52:47 Brand: Roger. And, I guess it follows, but your perigee is a little bit high right now, too; so that will be bringing it back ... back down, that is.
102:52:57 Lovell: Yes. Yes, that's the important thing. [Long pause.]
102:53:16 Brand: One other question, Jim. Our readings down here say your LM cabin's about as cold as the Command Module cabin. Is that right?
102:53:29 Lovell: Well, we really don't know. There's usually two people in the LM cabin, and it's a lot ... It seems to be a lot more compact, and so we don't notice the coldness down here as we do in the Command Module.
102:56:32 Lovell: Houston, Aquarius.
102:56:35 Brand: Go ahead.
102:56:40 Lovell: Some time ago, I copied down a long Comm midcourse-7 corridor control burn at a GET of 134:59:42.98. Is that burn PAD still valid? [Long pause.]
102:57:07 Brand: Jim, that's affirm. That PAD is still valid.
102:57:14 Lovell: And that is assuming no midcourse 7 here at 105 hours.
102:57:19 Brand: That's affirm. [Long pause.]
102:57:58 Brand: Aquarius, Houston.
102:58:03 Lovell: Go ahead.
102:58:04 Brand: Jim, we're setting up your burn for 105:30, and we'll be working up a PAD, et cetera, based on that time. Over.
102:58:17 Lovell: Roger. The time will 105:30.
102:58:21 Brand: And, additional point; I guess this one's for Jack. Do we have any idea why we couldn't read the Main Bus B voltage a while back when first he didn't get it and then later he did?
102:58:40 Lovell: Yes. I think we have a reason for that. Stand by. [Long pause.]
102:59:04 Lovell: It appears, Vance, that the battery charge circuit breaker which appeared to be in, wasn't in. Fred pulled it and reset it, and then he started getting readings.
102:59:17 Brand: Roger. Which circuit breaker was that? [Pause.]
102:59:28 Lovell: It was ... It was the battery charge circuit breaker that allows you to read volts, but we haven't ... don't know the exact name for it yet.
102:59:39 Brand: Okay. Understand. [Pause.]
102:59:48 Lovell: The name is Battery Charger Bat B Charge. Jack tells me.
102:59:52 Brand: Okay. Battery Charger Bat B Charge. [Long pause.]
103:00:22 Brand: Aquarius, Houston.
103:00:25 Lovell: Go ahead.
103:00:28 Brand: Have you opened your ... just curiosity ... Have you opened your food locker just aft of the LM data file? Over. [Long pause.]
103:00:51 Lovell: Yes. It's been opened.
103:00:55 Brand: Okay. Just checking. Thanks.
103:00:57 Lovell: [Garbled] meal had come through.
103:01:00 Brand: Good. [Long pause.]
103:01:14 Lovell: It came at the right time.
103:03:30 Brand: Aquarius, Houston. Over.
103:03:36 Lovell: Go ahead.
103:03:38 Brand: Jim, we have some CSM temperatures here for you that might be of interest, if you're ready to copy. [Pause.]
103:03:56 Lovell: Roger. Go ahead.
103:03:58 Brand: Okay. Your quad package temperatures range from 85 degrees to 44 degrees. Your CM RCS injectors range from 44 degrees to 21; and your heat shield is well above its lower limits in all the various locations. Temperatures appear to be cycling based on Sun angle, and it's no sweat. They all look very good.
103:04:45 Lovell: Sounds good.
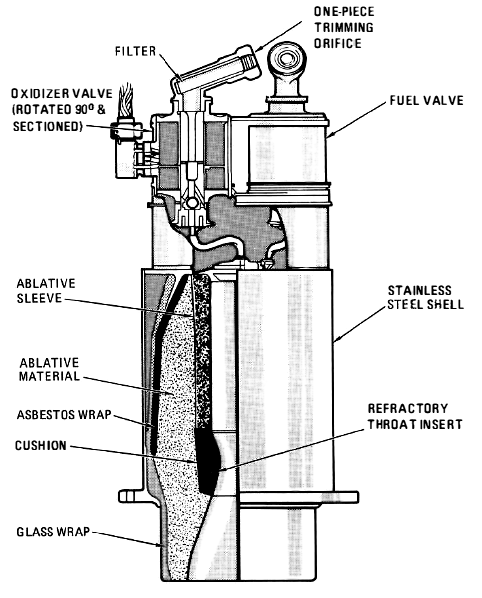
Cross-section of a CM RCS thruster.
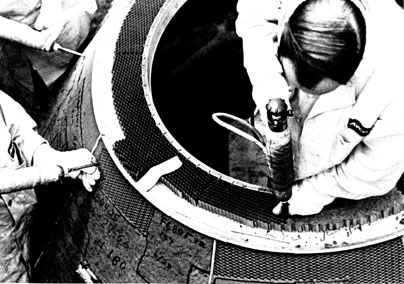
Avco Corporation engineers filling the heat shield honeycomb orifices with phenolic resin from caulking guns.
103:27:08 Lovell: Were you calling, Houston?
103:27:12 Brand: Negative, Jim.