
1,587 Panoramic Camera frames exposed (1,415 in Lunar orbit, the balance post TEI)
3,441 Mapping Camera frames exposed (2,514 exposed over lit area's, 927 exposed over dark area's in support of the laser altimeter experiment)
SIM Bay door jettisoned 69:59:01 MET
TEC EVA performed by Thomas Kenneth Mattingly (CMP)
| Commenced: | 218:39:46 MET |
| Finished: | 220:03:28 MET |
| Duration: | 1:23:42 |
02 21 35 50 CDR Okay, Houston . We're manoeuvring to the SIM bay door-jett attitude now.
02 21 35 54 CC Roger, copy.
02 21 36 03 CDR Don, how do you read me now?
02 21 36 05 CC Read you loud and clear. We copied your manoeuvre.
02 21 36 10 CDR Ok. Roger. I - I had to switch back to the Snoopy hat. That lightweight headset just isn't working out.
02 21 36 20 CC Roger.
02 21 36 21 CMP Okay, we're going through the SIM door-jett checklist, and I've got here a - a list of verifies - I'm on page 1-7, step 10 - and it has SM/AC POWER on, and - and we haven't been on. With your concurrence, I'll go ahead and turn it on now.
02 21 36 42 CC Stand by 1.
02 21 37 23 CC Okay, Casper, you can go ahead and turn the POWER.
02 21 37 28 CMP Thank you, sir.
02 21 38 20 CMP Houston, I'm ready to put the PAN CAMERA POWER on to POWER.
02 21 B8 45 CC Okay, 16. Stand by a minute.
02 21 38 56 CC Casper, we don't have any pan camera data yet.
02 21 39 04 CMP Okay, I haven't put the POWER on yet. I'm – the checklist says to stand by for MSFN cue. We have the DATA SYSTEM ON, the AUX TV is in the SCI, and we have SM/AC POWER on. PAN CAMERA switches are in STANDBY and OFF.
02 21 39 34 CC Okay, Casper . You can go ahead and turn the POWER on and we'll cue you when you - when to go to BOOST.
02 21 39 47 CMP Okay, POWER's coming on on.
02 21 39 48 CMP MARK. Barberpole's good; back to grey.
02 21 39 55 CC Roger; copy.
02 21 41 05 CC Okay, Casper. You're Go for PAN CAMERA to BOOST.
02 21 41 12 CMP Okay.
02 21 51 40 CDR Okay, Houston. Are we Go for SIM door jettison? Over.
02 21 51 45 CC Stand by 1.
02 21 51 52 CDR Okay.
02 21 52 02 CC 16, we're standing by to arm the SM power buses.
02 21 52 11 CMP Okay, I was going to hold up on that. I'll go ahead and give you a LOGIC POWER to jettison at this time.
02 21 52 18 CC Roger.
02 21 52 26 CMP Here comes LOGIC POWER JETT 1 to JETT and number 2, JETT.
02 21 52 36 CDR Okay, they're armed.
02 21 52 39 CC Roger; we show them armed.
02 21 52 49 CC And we're GO for door jett.
02 21 52 54 CDR Okay, understand Go for door jett.
02 21 52 56 CC That's affirmative.
02 21 58 32 CDR Thirty seconds to door jett.
02 21 58 35 CC Roger; 30 seconds.
02 21 58 53 CDR 10, 9, 8, 7, 6, 5, 4, 3, 2, 1...
02 21 59 02 CDR JETT. There it goes.
02 21 59 05 CC Roger.
02 21 59 14 CDR Okay, the door went, and I don't think anything changed much from what we could tell.
02 21 59 21 CC Roger; copy.
02 21 59 48 CDR Okay, Houston, we can watch it spinning around, out both the center window and Charlie's window, and it's quite a sight every time it comes around; the bright side front really flashes. 02 22 00 00 CC Roger.
02 22 00 55 CDR Okay, Houston, that was a pretty good bang.
02 22 00 59 CC Roger.
02 22 01 01 CDR The reason it was is on account of we're standing around here in our underwear, you know. That is, helmets and gloves off.
02 22 01 10 CC Roger; copied that.
02 22 01 12 LMP And - I guess the - the sound - the sound of it was about half of what you hear when the – when you're in the LM and - and the CMP's in here and he hears the pressure reg - the pressure release valve closing on him.
02 22 01 32 CC Roger.
02 22 01 35 LMP The cabin repress valve, that is.
02 22 01 42 CMP Okay, Don. All of the SIM bay configurations have been completed if you want to take a look at the data and see if there is anything that looks funny to you, I can recheck it.
02 22 01 52 CC Okay, Casper. Stand by 1 and we'll take a look.
02 22 02 39 LMP Okay, and we're going to P52 attitude now.
02 22 02 44 CC Roger; copy. P52 attitude.
02 22 03 26 LMP Okay, the door has rapidly receded from us, and it's certainly hard to tell how far away it is, but it's plenty far away; certainly no recontact problem.
02 22 03 38 CC Roger; copied. And, Casper, the SIM bay looks okay.
Film Cassette Retrieval EVA Timeline
The following transcript has been extracted form the Apollo 16 Technical Air-to-Ground Voice Transcript MSC-06802 covering the period of Trans-Earth Coast EVA.
09 02 38 51 CDR Okay, equalization valve's coming open.
[Command Module depressurisation is underway, prior to the opening of the main hatch.]09 02 39 10 CMP Okay, coming down through 4.5.
09 02 39 31 CMP Yeah. We may get a jettison before we get the cabin dumped. Okay, going through about 3.5.
09 02 39 39 CC Roger; 3.
09 02 39 44 CMP 3.25.
09 02 39 45 CC Okay, 3.2.
09 02 39 48 CMP Okay, equalization valve is closed.
09 02 39 52 CDR Okay, O2 FLOW indicator is less than a half. It is. It's reading - Well, wait a second. Let it stabilize here. Got another accumulator cycle.
09 02 40 08 CC Accumulator cycle, we confirm.
09 02 40 12 CDR Okay, right down now.
09 02 40 22 CMP Okay, that's great. Go ahead and - Ready to go?
09 02 40 26 CDR Yeah.
09 02 40 27 CMP Okay, cabin's coming down.
09 02 40 29 CDR Okay.
09 02 41 02 CMP Okay, I show 2.5. Want to get that one in there.
09 02 41 17 CDR Okay.
09 02 41 32 CMP Cabin pressure is 2.0.
09 02 41 B6 CDR Okay.
09 02 41 37 CMP Fixing to get ... off the peg pretty soon.
09 02 42 20 CMP Okay, I'm showing 1.3.
09 02 42 24 CDR Okay.
09 02 42 52 CMP Cabin shows about 1. I'm going to open it a little more; that can help it.
09 02 43 04 CDR How's your keying, Ken?
09 02 4B 05 CMP I'm fine.
09 02 43 06 CDR Good.
09 02 43 08 CMP It's a lot better when you get the cabin depressurized.
09 02 4B 40 CMP Well, I'm still showing about three-quarters.
09 02 43 47 CDR Don't - don't let that screw go in there, Ken.
09 02 43 49 CMP Oh, I tried.
09 02 43 52 CDR Did it go in?
09 02 43 55 CMP It looks like it went in here, I can't tell.
09 02 44 33 CMP Okay, looks like we're down pretty low.
09 02 44 40 CDR Okay, verify suit pressure stable, 3.5 to 4.0.
09 02 44 43 CMP My pressure is steady at 3.75.
09 02 44 46 CDR Okays verify O2 FLOW HI light is off. That's verified. How's your cuff gage, Charlie?
09 02 44 58 CDR Okay. Mine, too. EVA station pressure gage 100 to 500. No tone.
09 02 45 03 CMP Okay, still setting on 300, and no warning tone.
09 02 45 06 CDR Okay, panel 3 S-BAND AUX TV to TV.
09 02 45 09 CMP Okay.
09 02 45 11 CDR I'm going to INTERCOM/PTT.
09 02 45 13 CMP Oh, let's see. I'm not sure that cabin's really down out off that pazhan [?] region. How about reading me that - that step again when I get the hatch?
09 02 45 31 CDR It doesn't matter right now? Okay.
09 02 45 34 CMP If you can get it on, fine; if not, don't worry about it.
09 02 45 43 CDR Okay.
09 02 45 48 CMP I can't read the parallax in the gage. It looks like it must be just about down though.
09 02 45 52 CDR Okay, well let's ask the ground. Houston, what do you show the cabin pressure?
09 02 45 54 CC Roger; we're showing you 0.1.
09 02 46 00 CMP That ought to be enough, huh?
09 02 46 02 CDR Okay. Yeah, that's enough. Okay, I'm going to INTERCOM/PTT.
09 02 46 08 CMP And, Houston, is that low enough pressure to turn the TV on?
09 02 46 32 CMP Henry, did you read...
09 02 46 33 CC Roger. We copy. Press on with the - with the - turning it on.
09 02 46 38 CMP Okay. Thank you, sir.
09 02 46 57 CMP You have TV on.
09 02 47 06 CMP Okay, it's unlatched.
09 02 47 12 CMP That's affirmative. Okay, there. It's unlatched. *** you. Okay.
09 02 47 43 CMP Okay, what do I do now? I've put the handle up and - Okay, it's set on L. It's stowed. I am. I am. It's stowed. How about the gear box? Okay, gear box is to latch. Okay. My inner visor is down. Okay.
09 02 48 59 CMP Okay. How about if I get rid of the jett bag first? Okay. Yep. Yep.
09 02 49 17 CMP Bye-bye, bag. Okay. Okay, I'll go out and get the TV.
[Ken Mattingly is exiting the Command Module main hatch.]09 02 49 46 CMP-EVA Ooh! Charlie, you'll need the outer visor as soon as you get into the hatch.
09 02 50 03 CMP-EVA Okay.
09 02 50 14 CMP-EVA You can use the visor shade, too, when you get out. How's that?
09 02 50 31 CMP-EVA Oh, just me (laughter).
09 02 50 42 CMP-EVA I did. Sorry about that (laughter). Oh-no. Okay, where's the camera? Yeah, get my - I've got to get my umbilical up here first, John.
09 02 51 07 CC Charlie, could you check and see if the GLYCOL mixing valve got bumped into AUTO, the TEMP IN?
09 02 51 15 CMP-EVA John, you can check that.
09 02 51 22 CDR In MANUAL.
09 02 51 29 CC Roger; copy MANUAL.
09 02 51 33 CDR Yeah, the GLYCOL EVAPORATOR TEMP IN is in MANUAL.
09 02 51 43 CMP-EVA Johns I'm hung up on some cable there.
Og 02 51 48 CDR There it is.
09 02 52 03 CMP-EVA Yeah. All right. I will when I get here. Looks like it's hung up on something there.
09 02 52 17 CC 16, if you'll take the TEMP IN switch to AUTO, please.
09 02 52 28 CDR Okay.
09 02 52 38 CC Okay, back to MANUAL on the TEMP IN.
09 02 52 44 CMP-EVA I need some more cable there, Charlie.
09 02 52 57 CMP-EVA Yep.
09 02 53 08 CC Roger; you verify you're in MANUAL in TEMP IN?
09 02 53 14 CDR Yeah, that's affirmative.
09 02 53 25 CMP-EVA Charlie, I'm going to have to back in here so I can get a little better grip. IÂ’ve got to turn the pole around. Get my foot on something. Okay, thank you. See now - let me see if I can...
09 02 53 46 LMP That's it. Panel 16 [sic] POWER, ON.
09 02 54 02 CMP-EVA Yeah, I can feel it. How's the - how's the photos of the SIM bay? Does it - do I need to adjust it?
09 02 54 ll CC Looks pretty good down here, Ken.
09 02 54 12 CMP-EVA Houston, is that picture okay? All right, I'm going back to the SIM bay.
09 02 54 24 CMP-EVA It - it really is ripe.
09 02 54 41 CMP-EVA Okay.
02 54 56 CMP-EVA Are you ready, Charlie?
09 02 55 01 CMP-EVA Yeah, on your egress, you sure will.
09 02 55 l0 CMP-EVA All set?
09 02 55 17 CMP-EVA Okay.
09 02 55 20 CC Charlie, can you verify the TV pole's aligned?
09 02 55 24 CMP-EVA Okay, I'd say the service module is pretty well blistered. Did the picture shift? Are you not getting a good picture, Hank?
09 02 55 38 CC It looks like it might be swung - swung a little too far to the left. We're not sure. That would be to Charlie's left.
09 02 55 45 CMP-EVA Okay, I'll fix that in a minute. All right. Okay. Stand by. No, we can't put it there without moving the door. Let's get this done. Number l, I'm at the mapping camera, and the stellar cover door is open, and the stellar cover is jammed out, and jammed against the handrail. Copy, Hank?
09 02 56 13 CC Roger; copy.
09 02 56 17 CMP-EVA I am.
09 02 56 29 CMP-EVA Yeah.
[Ken Mattingly is now retrieving the Panoramic Camera film cassette.]09 02 56 59 CMP-EVA Oh, man. Man, the old Moon's out there. Okay, going after the pan camera. Okay, here comes the hard cover - gone.
09 02 57 32 CMP-EVA Soft cover has gone. Okay, I'm going after the hook.
09 02 57 43 CMP-EVA Okay, good.
09 02 58 00 CMP-EVA Boy, that old visor of yours - that outer visor on the glare shield really comes in handy. Okay.
09 02 58 23 CMP-EVA The pip pin it out, and I'm throwing it away.
09 02 58 35 CMP-EVA Oh, they'll open, not much I bet. Not at all, there it is, it's out.
09 02 59 ll CMP-EVA Okay, get my feet out. There's one. There's two.
09 02 59 28 CMP-EVA Okay.
09 02 59 40 CC Ken, the TV is just right. It doesn't need adjustment.
09 02 59 49 CMP-EVA All right.
09 03 00 33 CMP-EVA It is that, all right. I don't even see any stars.
09 03 01 l0 CMP-EVA Okay, Charlie, will you hook that back to my ring?
09 03 01 24 CMP-EVA You don't need to lock it.
09 03 01 28 LMP Thank you.
09 03 01 30 CMP-EVA All right, going back for the mapper.
09 03 01 47 CMP-EVA No, the mapper is still out here, I betcha.
09 03 01 54 CMP-EVA Oh, man!
09 03 02 10 CMP-EVA All righty. I got my feet well locked, and I got a good suit pressure, and cooling is just fine, and let me tell you a few things about the old SIM bay. Okay. The first thing that's real obvious to you out here is the - is the amount of bubbling on the service module paint. It's more - it's a bit more than I anticipated seeing and the radiator panel down to the right side of the SIM bay looks nice and clean. There's no bubbles on the paint or anything like that. The area right under the quad - I'll have to raise my visor to see - Yeah, I got the inner one still down. I will. Yeah, you don't need to remind me of that one.
09 03 03 13 CMP-EVA Okay, the area directly under the quad doesn't look to me like it's blistered any more than the areas everywhere else around here. That's just a qualitative comment. The - in fact, the paint on the quad itself is as blistered. The area directly under the nozzle on the - the plus-Z jet on quad B is all blistered. I can see that in the Sun. I can't tell about the other surfaces. Okay, looking now at the mapping - at the mass spec and the gamma-ray, I'm going to have to move aft to do that.
09 03 03 51 CC Ken, I'd like to caution you on the mass spec to steer clear of that door there. It's very soft and it could bend and break and leave a jagged edge.
09 03 04 01 CMP-EVA Roger. I won't touch it.
09 03 04 10 CMP-EVA Yeah.
09 03 04 17 CMP-EVA Sorry about that.
09 03 04 33 CMP-EVA Okay, I've got a good handhold over here on the pan camera - this rail, so that's a good one, and now I'm over the gamma ray door and it's about open at, say, 30 degrees.
09 03 04 58 CMP-EVA And I can't - I can nudge it, and it looks like it's hitting on the top of the gamma ray spectrometer itself. No, it isn't. It's not touching the spectrometer. And I'm not real sure what it is jammed on. I can't see anything anywhere. The cover just feels like it's a little bit loose at about a 30-degree jiggle, and I can't see the mechanism to tell whether it's broken. The...
09 03 05 32 CC Roger; can you see if the guide rails come through the SIM?
09 03 05 34 CMP-EVA ...mapping camera - Oh, let me take a look; I don't think I can get my head over there far enough to tell that. Yes, they do. They come right up to the pointed edge.
09 03 05 49 CC Roger. Copy.
09 03 05 52 CMP-EVA Okay, and on the mass spec, there's nothing there but the door wide open. Was there something in particular you'd like me to look at back here – on the mass spec?
09 03 06 03 CC Negative.
09 03 06 06 CMP-EVA Okay, anything else on the aft end? I don't see any blistering of paint or anything. It's all clean in the aft shell.
09 03 06 17 CC Okay. Copy.
09 03 06 32 CMP-EVA All right; thank you, Charlie. Now, I'll put my feet in here, and we'll take a look at the old mapper. Okay, while I'm standing on top of the DAC camera, the V-over-h sensor looks perfectly clean. There's nothing on the sensor. I see no evidence of contamination on the sensor, either the – the light meter or the V over h. The barrel is clean, all the decks and surfaces of the pan camera installation are clean.
09 03 07 13 CC Very good, Ken.
[Ken Mattingly has now moved his attention to retrieving the Lunar Mapping Camera film cassette.]09 03 07 28 CMP-EVA Okay, here comes the mapping camera cover – hard cover. The soft cover. Okay, that'll be next. Yeah, that's my wrist tether.
09 03 07 55 CMP-EVA Okay.
09 03 08 12 CMP-EVA Ready?
09 03 08 26 CMP-EVA Okay, I'm putting the tether on now, John.
09 03 09 05 CMP-EVA Oh, IÂ’m having trouble with this hook. I - If I can get it on, I can get it locked.
09 03 09 48 CMP-EVA Stand by.
09 03 10 41 CMP-EVA Oh, yeah. I just can't get the darned insulation out of the way. It's a little stiffer than the...
09 03 10 56 CMP-EVA Okay, it's on.
09 03 11 20 CMP-EVA Okay.
09 03 11 49 CMP-EVA Okay, why don't you wait until I get to the hatch?
09 03 12 12 CMP-EVA I see them.
09 03 12 24 CMP-EVA Yes, sir. Yes, sir.
09 03 12 39 CMP-EVA If you get it hooked on, you can pull the tether off my hand there, Charlie.
09 03 12 53 CMP-EVA No, sir. Okay, how we doing on umbilical now? How we doing on umbilical? You got most of it inside? Okay. Go ahead.
09 03 13 21 CMP-EVA Yes, after Charlie gets in.
09 03 14 07 CMP-EVA Hey, let's go on back to the - Let's see - okay. Yeah, yeah. Let me - turn around here and get my feet in.
09 03 14 40 CMP-EVA Okay, wait a minute. Got to - Let me see if I can find a place to put my feet here. Is that a safe place for my right foot? Okay.
09 03 15 07 CMP-EVA You got - You got anything on the TV?
09 03 15 12 CC Not right now. Yeah, we got something there.
09 03 15 20 CMP-EVA Yeah, I'm not very steady here.
09 03 15 24 CC Looks like the old Moon.
09 03 15 28 CMP-EVA That's her, babe. Right off the nose.
09 03 15 35 CMP-EVA Okay. that's all for today on that.
09 03 15 48 CMP-EVA Okay, I'm going to have to pull myself in. Let me - send this thing in to Charlie. All righty.
09 03 16 23 CMP-EVA Okay.
09 03 16 24 LMP Go ahead.
09 03 16 25 CMP-EVA Let me get my umbilical down here. Yes, sir. Okay, Houston, we're maneuvering to the MEED attitude
09 03 16 43 CC Roger.
09 03 16 50 CMP-EVA Don't move my feet. I'll lift.
09 03 17 01 CMP-EVA Out the - All you got to do is pull the - Okay.
09 03 17 11 CMP-EVA I got the pole. Okay.
09 03 17 24 CMP-EVA Okay, let me pull this rail down to hold on to and we'll play ride'em cowboy.
09 03 17 45 CMP-EVA Is that enough out of the way, Charlie? Okay.
09 03 18 06 CMP-EVA Easy. How's that?
09 03 18 40 CMP-EVA Okay. No, it's in the two-bar. No, Charlie's going to unstow it. Okay. Oops! How about if I slide over here? Will that - Okay. Ail right? Let me - No, I got it here, I think. From here you can't either? Okay, all right, okay. Okay. I got to come in to turn around, then. Hold the - hold this pole until I get out. It - If you let John hold it, then I won't have - it'll be easier to - Okay. The visor back down...
09 03 19 52 CMP-EVA Okay. How's that?
09 03 20 10 CMP-EVA And, right now, I've got the Earth peeking over the side of the fuselage, just a little crescent. Okay, coming in.
09 03 20 40 CMP-EVA Fine. Yeah, okay, I got that. And hold...
09 03 21 10 CMP-EVA Okay, Houston, we've reached the MEED attitude.
09 03 21 16 CC Roger.
09 03 21 19 CMP-EVA Wait a minute. Okay .... It's locked. Of course, we got it. Okay, out with the MEED.
09 03 21 54 CMP-EVA Seven. I found a sigh; here. Wait a minute.
09 03 22 03 CMP-EVA I don't know. I can't - I've got this visor stuck down and can't see what it is. Got a lot of dirt on it.
09 03 22 20 CMP-EVA Yeah, it wouldn't hurt. Okay, I got to rotate this another few degrees. You got both my feet there? Okay.
09 03 22 43 CMP-EVA Okay, all right, let go of my feet there, get up here to attitude - there's my foot there - I don't have to go outside, I don't think. Let's see, Charlie, - you're going to have to - let me see...
09 03 23 26 CMP-EVA All right, just a second. Oh, that's just what we didn't think about. That Velcro strip lays right in front. Yep. Hang on; I've got my scissors right here. I'll be right with you. Yes, sir. Okay, okay, okay. Okay, what we do need to do is to pitch up, minimum impulse. Oh, you've got to go about 3 degrees.
09 03 24 50 CMP-EVA Put in - input yet? Okay, go - pitch down then. Yeah. Okay, up should be in the right direction on this thing. I said up the first time and that - that looked like it went the wrong way. Oh, okay; well, you need to go up about 3 degrees then.
09 03 25 25 CMP-EVA I can't tell that you're moving. Has the attitude changed? Yeah, yeah, and that's moving now. Moving in the right direction. Let it ride at the slow rate for about another minute. What's that - Oh, is that right (laughter). Boy, how's that for luck?
09 03 26 19 CMP-EVA Okay, John we got another 30 seconds to drift and we'll be there. Yes, sir. Yeah. Nope. Okay.
09 03 27 02 CMP-EVA Okay.
09 03 27 16 CMP-EVA Okay. Why don't you go to AUTO?
09 03 27 22 CMP-EVA Okay, are you ready?
09 03 27 40 CMP-EVA Stand by.
09 03 28 01 CMP-EVA Hey, can you hold my feet?
09 03 28 19 CMP-EVA There it is.
09 03 28 22 CMP-EVA Okay, pull me in. I'll pull myself in.
09 03 28 31 CC Is the MEED open now, Ken?
09 03 28 36 CMP-EVA Yes, sir.
09 03 28 39 CC Okay, I didn't get your mark.
09 03 28 20 CMP-EVA It's been open 15 or 20 now. Sorry.
09 03 28 42 CDR Yeah, it's on 22 seconds now.
09 03 29 38 CMP-EVA What kind of pressure do you have now?
09 03 29 49 CMP-EVA How about our suit gages?
09 03 30 15 CMP-EVA Okay.
09 03 30 21 CMP-EVA I'm very comfortable.
09 03 30 29 CMP-EVA 3.85. Like a champ.
09 03 30 38 CC John, could you give us a cuff gage reading?
09 03 30 44 CMP-EVA Okay, I got 3.85, Hank.
09 03 30 58 CC Roger. Could we get one from John and Charlie?
09 03 31 00 CMP-EVA Do you want all of them or just mine? Okay, say again what you had, John. John has 3.55.
09 03 31 08 CC John has 3.55. Roger.
09 03 31 11 CMP-EVA Charlie has 3.95.
09 03 31 13 CC 3.95.
09 03 31 28 CMP-EVA Probably getting some off the bulkheads, too, drying this place out.
09 03 31 40 CMP-EVA Hey, how's the time coming?
09 03 31 45 CMP-EVA Okay, it's sure not.
09 03 31 57 CMP-EVA Houston, you are now win - witnessing one of the longest 10-minute periods in history.
09 03 32 02 CC Roger.
09 03 32 22 CMP-EVA (Laughter) Yeah, I think that one was longer. I'm looking at our dump nozzles out here. And there is very little build up on the waste dump.
09 03 32 43 CMP-EVA (Laughter) I don't plan to have that.
09 03 32 51 CMP-EVA Okay.
09 03 32 56 CMP-EVA Henry, was there anything else you wanted to know about the SIM?
09 03 33 02 CC Roger. When you were arou - around the mapping camera, did you happen to notice the condition of the cable that lays between it and the bulkhead there?
09 03 33 12 CMP-EVA I couldn't see down in there. There's too many shadows.
09 03 33 15 CC Roger; copy. And, on the stellar camera door, how far out was it?
09 03 33 22 CMP-EVA Oh, I'd say the - the - the last folding lip is up against the handrail. Well, it - yeah, just about that far.
09 03 33 32 CC Roger.
09 03 33 37 CMP-EVA All right, thank you. Oh, I'm just fine. I got nothing to do but just loop my finger around this thing.
09 03 33 57 CMP-EVA No, sir.
09 03 34 07 CMP-EVA Right.
09 03 34 25 CMP-EVA Fine.
09 03 34 36 CMP-EVA (Laughter) I wish you wouldn't put it that way. No.
09 03 35 21 CMP-EVA (Laughter) No wonder that was such a long time. Hank, we got another one of those event timers that's timed to some base other than universal time.
09 03 35 33 CC Say again.
09 03 35 34 CMP-EVA But don't worry about the MEED; we got a watch on it.
09 03 35 37 CC Okay, I'm timing you down here, too.
09 03 35 41 CMP-EVA Okay, we got regular - regular watches on it, so it's okay. Why don't you cheek us at 8 minutes, Hank?
09 03 35 50 CC Will do.
09 03 36 17 CC Coming up on 8 minutes...
09 03 36 21 CC MARK.
09 03 36 26 CMP-EVA Okay, thank you, Hank. We're right with you.
09 03 36 48 CMP-EVA You get a good look at the Earth, Charlie?
09 03 37 05 CMP-EVA I'm really surprised I don't see any stars.
09 03 37 21 CMP-EVA (Laughter) What time is it? Okay, 9 minutes.
09 03 37 51 CC Got about 30 seconds, Ken.
09 03 37 54 CMP-EVA Okay, I'm on my way to the experiment. Charlie, can you hold my feet there? And would somebody give me a call at 10?
09 03 38 11 CMP-EVA Man, that sight's right on.
09 03 38 12 CC Ten seconds.
09 03 38 14 CMP-EVA Okay. We're counting down the last ten.
09 03 38 22 CMP-EVA Closed.
09 03 38 24 CC Okay, make sure it's closed and locked, Ken.
09 03 38 29 CMP-EVA It's closed; I'm working on the lock.
09 03 38 42 CMP-EVA Charlie, can you hold my feet real good there? Hold both of them. Okay.
09 03 39 17 CMP-EVA Well, I didn't get it locked. Yeah, I'm - I'm working on that, John. I got to compress the seal. I'm trying to get some leverage on it.
09 03 39 50 CMP-EVA Wait a minute.
09 03 40 l0 CMP-EVA Well. No. No.
09 03 41 01 CC Ken, you having any luck with that lock yet?
09 03 41 03 CMP-EVA Not yet.
09 03 41 ll CC Okay, that goes clockwise and then closes, and then counter clockwise.
09 03 41 18 CMP-EVA Yes, sir, I've got the sequence. It's the lock I don't have.
09 03 41 25 CDR How about if we bring it in and tape it closed?
09 03 41 28 CMP-EVA I'm gonna do that in just a second, if I don't get it on this try. Well. Hey, there we go, I think. Let me try that now.
09 03 41 52 CMP-EVA I feel it coming.
09 03 42 13 CMP-EVA Well, I'm going to have to let it have - a little extra LTV.
09 03 42 28 CMP-EVA Because I can't hold it shut and bring it in. Charlie, you got my foot?
09 03 42 42 CC Ken, do you intend to use the TV any more?
09 03 42 47 CMP-EVA No, sir. Okay, I've got to get that thing closed here - at least out of the UV. Okay, I've got it. It was - Hank, it was open for about 3 seconds.
09 03 43 08 CC Roger.
09 03 43 27 CMP-EVA You got it?
09 03 43 34 CMP-EVA All right.
09 03 43 42 CMP-EVA Let me - let me get my hand out of here, that's what's holding me up; now you can pull it in.
09 03 43 55 CMP-EVA Wrap a piece of that tether around it until we get the cabin pressurized. You got it? Okay.
09 03 44 16 CMP-EVA You can probably stick the whole thing under there.
09 03 44 27 CMP-EVA Take your time and get it all cleaned up. All righty.
09 03 44 56 CMP-EVA I see a piece of tether coming up here, is that the MEED? Okay. Yeah. Don't - don't disconnect the lanyard.
09 03 45 15 CMP-EVA Okay. I'll turn around and start in. (Laughter) Rud-a-dub-dub. Okay, you got my umbilical in sight?
09 03 45 40 CMP-EVA Okay. Let me get my - I've got to get - Something's under my foot there. Okay, I've got to get my foot low in order to get in. Want me to go back out? Hey, okay; swing. Oh, not quite. Got to get this thing up where I can see something.
09 03 46 42 LMP Look at that!
09 03 46 50 CMP-EVA Get the - John, you sure have a lousy LEVA. It's closed and the hatch is clear. Just a second. Okay. All right. Before I take it any further, let me try and ... some of those latch seals ... You're right. Can you see the latch seals? I can't see the top. Can you see the top, John? I just want to make sure I don't have something stuck - a lanyard stuck in there somewhere. Okay? Yeah. Hey, the - the handle - the indicator looks latched. Yes, sir.
09 03 48 35 CC Okay, Ken. Before you pressurize the cabin, we'd like for you to verify that the switch on the TV is in STANDBY, and that the S-BAND AUX TV is OFF.
09 03 48 48 CMP Okay. What's the next step on the latches, here? I think you read one I did miss. And on ... It's latched. Okay, let me - I can get that TV switch. Hey - Okay. That's a big help. The switch is OFF. that's affirmative. Oh, and the - I can't find that. Wasn't on the checklist. Yes, you do. Right up there. I'm trying to get the visor up so I can see. (Laughter) No, I'm going to use this hatch right here. If I can read through this thing. Beg your pardon? It's right there. ()kay. Dump valve coming close. Okay; the PRESSURE EQUALIZATION VALVE is CLOSED. Okay, watch this. I'll just sort of hit it once and see how it works.
09 03 51 39 CDR Okay. Houston, can you call us at a cabin pressure of l?
Page 14-100
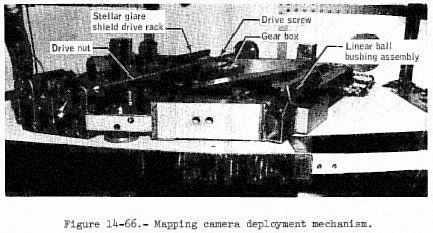
This anomaly is similar to the Apollo 15 problem in that the times of the first extension and retraction were normal and subsequent times were excessive, with some in excess of 4 minutes. In addition, the Apollo 15 camera would not retract after the final (15th) deployment. Subsequent investigations did not isolate a probable cause of that anomaly. Deployment rails attached to the bottom of the camera slide through ball-bushings that are part of the deployment mechanism (fig. 14-66). Deployment of the camera is accomplished by the drive screw turning within the drive nut, which is bolted to the camera. Friction in this screw-nut drive is minimized through the use of re-circulating streams of ball bearings riding between the threads of the nut and screw. Two redundant motors, each capable of deploying the camera should the other fail, power the drive screw via a drive train consisting of clutches, gearing, and a "no-back" device that locks the deployment mechanism when power is removed from the motors. The motors, clutches, and most of the gearing are contained within the gear box. Two clutches are used, one with each motor. Their design is such that, should a motor seize, its clutch will decouple from the drive train. The clutches contain bearings that are lubricated with a mixture of silicone oil and grease; therefore, a test was conducted to determine the effect of contamination of the friction surfaces by the lubricant. The result was that lubricant applied directly to the friction elements did not significantly affect the clutch performance.
Pre-flight deployment operations had disclosed a chattering noise in the mechanism when the retraction was aided by the pull of the cable harness to the camera. An analysis of the drive train indicates that a state of dynamic instability may exist in a zero-g environment because of the resultant loss of the damping provided by the deployment rail friction. Simulated zero g tests are being conducted by suspending the camera with a long cable in order to remove the weight from the rails while maintaining the inertial properties of the camera during the deployment.
14-101
A separate anomaly report will be published upon completion of analysis and testing.
This anomaly is open.
Scientific instrument module bay photographs taken from the lunar module indicate the glare shield was properly retracted at rendezvous; therefore, the failure to retract occurred at the third, fourth, or fifth (last) camera retraction. A review of the stellar film indicates that this anomaly did not affect the stellar photography. Glare shield deployment is accomplished by a rack-and-pinion mechanism that is connected by gearing to a rack on the camera deployment.
14-102
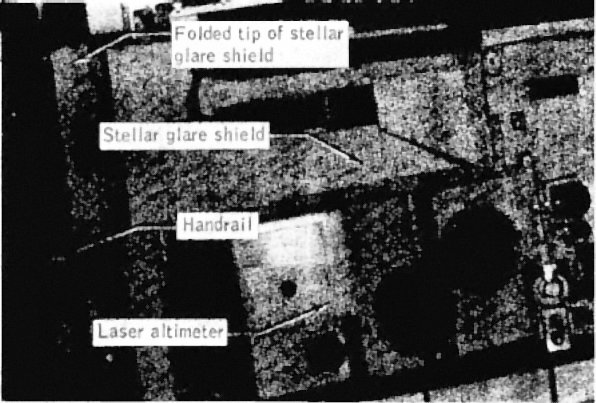
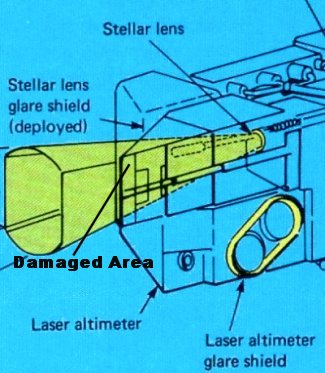
The Command Module Pilot observed that the glare shield for the stellar camera was jammed against the handrail paralleling the scientific instrument module bay (fig. 14-67) during the trans-Earth extravehicular activity. In the 16-mm photography of the extravehicular activity, the outermost edge of the folding tip of the glare shield is visible above the handrail, in the fully-extended position as shown in figure 14-64.
Scientific instrument module bay photographs taken from the lunar module indicate the glare shield was properly retracted at rendezvous; therefore, the failure to retract occurred at the third, fourth, or fifth (last) camera retraction. A review of the stellar film indicates that this anomaly did not affect the stellar photography. Glare shield deployment is accomplished by a rack-and-pinion mechanism that is connected by gearing to a rack on the camera deployment mechanism (fig. 14-66). As the camera is deployed from the scientific instrument module bay, the glare shield is automatically extended outward from the stellar camera. Two sets of miter gears are utilized. Both sets are located within the camera body. Each set contains a steel gear and an aluminum gear.
14-102
During the inspection of the exposed film prior to processing, numerous aluminum particles were found wound up with the film. Analysis of the chips indicated they were 6061 alloy rather than the 2024 alloy of the gears, showing a source other than the gears. Since the glare shield deployment mechanism is driven by the camera extend/retract action, useful information related to this anomaly may be obtained from the camera zero-g tests being performed.
A separate anomaly report will be published upon completion of analysis and testing.
This anomaly is open.
14-103
The degradation rate appeared to be rather constant during the next three operating periods, with voltage step 4 appearing near the end of the fifth period (revolution 47). During the sixth operating period (revolution 60), the degradation appeared to accelerate and the pulse forming network voltage controller reached step 5, the highest available step, by the end of this run. In step 5, maximum voltage is delivered to the flash lamps which "pump" the laser ruby. During the last scheduled operating period (revolution 63), laser output degraded to the point that no further altitude data were obtained.
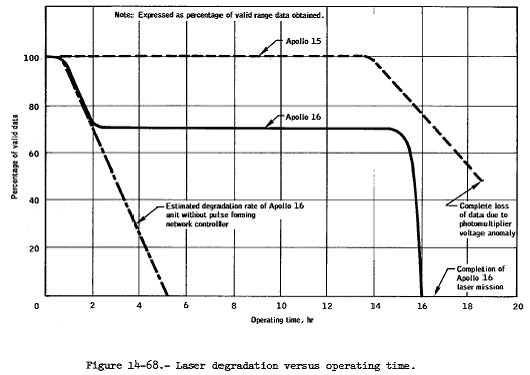
There were approximately 2,400 laser operations (firings) during the mission. The laser output appeared to degrade more rapidly than during the Apollo 15 mission (fig. 14-68) but was compensated by the action of the pulse forming network voltage controller added for this purpose as a result of the Apollo 15 anomaly. The voltage controller consists of a laser power status sensor (photodiode) located inside the laser module and associated circuitry to increase the output of the pulse forming network power supply if the sensed laser power is lower than a pre-established threshold.
Compensation was sufficient until the last 40 minutes of the final scheduled operating period. After this time, laser output was apparently too low for ranging against the sunlit lunar surface. One consequence of the pulse forming network controller operation was some loss of altitude data on alternate laser firings ; therefore, data validity was only about 70 percent during most of this mission. Had the controller not been added to this unit, the amount of valid data obtained would have been significantly less. An estimate of the data that would have been obtained is shown in figure 14-68. The controller operates to increase input power to the laser if the laser output on the preceding operation was low, and to decrease input if the output was high. It appears that the threshold may have been low, or the voltage steps too large, so that inadequate output was obtained on the lower step, resulting in loss of altitude data. This was particularly true on illuminated portions of the lunar surface where background radiance decreases receiver sensitivity.
14-104
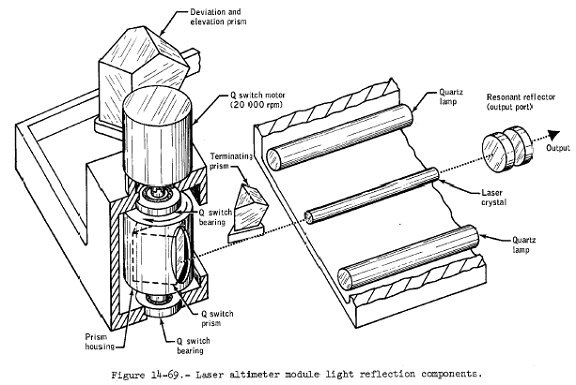
Analysis of the Apollo 15 failure indicated that the most probable cause was contamination of the internal optical surfaces by oil from the Q-switch bearings (fig. 14-69). Consequently, a delta qualification test was performed on a laser module, using new bearings incorporating oil-retainer shields. The qualification test consisted of a 220-hour thermal vacuum test which included a 50.5-hour mission operation timeline. Over 9,000 laser firings were performed and the voltage controller had only reached step 4 by the end of the test.
Since the Apollo 16 laser also incorporated these new bearings, similar improved performance was expected during the mission. The number of pre-launch discharges was limited, however, to conserve laser life so the rapid laser degradation was not detected before launch. The plots of data validity versus operating time in figure 14-68 are approximate in that the effects of laser module temperature and lunar surface illumination have been averaged out. During the first ll hours of laser operation during Apollo 15, the command and service module was in a highly eccentric orbit which, due to the range limitations of the laser altimeter, caused the loss of approximately 50 percent of the altitude data. Since the data loss was not due to a hardware malfunction, the curve for Apollo 15 is drawn at 100 percent during this period.
Contamination of the optical surfaces within the laser module is considered to be the most likely cause of the degradation. A secondary cause is the degradation of the flash lamps because of discoloration of the lamp quartz as the result of the repeating high intensity light flashes and impurities in the quartz. The lubricant in the Q-switch motor and rotor bearings is apparently the principal source of contamination. Bearing life tests indicated that elimination of the oil reservoir in the bearings by the use of oil-impregnated bearings does reduce oil migration. Consequently, the Apollo 17 laser module will be modified to incorporate Q-switch bearings with oil-impregnated ball retainers and selection of flash lamps using a high purity quartz which is not as subject to degradation.
Cover plates, installed over both access openings to the motor coupling, will complete the enclosure of the motor bearing.
This anomaly is closed.
14-107
Throughout the mission, telemetry indicated that the sensor output was too low, resulting in a slit width that was too wide. Consequently, an overexposure of the film occurred. Based upon pre-flight brightness calculations and real-time mapping camera exposure data, the degree of overexposure was estimated to be approximately 1½ to 2 f-stops. As a consequence, the film processing was modified to compensate for this degree of overexposure.
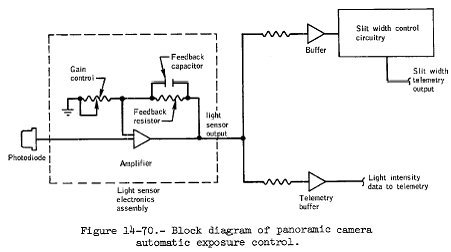
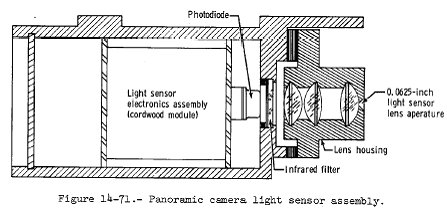
The problem could have been the result of contamination on the sensor optics or a failure in the light sensor or its associated circuitry (fig.14-71). Analyses and tests have shown that component open or short circuit failures could not have caused the problem since the amount of overexposure could not be duplicated. Feedback capacitor leakage (equivalent to about 6 mega-ohms leakage resistance), or a decrease in the gain of the photodiode input amplifier (an integrated circuit), or a decrease in photodiode sensitivity, shown in figure 14-70, could have caused the problem.
These components, however, have no previous history of these types of failures; therefore, no corrective action will be taken. A review of data indicates that the problem occurred pre-flight, at some time between January 5, 1972 , and February 25, 1972 . The failure was not detected because the test merely ascertained that the light sensor responded to stimulation (a light source placed in front of the sensor). Although sensor output voltage was recorded, no voltage tolerances had been established for the test.
14-108
To preclude a similar problem not being detected in ground testing, sensor output voltage limits have been added to the test procedure.
This anomaly is closed.
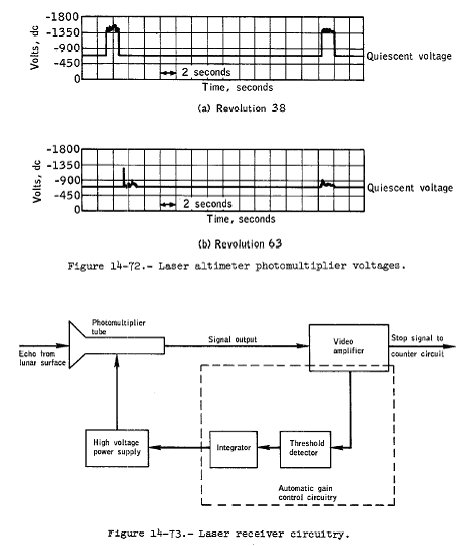
As a result of the automatic gain control action, the photomultiplier tube voltage varies during the mission and appears somewhat noisy, as evidenced by the normal trace (revolution 38) shown in figure 14-72. The revolution-63 trace is unusually erratic, however, and failure to rise from the quiescent level is indicative of anomalous operation.
14-109
14-110
Some of the anomalous voltages which occurred during revolution 60 were probably caused by sunlight reflecting off the deployed spectrometers. Although the spectrometers were not in the field of view of the altimeter receiver optics, reflections from the spectrometers may have been reflecting from the altimeter's gold-plated lens barrel and, thence, into the photomultiplier tube, thereby unduly affecting the automatic gain control action. This does not, however, explain the revolution-63 performance, because the mass spectrometer had been jettisoned and the gamma-ray spectrometer was not deployed.
A number of intermittent conditions are possible that could either increase the gain of the photomultiplier amplifier or couple electrical noise into the amplifier's input. Either of these occurrences could cause the effects observed in the data. An intermittent condition could have been caused by the cyclic thermal environment that occurs as a result of lunar orbit operation. Since qualification test results and acceptance tests are considered to be adequate for this equipment, no corrective action will be taken.
This anomaly is closed.
The complete operational sequence of the photocell servo is as follows:
Assume that the reflected lunar surface light level is decreasing, thus, the photocell output voltage is less than the reference voltage. The comparator supplies a continuously decreasing signal to the shift register, thus enabling the register to shift the "on stage" toward the slower shutter speed. A group of six clocking pulses are supplied to the register once before each film exposure (about every 20 seconds). When the first clocking pulse appears, the on condition is shifted one stage. The register then causes the reference voltage to decrease one step. If the photocell output is still less than the new reference voltage, the second clocking pulse will shift the on condition to the next lower stage in line in the shift register. This sequence will continue until the difference between the photocell output voltage and the reference voltage is within the dead band of the comparator, at which time the comparator output signal to the shift register will disappear and the register will stop shifting. The shutter speed will then be determined by which stage of the shift register is in the on condition.
14-111
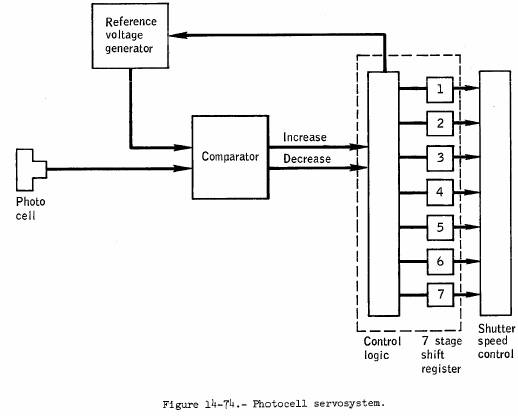
The seven shift-register stages correspond to seven shutter speeds with the first corresponding to the fastest speed, and the seventh corresponding to the slowest speed. The logic is designed such that at initial camera turn-on or whenever either of two invalid logic conditions exist (all stages off or more than one stage on), the fifth stage is turned on and all others are turned off.
Noise voltage pulses can set or reset (turn on or off) any stage in the register regardless of the condition of any other stage. Thus, more than one stage could be on at the same time, and, in this condition, when the first clocking pulse occurs, the logic would turn stage five on and all other stages off. The remaining five clocking pulses then could still shift to the on stage required by the light level seen by the photocell and no anomalous operation would result. Should the noise pulse occur - during the clocking cycle, however, there may not be enough clocking pulses left to shift the on condition back to the required stage. Since the effect of the noise pulse is to shift the on condition to stage five, slow shutter speed and overexposure can be expected to occur more often than fast shutter speed and underexposure.
Noise voltage on the power supplied to the register or generated by some intermittent condition in the camera must have switched one or more stages in the shift register on or off. The camera qualification test results and acceptance tests are adequate. No corrective action is necessary.
This anomaly is closed.
14-113
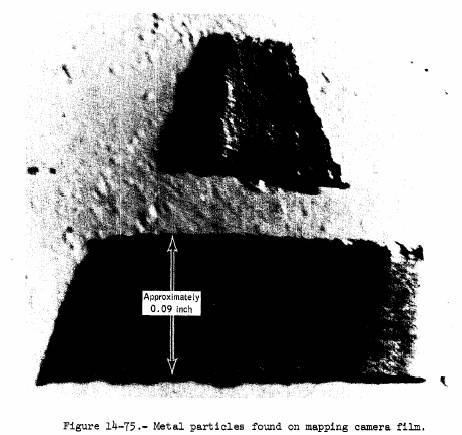
The contamination included many types of particles, most of them being metal chips of various sizes and shapes (fig. 14-75). There were also a few particles which appeared to be paint chips. Analysis of several of the metallic chips with a scanning electron microscope indicated that the chips were an aluminum alloy. The camera frame and cover are aluminum; however, consideration of the camera and cassette mechanisms plus visual examination of the particles indicate that the contamination was not caused by wear in the camera or cassette, but was more likely, either residue from manufacturing or introduced from some outside source, The Apollo 16 camera and cassette were tumbled and cleaned at the contractor's facility, and the camera again tumbled and cleaned at the Kennedy Space Center. Contaminate particles were removed in each case.
14-114
It is possible that some additional particles remained entrapped until the prolonged exposure to the zero-g environment during the mission. More thorough cleaning and inspection procedures are being implemented for Apollo 17. In addition, the special cleaning procedures which were developed for the Apollo 16 film will again be used with the Apollo 17 film.
This anomaly is closed.
Apollo 16 Mission Report - NASA MSC-07230, August 1972
Apollo by Numbers - NASA SP-2000-4029, Spring 2001
Apollo 16 Technical Air-to-Ground Voice Transcript - NASA MSC-06802, April 1972

|
|
|
|
|
Apollo 15 Statistics and Performance |
Return to SIM Bay Cameras |
Apollo 17 Statistics and Performance |