
| Journal Home Page | Apollo 11 Journal |
| Journal Home Page | Apollo 11 Journal |
During 2009, one of us (VP) got interested in precise photogrammetry of Apollo photos; and, through several Russian forums, got an opportunity to collaborate with a person nicknamed "N.A.", who was using photogrammetric software ImageModeler to identify and locate several boulders visible in the direction of West Crater in the Apollo 11 surface photography. Although, ImageModeler is intended for architectural purposes, but it is useful for photogrammetry of the Apollo images. It has a few drawbacks. For example, it sometimes has trouble with photos containing only benchmark points distributed on a relatively planar surface - such as parts of the lunar surface - a problem that can be remedied by the introduction of virtual benchmarks a few meters above the surface. ImageModeler also can become stubborn or even unstable when the number of features in the scene under construction gets large. Nonetheless, ImageModeler is excellent software for obtaining good quantitative results in a simple way.
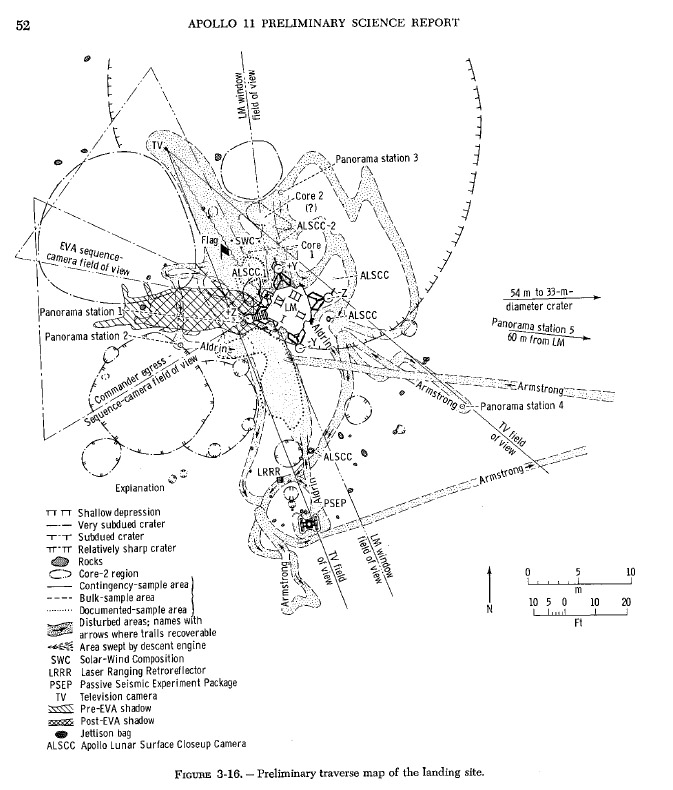
Figure 3-15 in the Apollo
11 Preliminary Science Report is a camera-station map
compiled by R.M. Batson and K.B. Larson at the USGS soon after the
mission. (A camera station is the location of the camera
when a particular photo was taken.) The map is dated 11
August 1969. See, also, a re-drafted, color version by ALSJ Contributor
Thomas Schwagmeier. The methods used by Batson and Larson
were necessarily simplistic but were chosen to allow rapid
compilation of a map adequate for the Preliminary Science Report
and for other early studies of the landing site. They wrote
in the Preliminary Science Report:
The surface traverse and sampling activities of the astronauts have been reconstructed from clues provided by the voice transcript, from review and analysis of the lunar television pictures, from analysis of the 16-mm pictures taken with a time-sequence camera mounted in the LM cockpit, and from detailed study of photographs taken with Hasselblad cameras before, during, and after the EVA. The camera stations for Hasselblad survey panoramas taken on the EVA were located by photographic triangulation from mosaics. Horizontal angles between the LM footpads were measured on the photographs as a function of the known field of view, and the angles were drawn on tracing paper. The paper was then manipulated over a scale drawing of the LM until the lines intersected the appropriate pads at the proper place. Once the panorama locations had been determined, azimuths were measured from two or more panoramas to conspicuous features on the surface, and the positions of the features were plotted by triangulation to produce the map of figure 3-15. Individual photographs were located, and their orientations were measured by similar methods, using for control both the LM footpads and other features on the lunar surface that had been located by triangulation from the panoramas.
Because the graphical method by which these data have been obtained is fairly crude, azimuths shown for individual frames may have errors of 3° or more. Positions of most of the camera stations are probably within a 1.5-m circle centered at the point shown. The determinations are sufficiently accurate, however, to provide a useful control net for an overall view of the astronauts' traverse and a starting point for more rigorous analytical photogrammetric measurements.
A 1978 USGS/Defence Mapping Agency site map, discussed in section 2.3, is probably derived from the "more
rigorous analytical photogrammetric measurements" for which time
became available in the years after Apollo ended.
Visual study of the 1969 map convinced VP that it is quite schematic and not very precise.
An initial photogrammetric
analysis with ImageModler produced improved locations and
orientations for each image, along with locations for
boulders and the US Flag, TV, LRRR, and PSEP. The initial
analysis made use of 116 of the 123 photos Neil and Buzz took
during the EVA. As
with the work of Batson and Larson, all locations are calculated
relative to structures on the LM. Of the seven images that were not used, 5904 is an accidental image of one of
the spacesuits, and is the only one of the 123 images that can
not be placed by any means. Five of the others are 5876
to 5880, photos documenting the bootprint penetration experiment
Buzz did for the soil mechanics experimenters. As discussed
in Section 5.2, the two bootprints Buzz made at this spot have
been identified in photos taken later in the EVA and out Buzz's
window after the EVA. This allows placement of the five
documentation photos, which are shown with empty arrowheads.
Finally, 5966A is the second of seven images exposed when Neil
advanced the film at the MESA, before removing the magazine.
It shows only an underexposed, blurred image of the MESA interior
but can be placed with confidence close to the MESA. 5966A is also
shown with an empty arrowhead.
Of the 116 images used in the
initial photogrammetric analysis, the eight photos Neil took
near the southwest rim of Little West, 5954-61, were not
accurately placed because the locale is up-Sun of the LM
and because only distant benchmarks can be identified in the Pan 5
images. However, as is
discussed more fully in section 2.1.5, these eight stations can be
placed with good accuracy using local photogrammetry and specific
features seen in both the Hasselblad images and LROC images of the
site. The Pan 5 images are shown with empty arrowheads.
In summary, accurate camera-station locations were determined in
the overall photogrammetric for a set of 108 out of the 123 photos Neil and Buzz
took during the EVA.
Seven of the 108 are LM
inspection photos that were not shown on the 1969 map. Of
the remaining 15 images, 14 could be placed using local
photogrammetry and/or other information. Of the 123 EVA
photos, only 5904 could not be placed at all.
Note that the map also
includes the rims of Double Crater and eight small small
craters. These rims were defined using photgrammetric
determinations of the locations of small rocks on the
rims. These craters are discussed in Section 4.4.
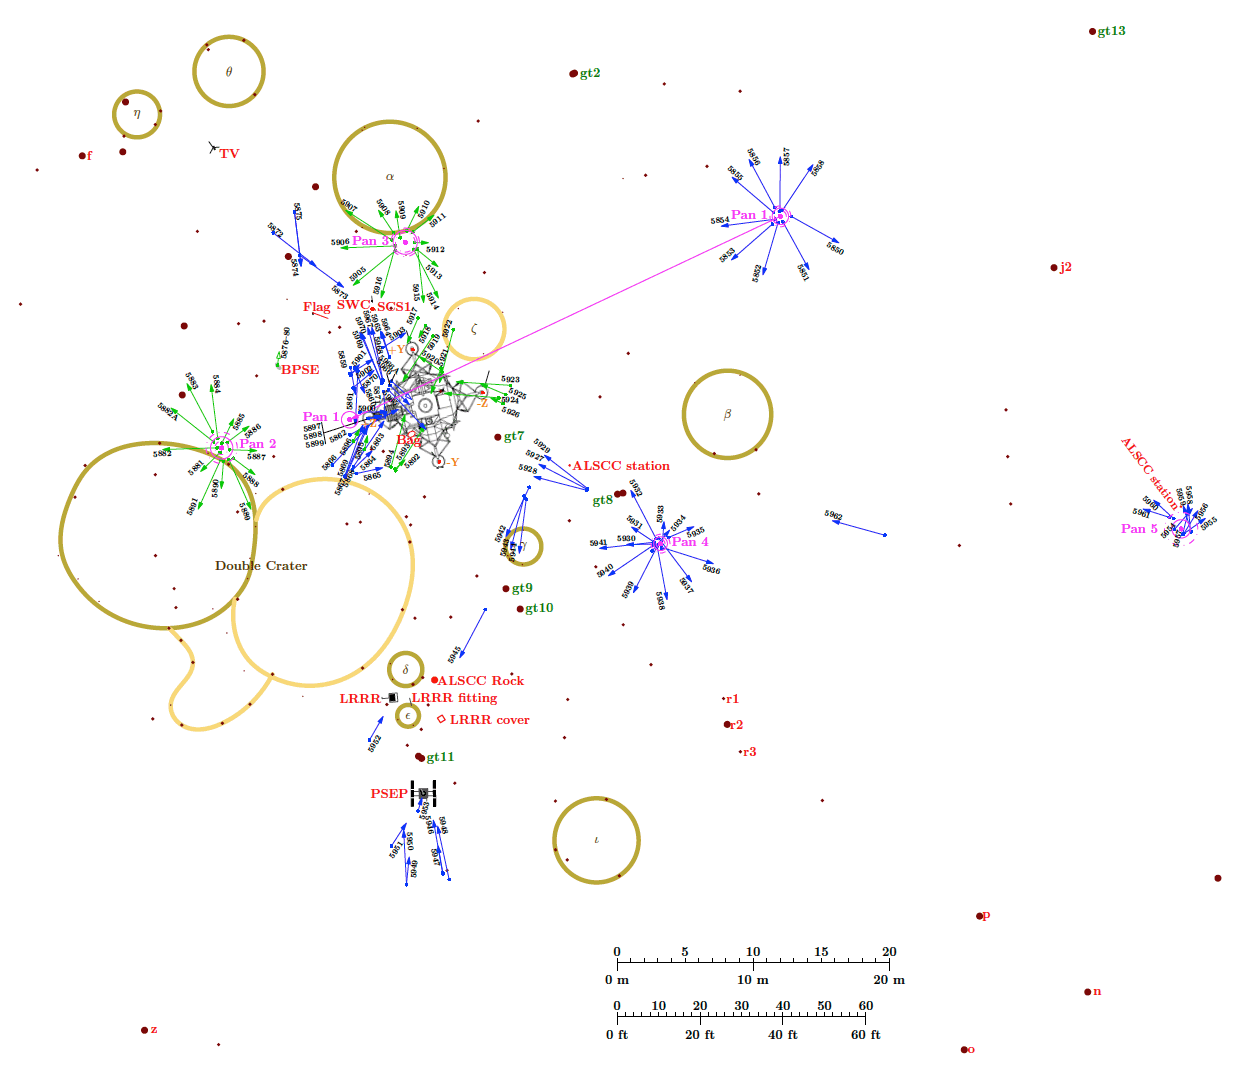
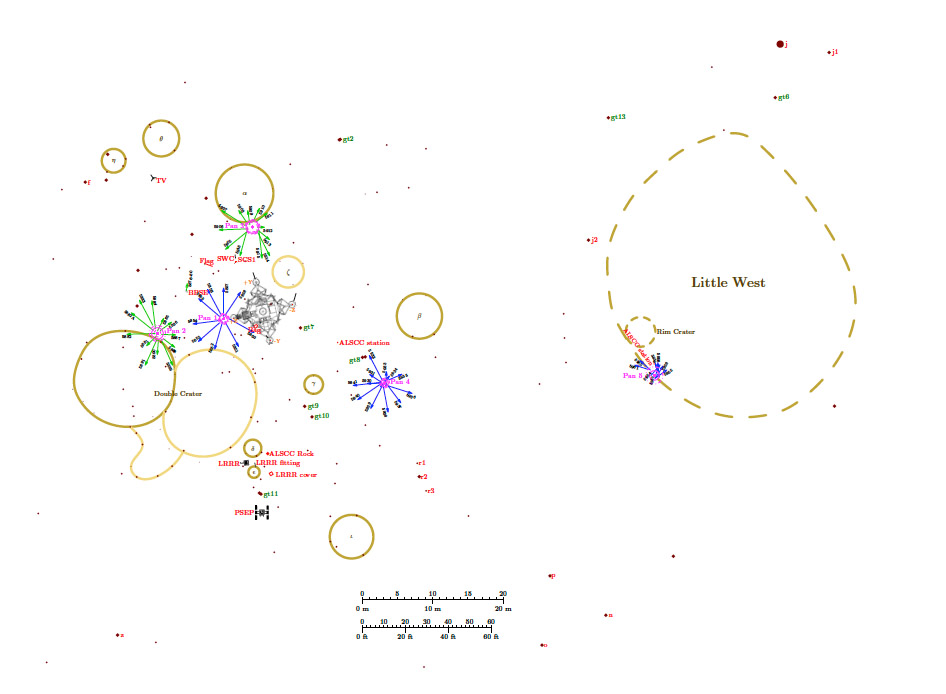
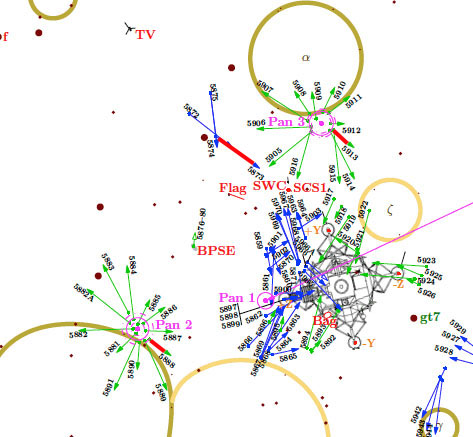
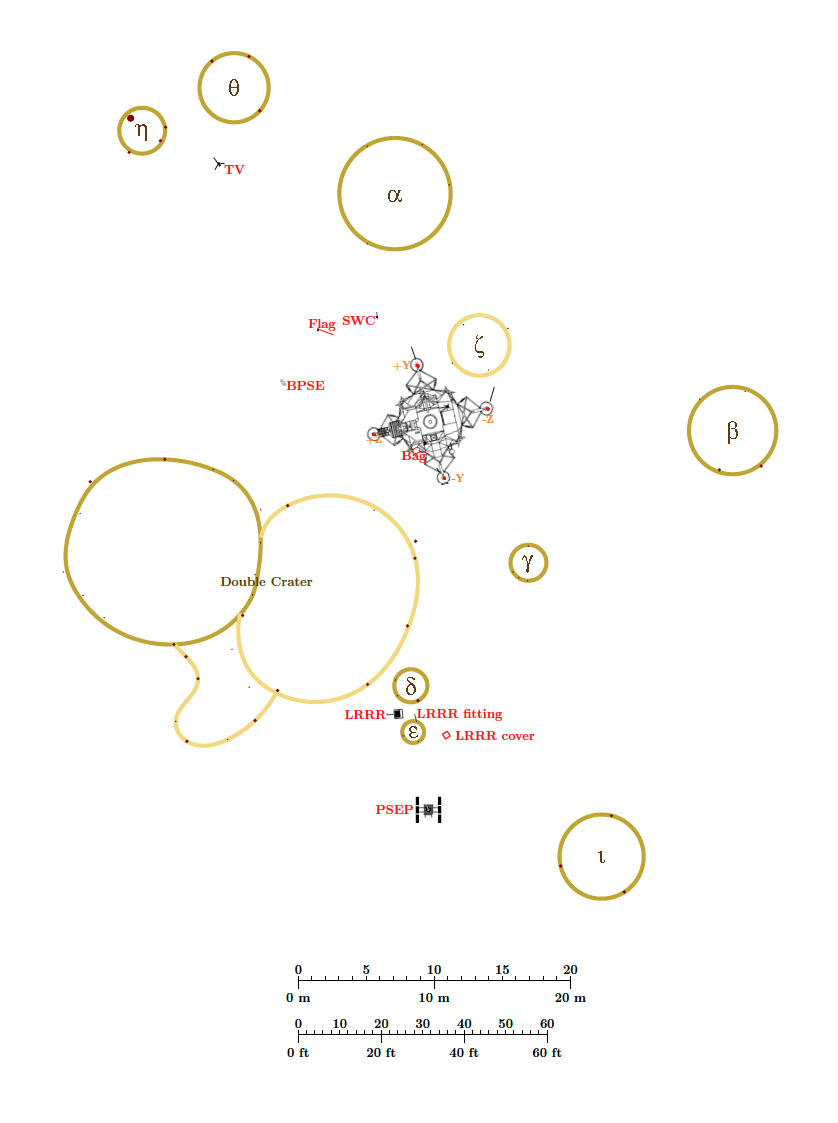
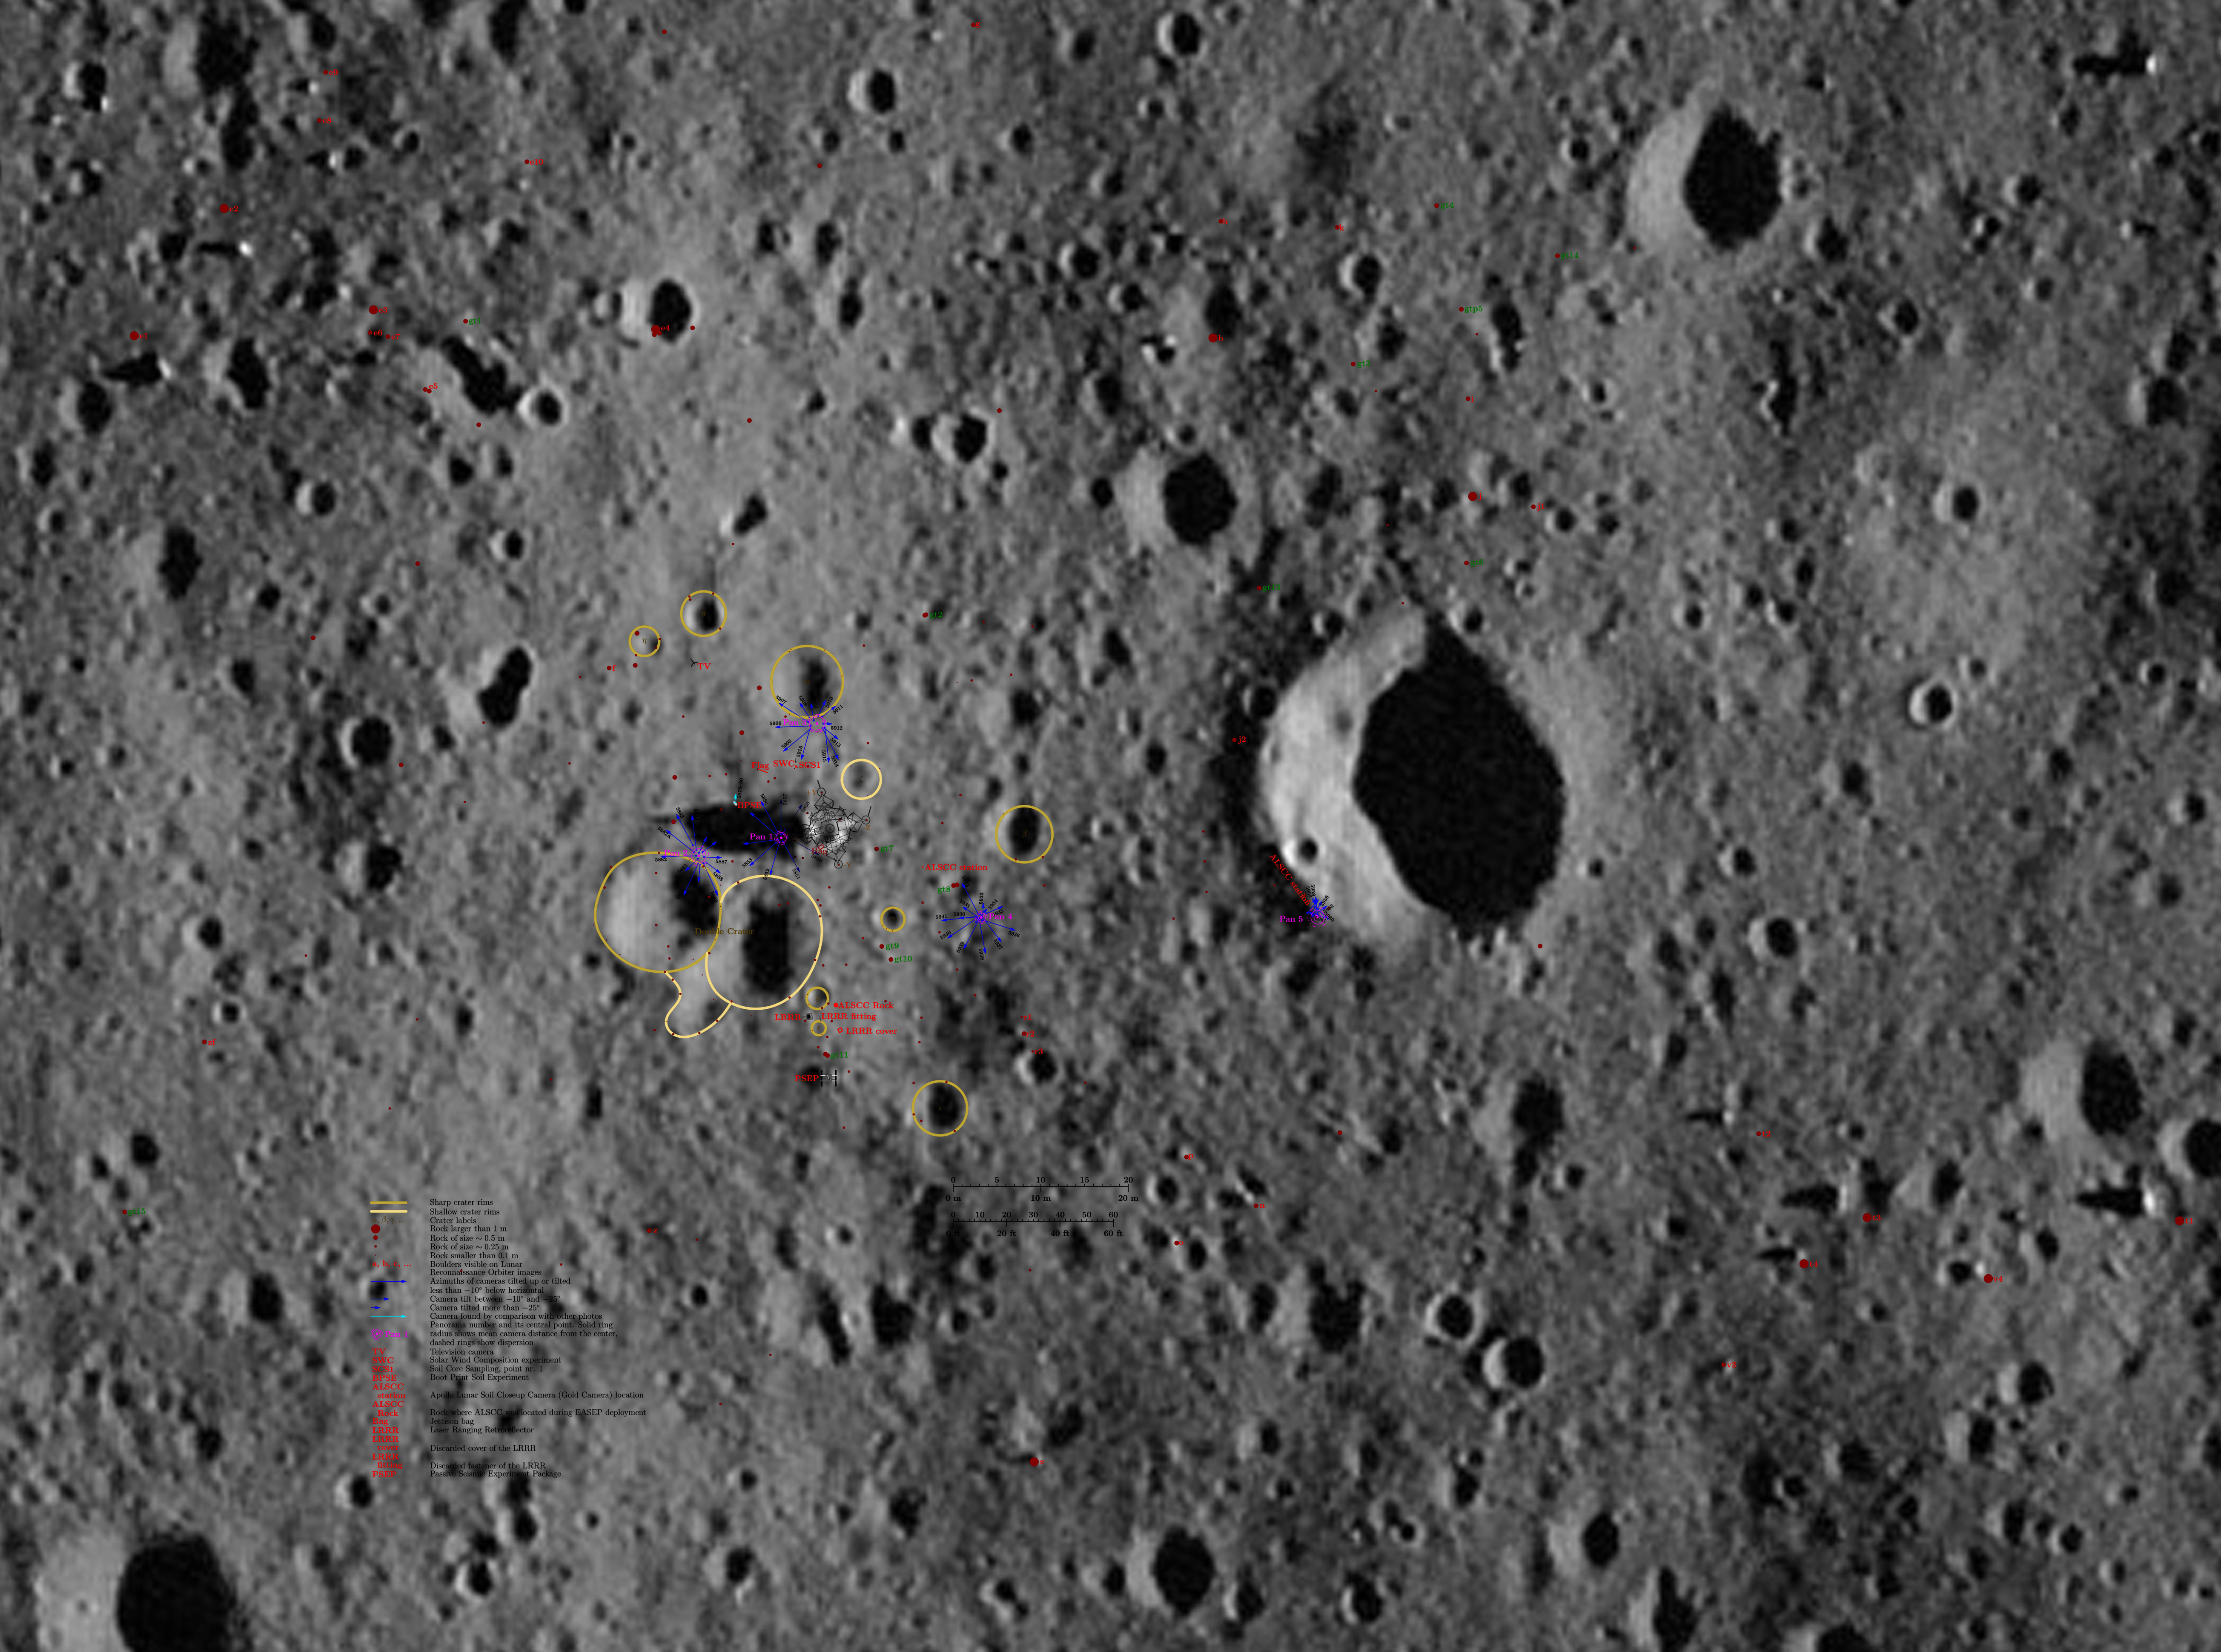
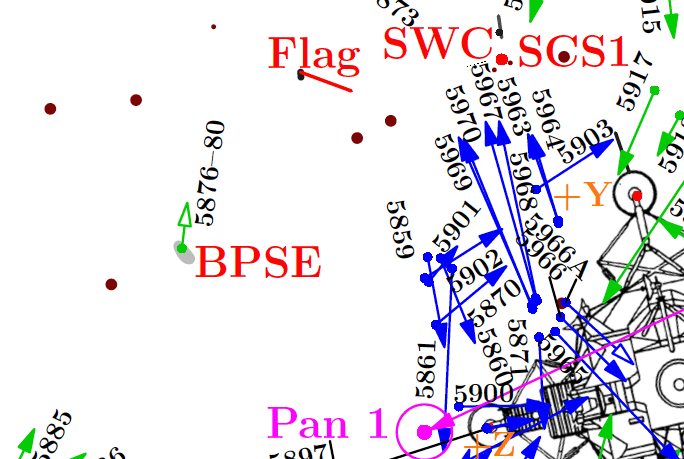
| This 24 January 2012 revision of the Apollo 11 camera-station map is based on photogrammetric analysis done for 116 of the 123 Hasselblad images taken during the EVA. Six others were placed by alternate means. Only one photo, 5904, could not be placed. The arrows show azimuthal pointing of the images, with arrow length indicating vertical tilt. Each small dot represents a location for a camera station (blue) or a rock (red). Boulders labeled with Roman letters can be identified in LROC images. For Pans 1, 2, 3, and 4, all of the camera locations and orientations were calculated in the overall photogrammetric analysis. The Pan 5 stations were determined in a separate analysis discussed in Section 2.1.5. In each panorama, the central location of the stations is plotted as a violet dot. A violet circle shows the characteristic distance of the stations from the pan's central point; and the dashed circles indicate mean-square deviations. Because of the large number of camera stations near the LM ladder, Pan 1 information has been moved to an empty area northeast of the LM. See, also, an animated comparison between the original 1969 map and the revision. The major differences are: (1) the locations of the LRRR and PSEP and associated camera stations, which are farther south of the LM in the new map than in the original; (2) camera station locations near the MESA (Quad IV) on the northwest side of the LM; and (3), the detailed distribution of camera stations within each panorama are now available. (Click on the image for the full map in PDF format.) |
| Camera stations for the five panoramas. For each pan, the central location of the stations is shown with a violet dot and the characteristic distance from that central point is shown with a violet circle. Mean-square deviations are indicated by dashed circles. Azimuth arrows for photos taken by Neil are in blue; those taken by Buzz in green. (Click on the image for a larger version in PDF format. See, also, an overlay on the Dec 2009 LROC image, M116161085R) |
| Pan No. and Location |
No. of frames |
Frame Sequence (AS11-40-) |
Characteristic distance from central point (meters) |
Mean-square deviation (meters) |
| Pan 1, Foot of LM ladder |
9 |
5850-5858 |
0.60 |
0.16 |
| Pan 2, 10m west of ladder
foot pad, on the rim of Double Crater |
12 |
5881, 5882, 5882A, 5883-5891 |
0.82 |
0.33 |
| Pan 3, 10m north of
plus-Y(north) footpad |
12 |
5905-5916 |
0.89 |
0.16 |
| Pan 4, 20m southeast of SEQ
Bay |
12 |
5930-5941 |
0.51 |
0.18 |
| Pan 5, rim of Little West
Crater (partial) |
8 |
5954-5961 |
0.66 |
0.30 |
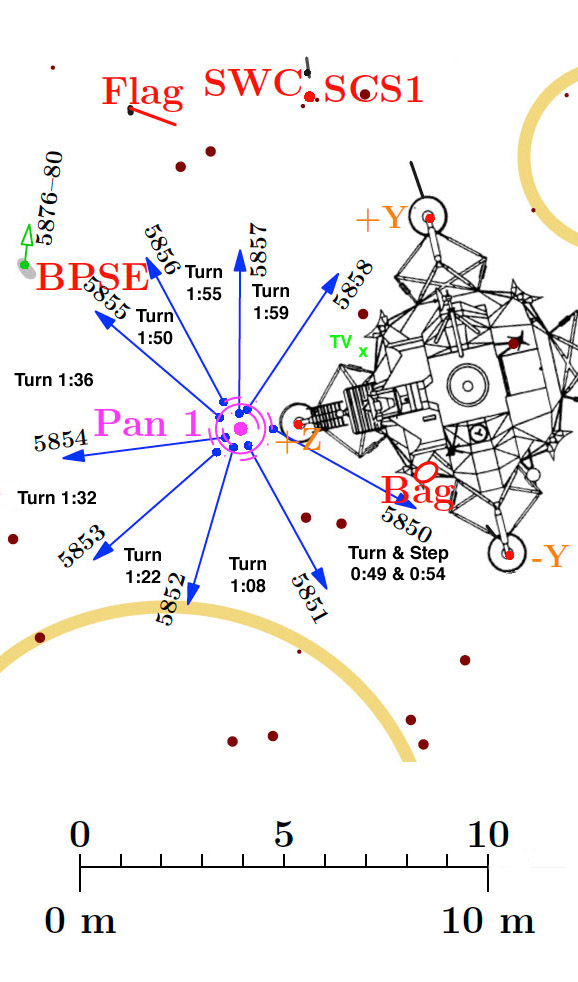
| Pan 1 camera-station map, with the location of the MESA-mounted TV camera marked (x). Times when Neil turned to his right between frames are discussed in the text. (Click on the image for a larger version.) |
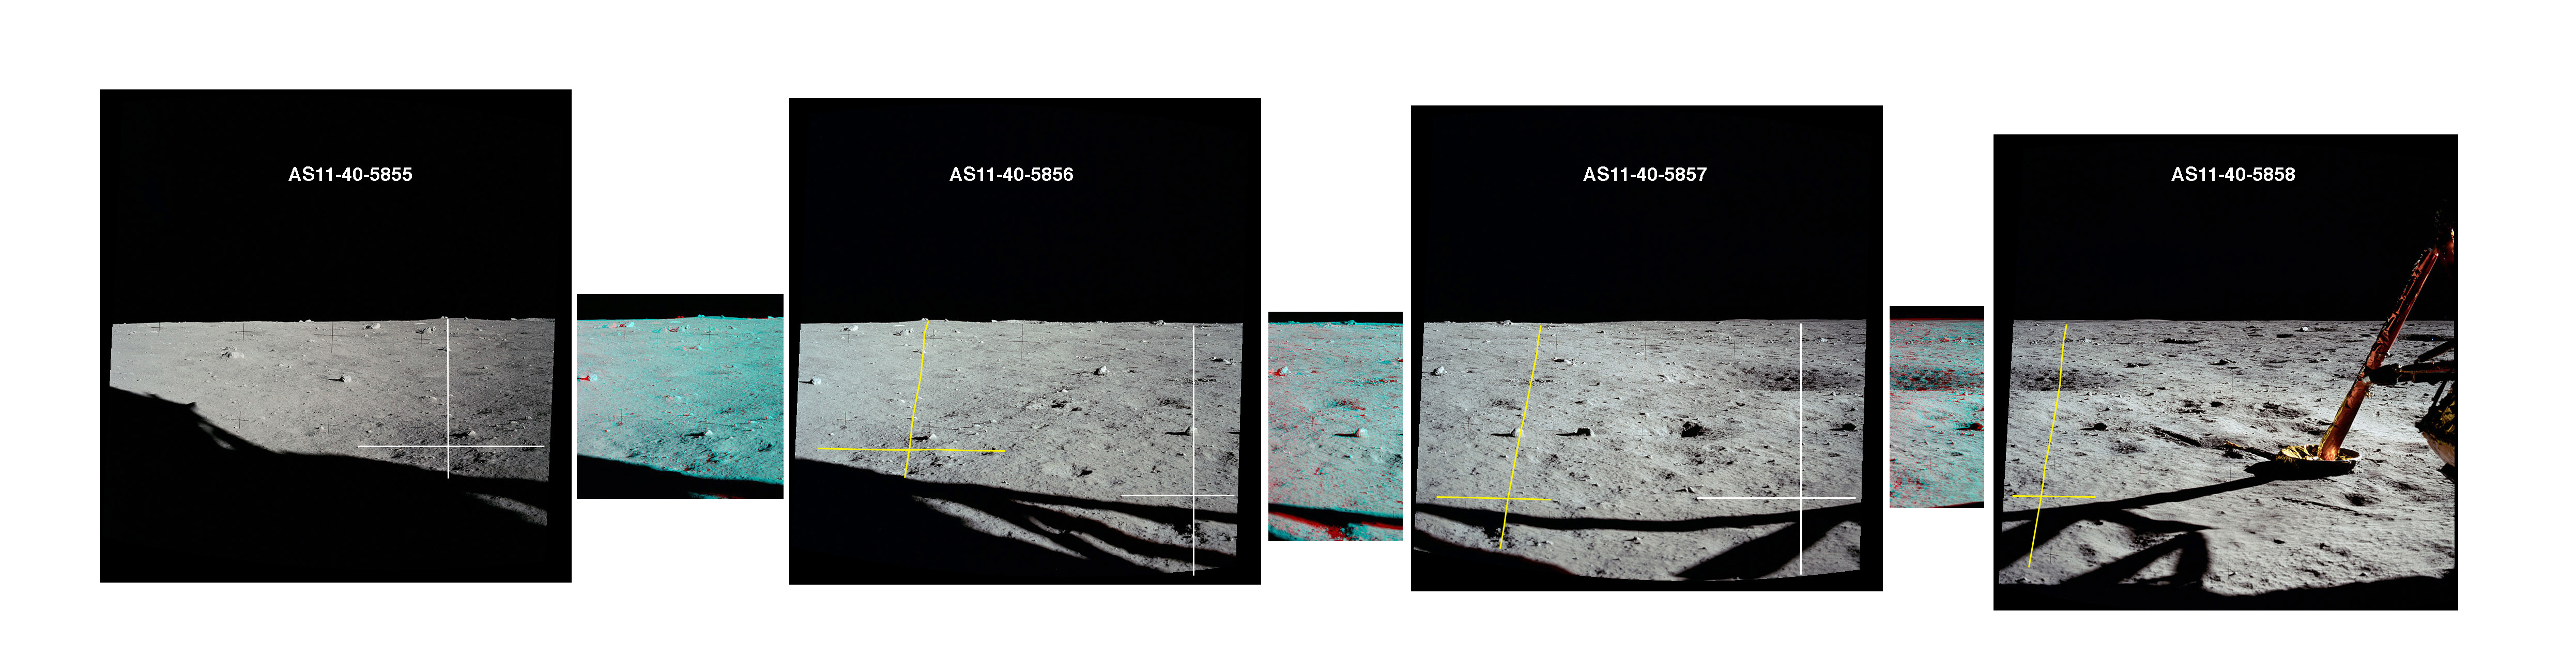
| Side-by-side comparisons of images 5855-58, indicating that, as Neil turned to his right between frames, the center of the film plane also moved to the right. In these three pairs, Neil got enough overlap to provided unintended stereo. An anaglyph is displayed between each pair. Note the effect on the vertical yellow line of the crater on the left in 5858. Comparison of the horizontal white and yellow lines indicate that Neil did not moved noticeably forward or back during this sequence. (Click on the image for a larger version.) |
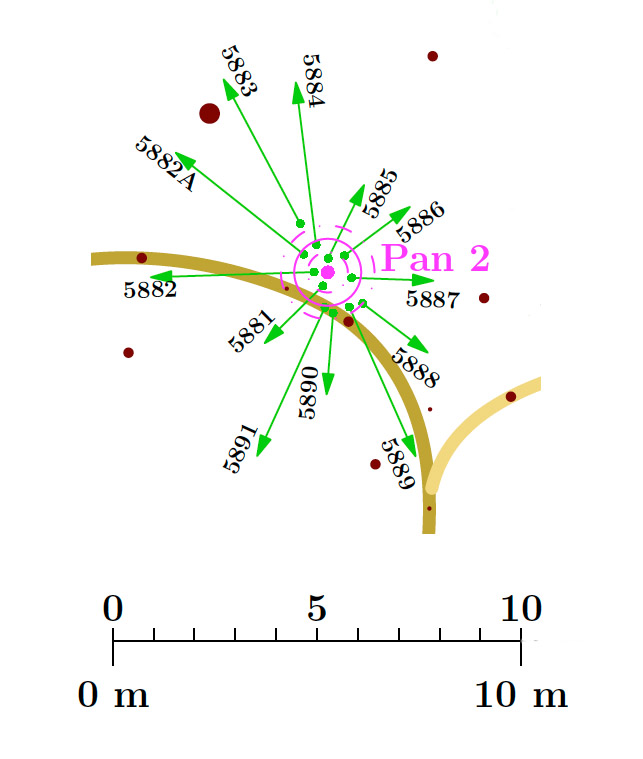
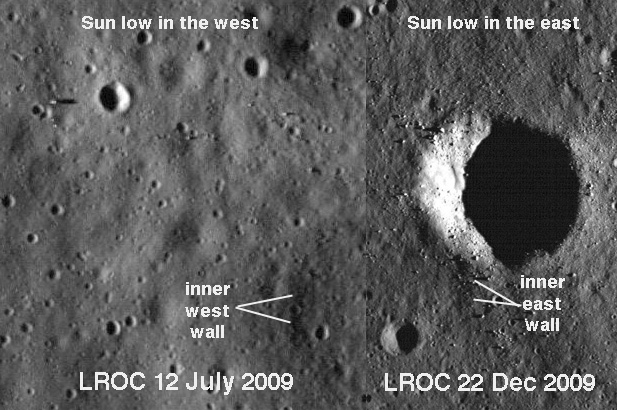
| Pan 2 camera station map. The distribution of stations is elongated roughly along the trend of the raised crater rim, indicating that Buzz was careful where he stood. The rim of the western component of Double Crater is drawn at the outer edge of the relatively steep inner wall. (Click on the image for a larger version.) |
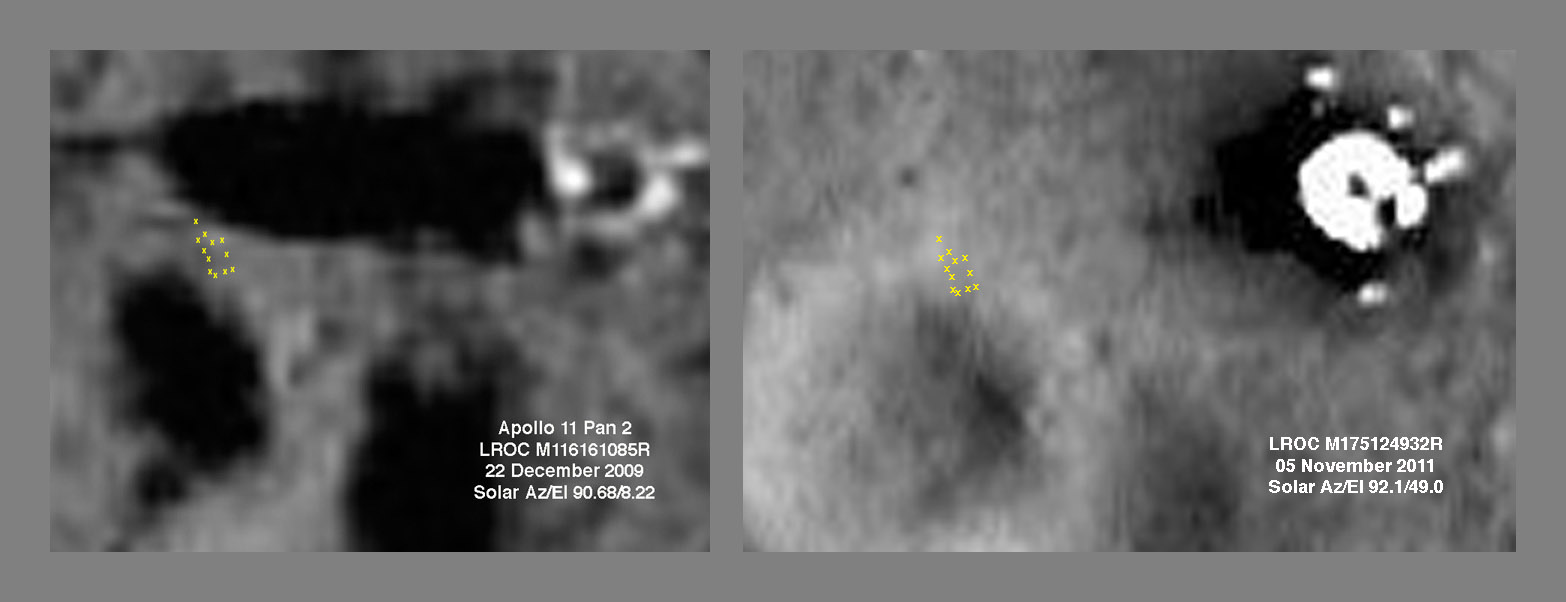
| Superposition of the Pan 2 map on a deconvolved detail of LROC image M116161085R provided by GoneToPlaid and a detail from M175124932LR. M116161085R was taken with the Sun low in the east and emphasizes the break in slope at the top of the inner, eastern wall of the crater. The elongation of the pattern of camera stations along the crater rim suggests that Buzz was careful about where he stood. (Click on the image for a larger version.) |
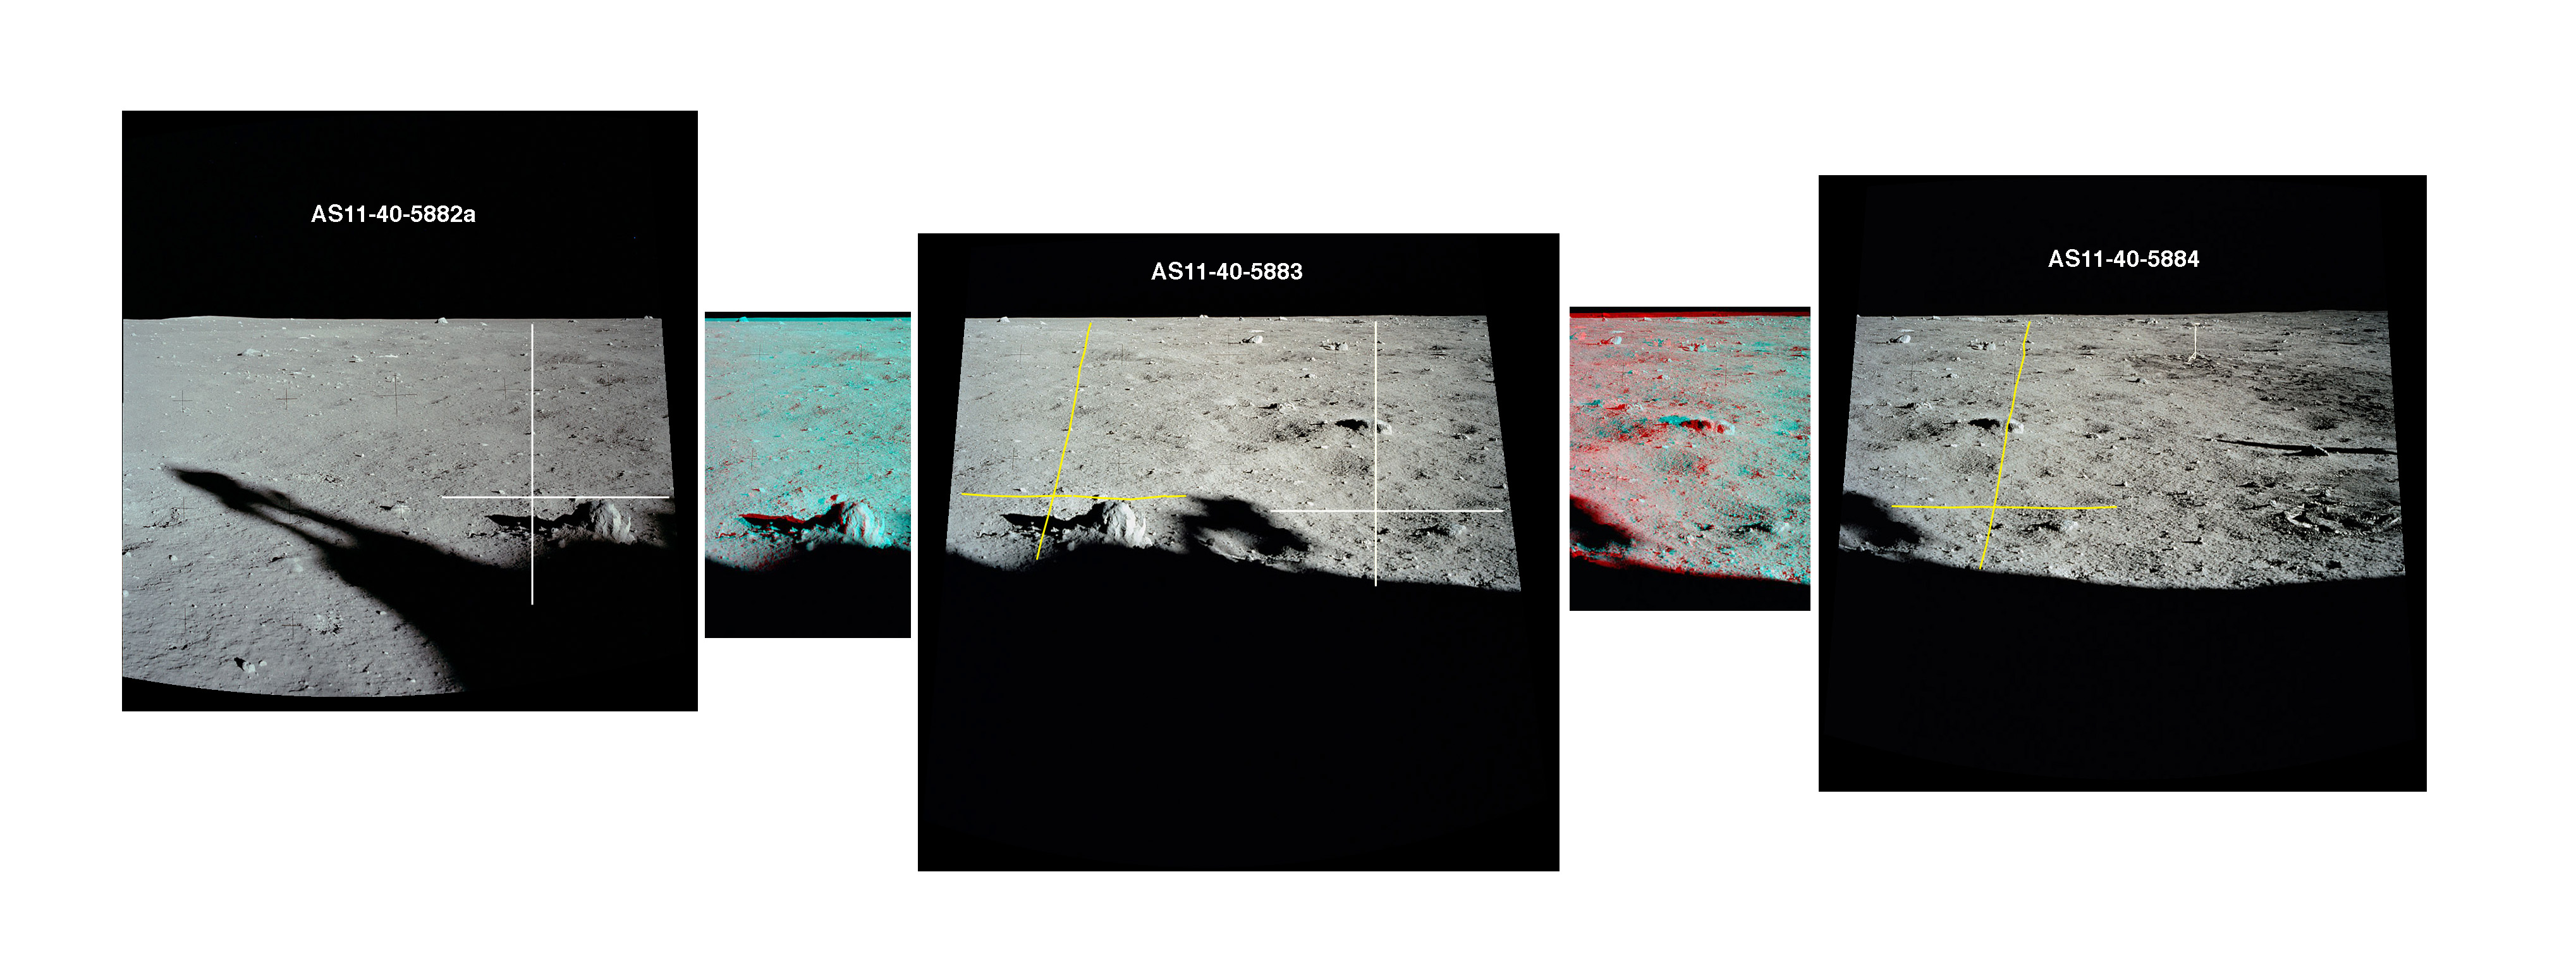
| Side-by-side comparison of frames 5882a to 5884, showing the view from northwest to north. Although the camera station map suggests that Buzz took 5883 forward of both the 5882a and 5884 locations, comparison of the horizontal white and yellow lines within each pair do not support that conclusion. The indicated relative error of the photogrammetrically-determined 5883 location is about 1 meter. As expected, both vertical yellow lines slope downward to the left. (Click on the image for a larger version.) |
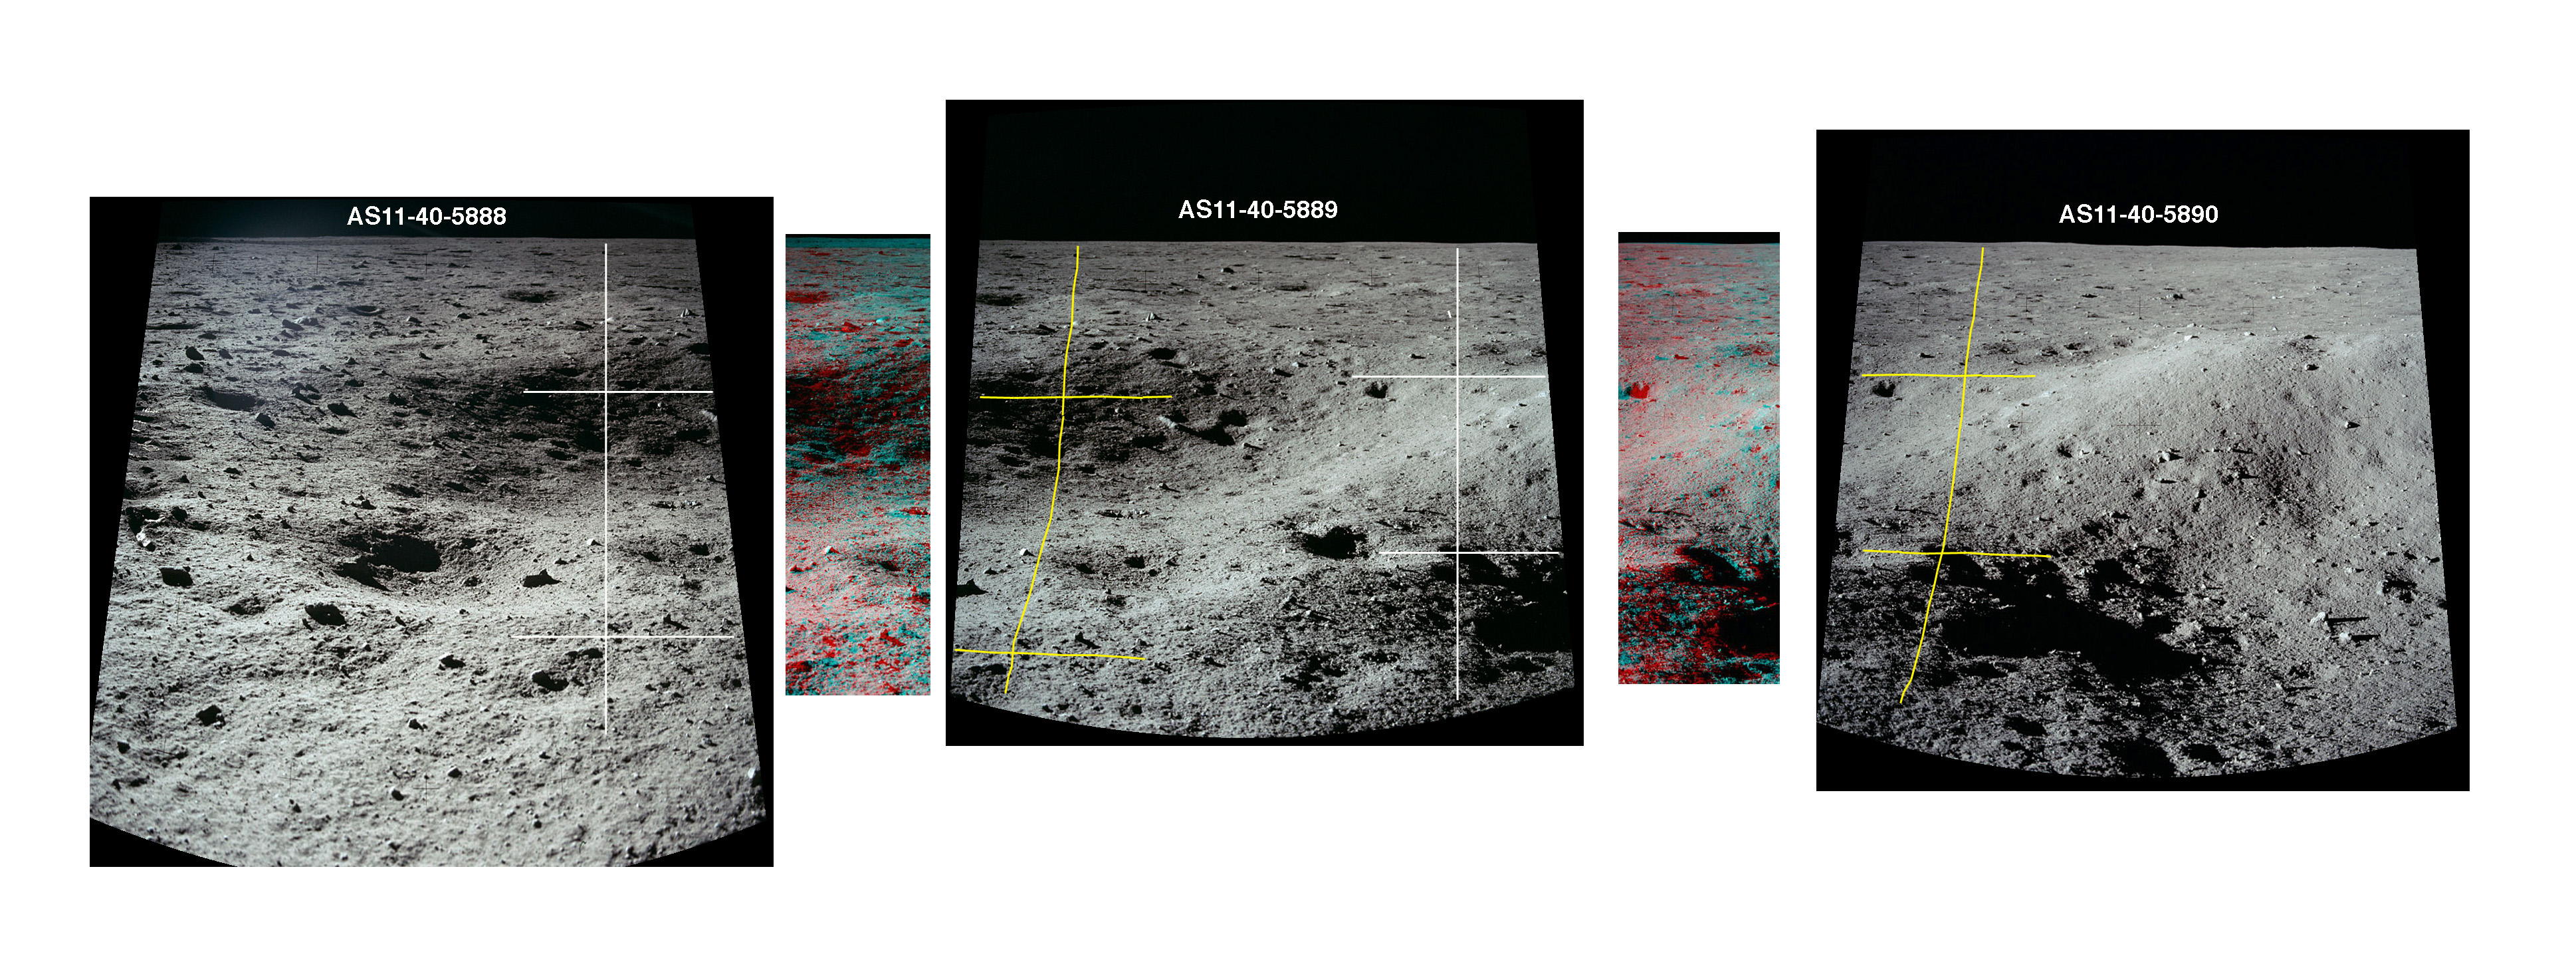
| Side-by-side comparison of 5888-90 showing the eastern component of Double Crater and part of the western component. The yellow horizontal line in 5889 is lower than its white counterpart in 5888, indicating that Buzz moved a bit forward between the two frames. Note the significant effect of the craters on the shapes of the vertical yellow lines. (Click on the image for a larger version.) |
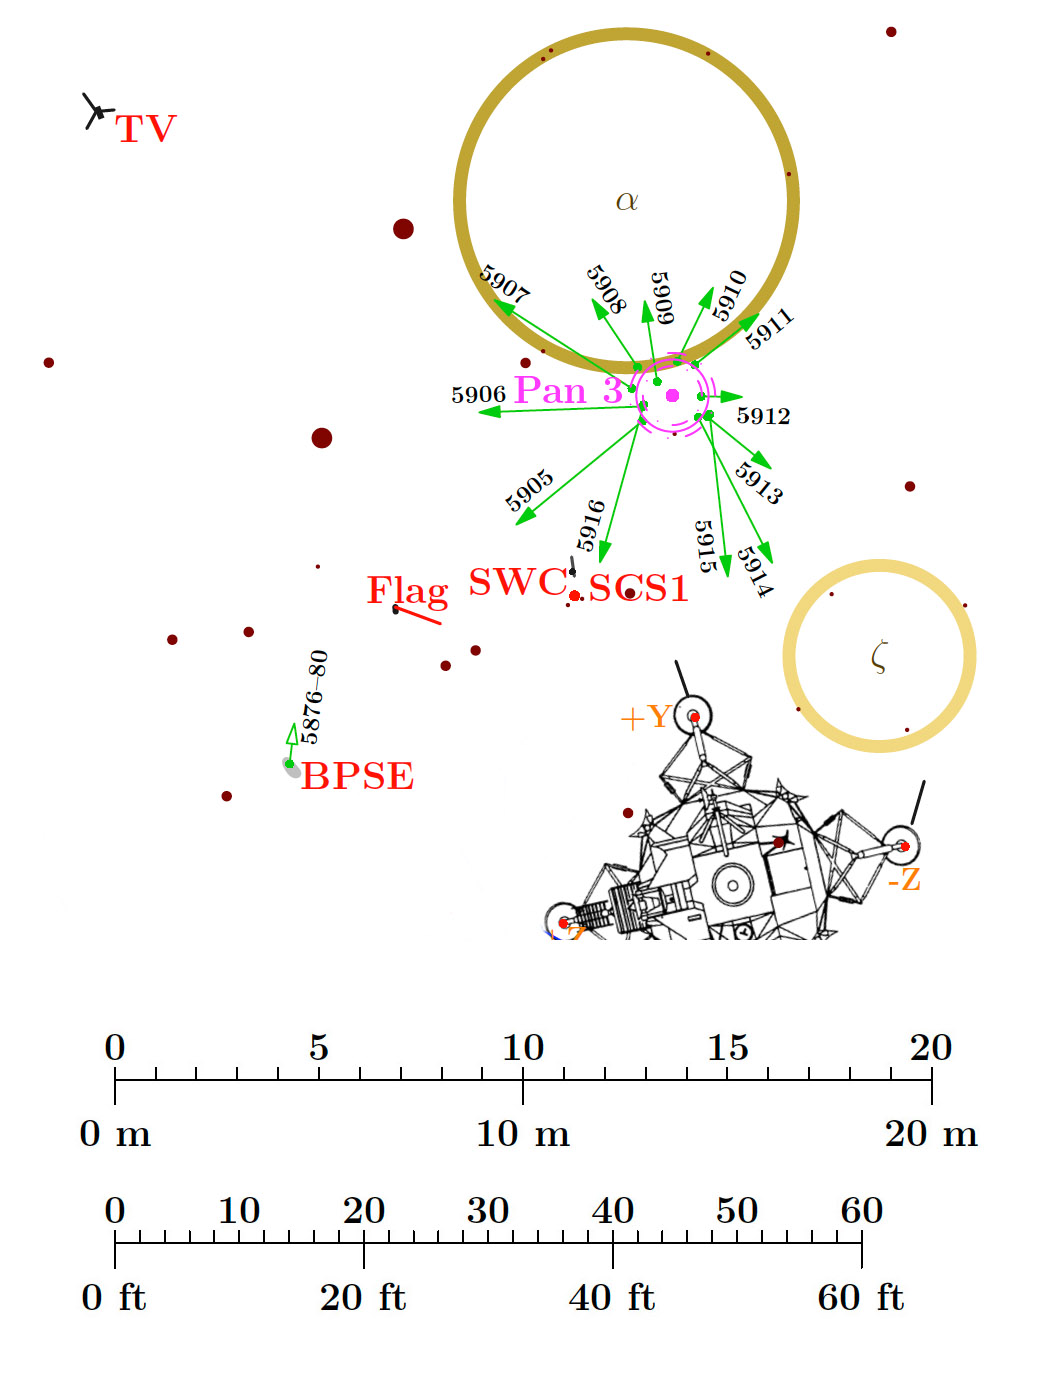
| Pan 3 Camera Station Map. Buzz took this pan about 8 meters north of the plus-Y footpad, on the rim of an 8-m crater. A labeled detail from the 22 December 2009 LROC image shows the camera station location relative to the crater. (Click on the image for a larger version.) |
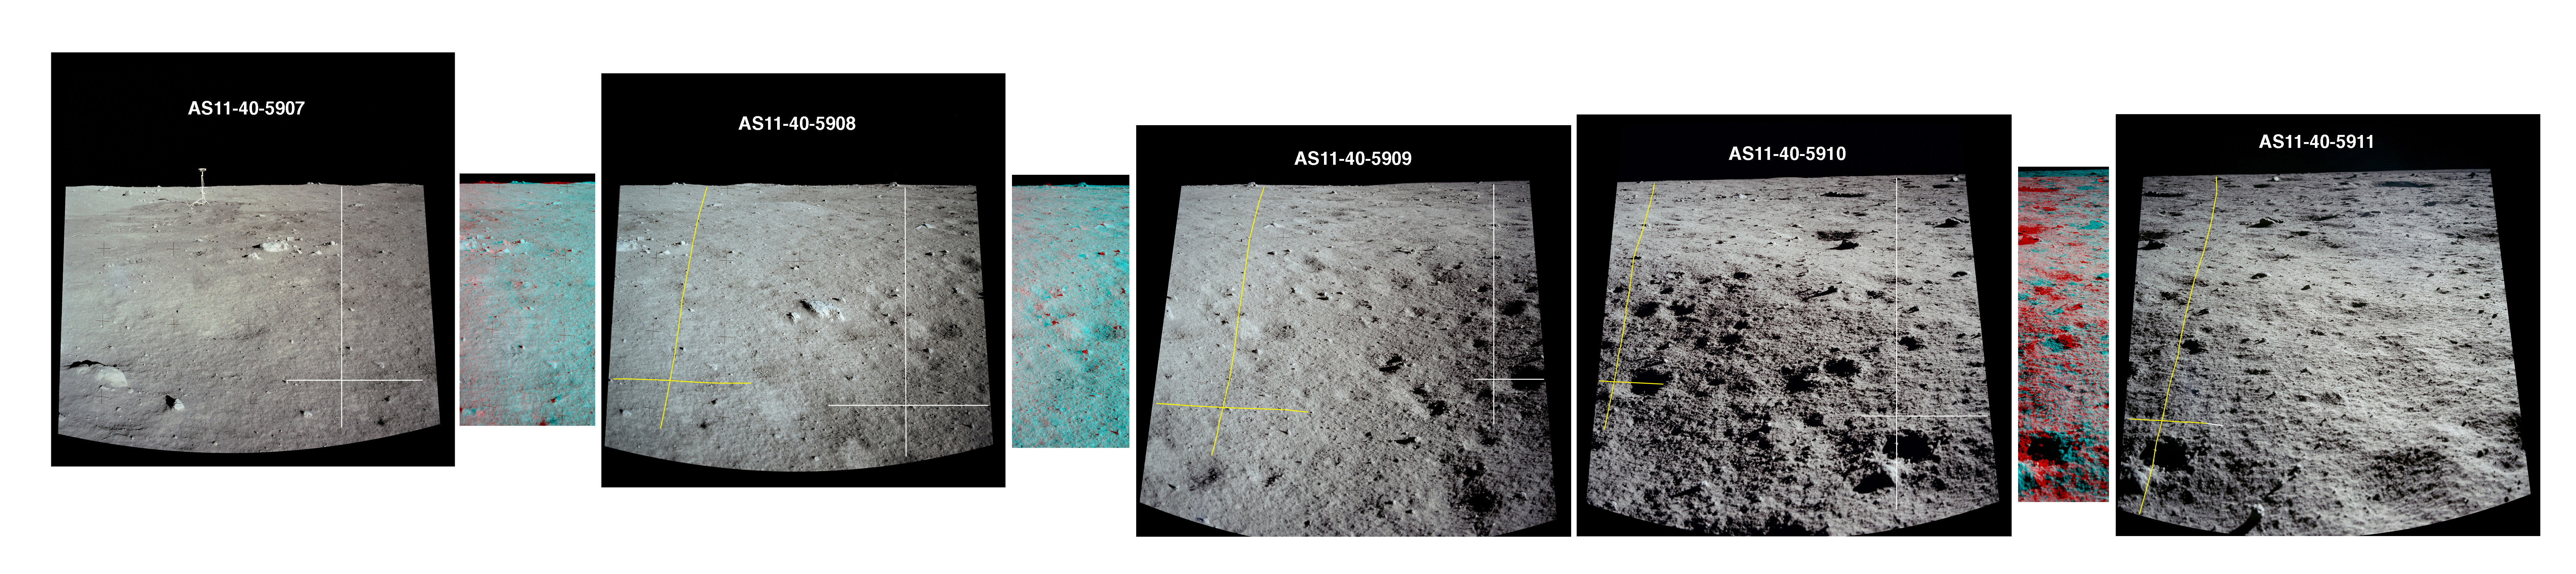
| Side-by-side comparions for 5907-11 (mini pan), covering the Pan 3 crater, labeled "α" in the camera station map. The crater isn't very deep, so it doesn't have as large an effect on the vertical yellow traces as Double Crater did in the Pan 2 comparisons. The photogrammetric map indicates that Buzz moved back between 5908 and 5809, and then forward again before taking 5910. The side-by-side comparisons do not support that result. The implied position error is about 0.5 m. (Click on the image for a larger version.) |
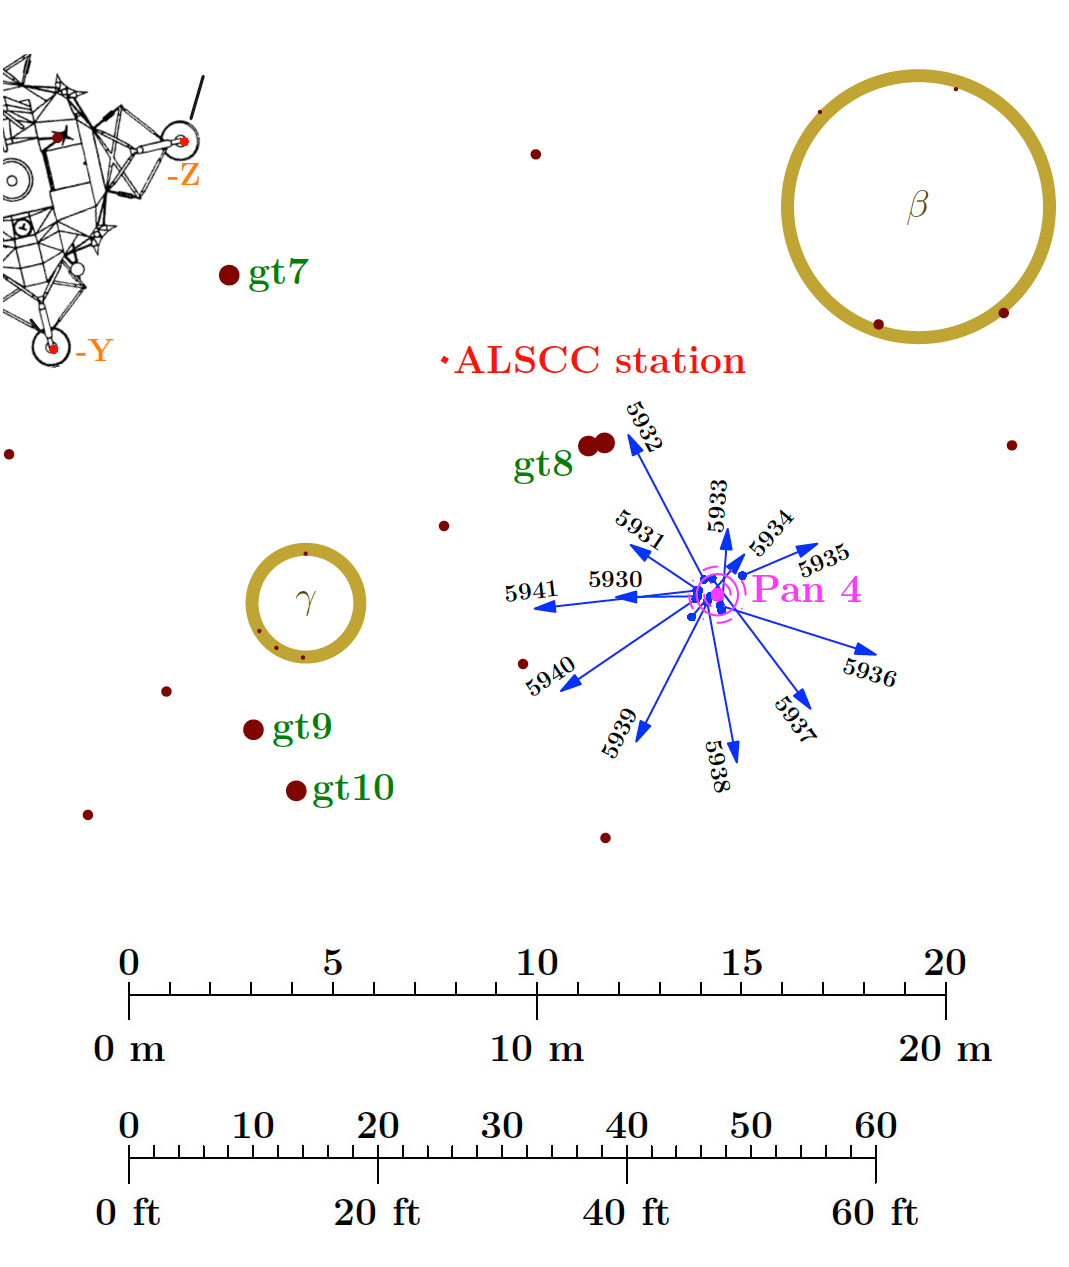
| Pan 4 Camera Station Map. Neil took this pan about 17 meters from the SEQ Bay on an azimuth about 30 degrees south of east. (Click on the image for a larger version.) |

| Side-by-side comparisons of frames 5930 to 34. In the photogrammetric analysis, the 5933 and 5934 camera stations are not part of a well-ordered sequence comparable to those of Pan 1 and Pan 3. The side-by-side comparisons demonstrate that Pan 4 was, indeed, taken in a very orderly fashion and, that, as expected, the scatter in the photogrammetrically-determined locations is due to the availability of only distant boulders for doing triangulation. (Click on the image for a larger version.) |

| Side-by-side comparisons for frames 5937 to 41, plus 5930. This sequence tells the same story: Neil took a well-ordered pan. Note that Neil actually took 5941 from a spot to the right of 5930. To make a comparison with 5930 attached to the end of the sequence, the white lines were drawn in 5930 and the yellow traces on 5941. Because of Neil's shadow, two vertical lines were used. Note that the vertical displacements of the horizontal lines in 5930 and 5941 indicate that Neil ended the pan a very short distance back from where he started. (Click on the image for a larger version.) |
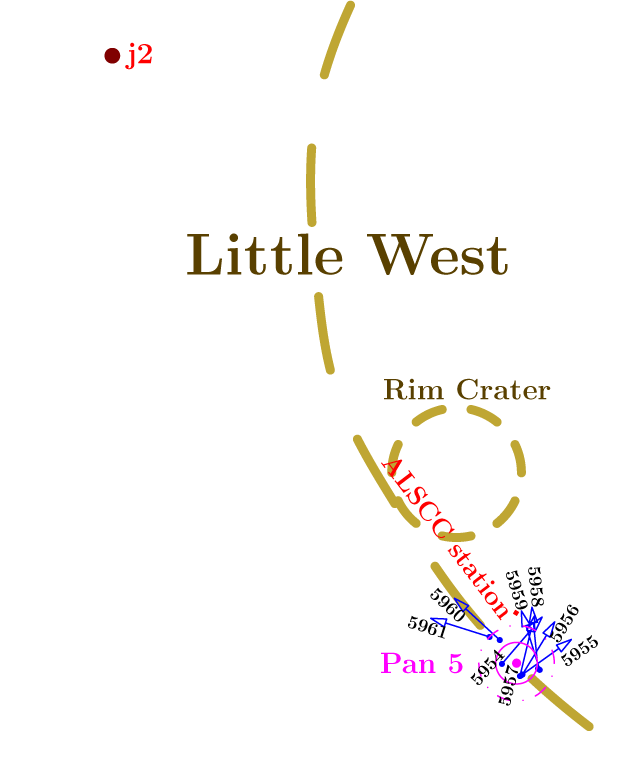
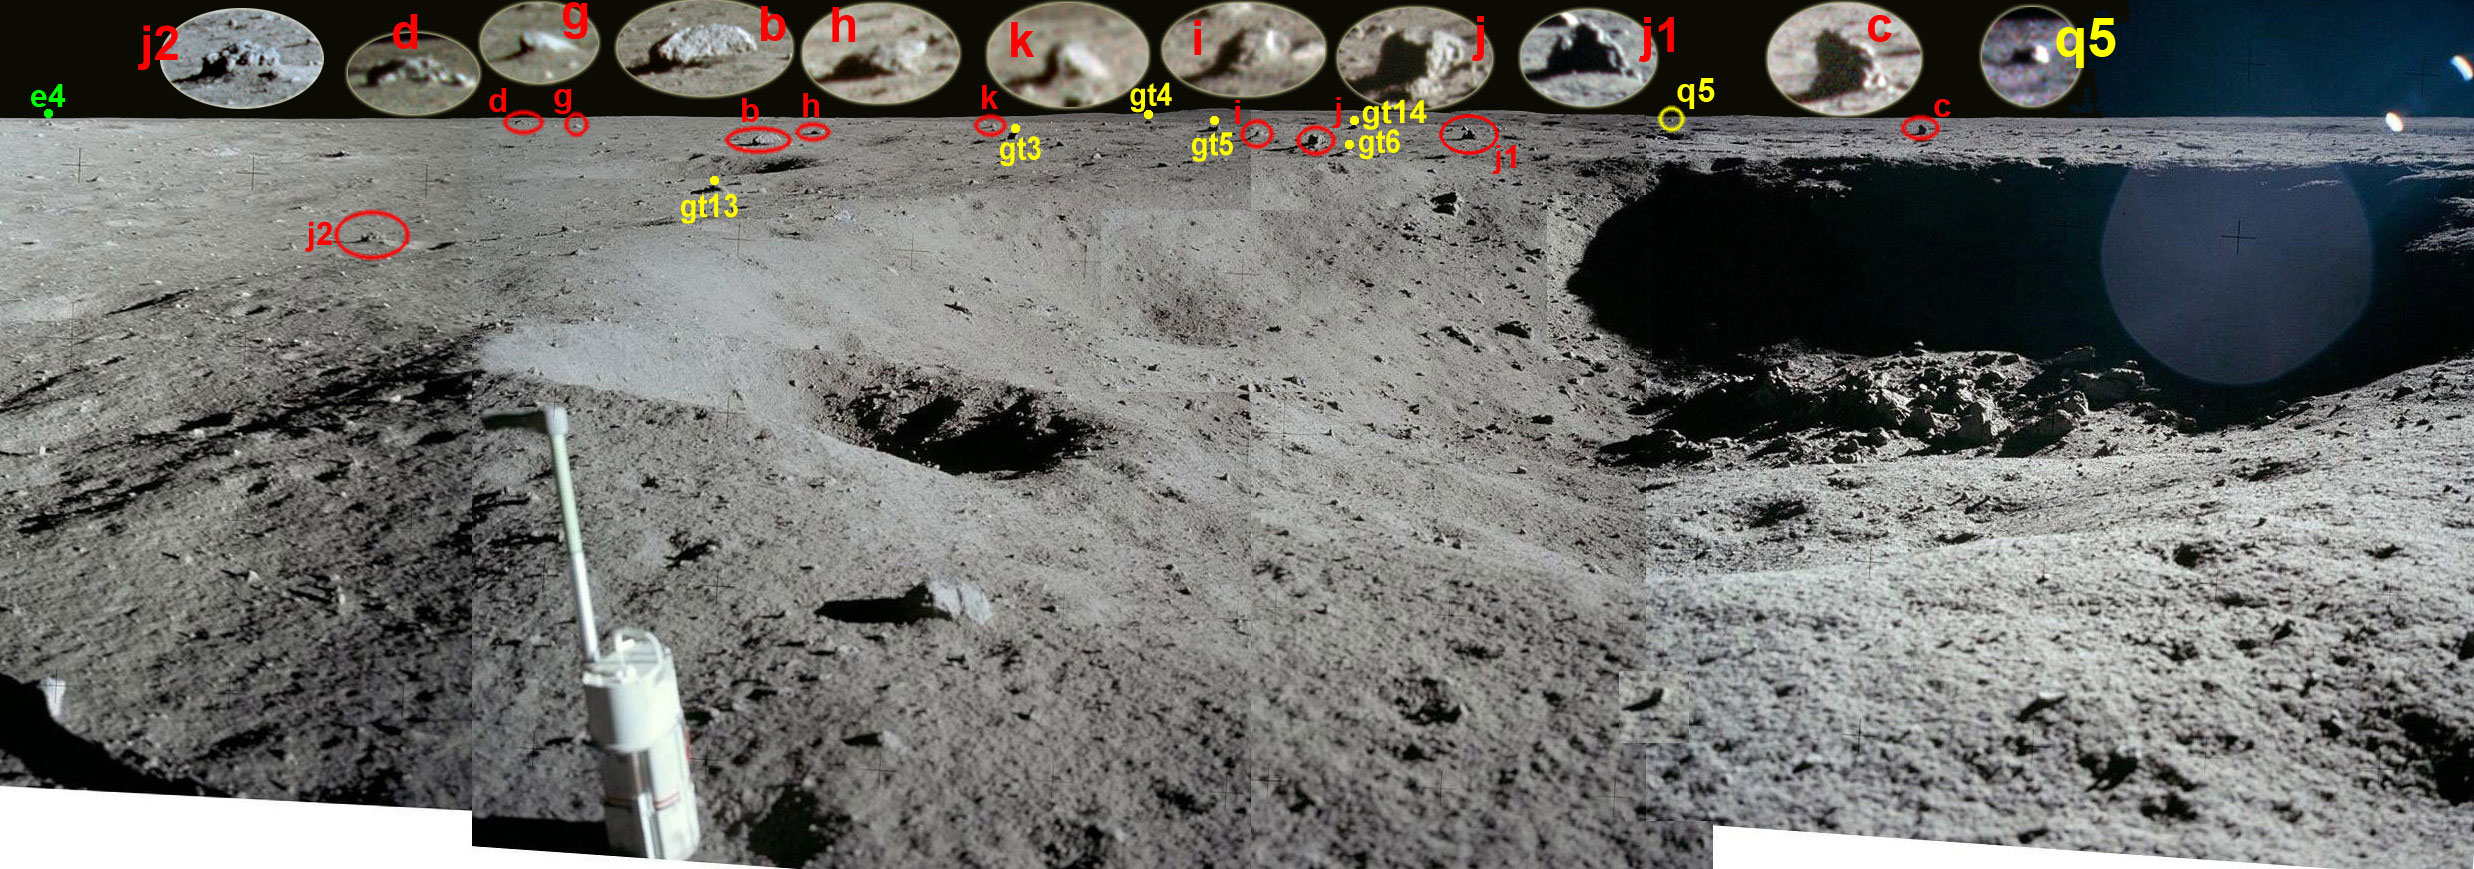
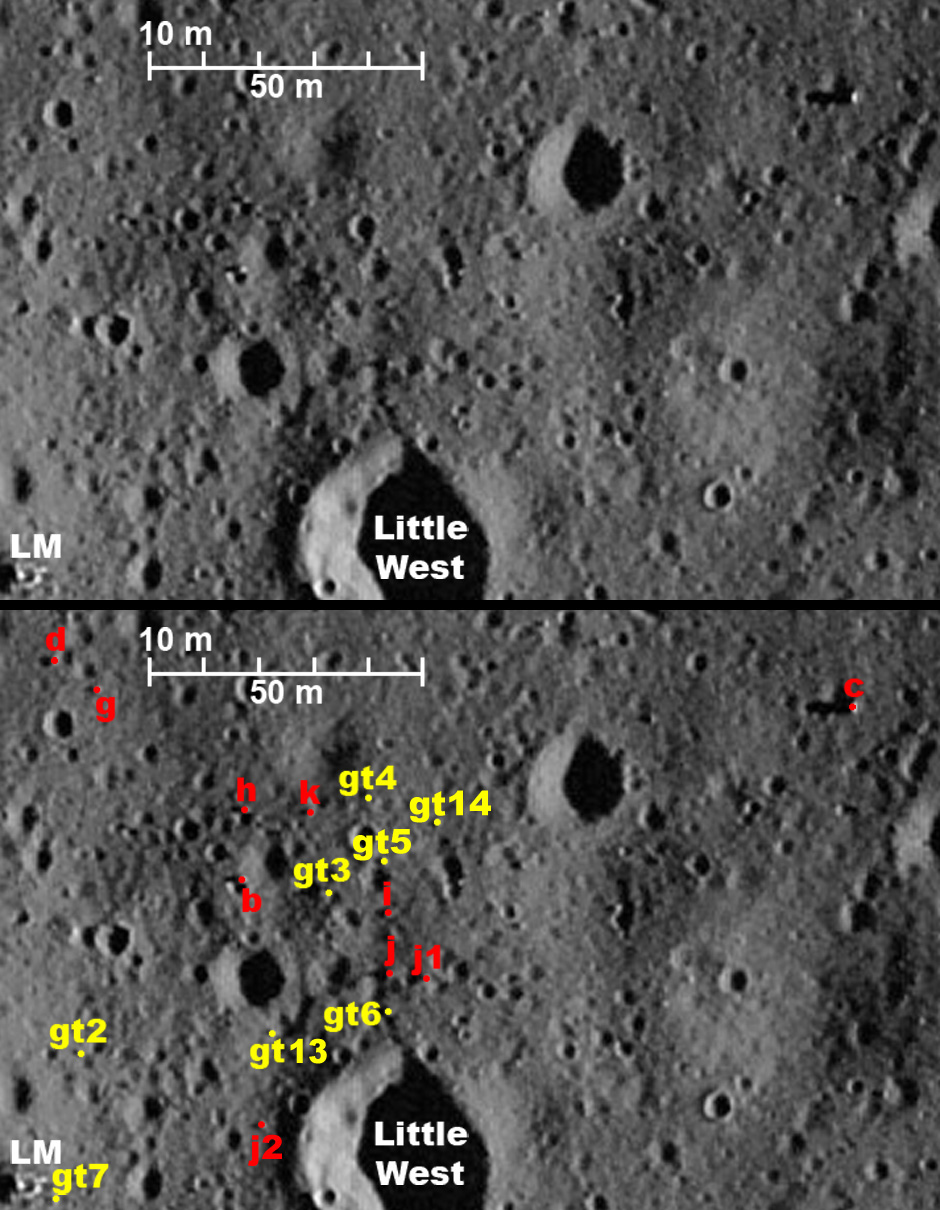
| Neil took Pan 5 about one crater diameter from the rim of a 4.5-m crater just inside the rim of Little West Crater, about 38 meters east of the Pan 4 location. This map shows the station locations determined in the separate analysis done for Pan 5. See, also, a version superimposed on details from LROC images M116161085R and M175124932LR. (Click on the image for a larger version.) |
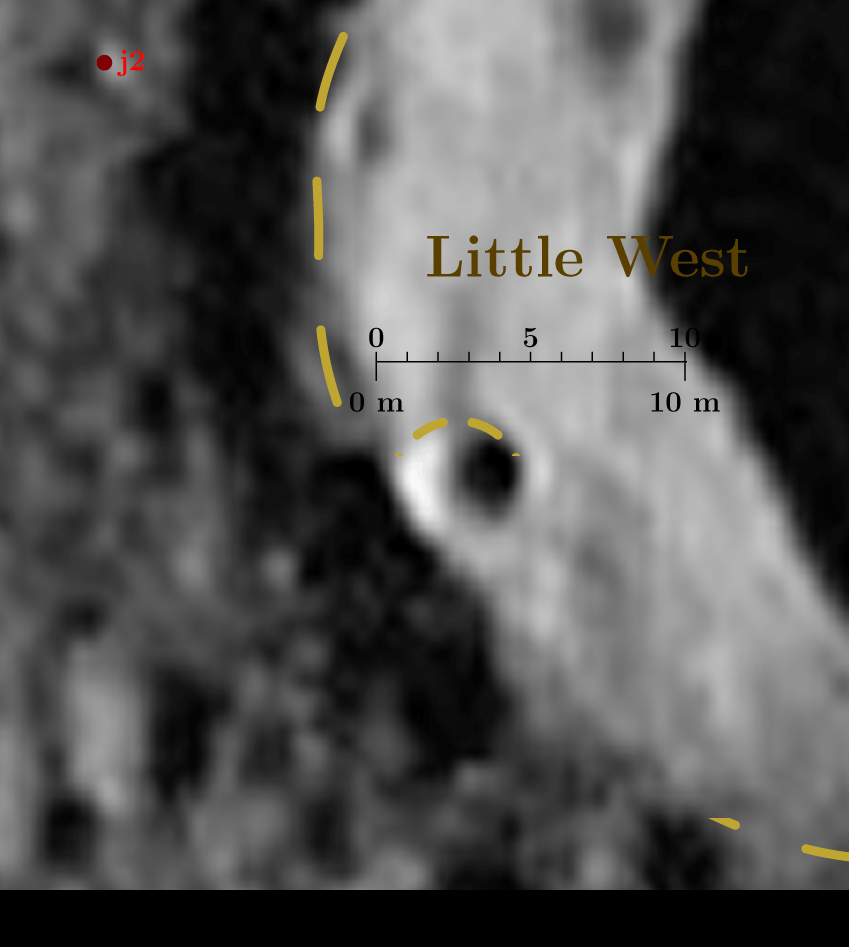
| Animation illustrating the three-step process used to place the Pan 5 stations at their proper positions near the 4.5-m crater just inside the southwest rim of Little West Crater. Note that the red dot near the top left in the figure indicates the actual position of boulder j2, with the sunlit face on the right (east) and the shadow on the left. (Click on the image for a larger version. |
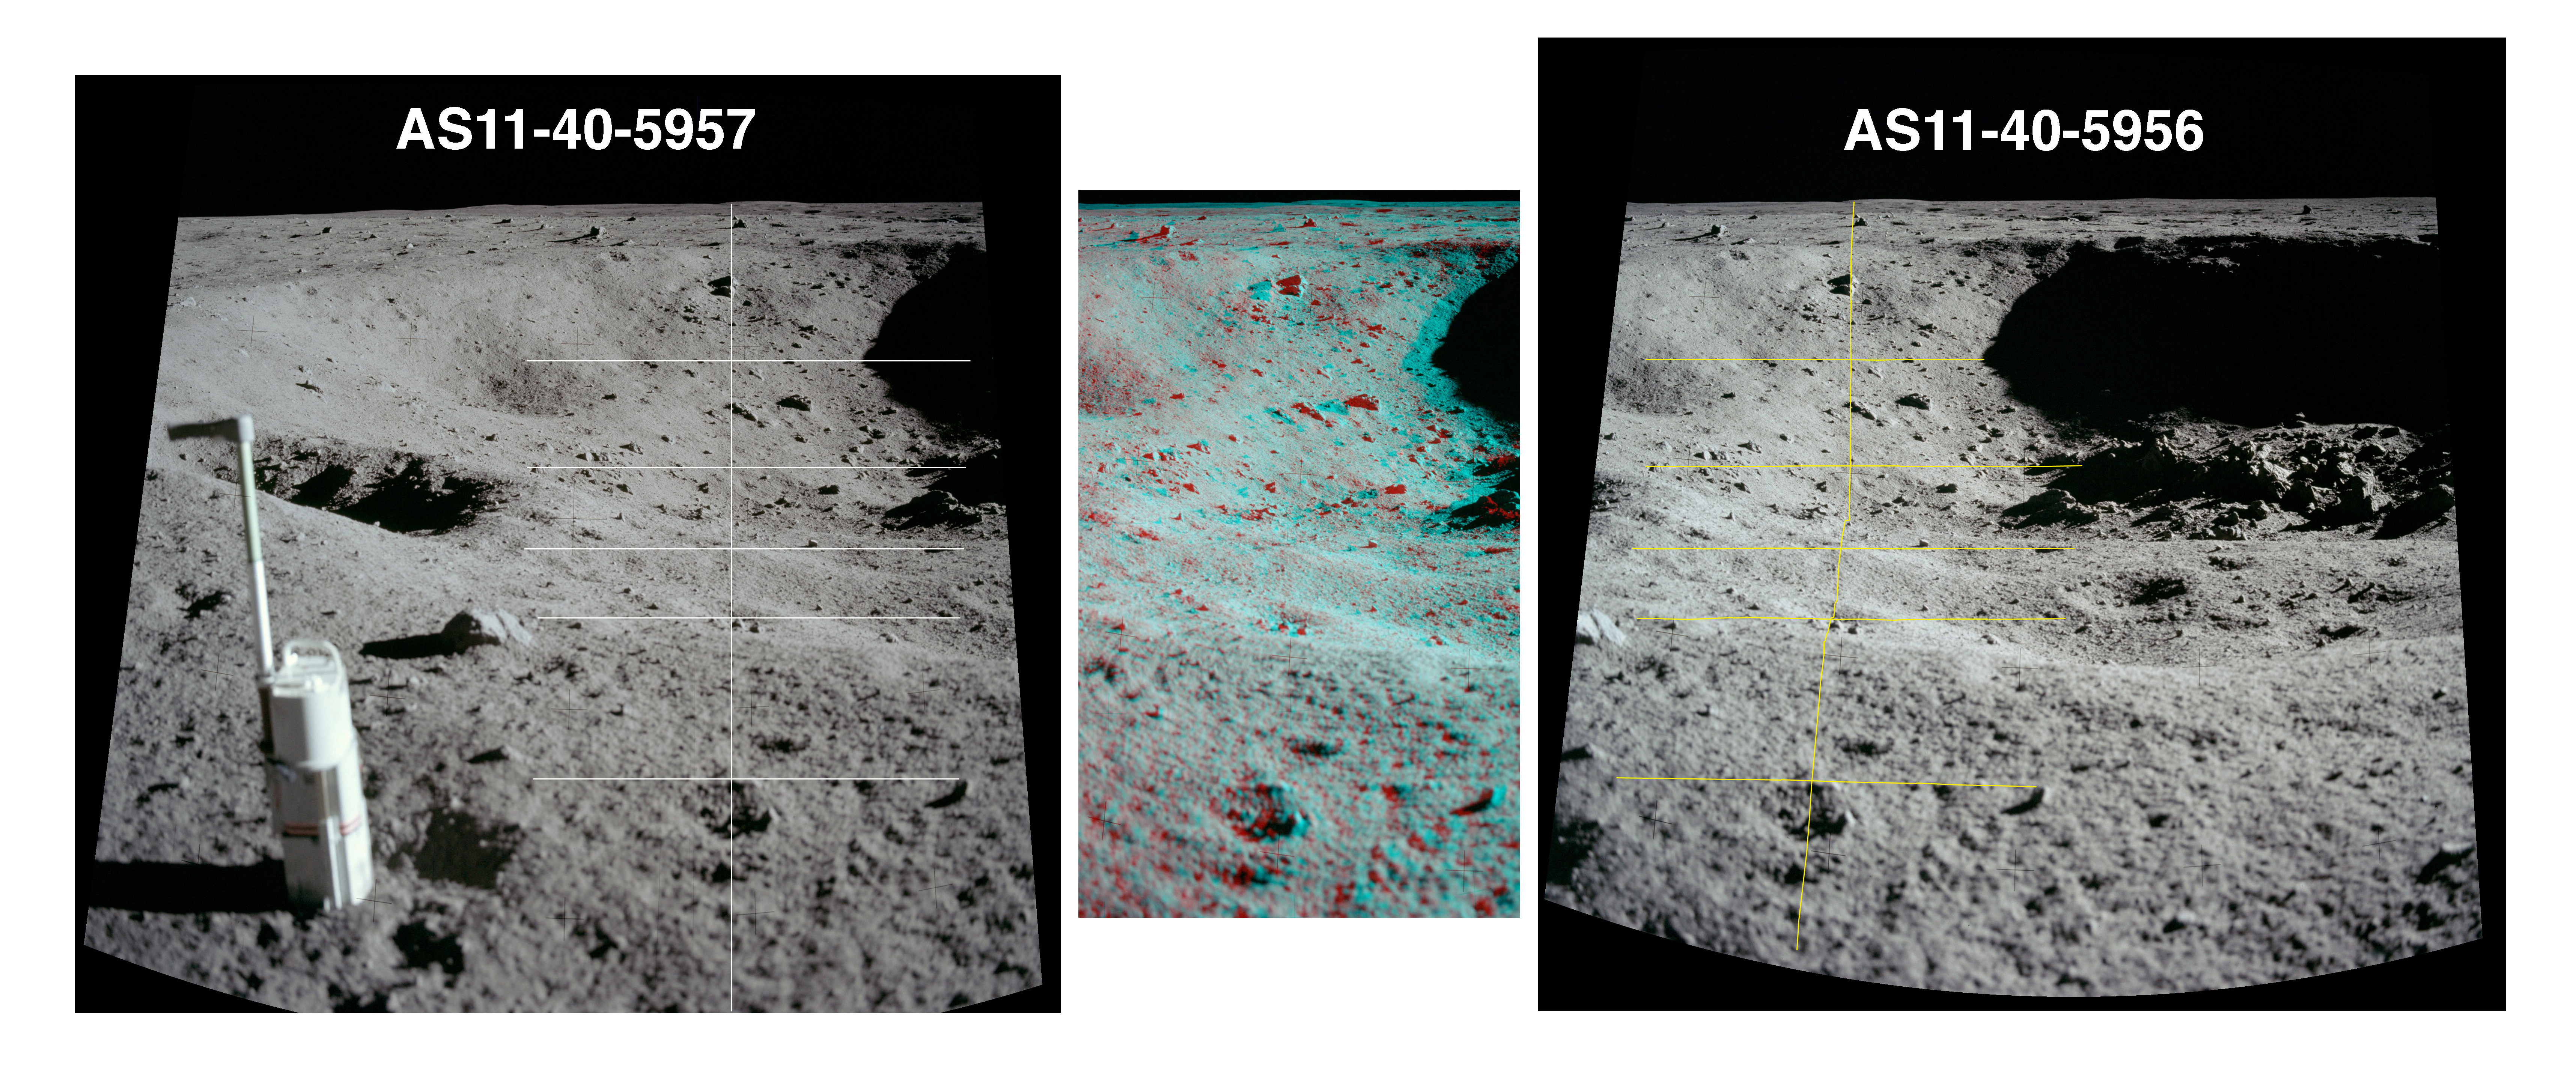
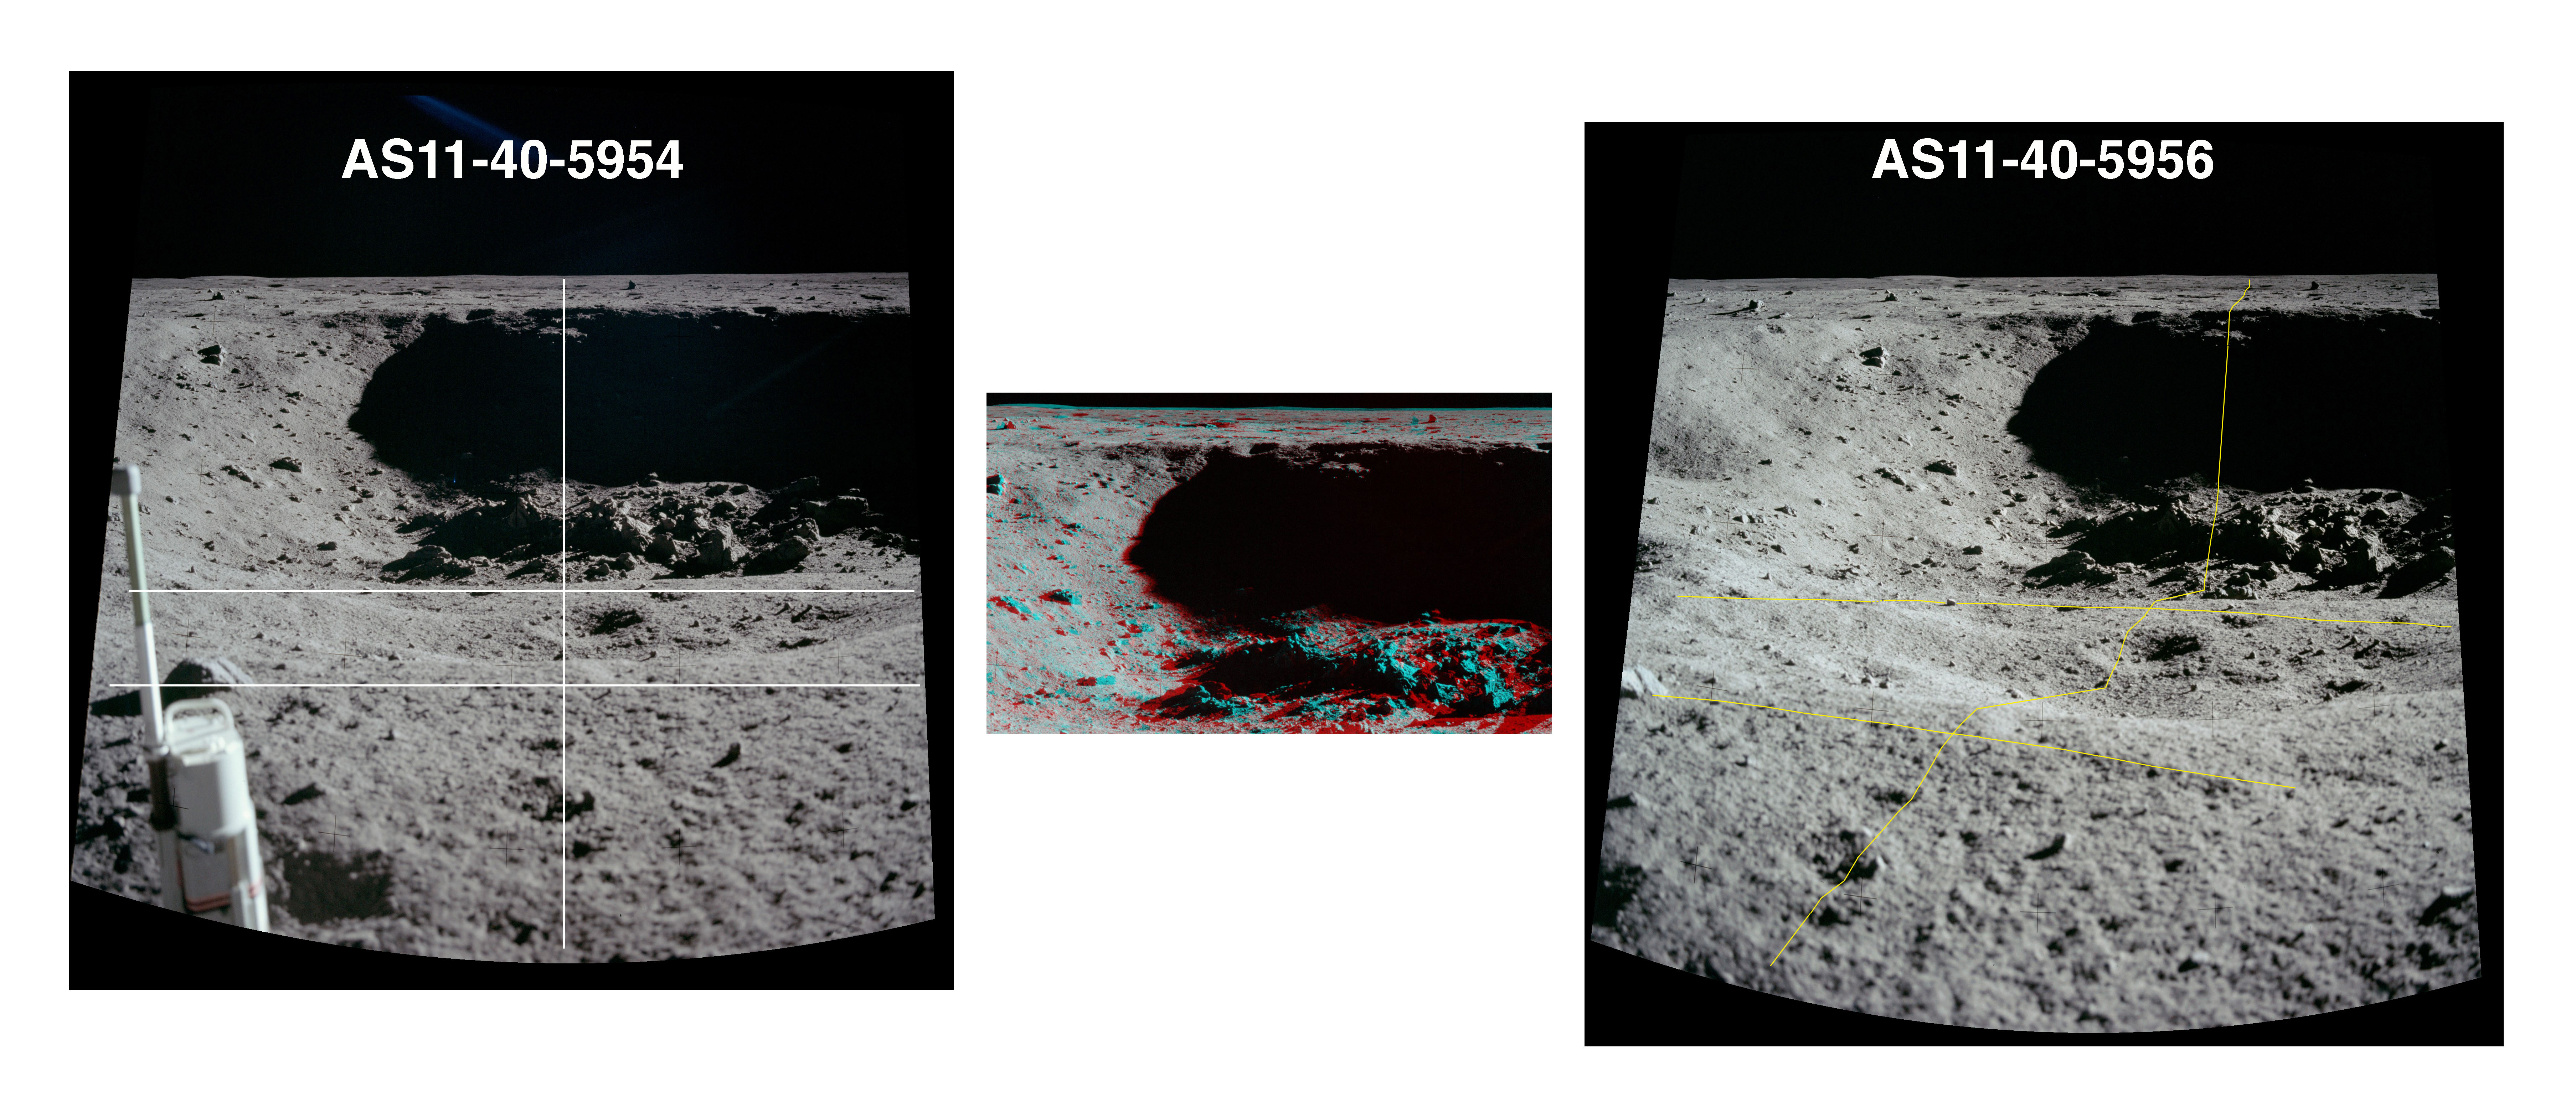
| Side-by-side comparison of AS11-40-5957 (left) and 5956 (right). As shown in the photogrammetric map, 5957 was taken slightly to the left of 5956. This is confirmed by the fact that the yellow trace in 5956 of the vertical white line slopes down to the left. In addition, there are only very small vertical differences in the intersections of the horizontal yellow lines with the vertical yellow line compared with their white counterparts. This indicates that the two camera stations have no appreciable forward or backward position difference. (Click on the image for a larger version; and click here for a full version of the anaglyph.) |
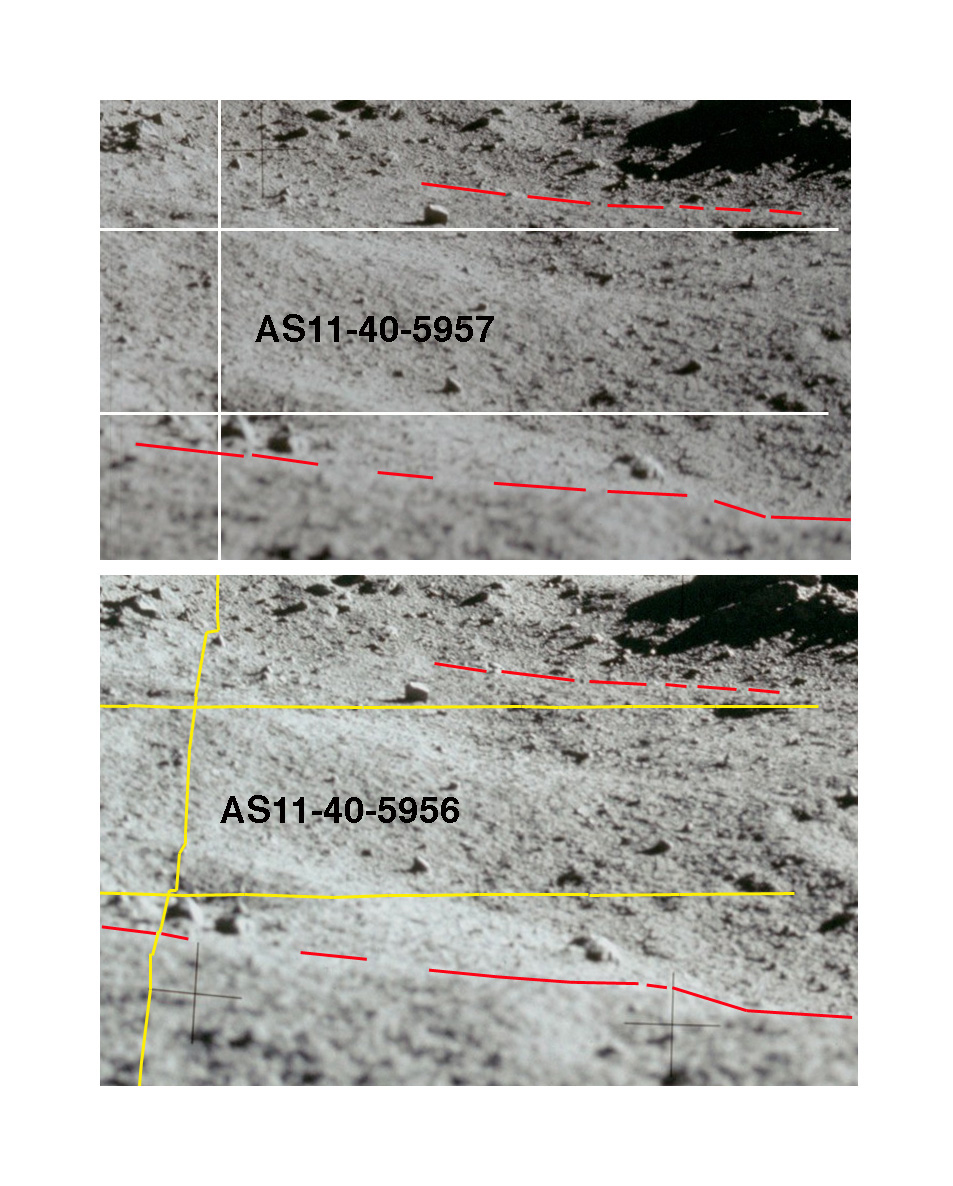
| Comparison of details showing breaks in slope in 5957 (top) and 5956 (bottom). The dashed red-lines approximate breaks in slope. (Click on the image for a larger version.) |
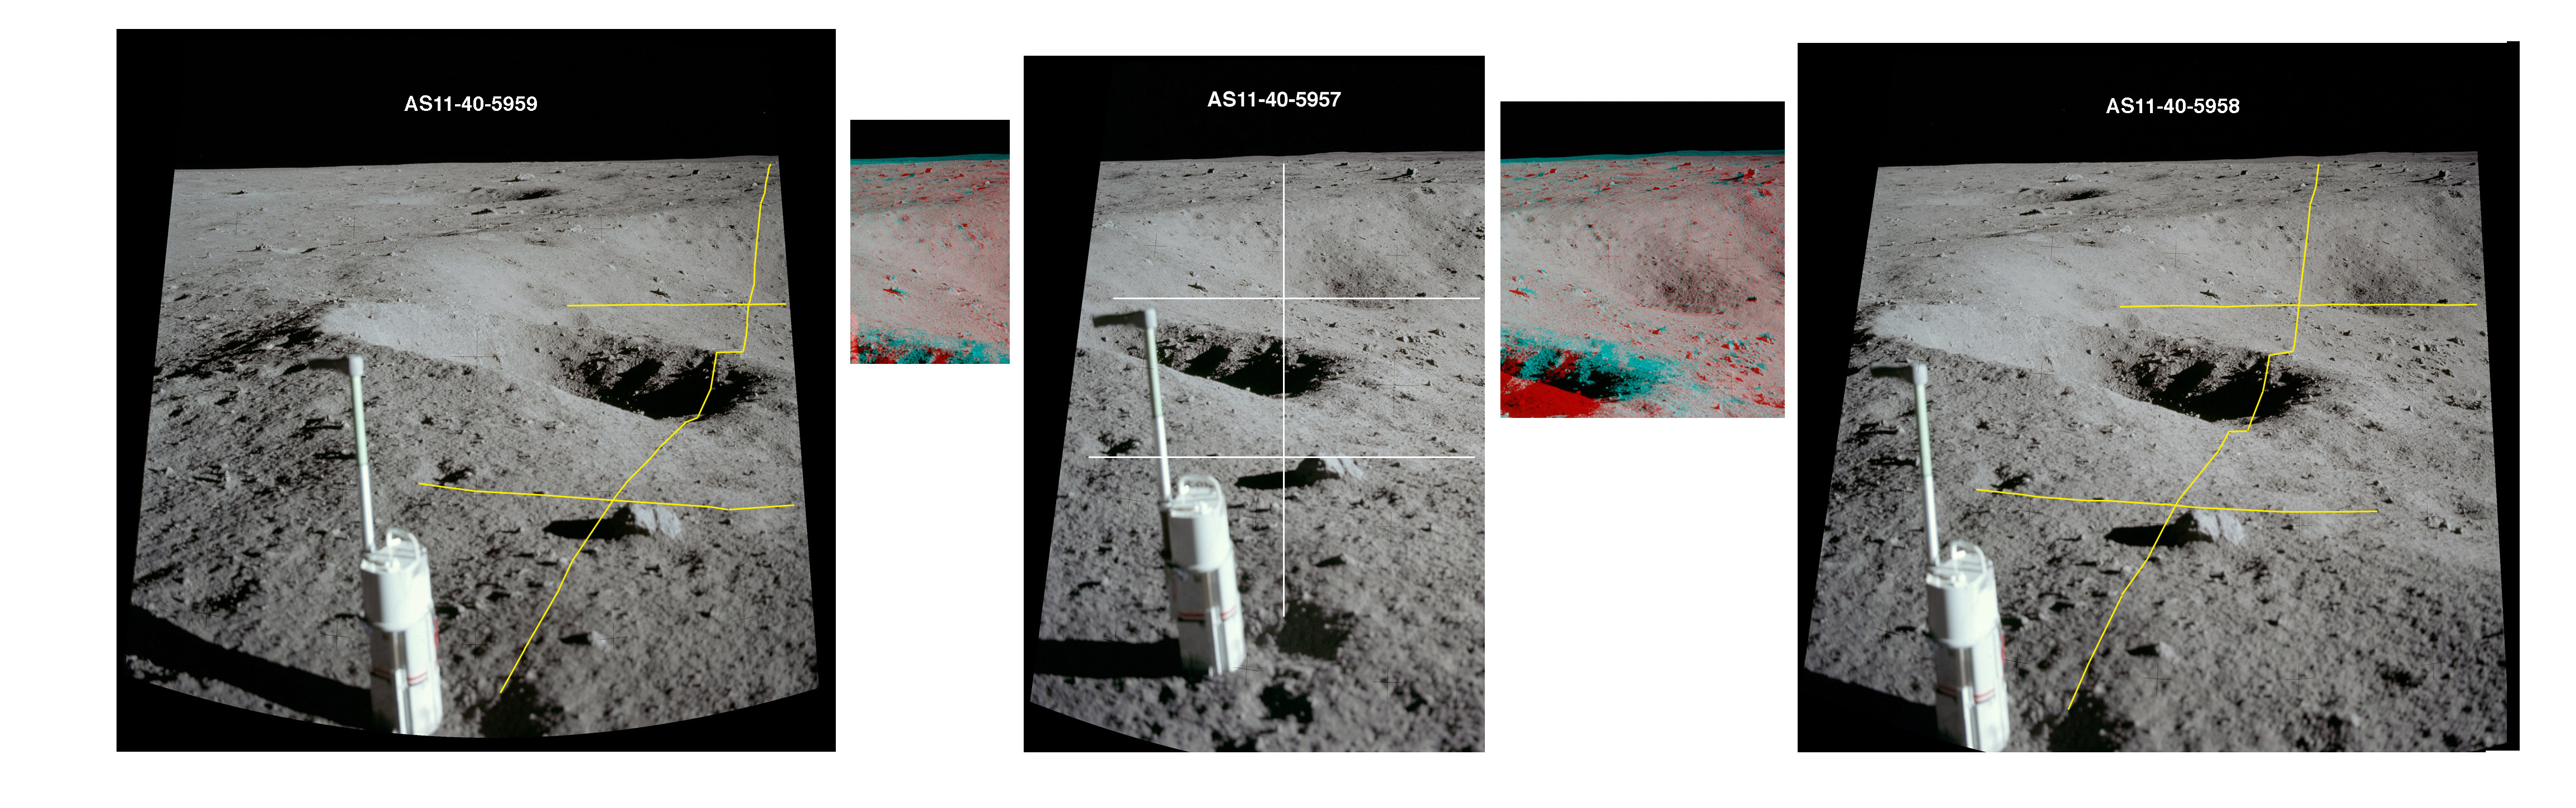
| Side-by-side comparisons of 5957 (center) with both 5958 (right) and 5959 (left). The white vertical and horizontal lines in 5957 are traced in yellow on each of the other images. (Click on the image for a larger version.) |
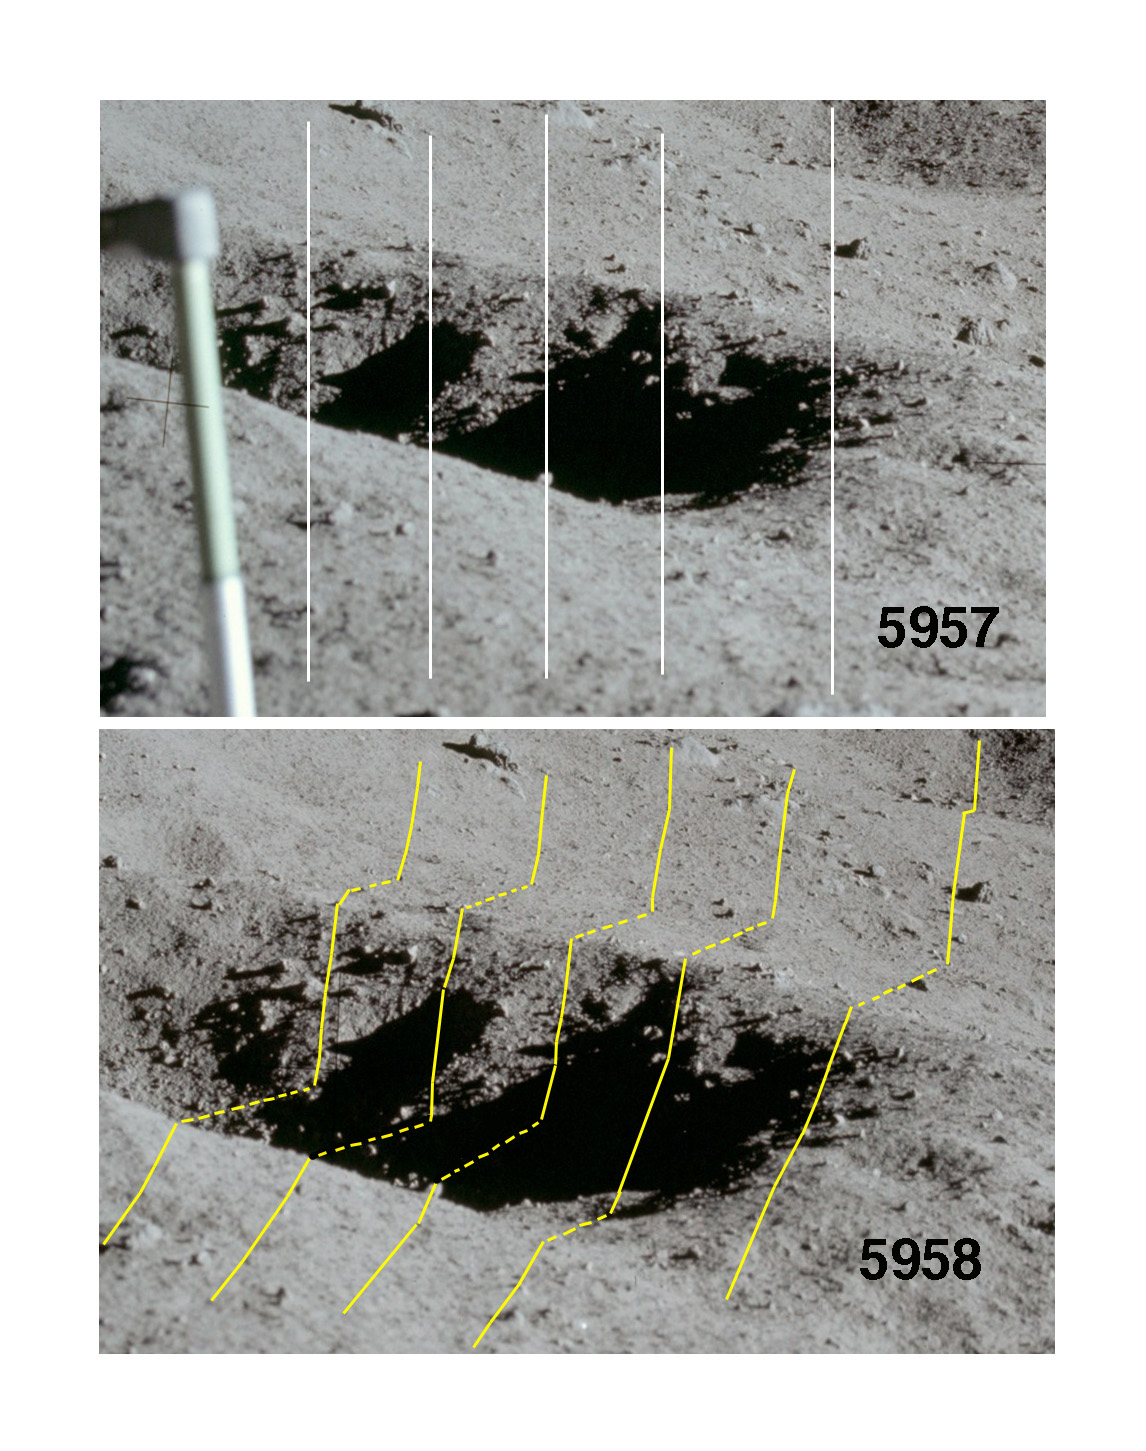
| Comparison of details of 5957 and 5958 showing the 4.5-m crater. The dashed portions of the yellow traces indicate parts of the surface that are visible in 5958 but are hidden in 5957 by the crater rim. This is a clear indication that 5958/59 were taken forward of 5957. (Click on the image for a larger version.) |
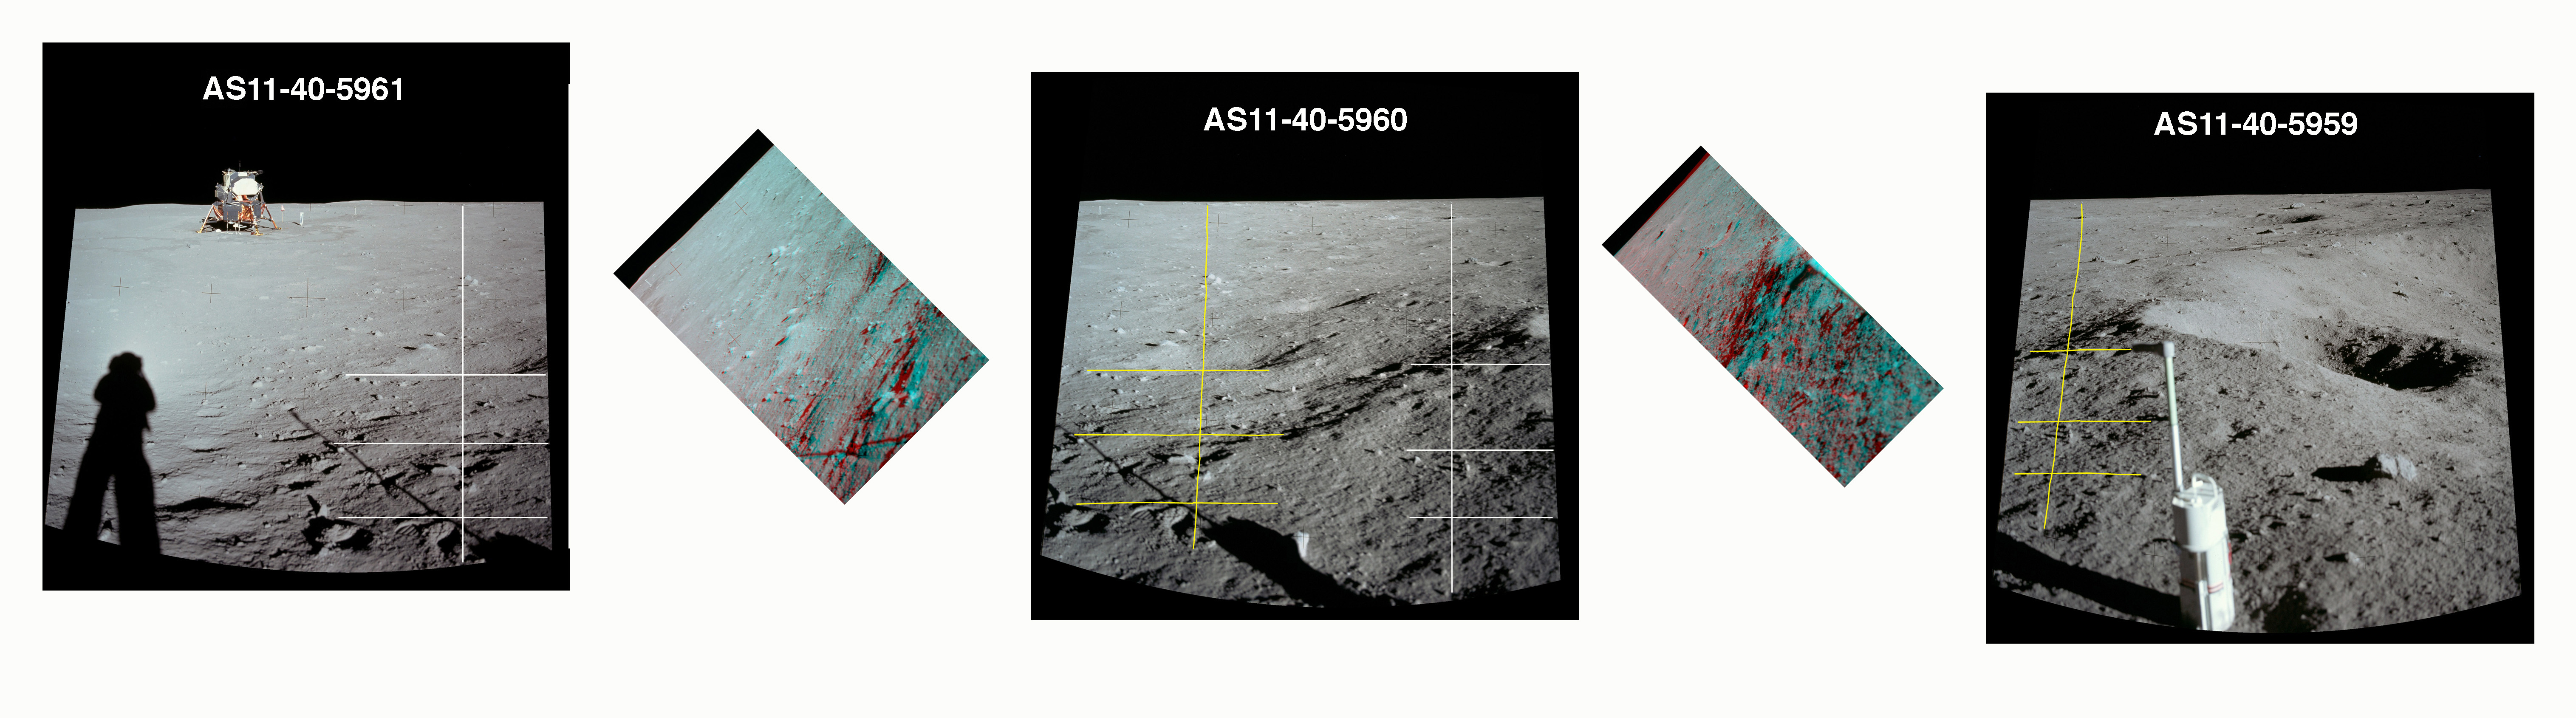
| Side-by-side comparison of 5961, 60, 59. Stereo information available from the image pairs is strongly influenced by relative displacement of the camera stations along the azimuths defined by the centers of the overlap regions. The center-line azimuth of the 5961/60 overlap is roughly 15 degree north of west; and the center-line azimuth of the 5960 overlap is roughly 40 degrees north of west. The anaglyphs have been rotated left so that the red and blue images of prominent features line up horizontally. In each case, a rotation of 45 degrees gives reasonable stereo. (Click on the image for a larger version.) |
| Left: The 1978 map includes the locations of the TV, U.S. flag, LRRR, and PSEP along with trails made by the astronauts. "ALSCC" denotes locations where the Apollo Lunar Surface Close-up Camera can be seen in various Hasselblad images. Right: An overlay of the 1969 and 1978 maps indicates that, in the 1978 map, the TV and US flag are about 2.5 and 1.3 meters, respectively, farther west and somewhat north of the 1969 mapped locations. The SWC at the same location in both maps; and the LRRR and PSEP are 3.8 and 5.9 meters, respectively, farther south in the 1978 map. Differences between the two presentations of the craters is discussed below. (Click on the image for a larger version.) |

| (Top) A comparison between the 1978 site map and the 2012 camera-station map shows excellent agreement for the locations of the TV, flag, SWC, LRRR, PSEP, and photogrammetrically defined crater rims. (Bottom) A comparison between the 2012 map and a detail from the December 2009 LROC image between illustrates the quality of the work that went into the 1974 map. (Click on the image for a larger version.) |
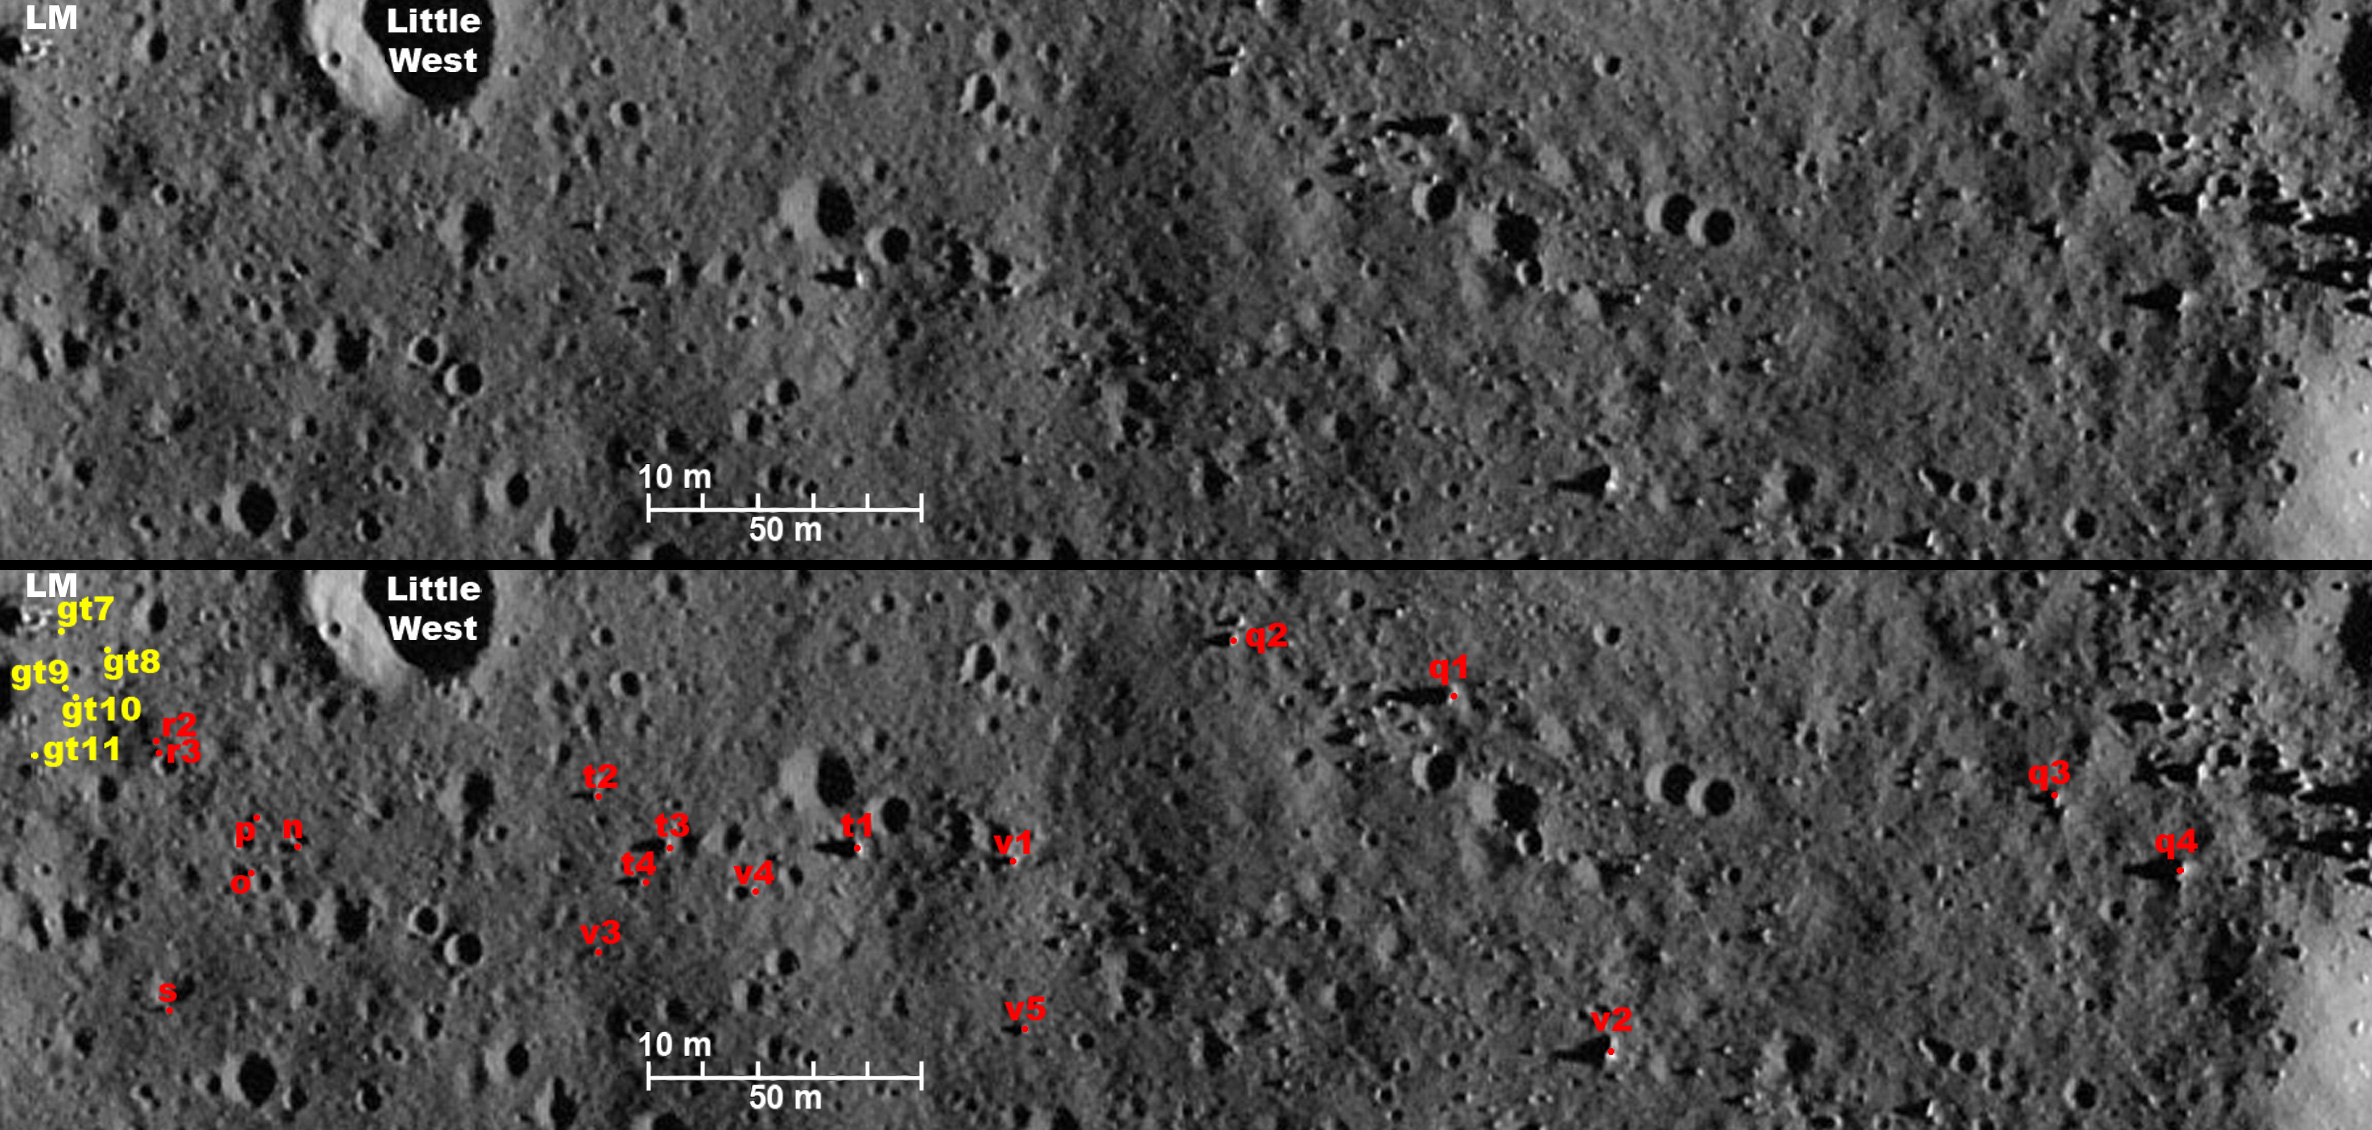
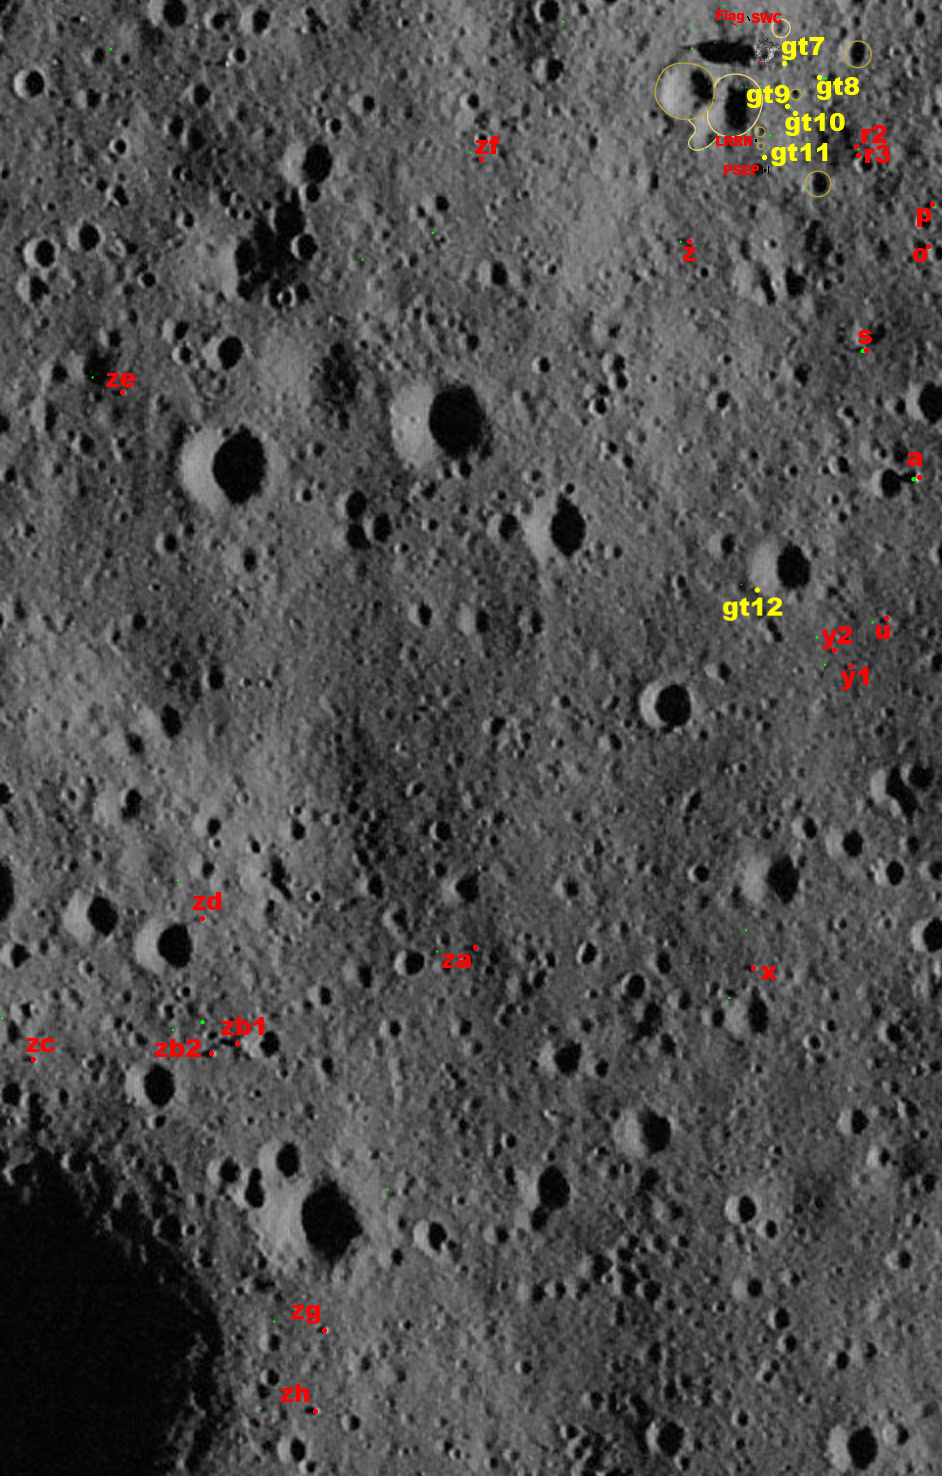
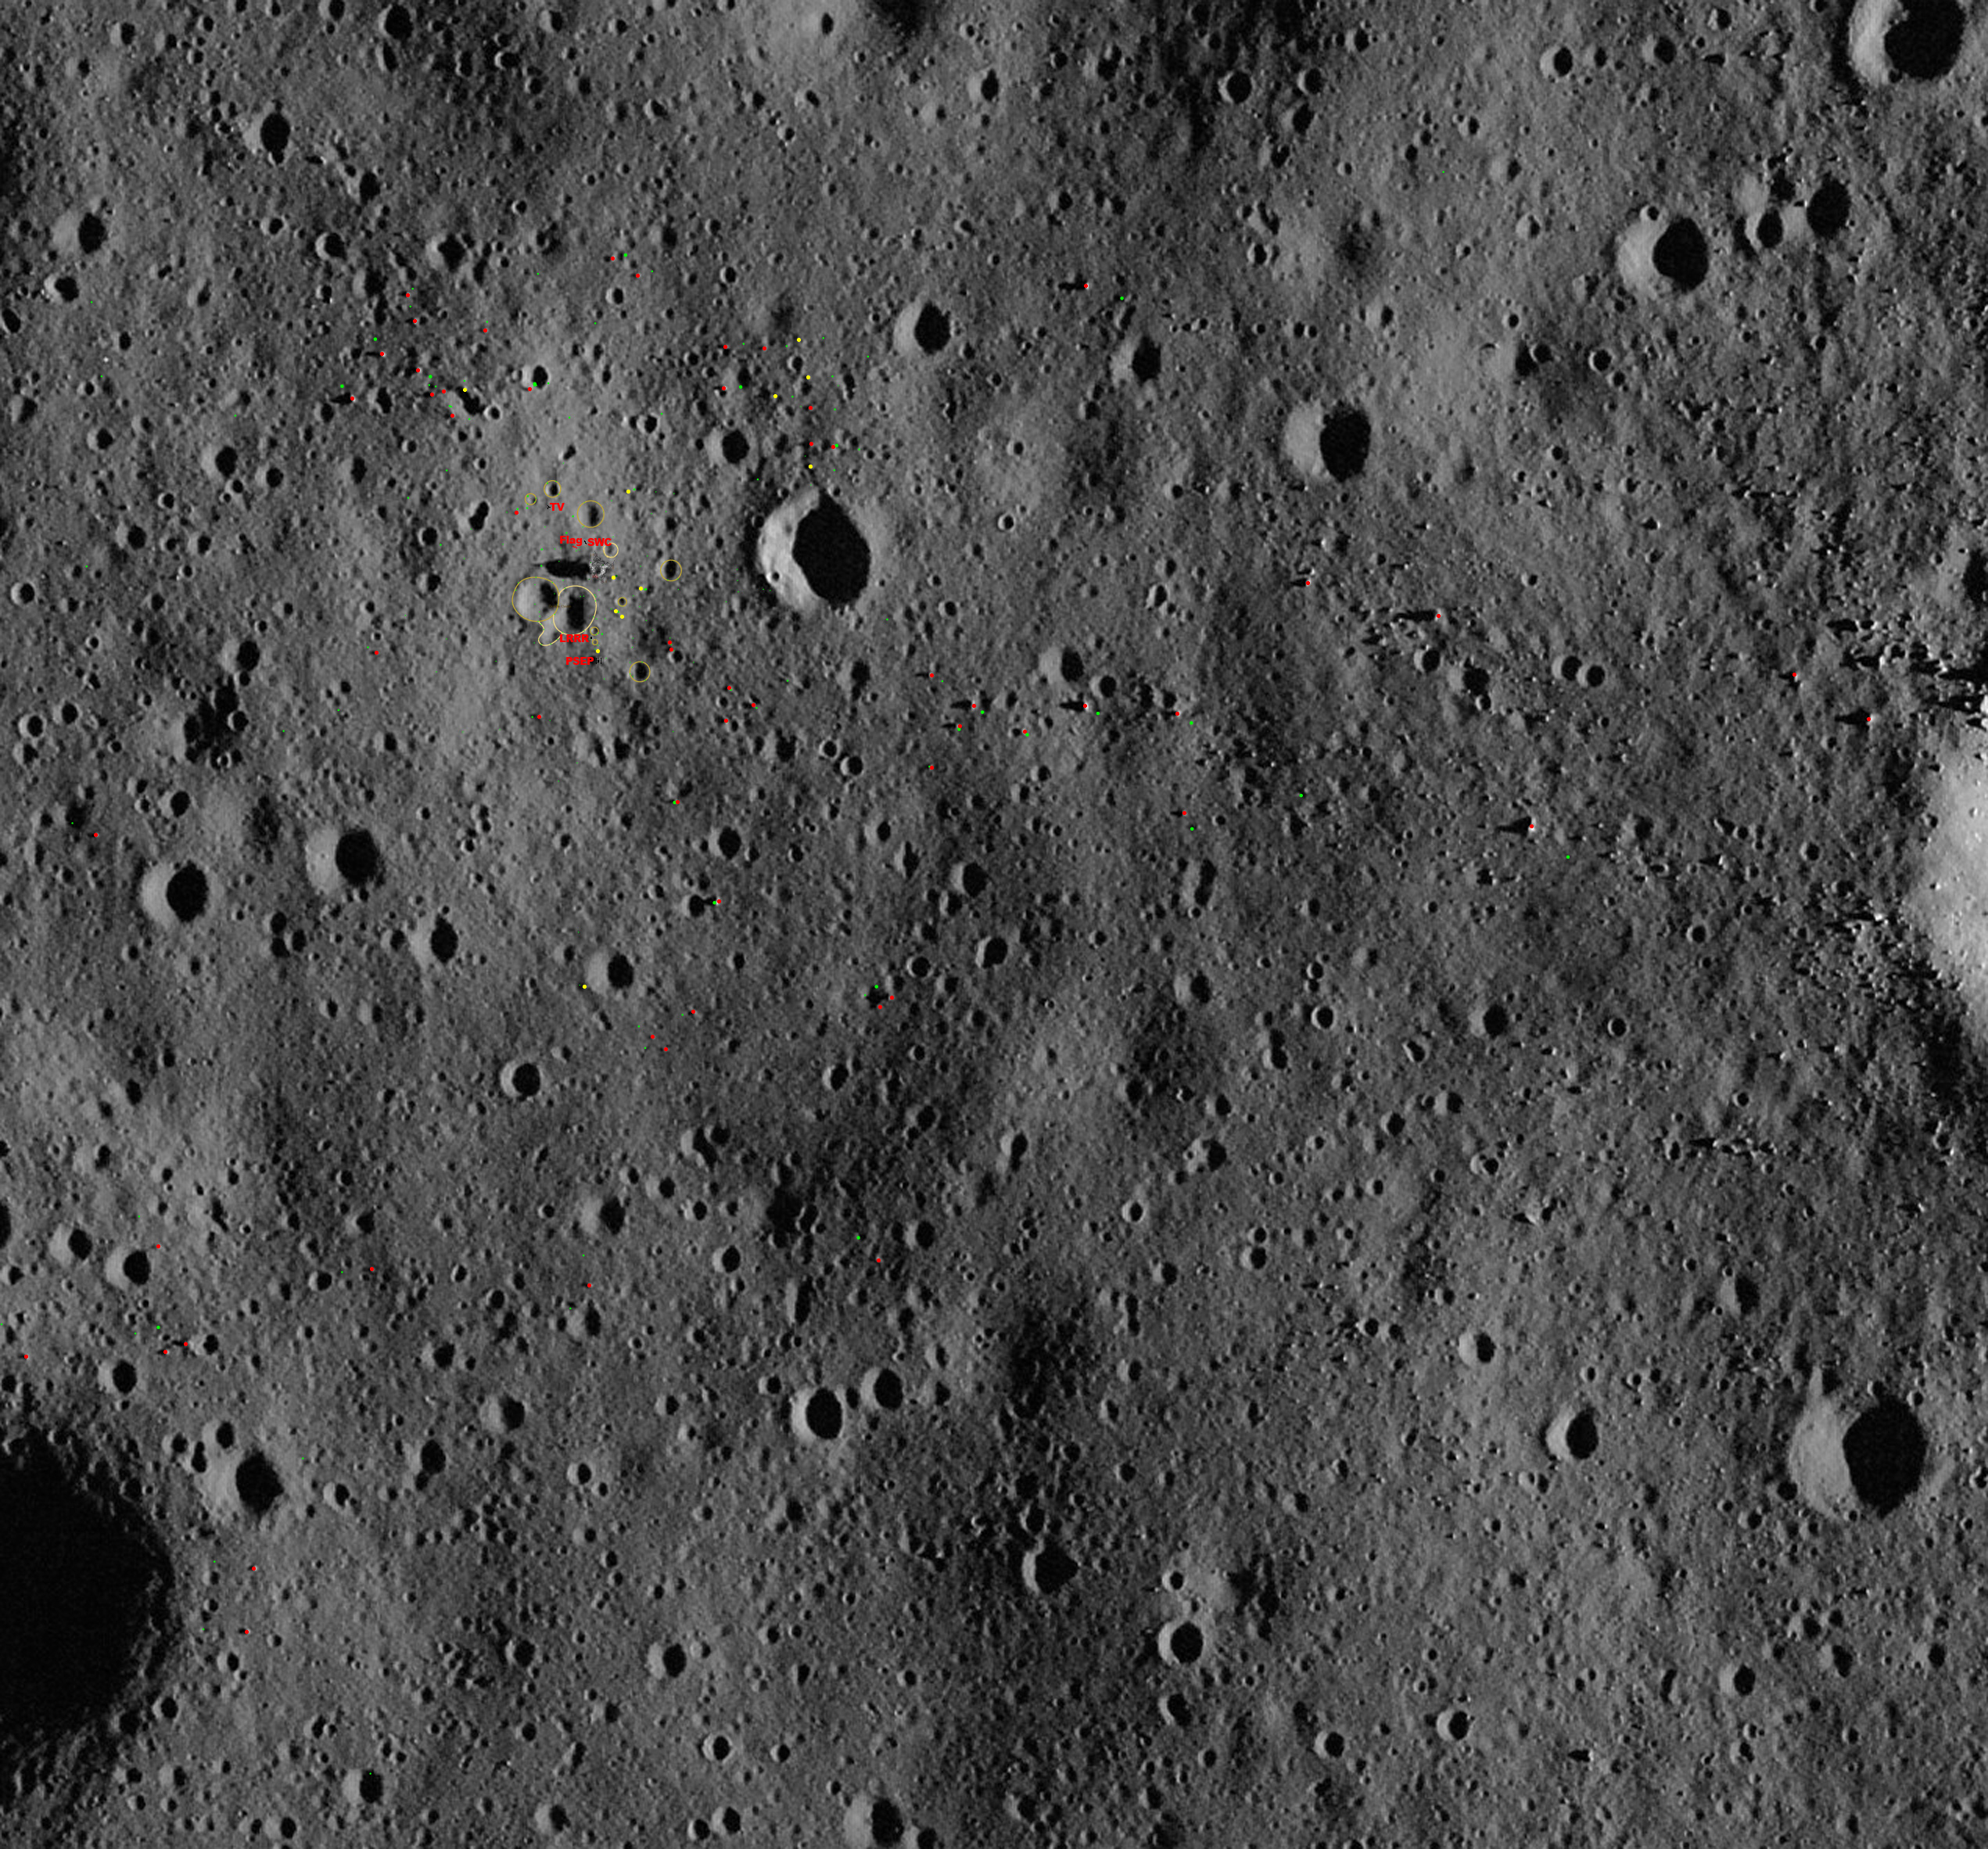
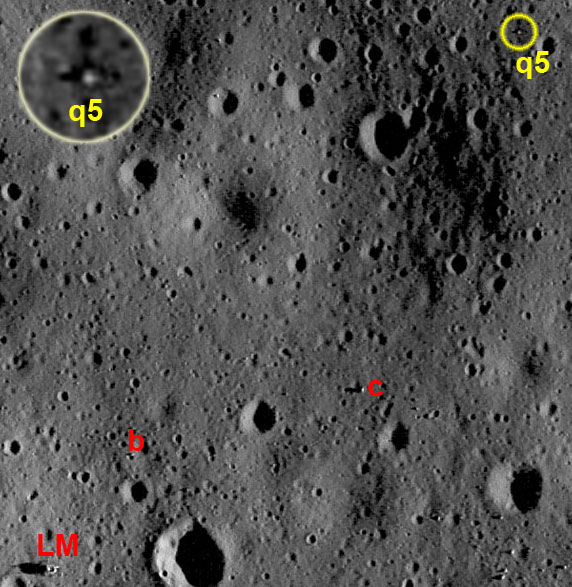
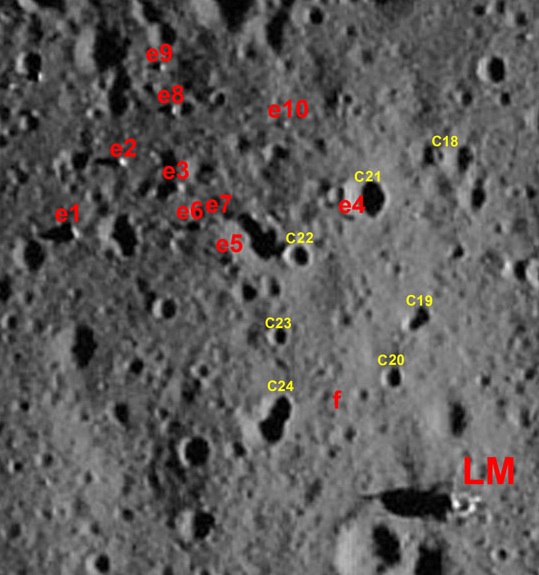
| Portion of the deconvolved 22 December 2009 LROC image provided by GoneToPlaid, showing some of the boulders visible in multiple Hasselblad images and in the LROC images, marked with either red dots (●) or yellow dots (●). (Click on the image for a larger version.) |
| Frame AS11-37-5516, taken out Buzz's window after the EVA, shows a boulder field northwest of the LM. Note the small, fresh crater along the line-of-sight to e9. (Click on the image for a larger version.) |
| This portion of the 22 December 2009 LROC image contains the boulders in Group e. In the bottom panel, actual locations of the boulders are marked with red dots (●) and yellow dots (●). (Click on the image for a larger version.) |
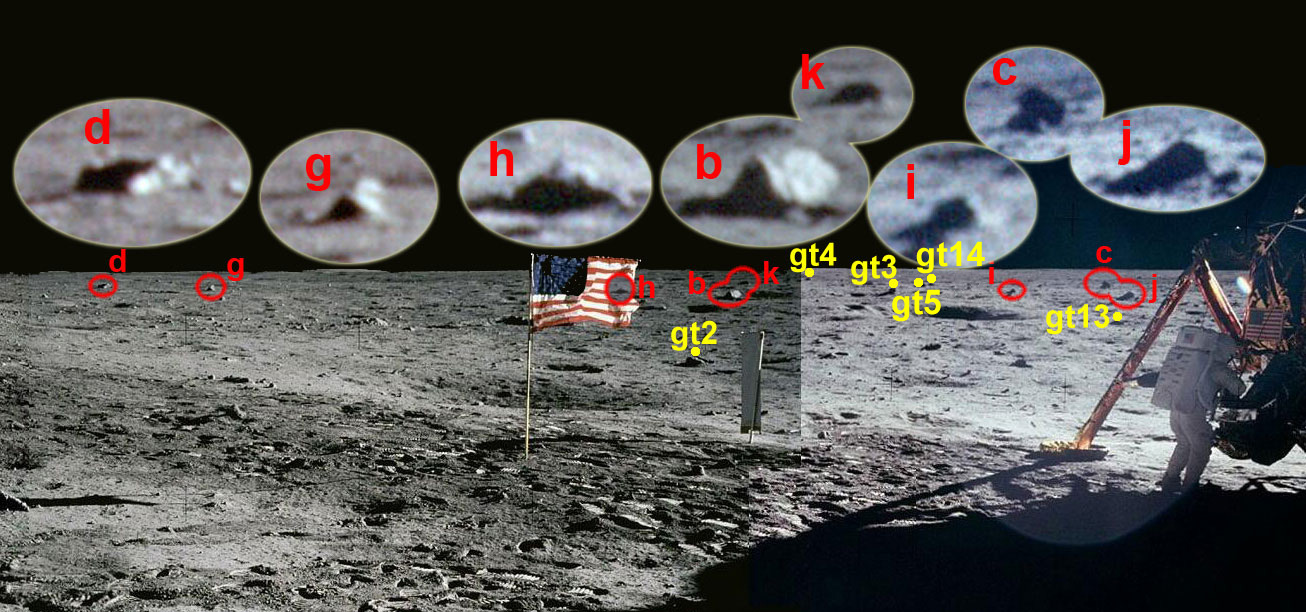
| Identified boulders northeast of the LM as seen in Buzz's plus-Z pan (Pan 2). The central part of the pan assembly was made from frame 5885, in which boulder h is hidden behind the US flag. Frame 5886 was taken from a slightly different location and shows boulder h. A small piece of 5886 has been inserted in the figure at the proper location. (Click on the image for a larger version.) |
| Identified boulders northeast of the LM as seen in Neil's Little West pan (Pan 5). Boulder e4 is also visible, directly under the green dot (●). (Click on the image for a larger version.) |
| This portion of the 22 December 2009 LROC image contains identified boulders northeast of the LM. In the bottom panel, boulders visible in the raw LROC image are marked with red dots (●) or yellow dots (●). (Click on the image for a larger version.) |
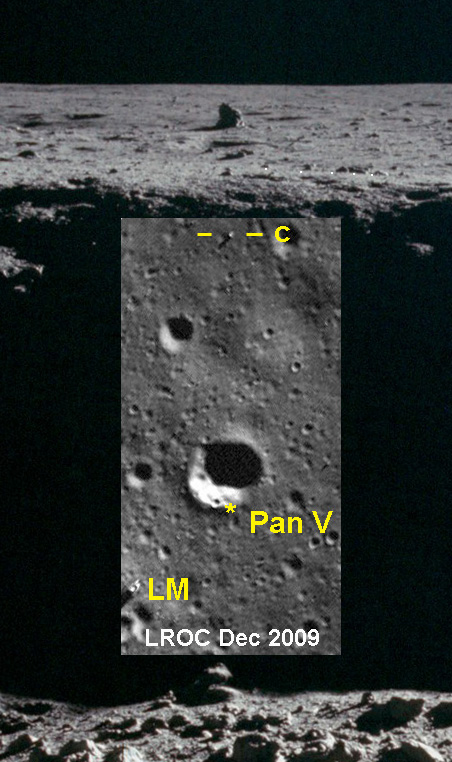
| Detail from 5955, taken as part of Pan 5, combined with a detail from the 22 December 2009 LROC image. The latter has been rotated 48 degrees left to put Boulder c directly over the Pan 5 location. What appears to be a portion of the apparent rim of Little West to the right of c is marked with small, white dots. (Click on the image for a larger version. See, also, an anaglyph, made from 5954 and 5964, which shows the apparent break in the scene beyond the rim.) |
The influence of Pan 5 location uncertainty is of the same order as systematic errors in photogrammetric positions of boulders which are identified using Pan 5 photographs. Essentially, all photogrammetric positions are shifted eastwards by several meters from the actual positions. An animation shows (1) the unshifted photogrammetric positions of this group (green dots), (2) the positions shifted 6 meters to the west (green dots), and (3) a comparison of the shifted positions with the actual boulder locations. The shifted locations are generally much closer to the actual locations. Boulder c has largest remaining error in the distance from the LM: ~6 m or ~4 %, compared with the unshifted error of ~11 m or ~7 %. For b, the error dropped from ~5 m to a value less than the size of the boulder. VP writes: "Correction of the systematic error also helped me to identify boulders j2, gt13 and gt14, since it revealed the correspondence between photogrammetrically located object and the boulders."
Limitations of IM do not permit use of the Gold Camera as an
additional scale restriction; but I believe that it may be
possible to create an an approximate photogrammetric map from
the Pan 5 photos alone, using the Gold Camera for scale
and, thus, determine relative Pan 5 camera station locations
more precisely.
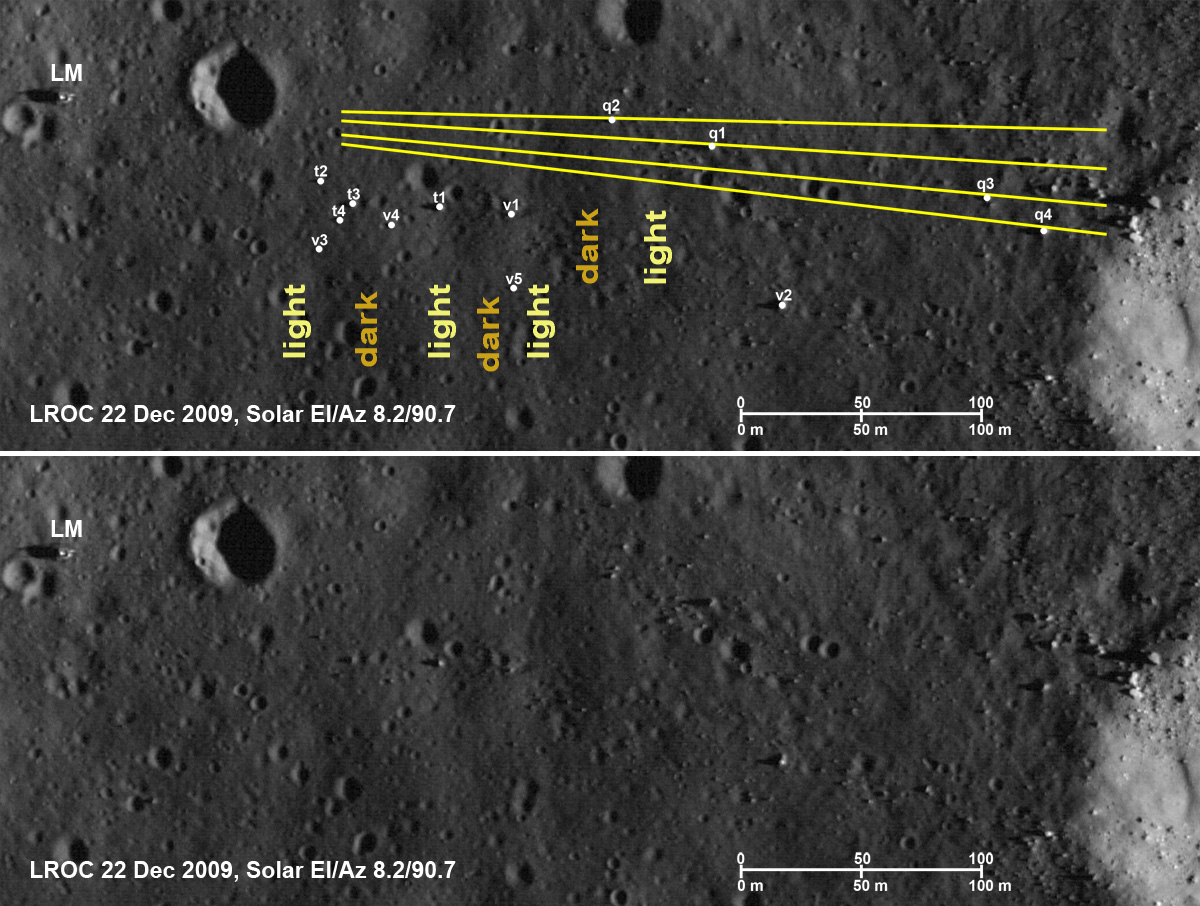
| Detail from the 22 December 2009 LROC image. The Sun is low in the east, so ground sloping up to the west will be lighter than ground sloping down to the west. Yellow azimuth lines have been drawn for the four q-group boulders. Because of the small parallaxes available from the Hasselblad images, photogrammetric distances to the q boulders is very uncertain. The azimuths are well determined, which permit identification of the boulders. (Click on the image for a larger version.) |
| Group q, t, and v boulders - along with
other boulders closer to the LM - marked on the deconvolved version of the 22 December 2009 LROC image. (Click on the image for a larger version.) |
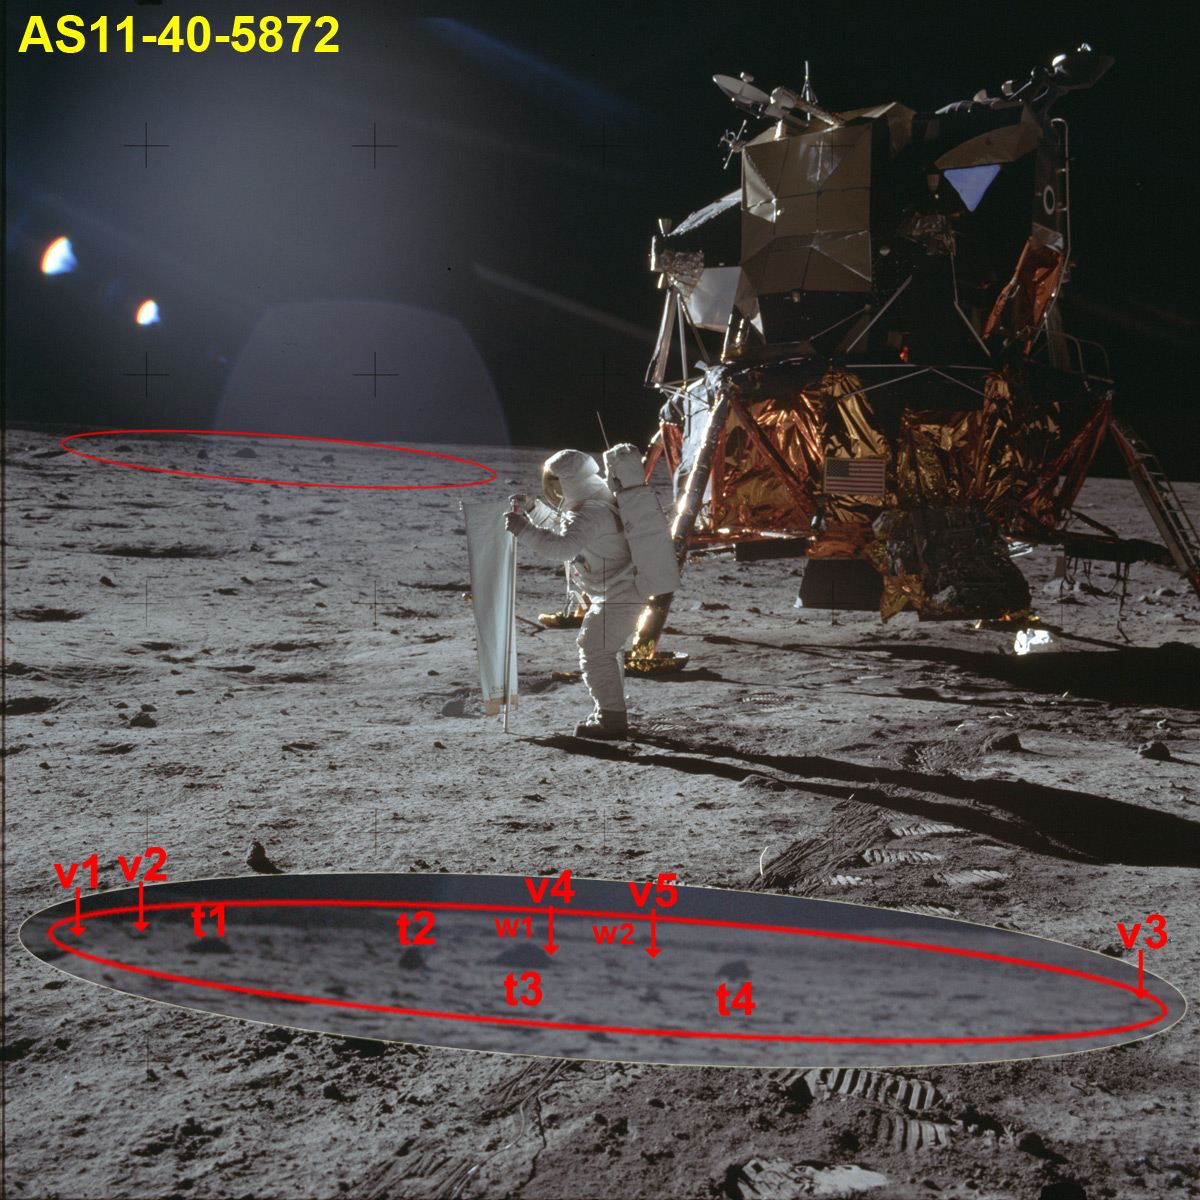
| Detail from 5872 with labels applied to twelve boulders in the general direction of the south rim of West Crater. Four prominent boulders assigned to the t group; and five less-prominent boulders assigned to the v group. The heavily-shadowed rim of West Crater runs to the left from beyond boulder t2. Two boulders associated with a thin, dark line - the inner, east wall of an old, eroded crater - are labeled w1 and w2 and are discussed in section 3.4. (Click on the image for a larger version.) |
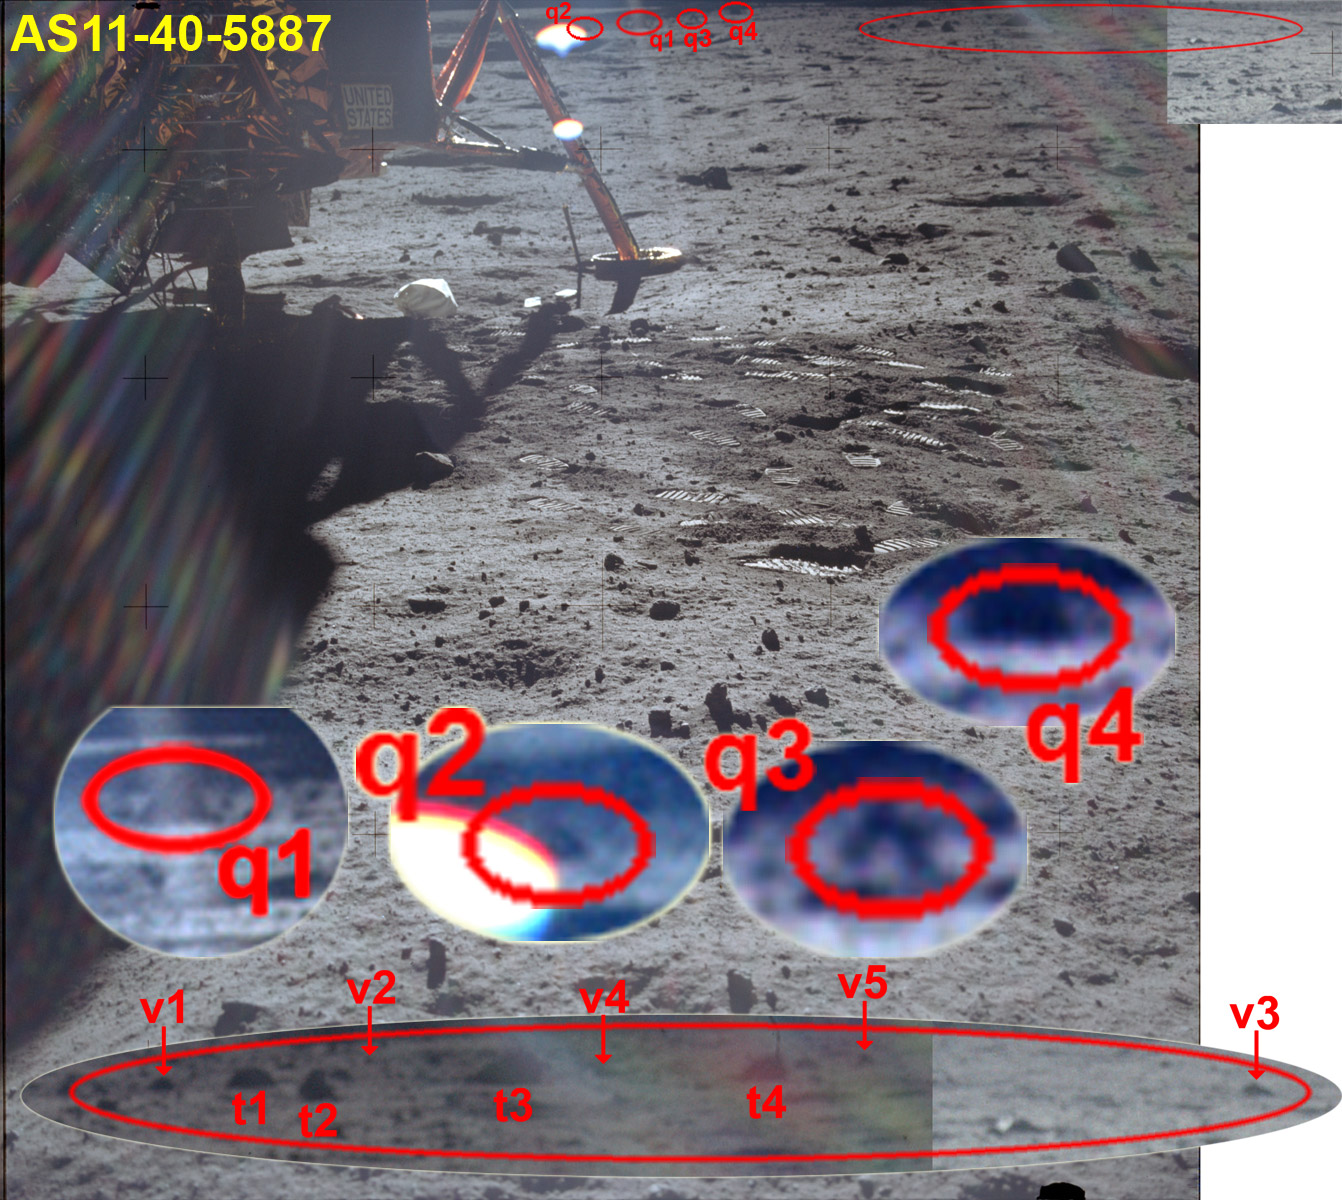
| Up-Sun image 5887 from Pan 2, with a small piece of 5888 added at the upper right, showing boulders q1 - q4, t1 - t4, and v1-v5. Buzz aimed the camera low to avoid getting direct sunlight in the lens. (Click on the image for a larger version.) |
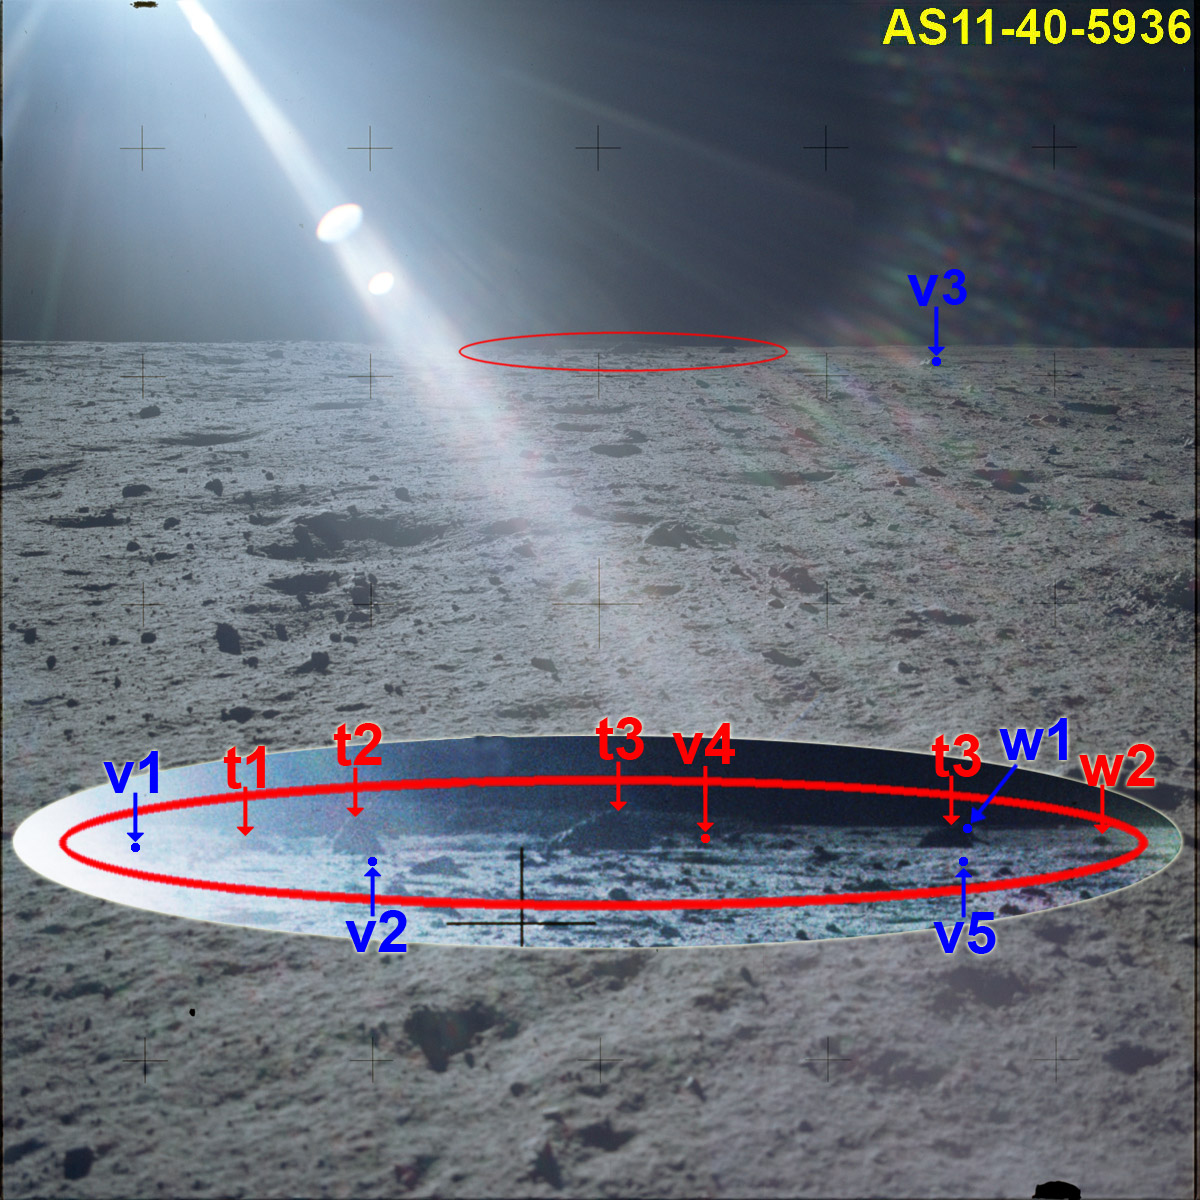
| Boulder groups t and v in AS11-40-5936, taken as part of Pan 4, which Neil took while Buzz was offloading the EASEP packages. Large parts of the t1 to t4 boulders and one of the w boulders are visible; these are marked with red arrows. I put red dots above the tops of boulders that are mostly hidden, and blue dots at the photogrammetrically-determined locations where unseen boulders would be if they were not screened by the terrain or foreground boulders. I haven't included v3 in the inset because of it's separation from the others. v3 is marked with a blue dot in the full image because it is hidden by a group of bright, foreground boulders; the blue arrow and dot indicates the position of v3 behind this group, not the bright group. (Click on the image for a larger version.) |
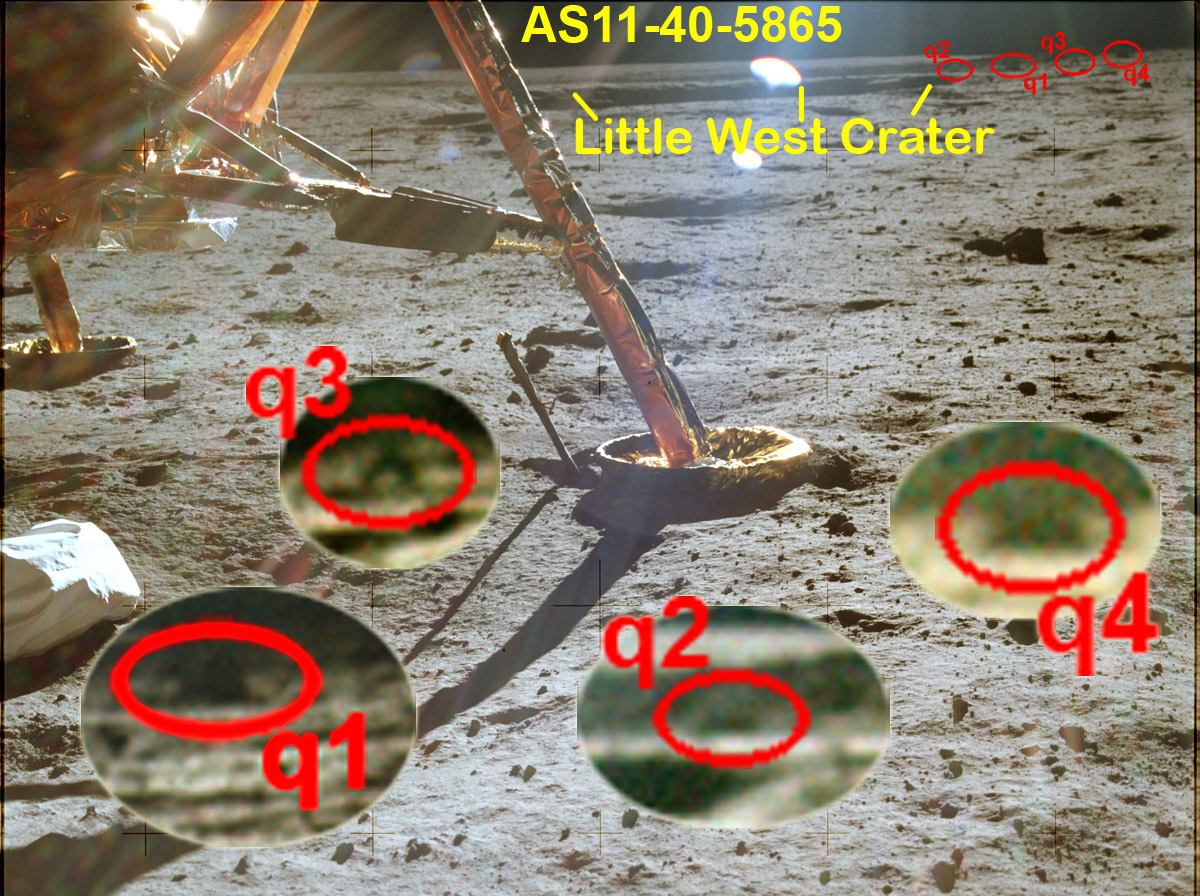
| Detail from AS11-40-5865 showing boulder q1 beyond the southern part of the Little West rim. This is the only Hasselblad image taken near the LM that shows all of Little West, including some of the interior. (Click on the image for a larger version.) |
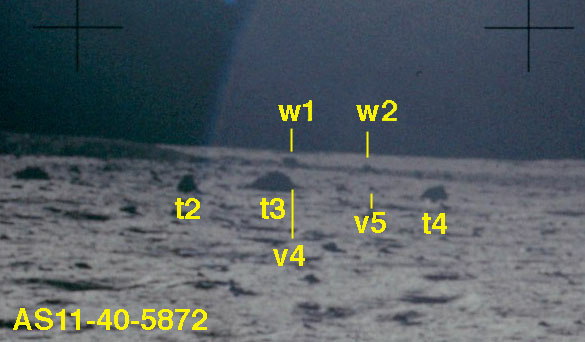
| Detail from AS11-40-5872 showing w1 and w2. From the 5872 camera station, the azimuths of boulders t3, v4, v5, and t4 bracket those of the two w boulders. |
| Detail from
the 24 January 2012 camera station map.
The three images used to identify boulders w1 and w2 -
5873, 5888, 5913 - are shown with red arrow
shafts. |

| Lines-of-sight
starting at camera stations 5873, 5888 and
5913 to w1 (red lines) and w2
(yellow lines) and passing selected t
boulders at angular distances determined
from the Hasselblad images. (Click on the
image for a larger version.) |
| Boulders
w1
and w2
are the only prominent boulders south of
West Crater and along the lines-of-sight
positioned relative to the t
boulders. |
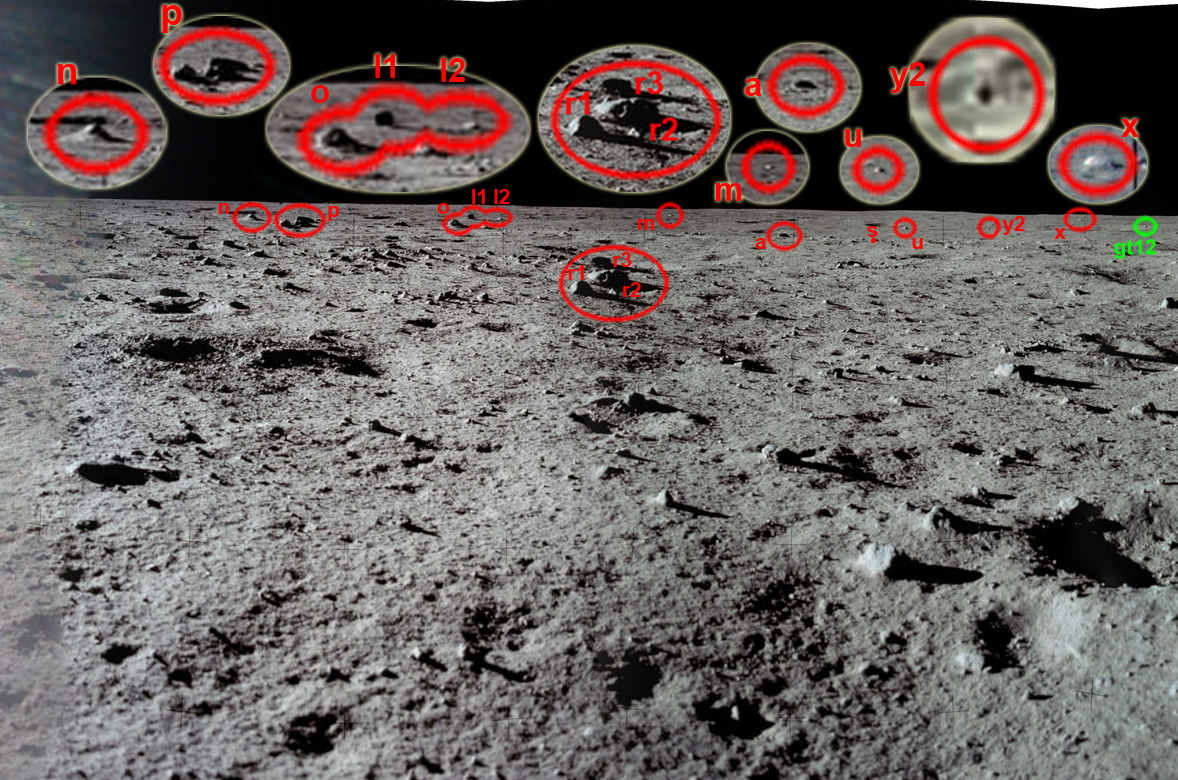
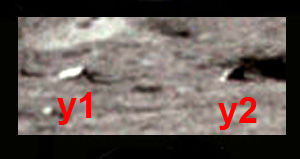
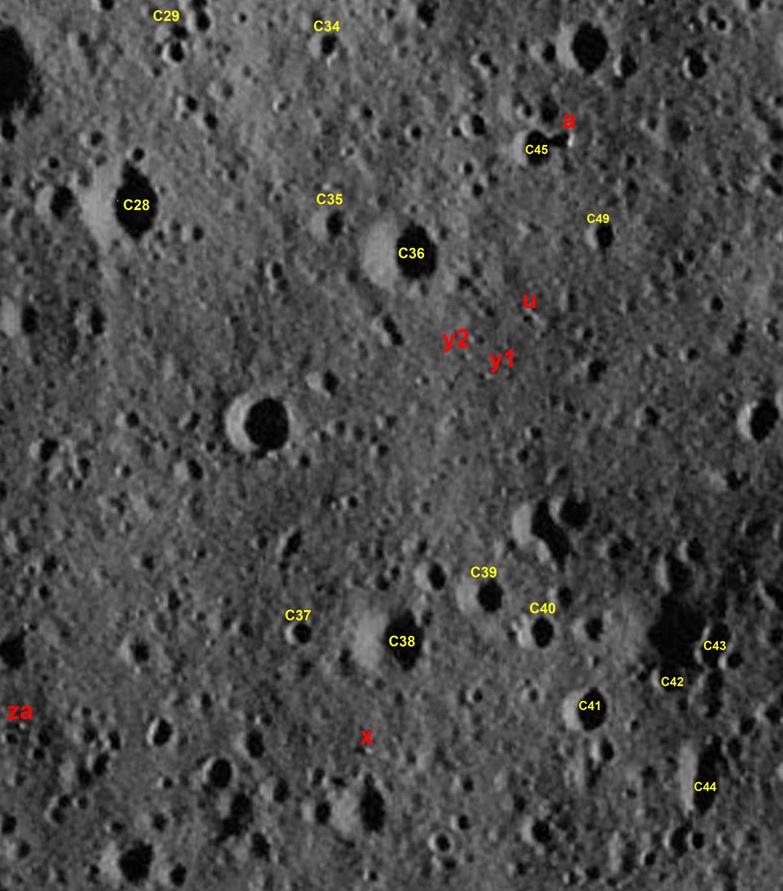
| Identified boulder southeast of the LM as seen in Pan 4. There are views of some or all of these boulders in Pan 1, Pan 2, and Pan 3. Note that boulder y1 is visible only from the CDR window. (Click on the image for a larger version.) |
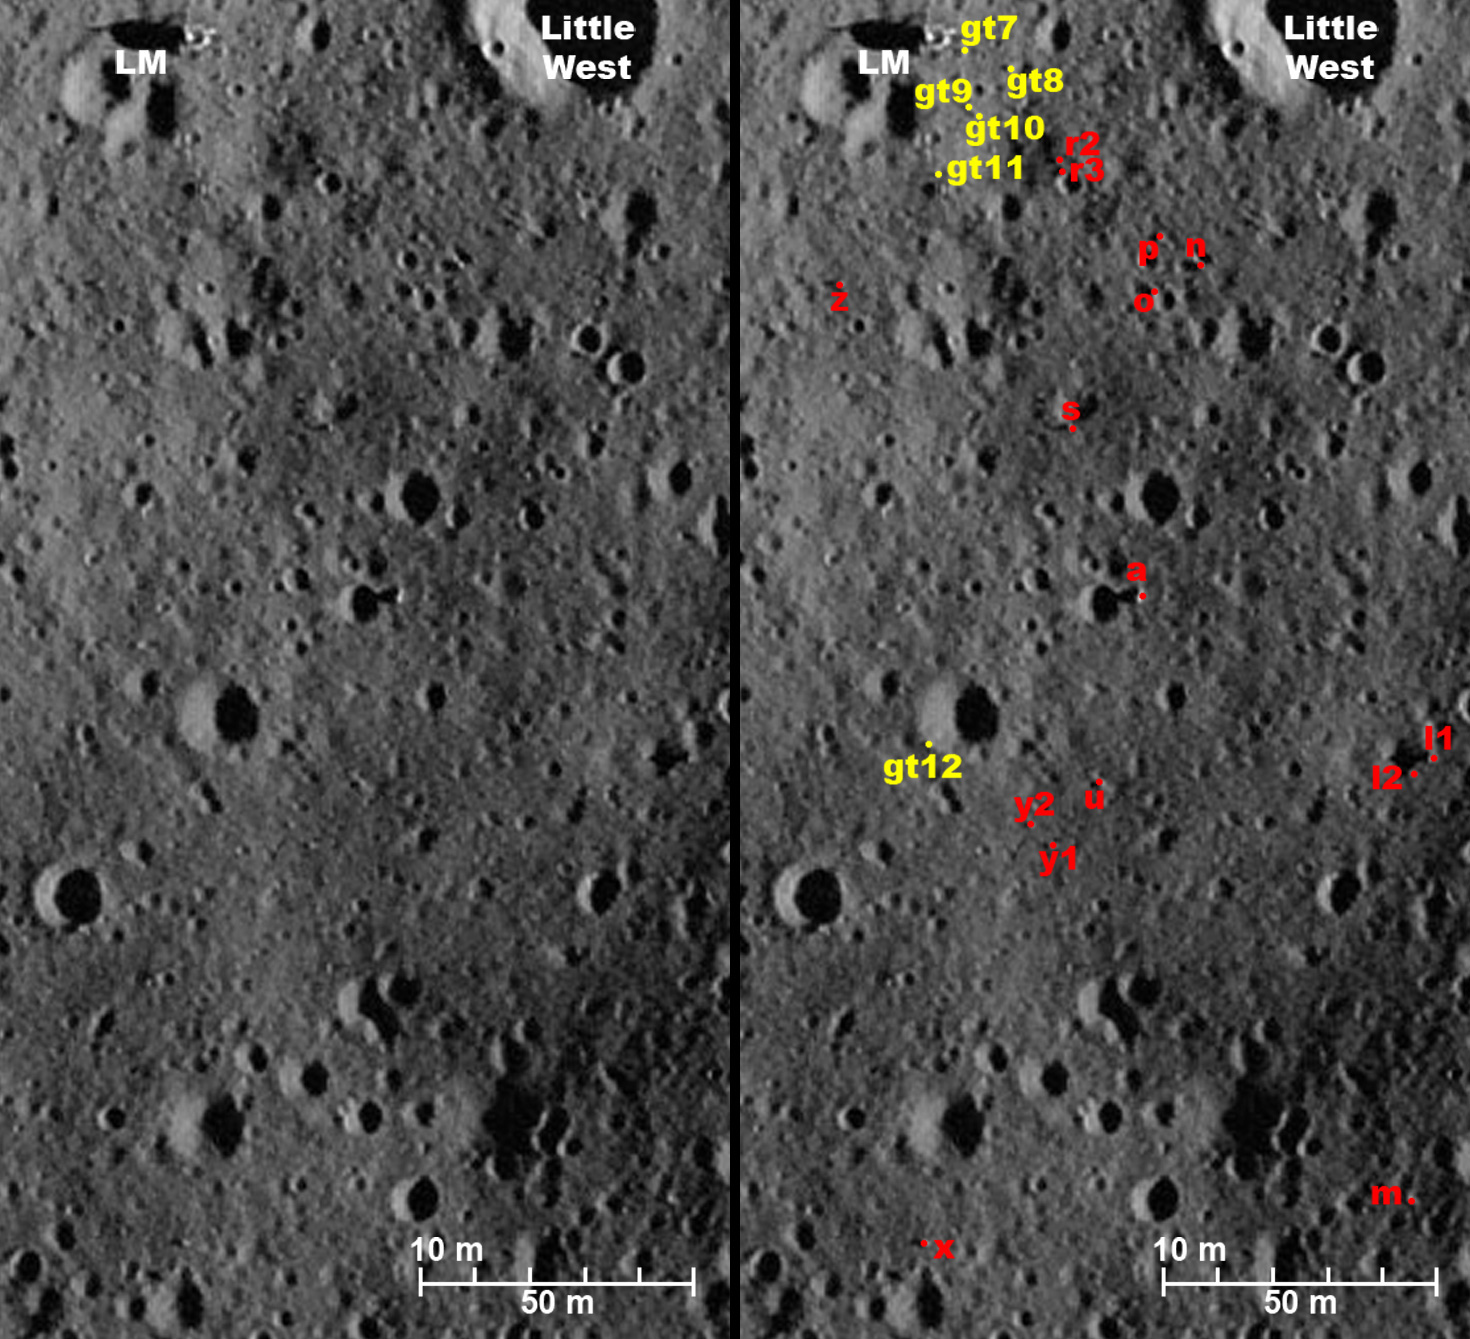
| Southeast boulders in the deconvolved 22 December 2009 LROC image. Identified boulders are marked in the right panel. (Click on the image for a larger version.) |
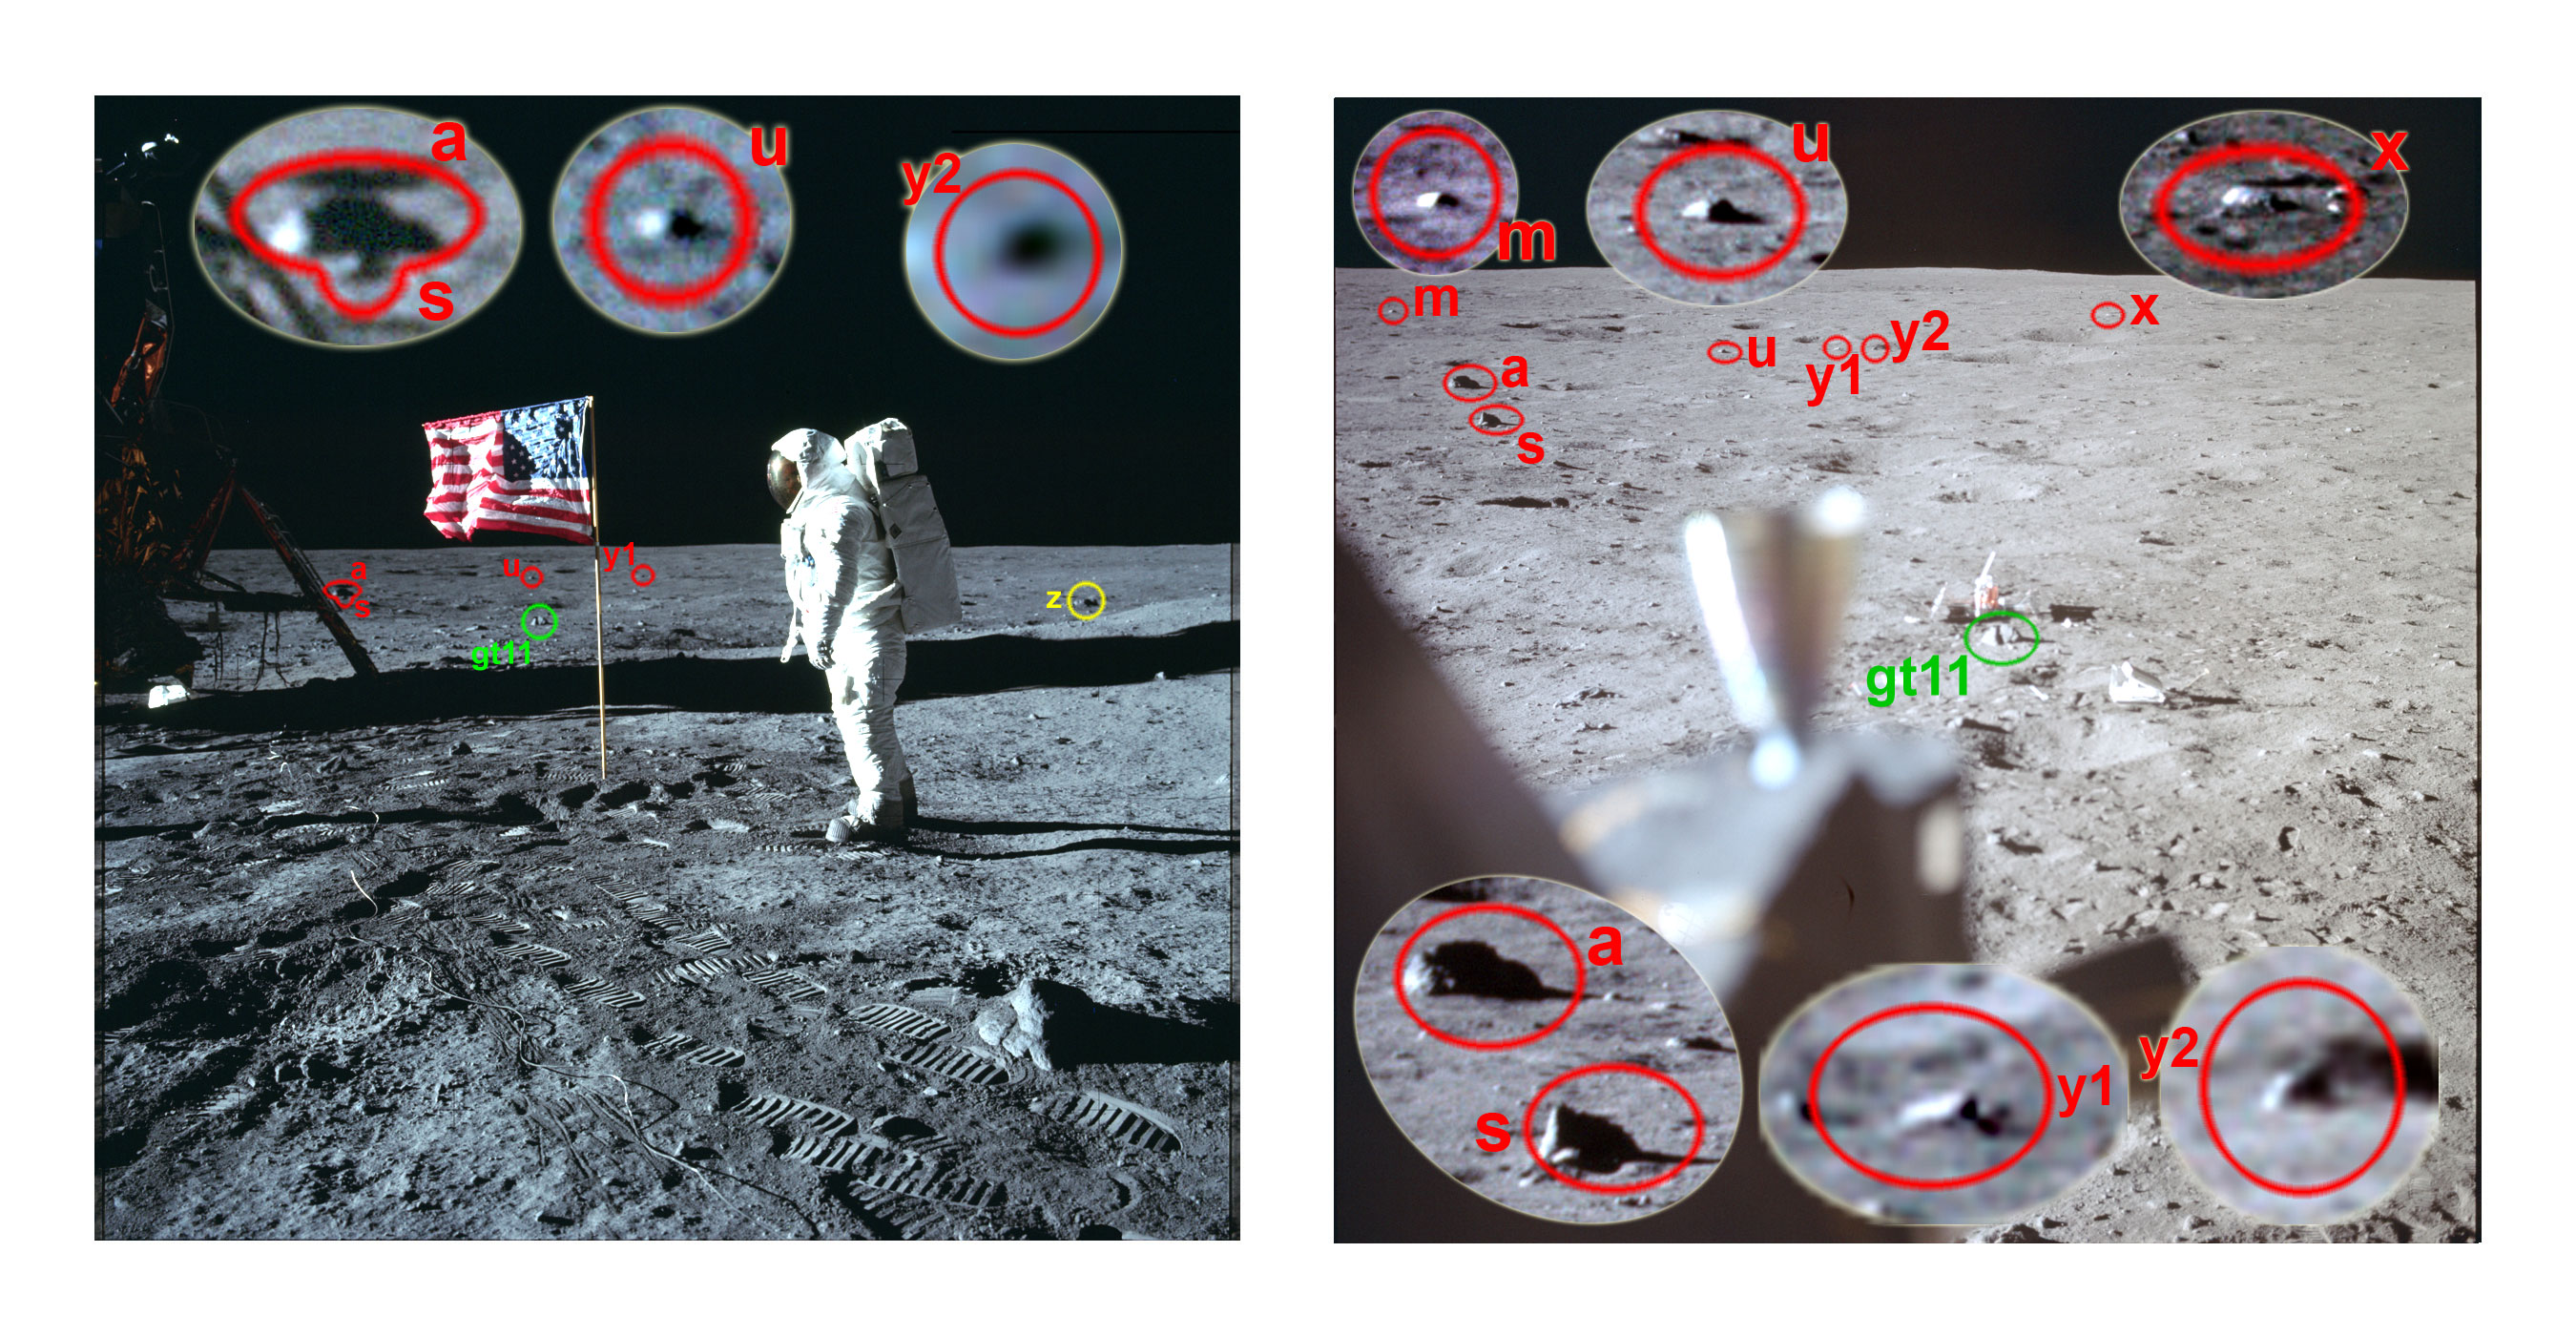
| Comparison between flag photo AS11-40-5875 (left) and CDR window photo AS11-37-5548 (right), with boulders a and s on the left in both images. In 5875, only the tip of s is visible, with the rest of boulder hidden by the rim of a shallow depression discussed below. Note that boulder z, marked here in yellow, is not in the AS11-37-5548 field-of-view. (Click on the image for a larger version.) |
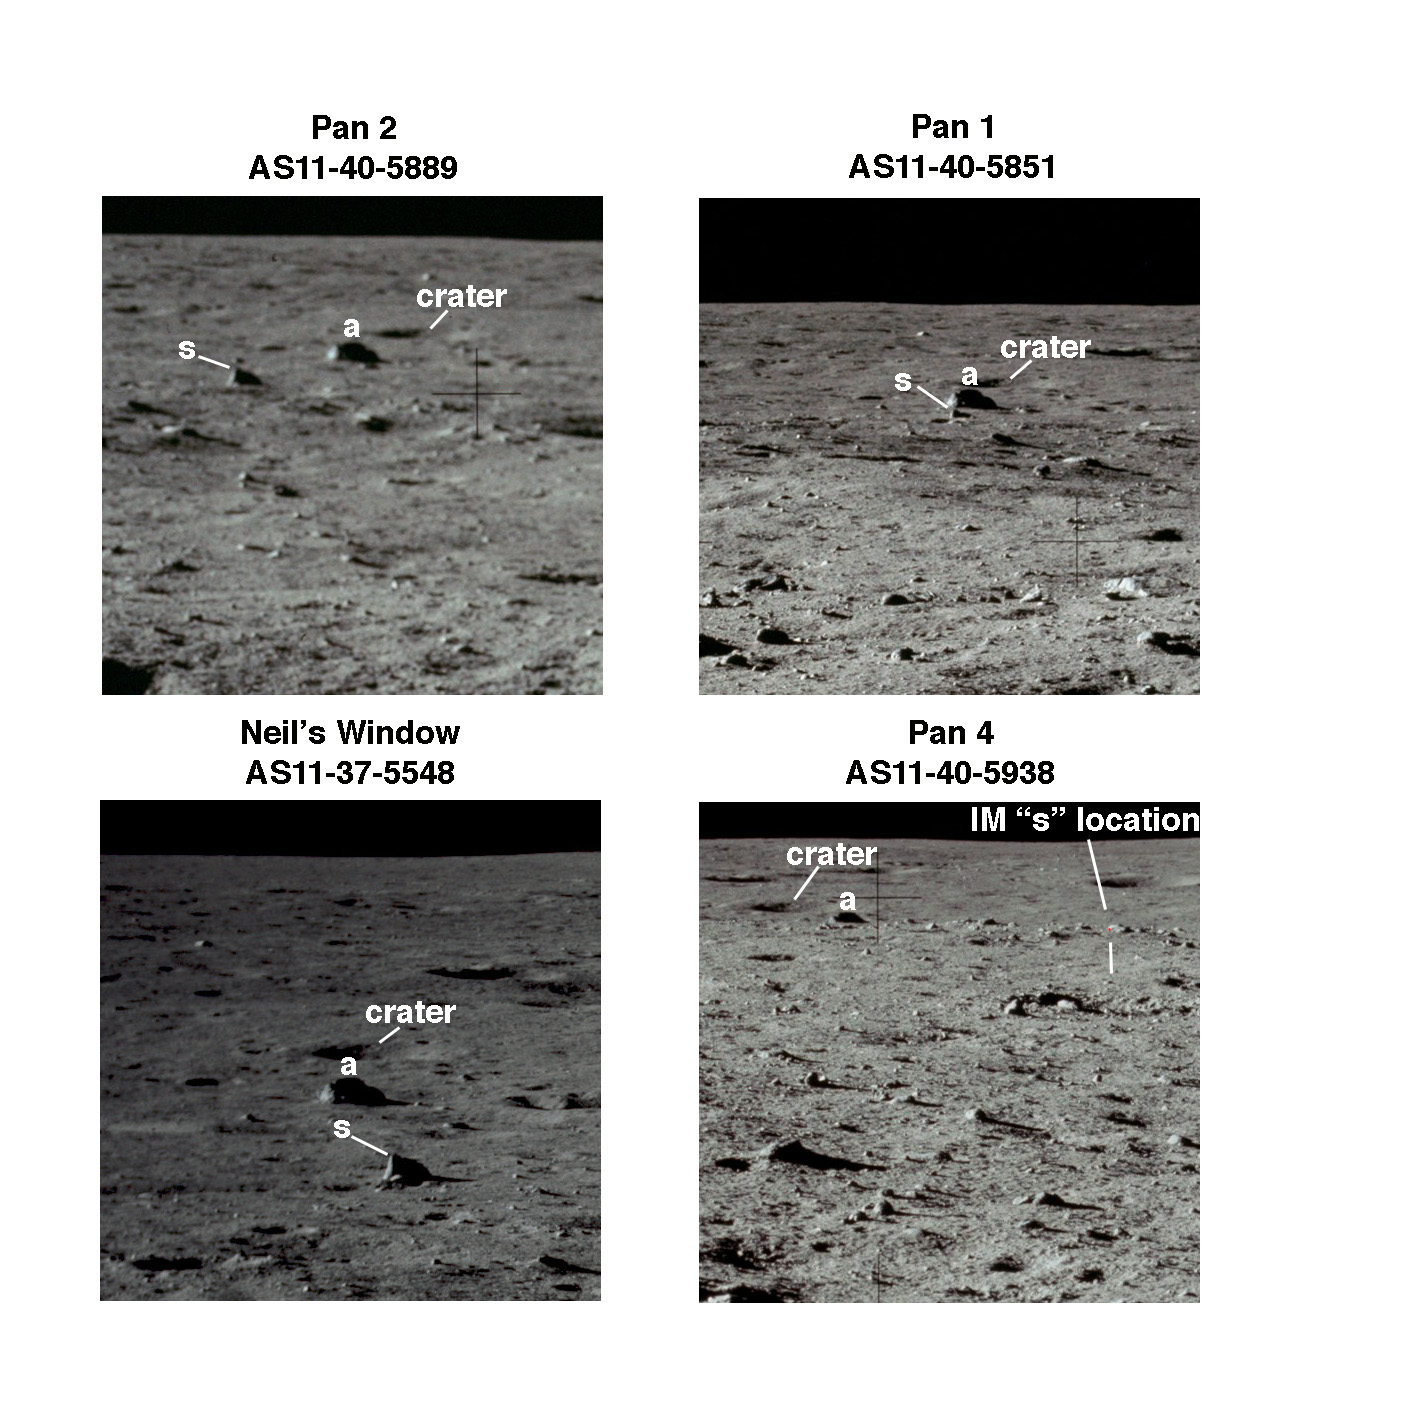
| Four views of boulders a and s from near the LM. The images are shown in the order of the west-to-east locations of the camera stations. Pan 2 (upper left) was taken farthest west; Pan 1 (upper right) from near the MESA and west of the Minus-Y strut; Neil's window is east of the minus-Y strut; and Pan 4 is the farthest east of the four locations. In that order, the position of a labeled crater beyond boulder a appears to move from right to left relative to the boulder. Because boulder s is closer to the LM than boulder a, it appears to move left to right relative to a. (Click on the image for a larger version.) |
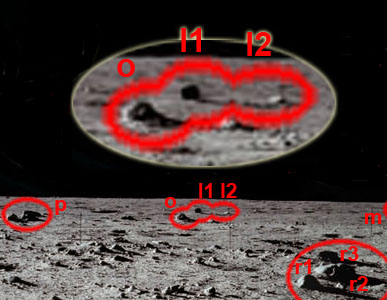
| Boulders southwest of the LM identified in Pan 1. Boulder zd is hidden by terrain in this view, but can be seen in a southern detail from Pan 2. Boulders ze and zf also appear in a western detail from Pan 2. (Click on the image for a larger version.) |
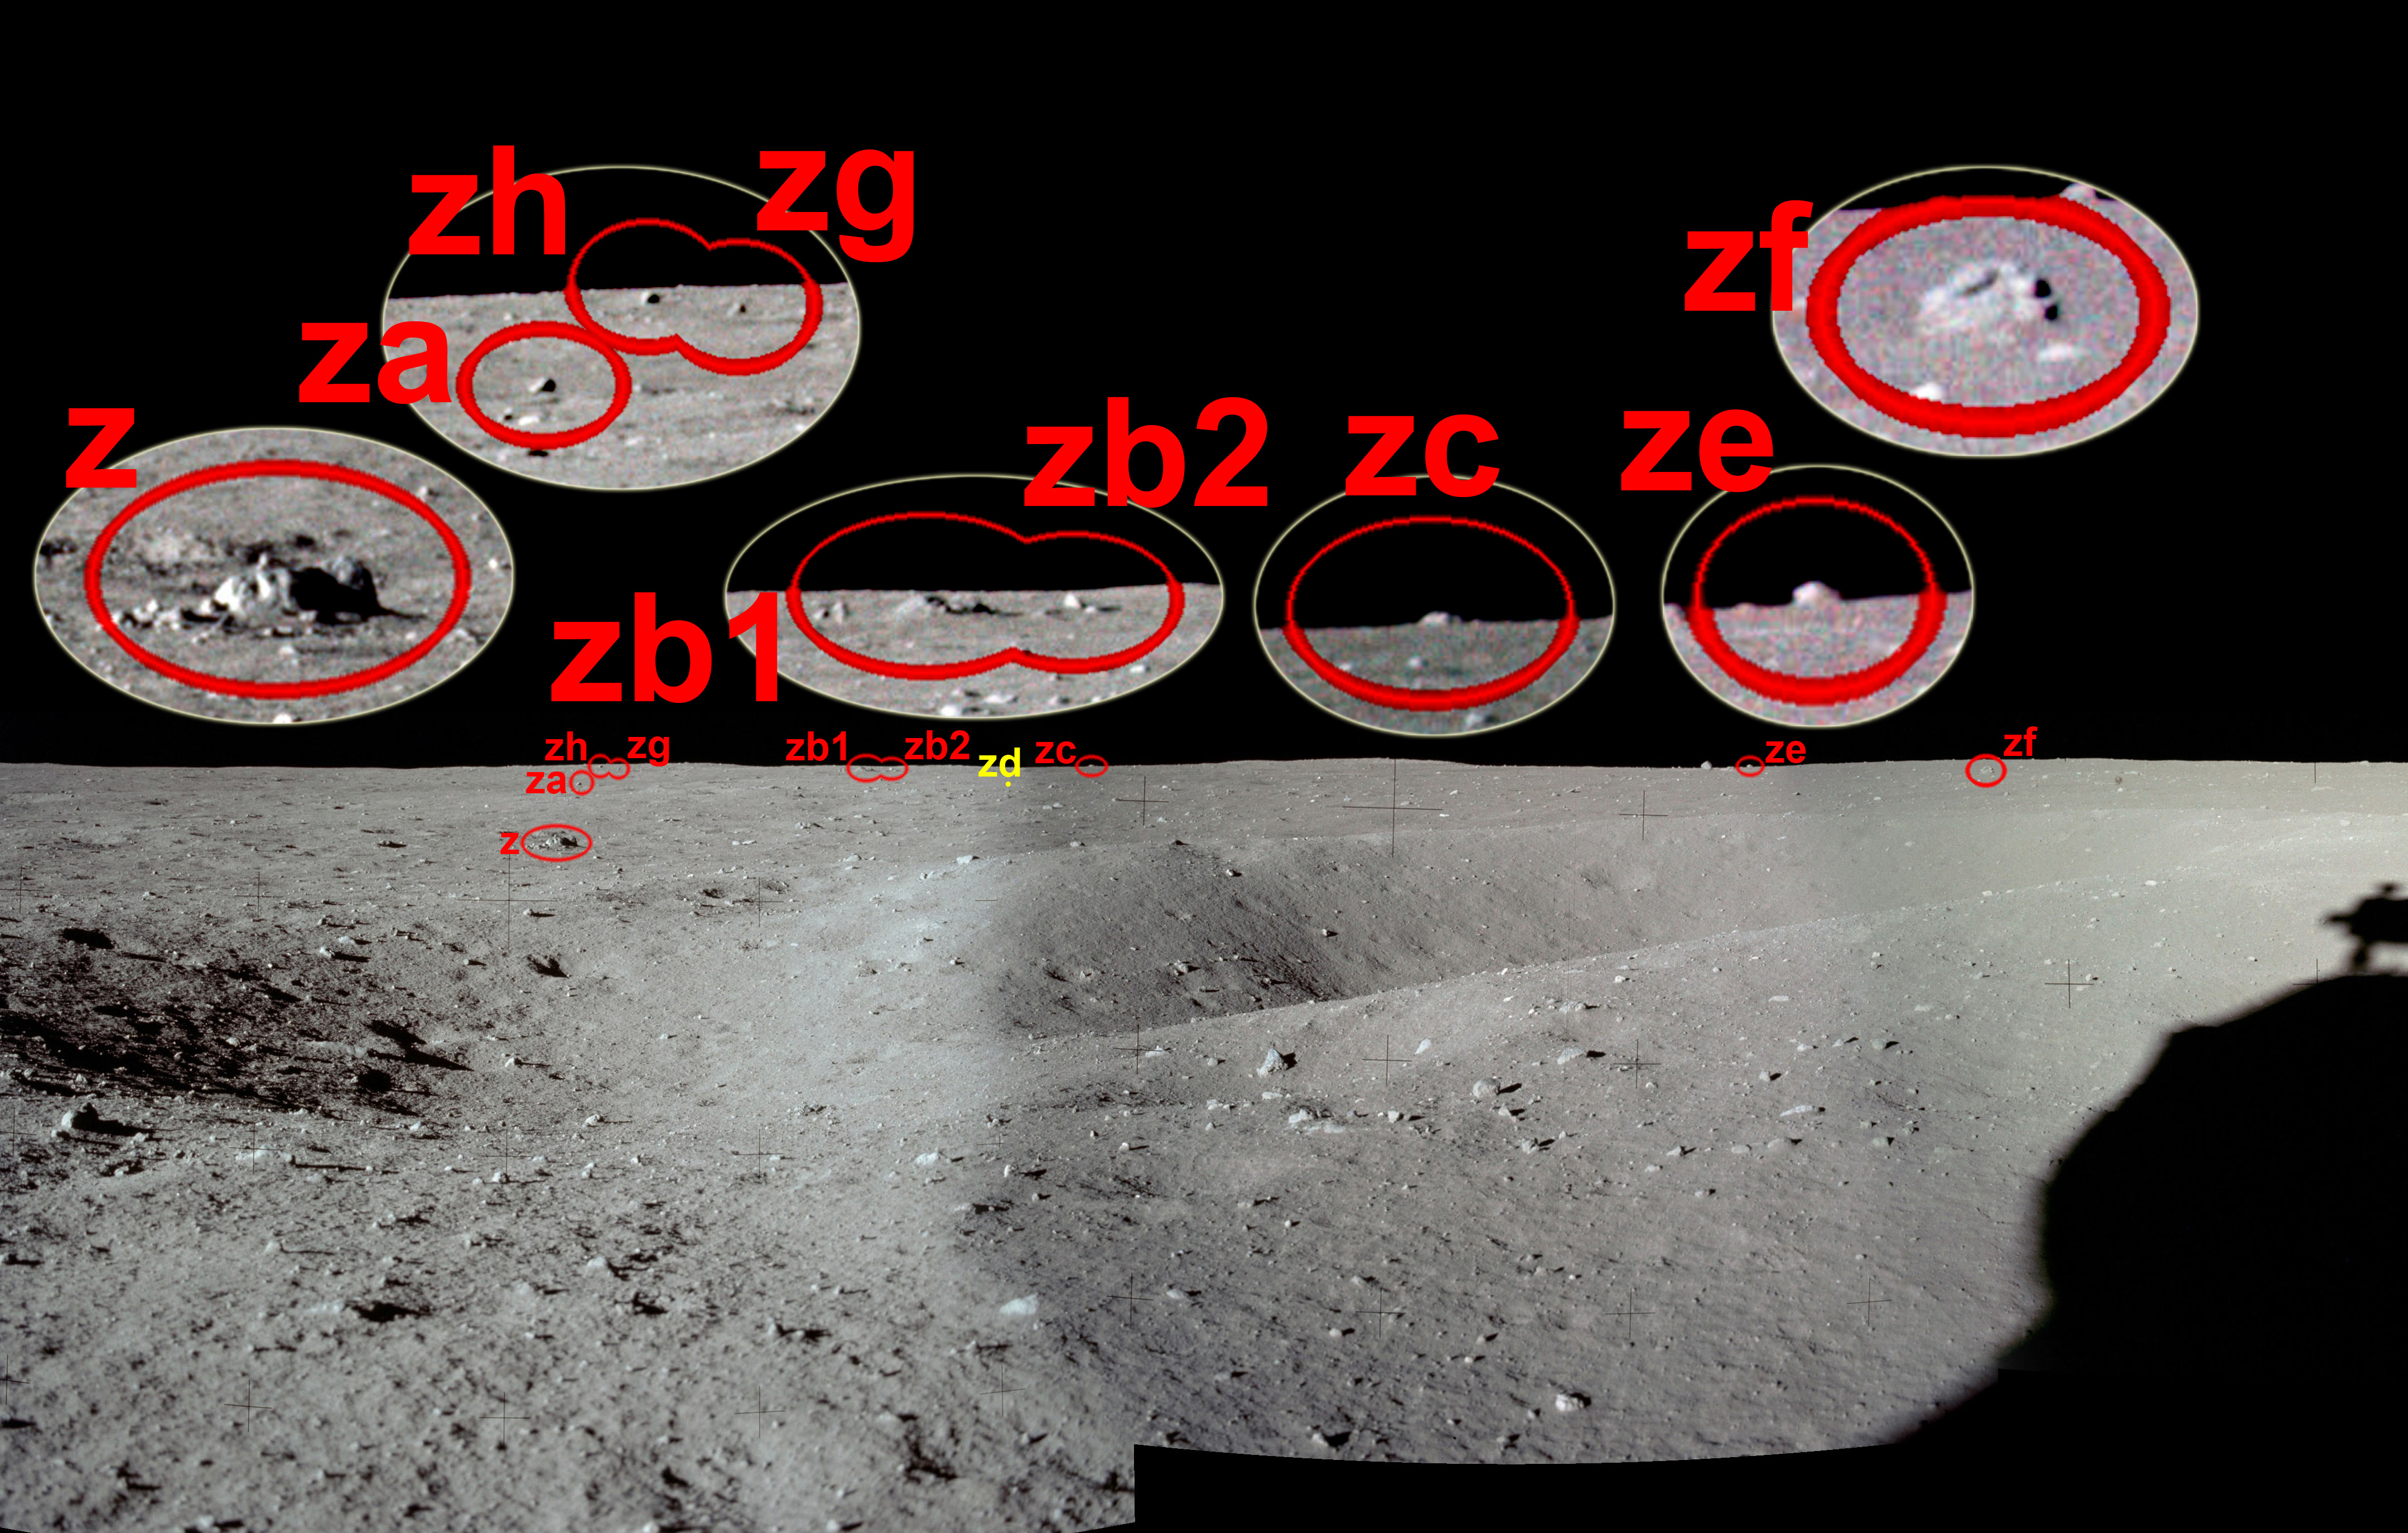
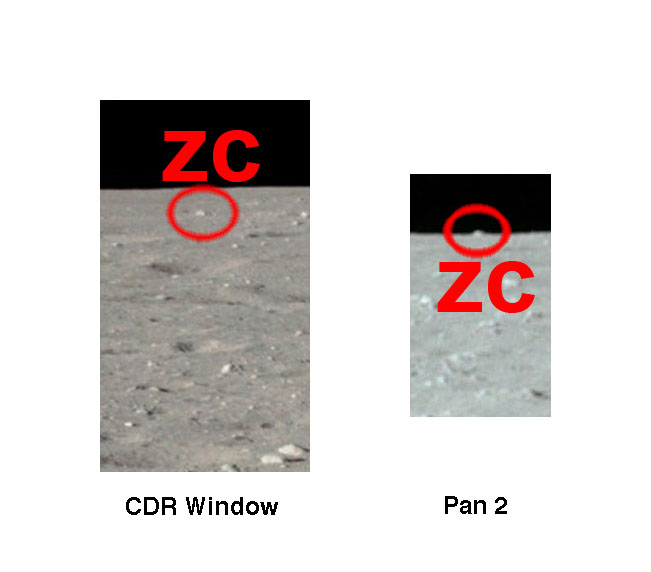
| Group Z boulders identified on a version of LROC image M116161085R deconvolved by GoneToPlaid. The red dots show the actual locations of the boulder; the green dots the photogrammetrically-determined locations. Note that five of the boulders in this group (zb1, zb2, zb3, zc, zg, and zh) are just outside the rim of a 140-m crater at the southwest corner of this detail. The nearest part of the rim is ~310 m to the south-west of the LM. The bottom of this crater is not visible from the elevation provided by the CDR's window, but the near rim is seen projected onto the inner wall on the far side of the crater. An animation made from AS11-40-5847, taken out Neil's window after the landing, highlights the near rim with a row of red dots. (Click on the image for a larger version.) |
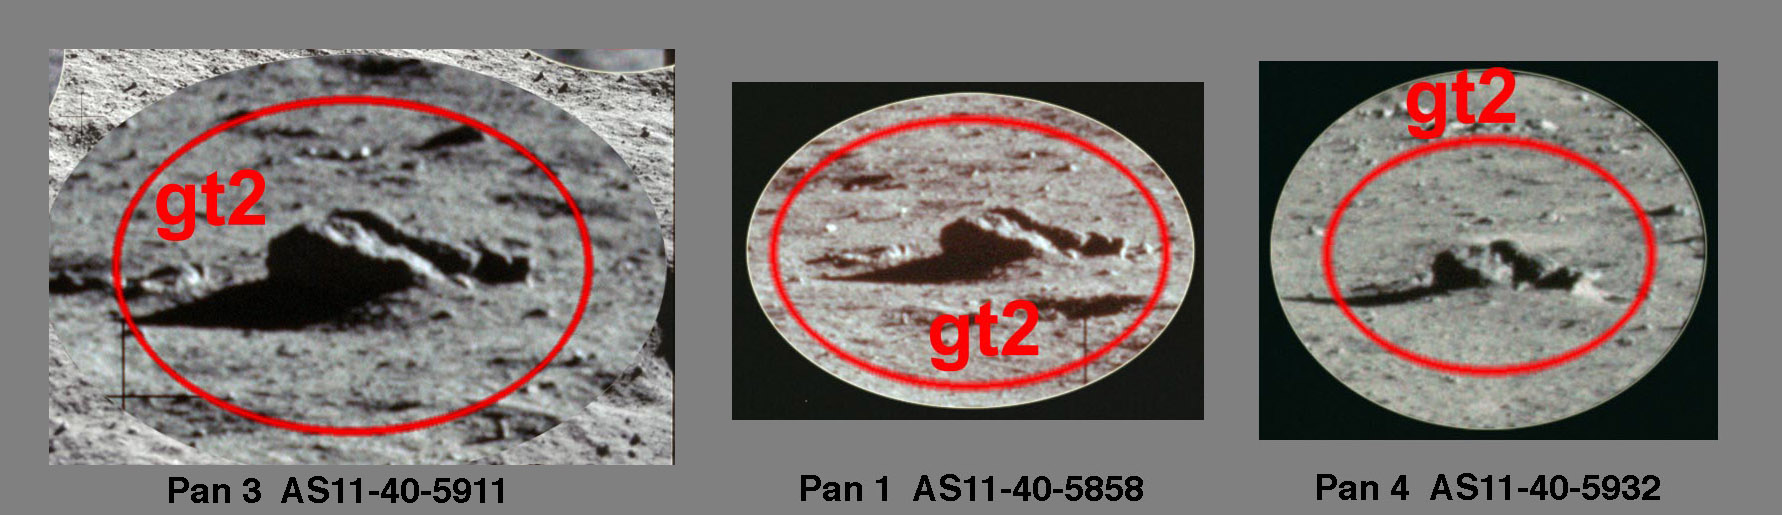
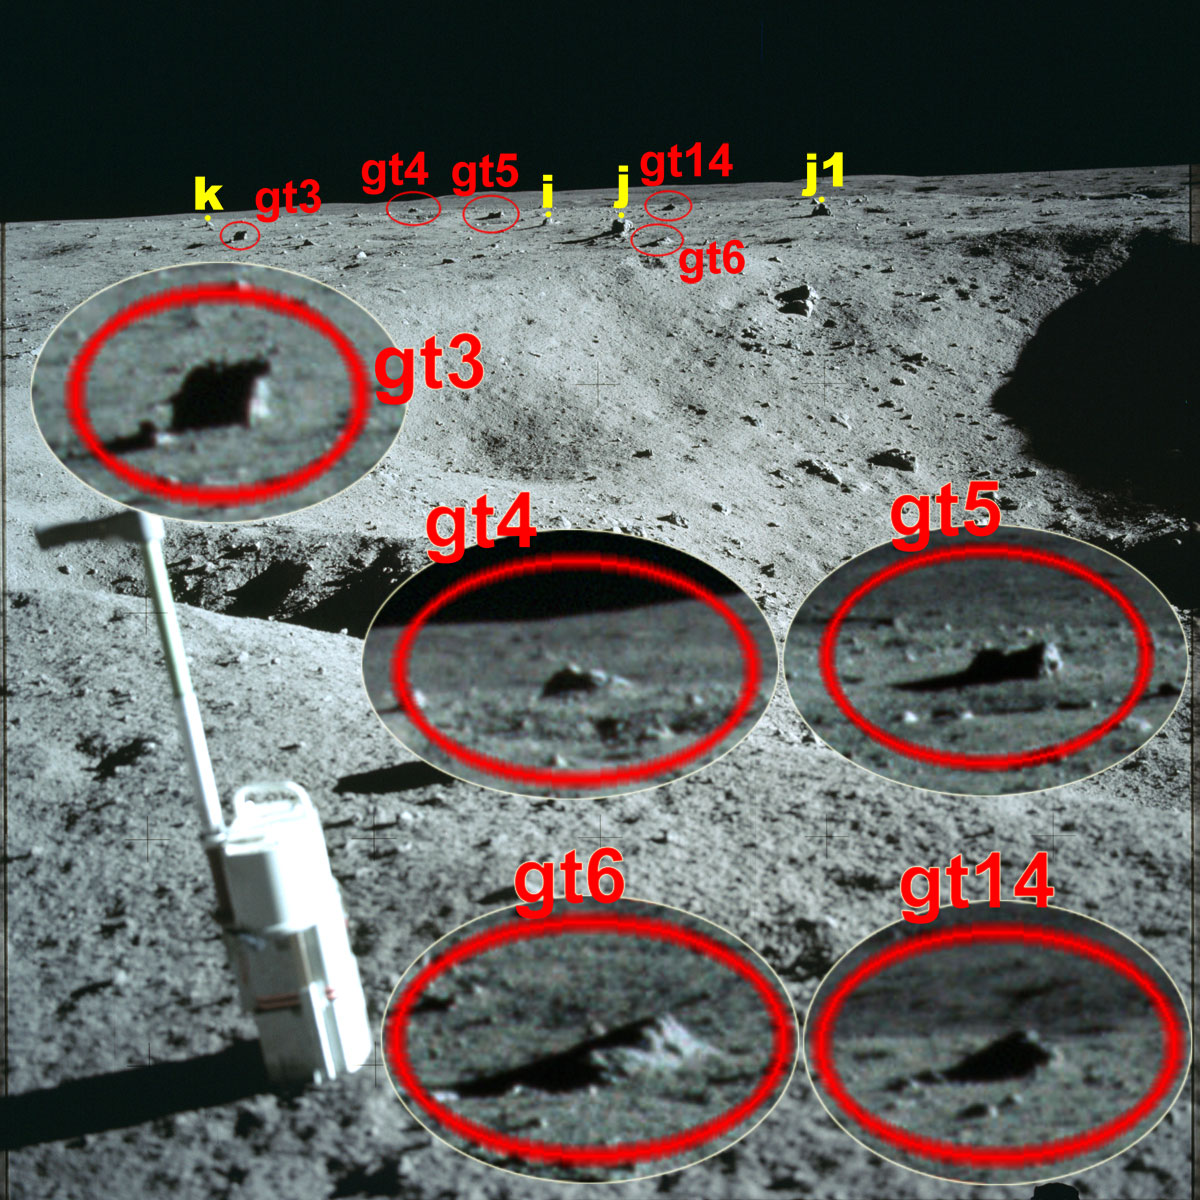
| Views of gt2 starting with the most up-Sun view (Pan 3) counter-clockwise to the most cross-Sun (Pan 4). (Click on the image for a larger version.) |
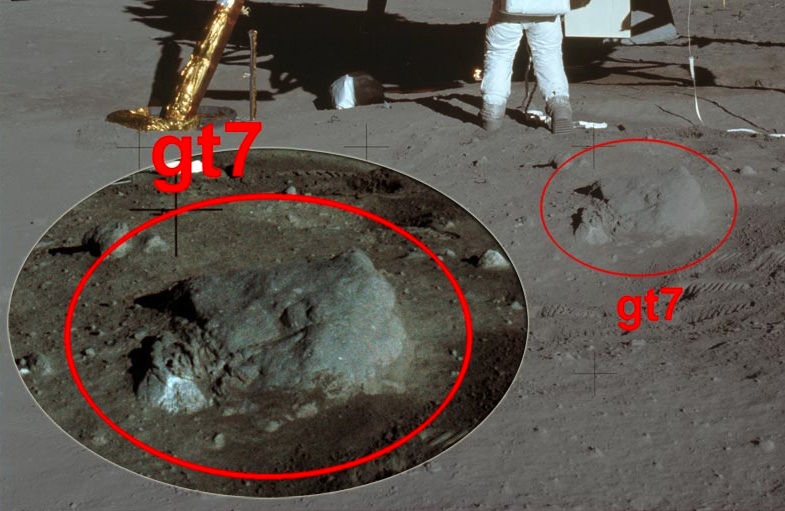
| Boulder gt7 in
a detail from 5927, one of Neil's pictures of
Buzz offloading the seismometer package from
the SEQ Bay. |
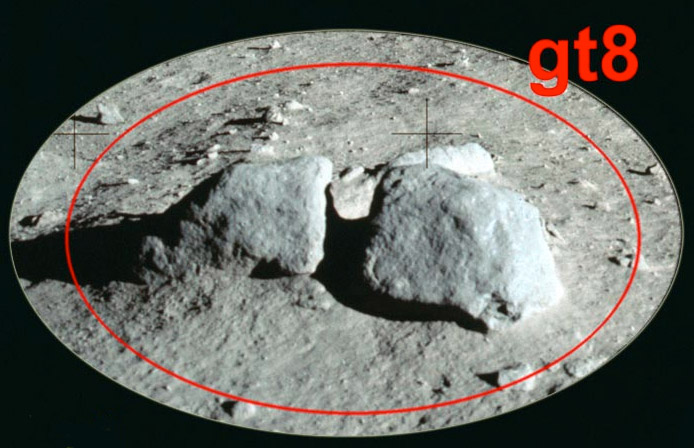
| gDetail
from AS11-40-5932
showing boulder gt8. The image is part
of Pan 4 and was taken from only 5.5 meters
away. |
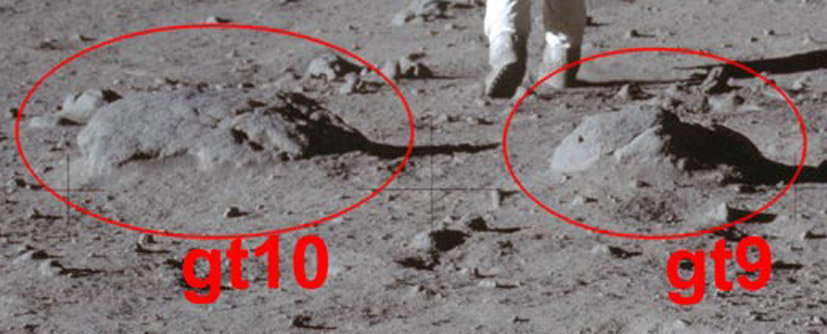
| Detail
from AS11-40-5944. Buzz is
carrying the EASEP packages to the deployment
site. He has just passed to the right of
gt9. |

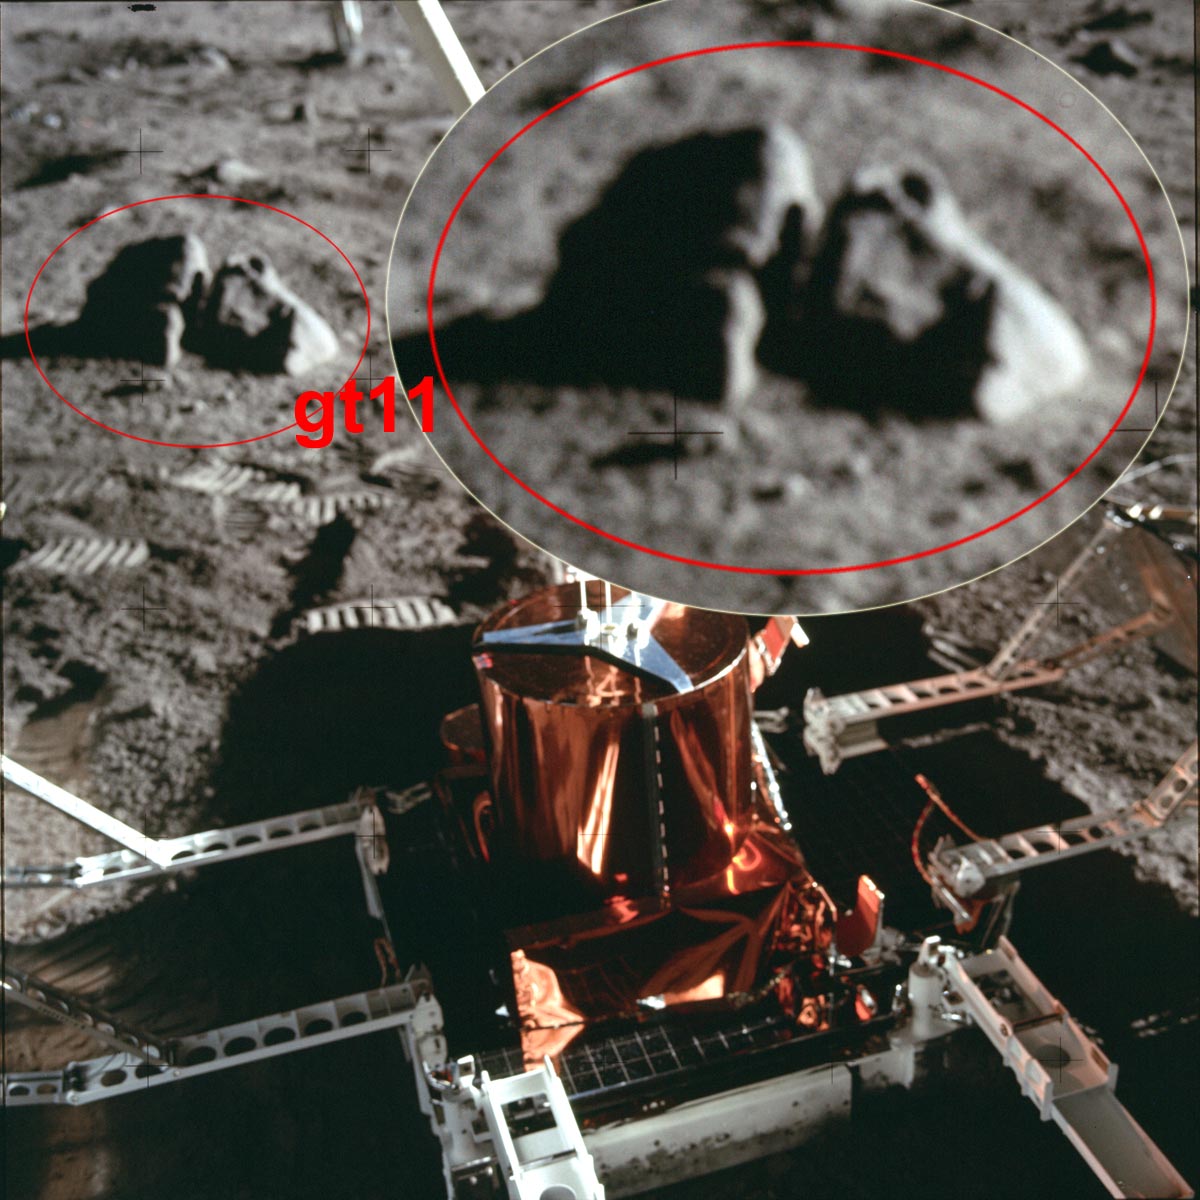
| Detail
from AS11-40-5953
showing boulder gt11 just north of the
Passive Seismometer Experiment Package (PSEP).
(Click on the
image for a view that shows more of the PSEP |
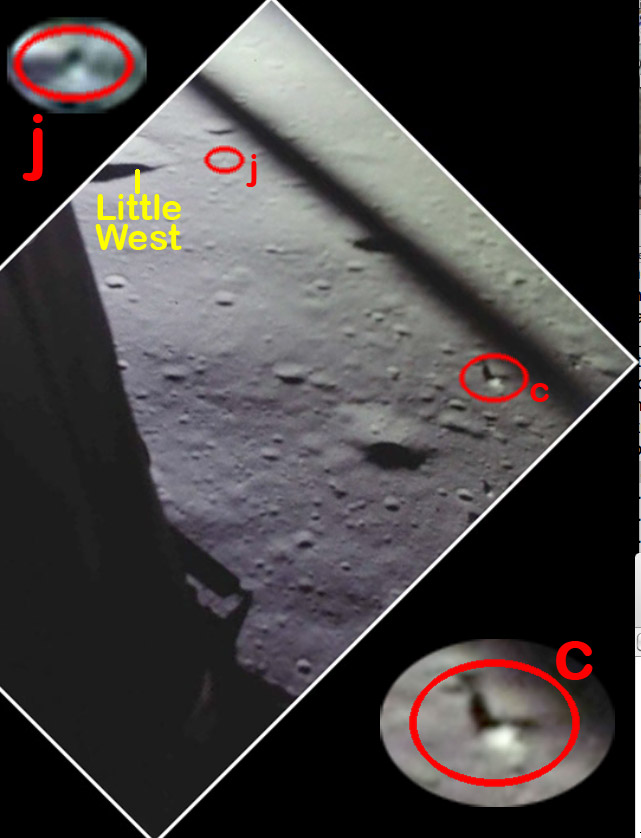
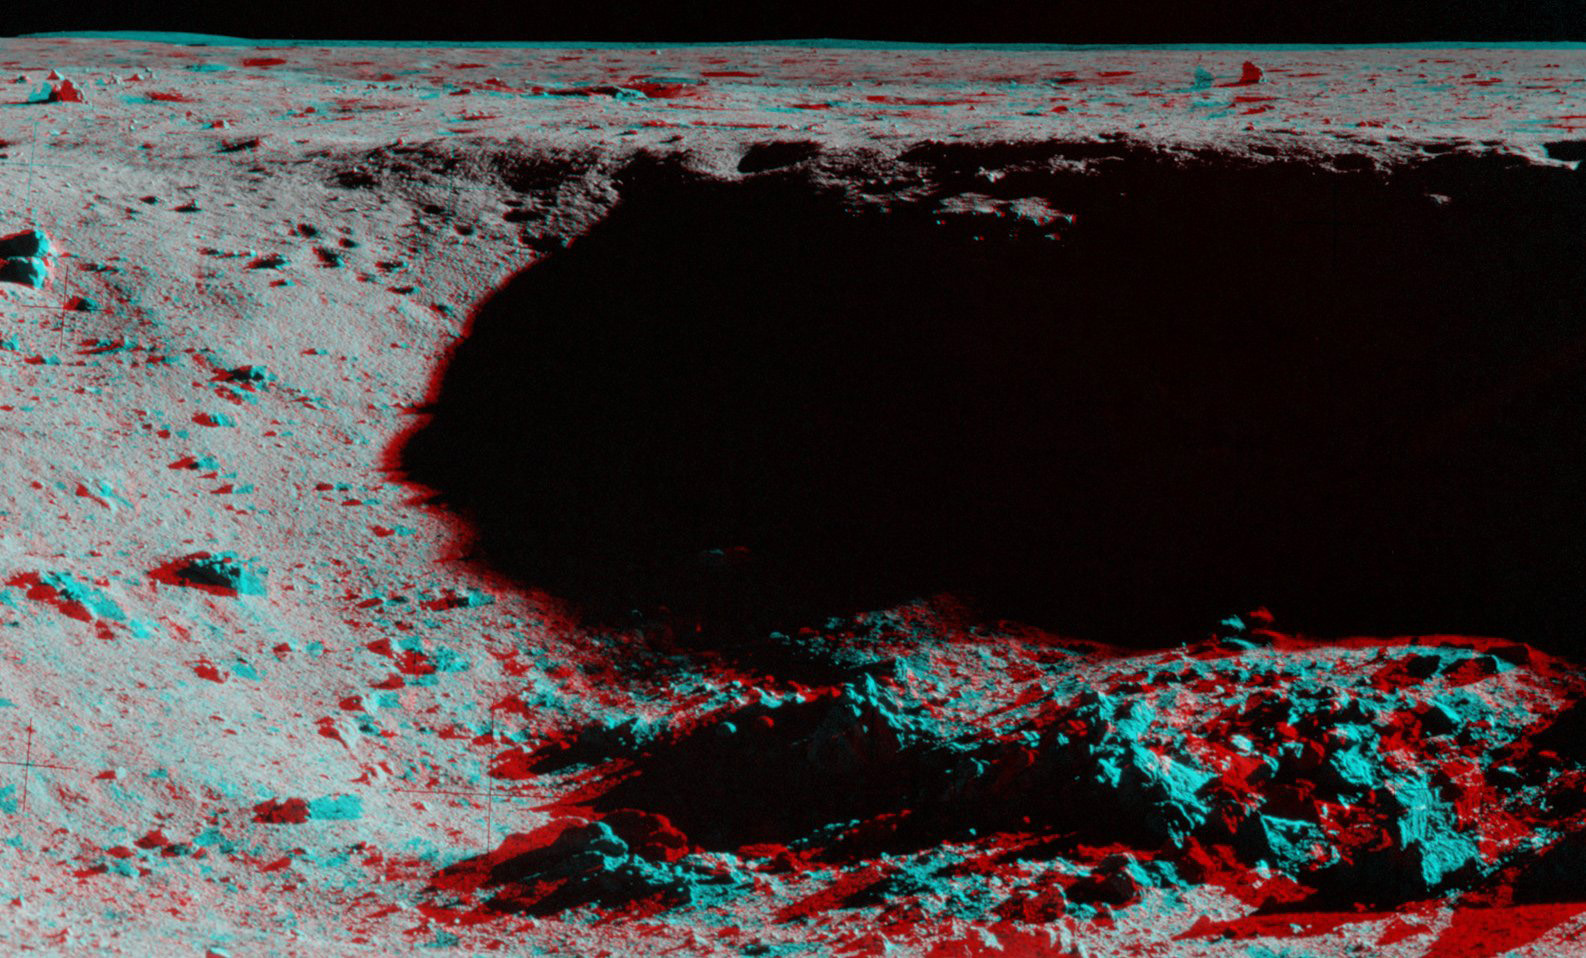
| Neil has the LM tilted more upright than planned to slow their descent. Boulders c and j are the only boulders visible in this frame that are also visible in the EVA Hasselblad images. (Click on the image for a larger version.) |
| With the LM tilted back a bit to slow its forward velocity, we get our best view of the area north and west of the eventual landing site. Although the LM is still east of Little West Crater, the three largest of the e-group of boulders are resolved. We also get a reasonable view of the fresh crater - and the depression beyond it - discussed in Section 4. The next image shows the foreground boulders from closer range. (Click on the image for a larger version.) |
| After Neil tilts the LM more upright to begin the final descent, we get an excellent view of nine boulders north and northwest of Little West that have been identified in the EVA Hasselblad images. (Click on the image for a larger version.) |
| Now closer to the landing site, we get good views of eleven small craters and six small boulders which can be identified in a detail from AS11-40-5934, a frame from Pan 4, and in a detail from Pan 5. (Click on the image for a larger version.) |
| On the final approach, the descent engine is sweeping fine dust from the surface. Eagle will land just off screen to the left of the Pan 3 Crater. Excepting only x3, the rocks and craters beyond the Pan3 Crater can also be seen in a detail from a panorama Buzz took out his window after the EVA, and in a detail from Pan 3. |
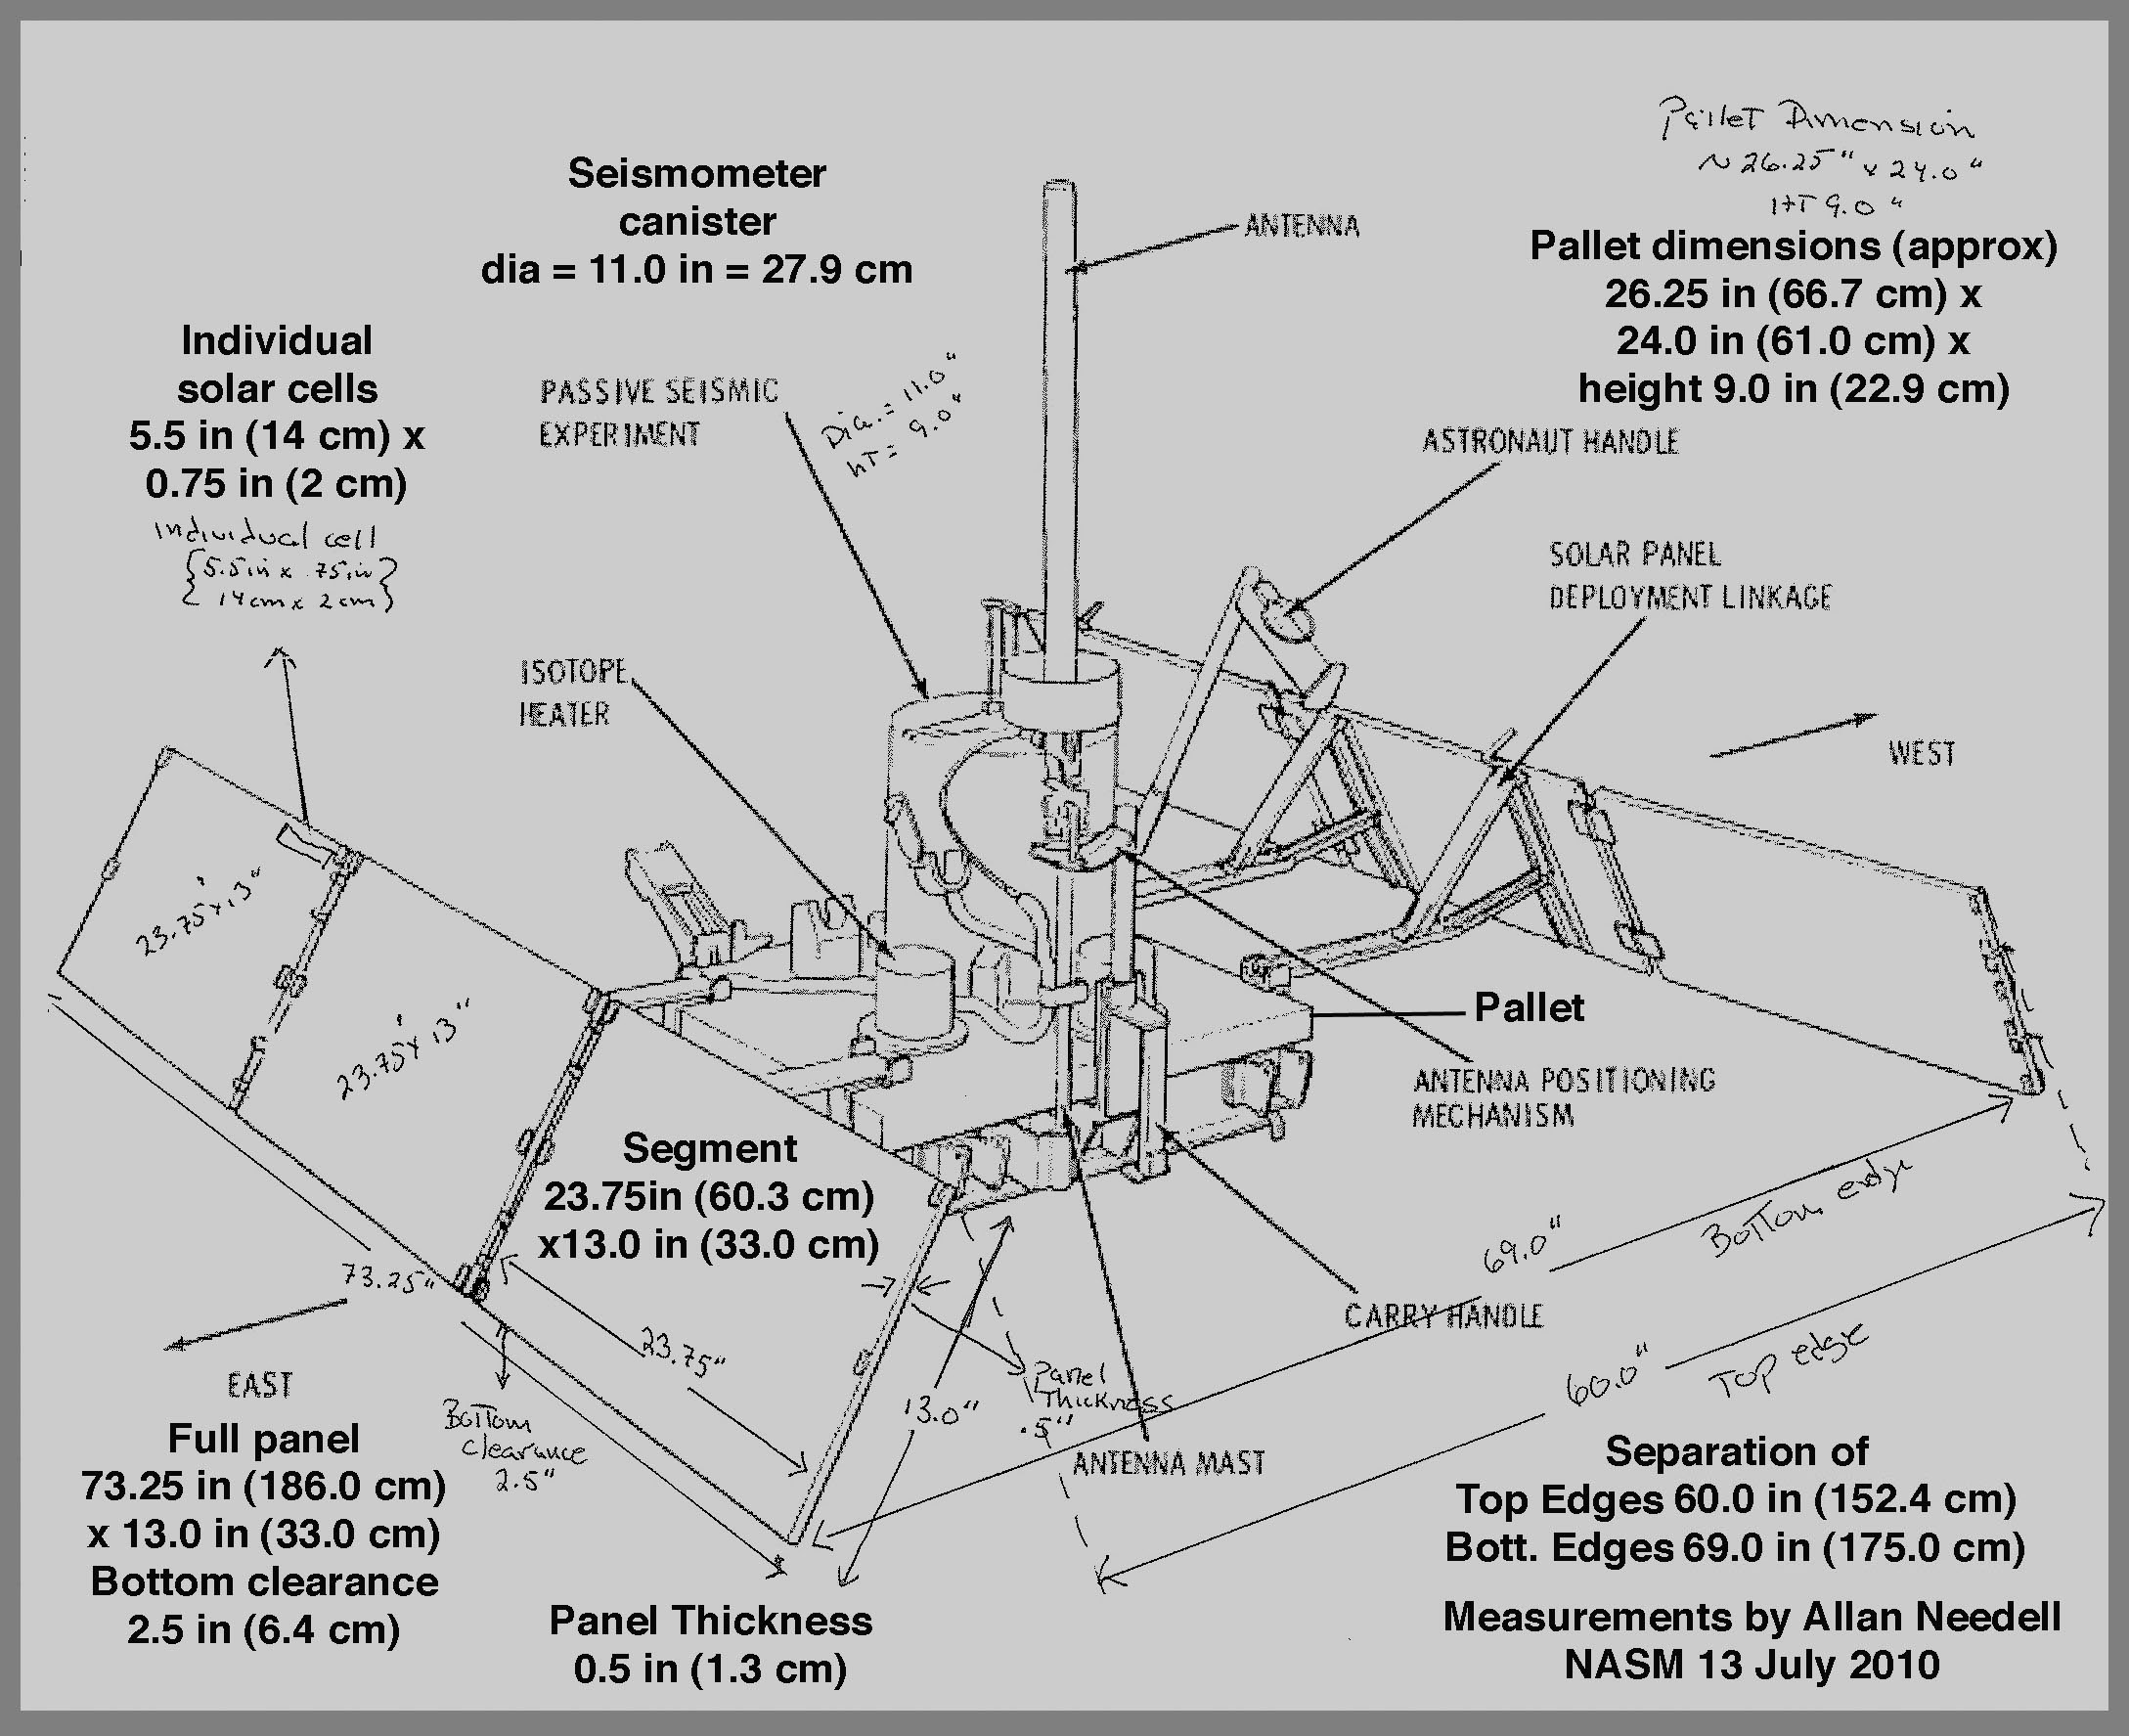
| Feature |
Lunar Dimension (m) |
NASM Dimension (m) |
| Solar panel length |
1.866 (average of four edges; both tops and bottoms |
1.860 |
| Solar panel width |
0.328 (average of four ends) |
0.330 |
| Top edge separation |
1.463 (average of near and far corners: 1.466 and 1.460 m, respectively) |
1.524 |
| Bottom edge
separation |
1.793 (average of near and far corners) |
1.750 |
| Solar panel tilt
from vertical |
30 degrees |
20 degrees |
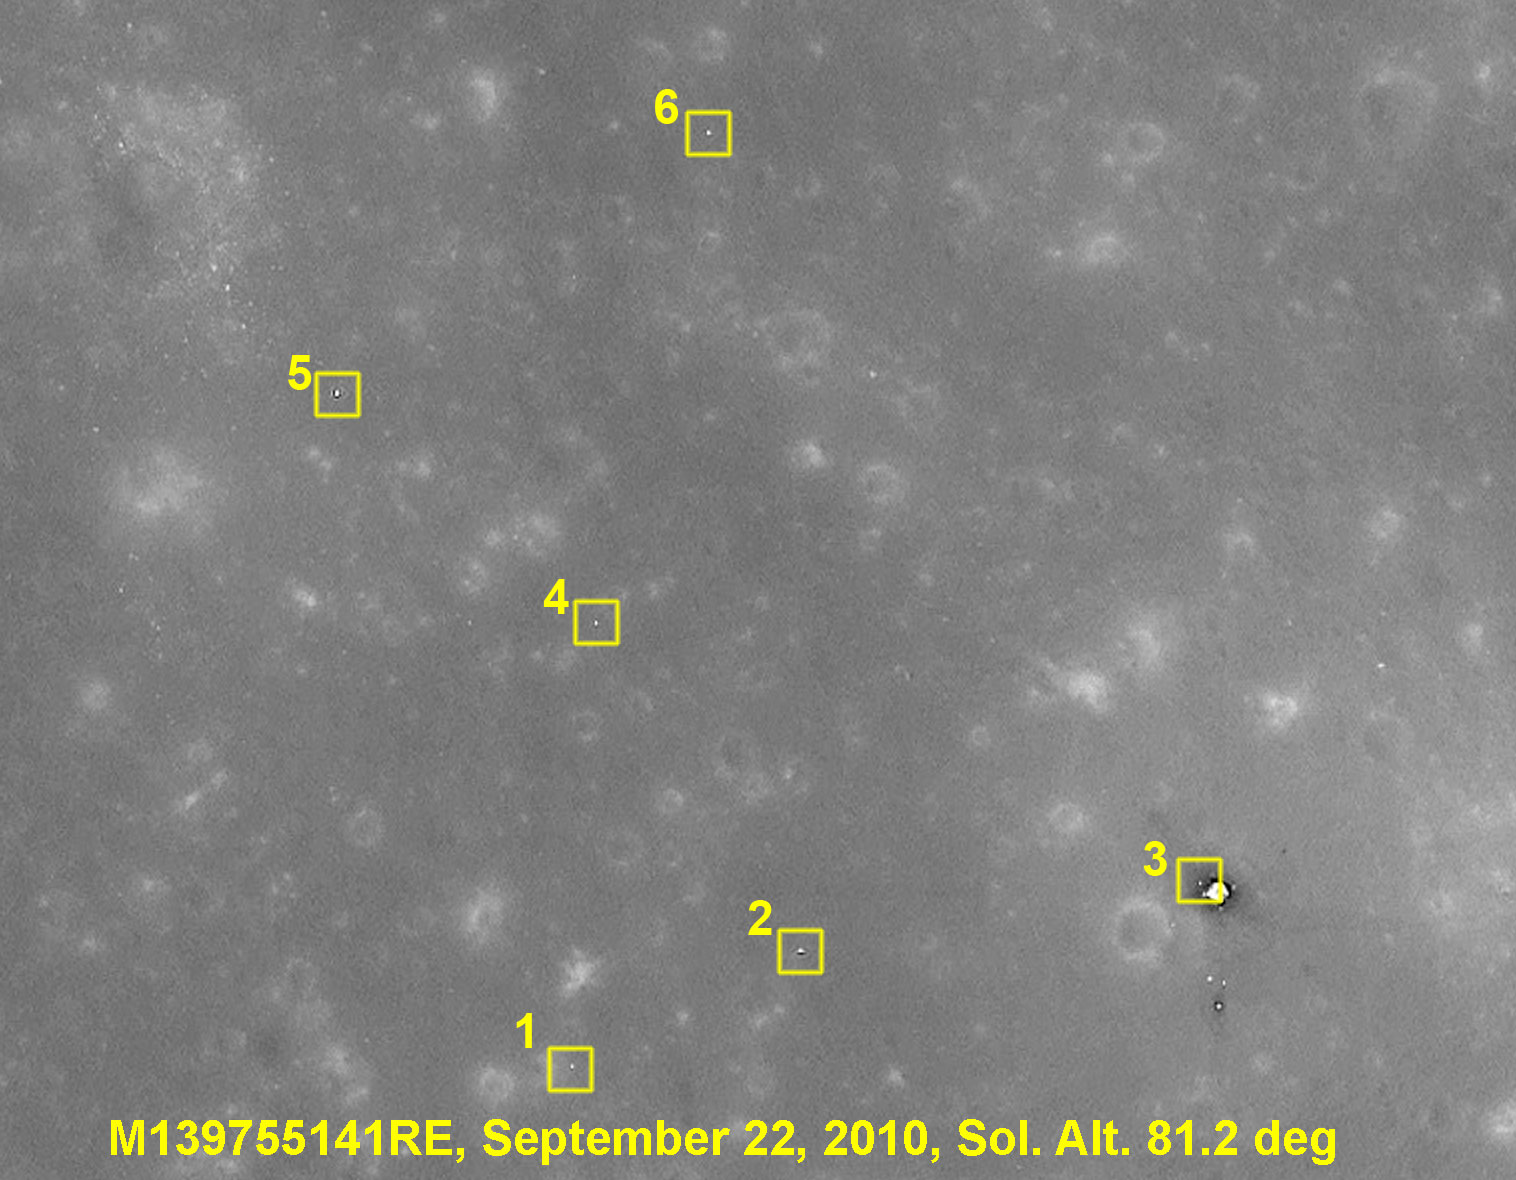
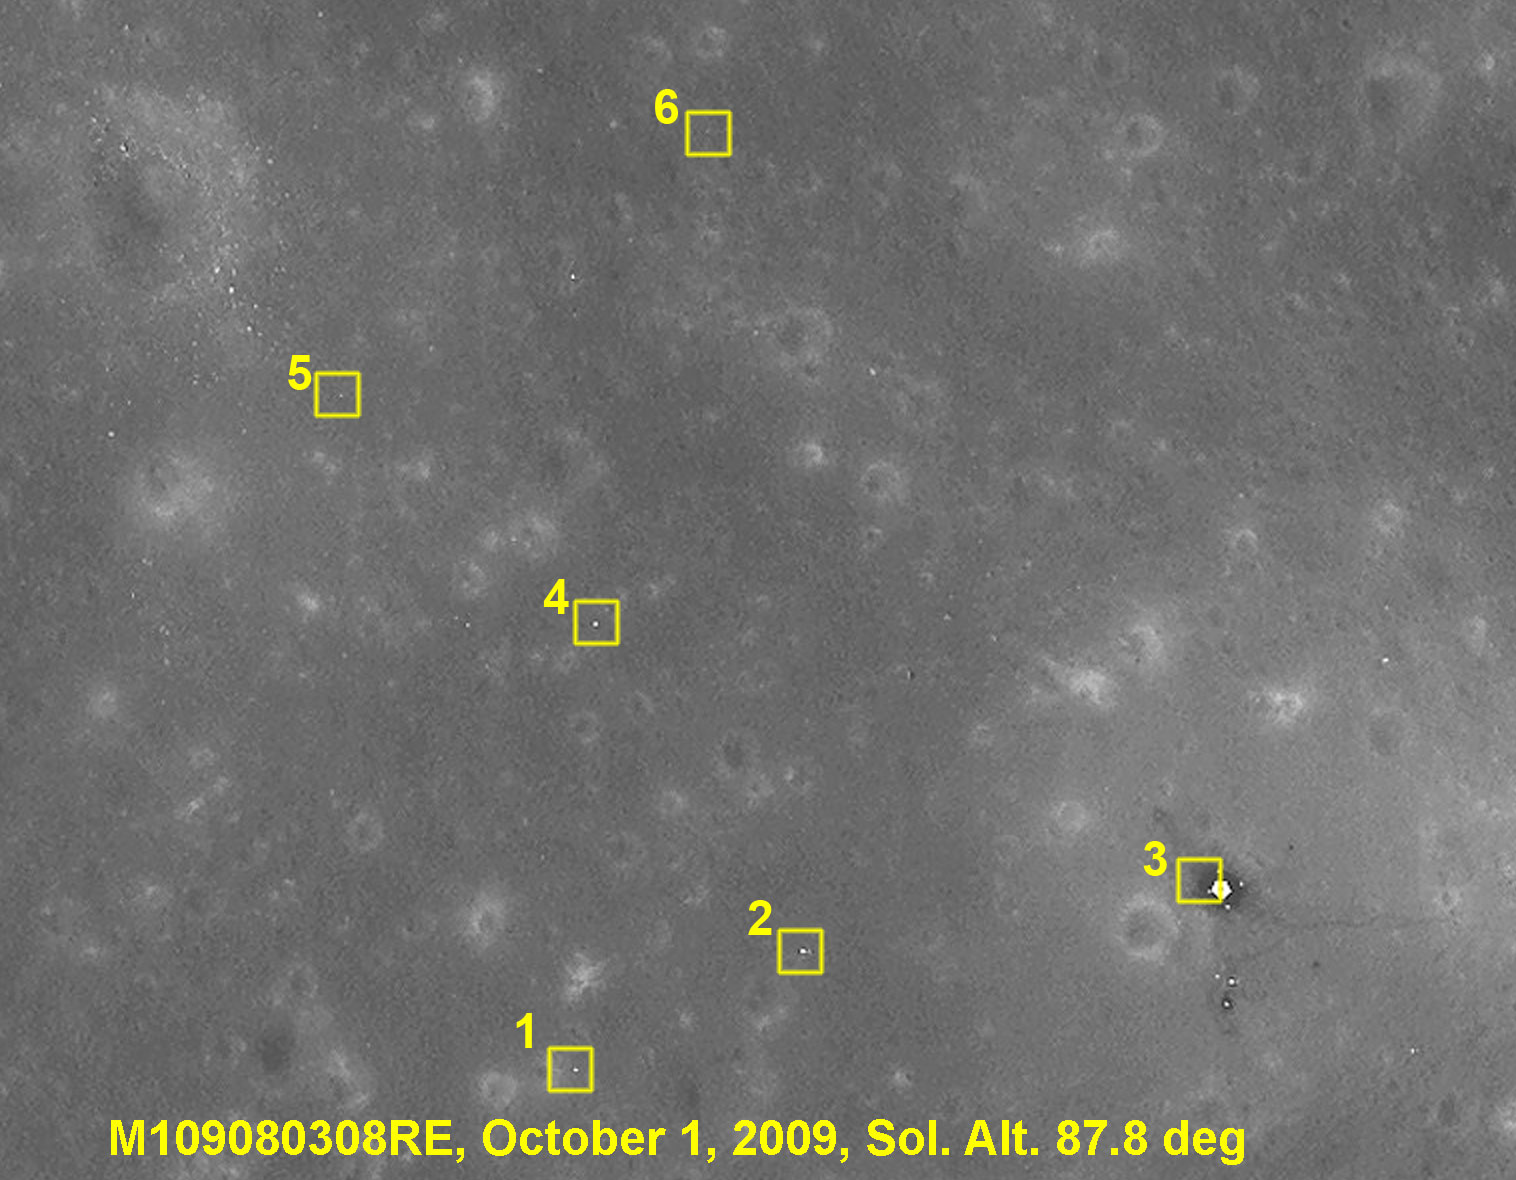
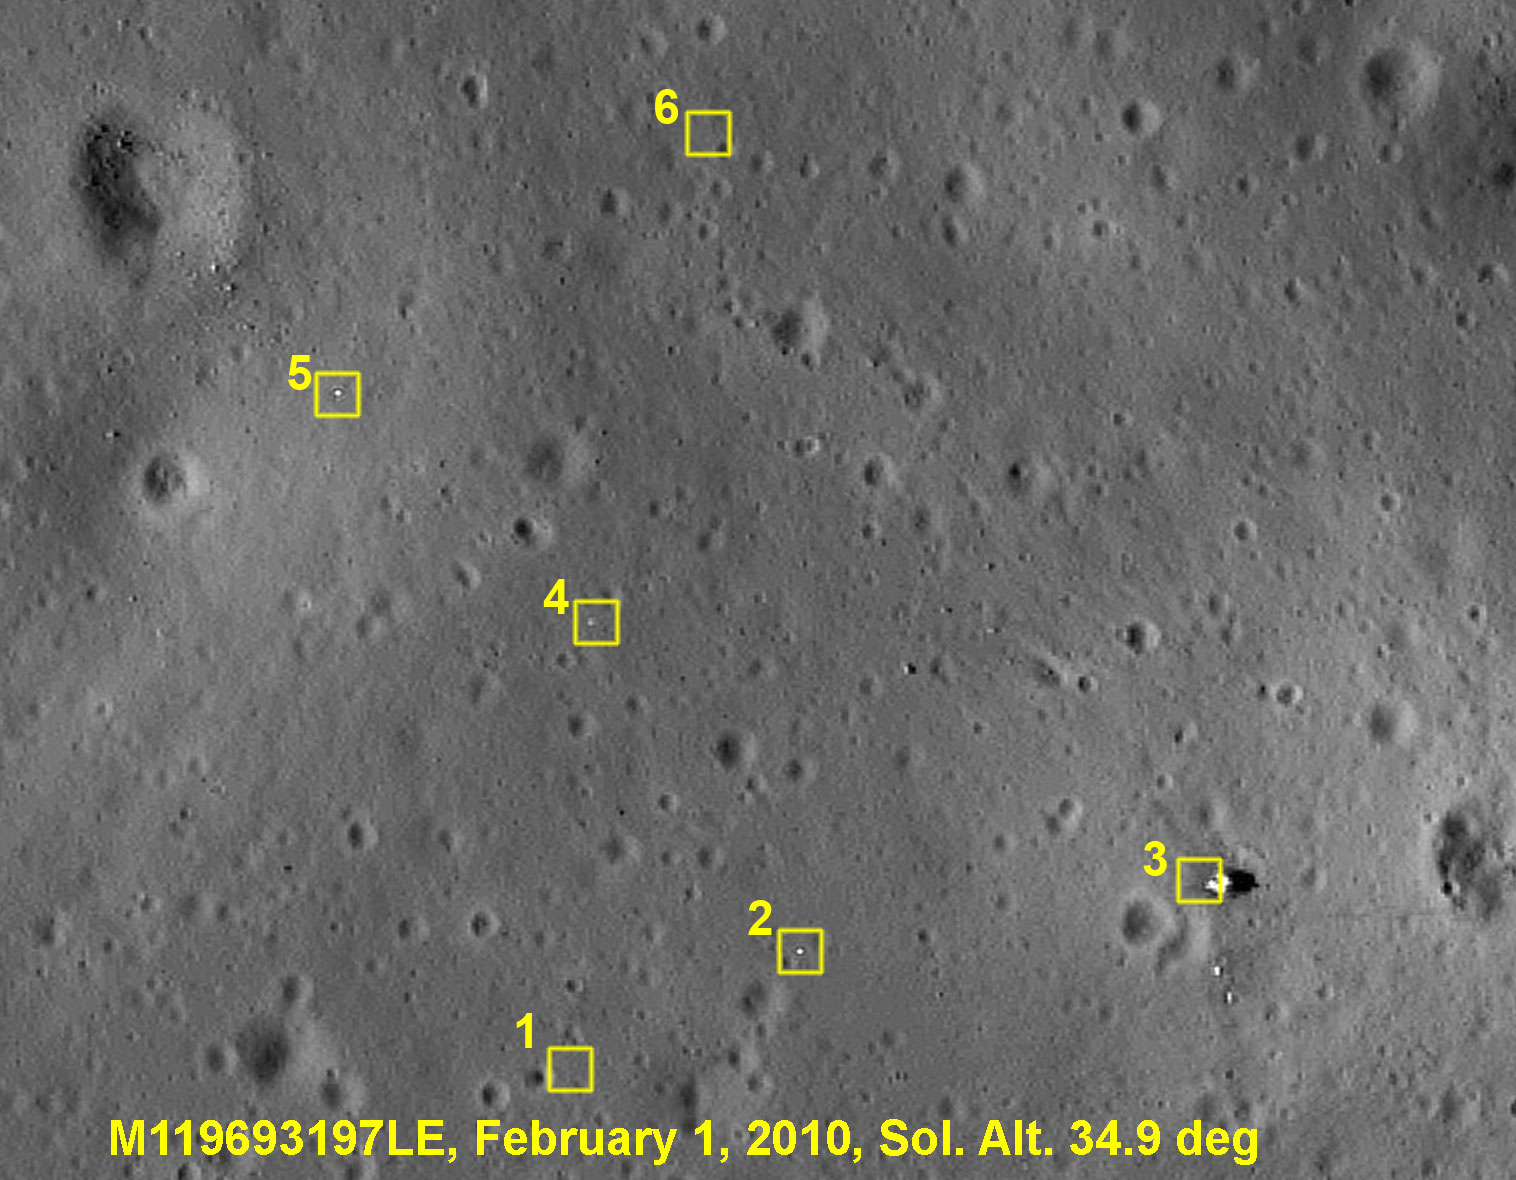
| Six pieces of LM
insulation in an LROC image taken with the Sun
about 9 degrees west of the zenith. Piece
2 is about 120 meters from the LM.
Deconvolved LROC image by GoneToPlaid.
(Click on the image for a larger version.) |
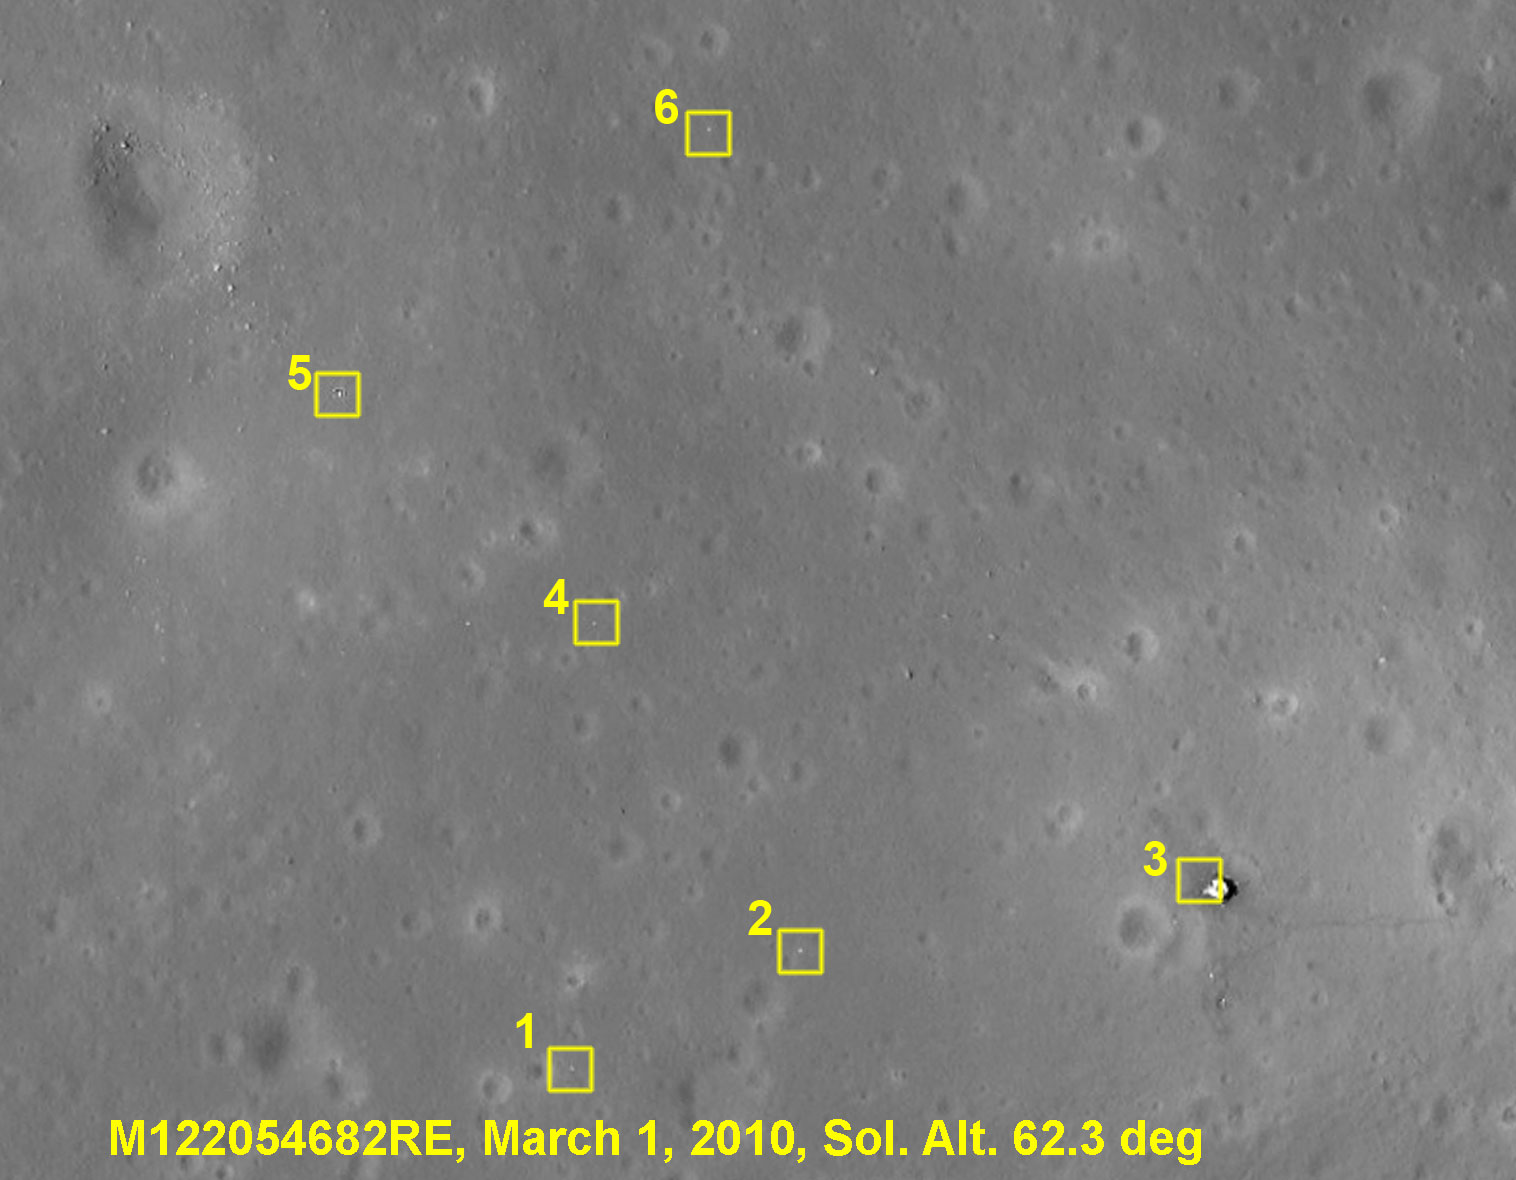
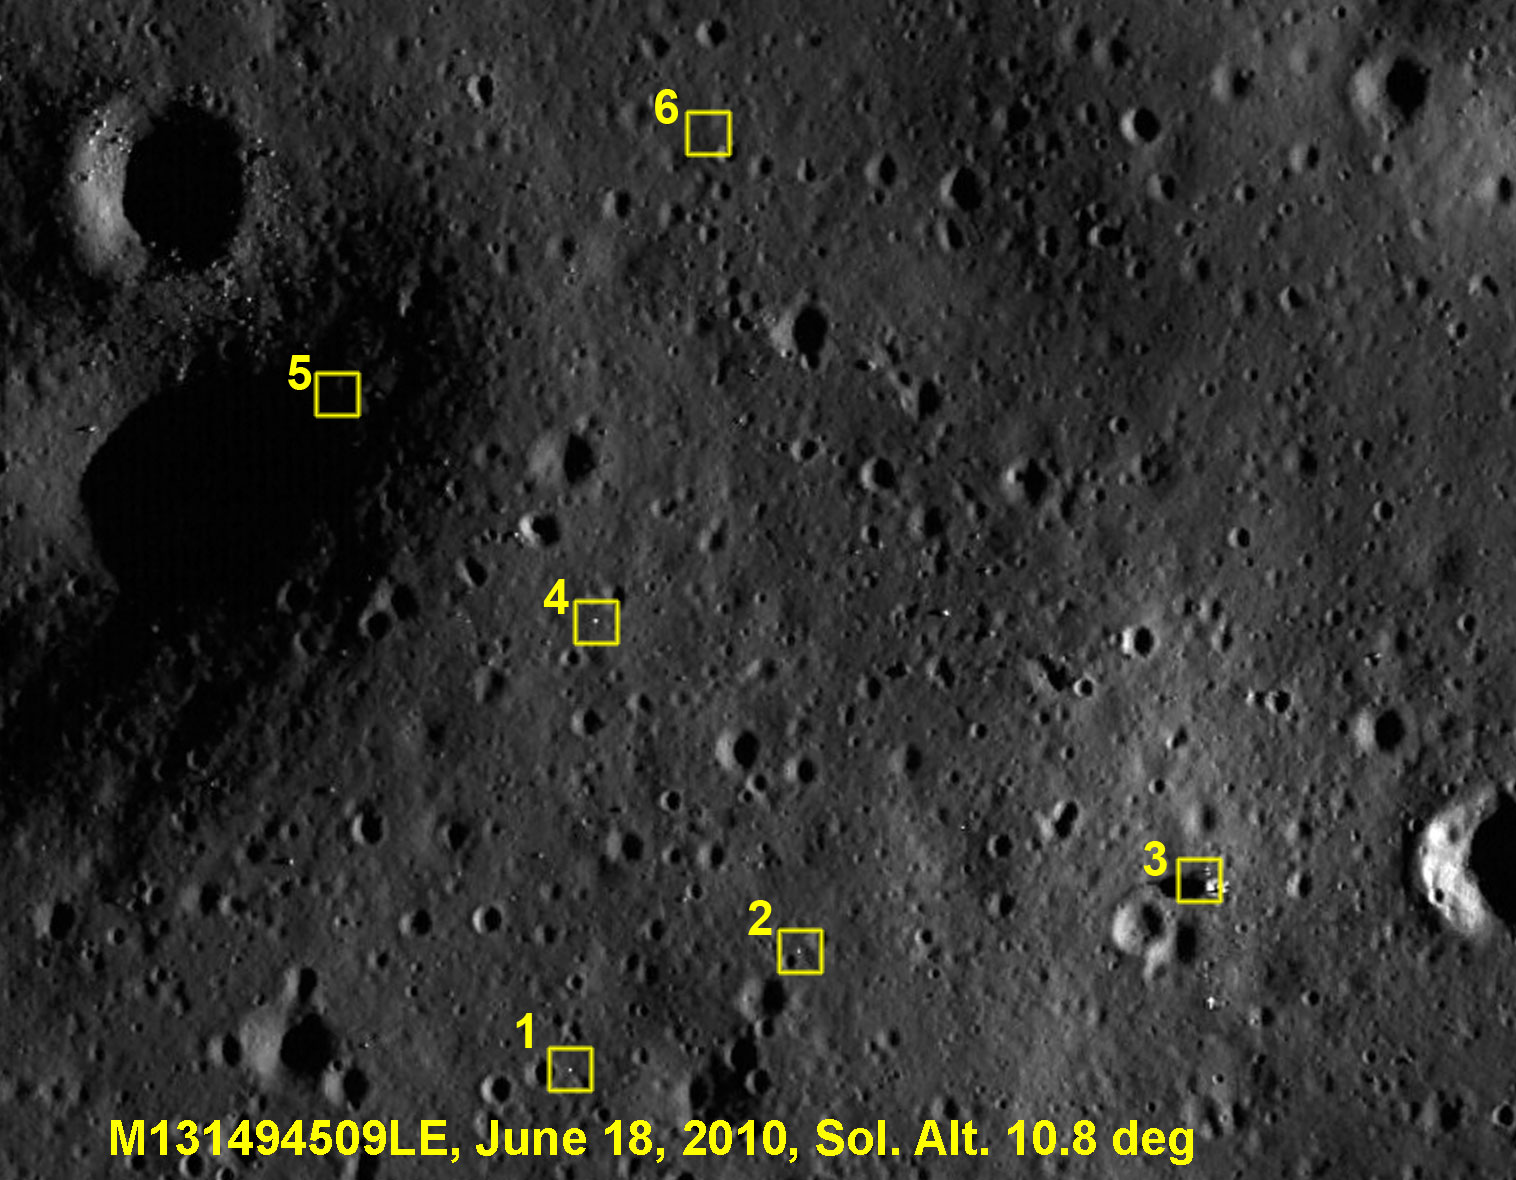
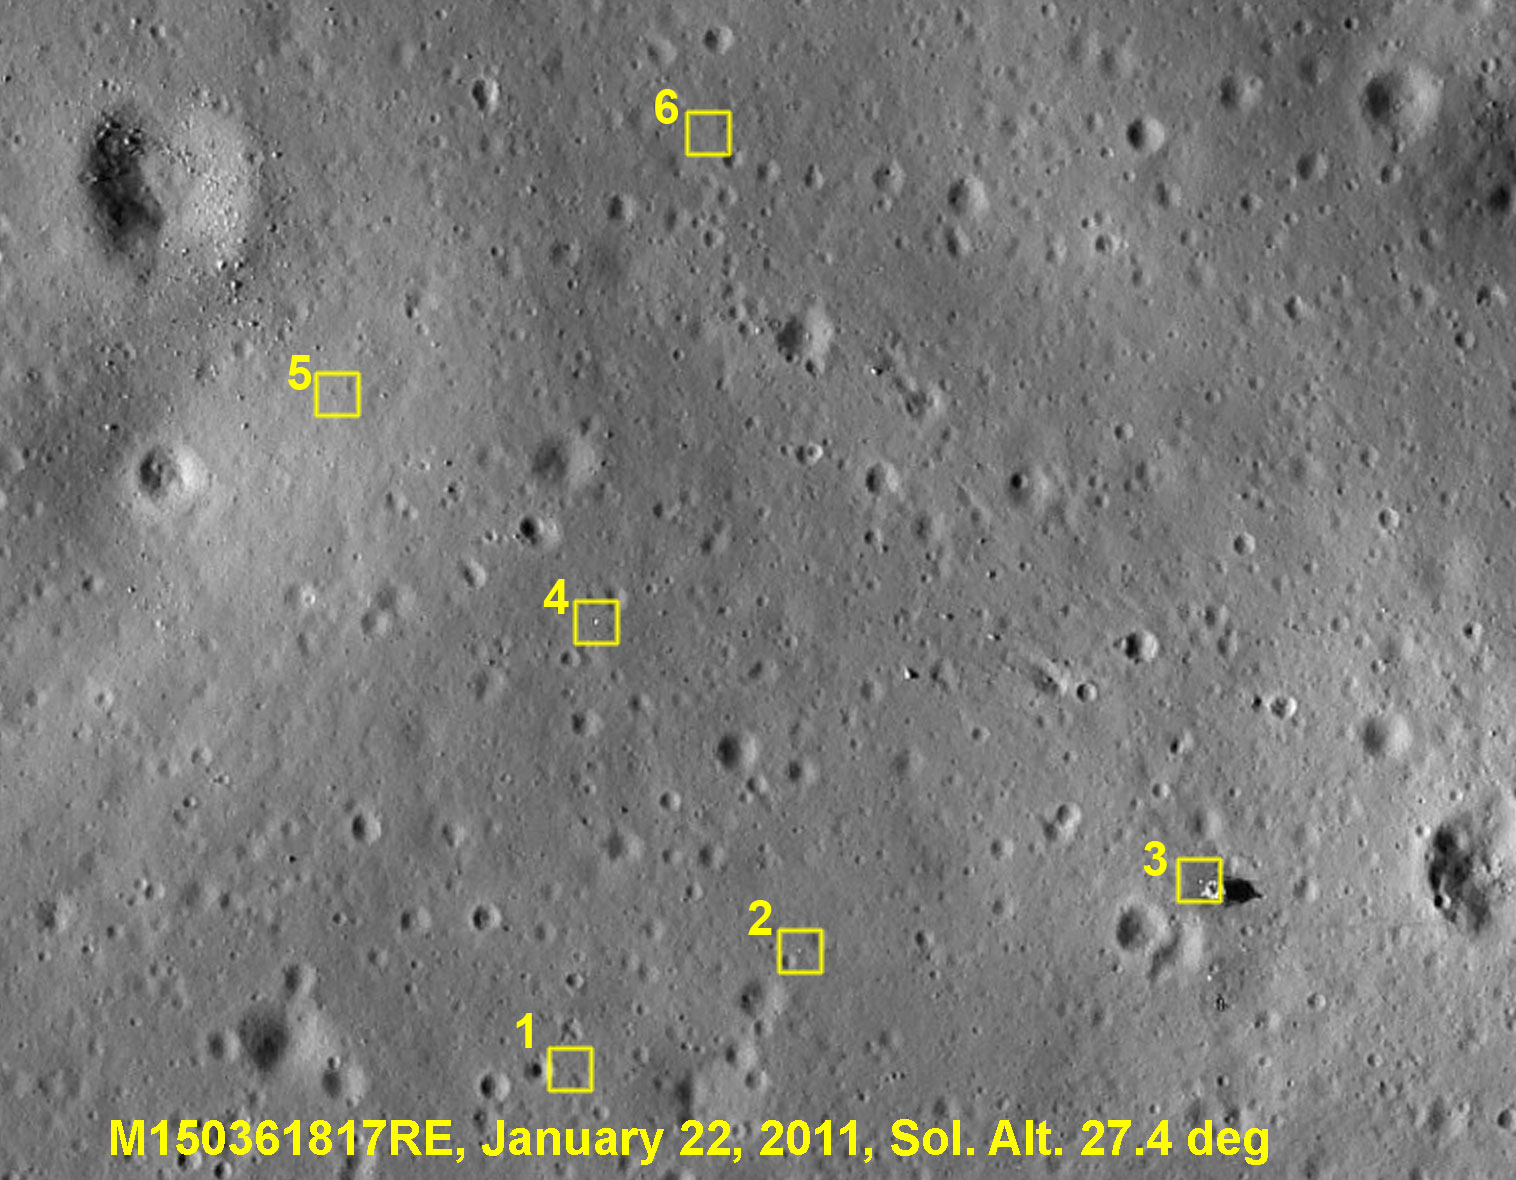
| LROC image linked to labeled version |
Date Time (UTC) |
LRO Altitude (km) Pixel width (m) height (m) |
Solar El/Az |
1 |
2 |
3 |
4 |
5 |
6 |
| M109080308R |
01 Oct 2009 23:50:41 |
49.96 0.53 0.54 |
87.8 / 195.3 |
Yes |
Yes | No |
Yes | Yes | Yes |
| M119693197L |
01 Feb 2010 19:52:11 |
40.74 0.92 0.88 |
34.9 / 270.3 |
No |
Yes |
No |
Displaced |
Yes |
No |
| M122054682R |
01 Mar 2010 03:50:15 |
41.52 0.43 0.55 |
62.3 / 271.3 |
Yes | Yes | faint |
Yes | Yes | Displaced |
| M131494509L |
18 Jun 2010 10:00:42 |
39.75 0.4 0.55 |
10.8 / 89.7 |
Yes |
Yes |
In Shadow |
Yes |
In Shadow |
In Shadow? |
| M150361817R |
22 Jan 2011 18:55:49 |
38.73 0.4 0.55 |
27.4 / 270.5 |
No |
Yes |
Yes |
Yes |
No |
No |
| M139755141R |
22 Sep 2010 00:37:53 |
45.86 0.46 0.55 |
81.1 / 255.4 |
Yes |
Yes |
Yes |
Yes |
Yes |
Yes |

| Detail from
AS11-40-5875 showing Buzz looking over at
Neil. Click on the image for a high-resolution version.) |
4.4.1 Flag Dimensions
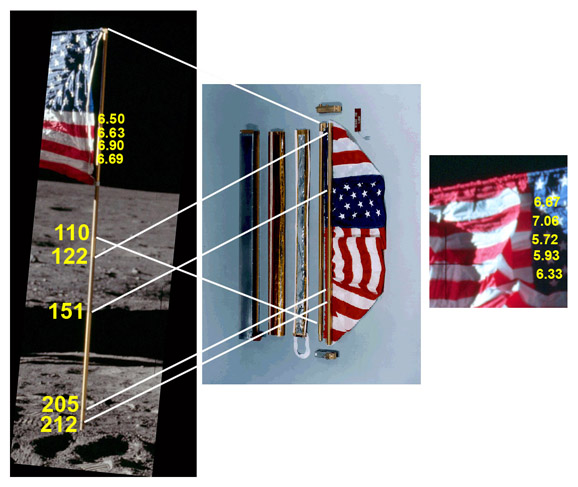
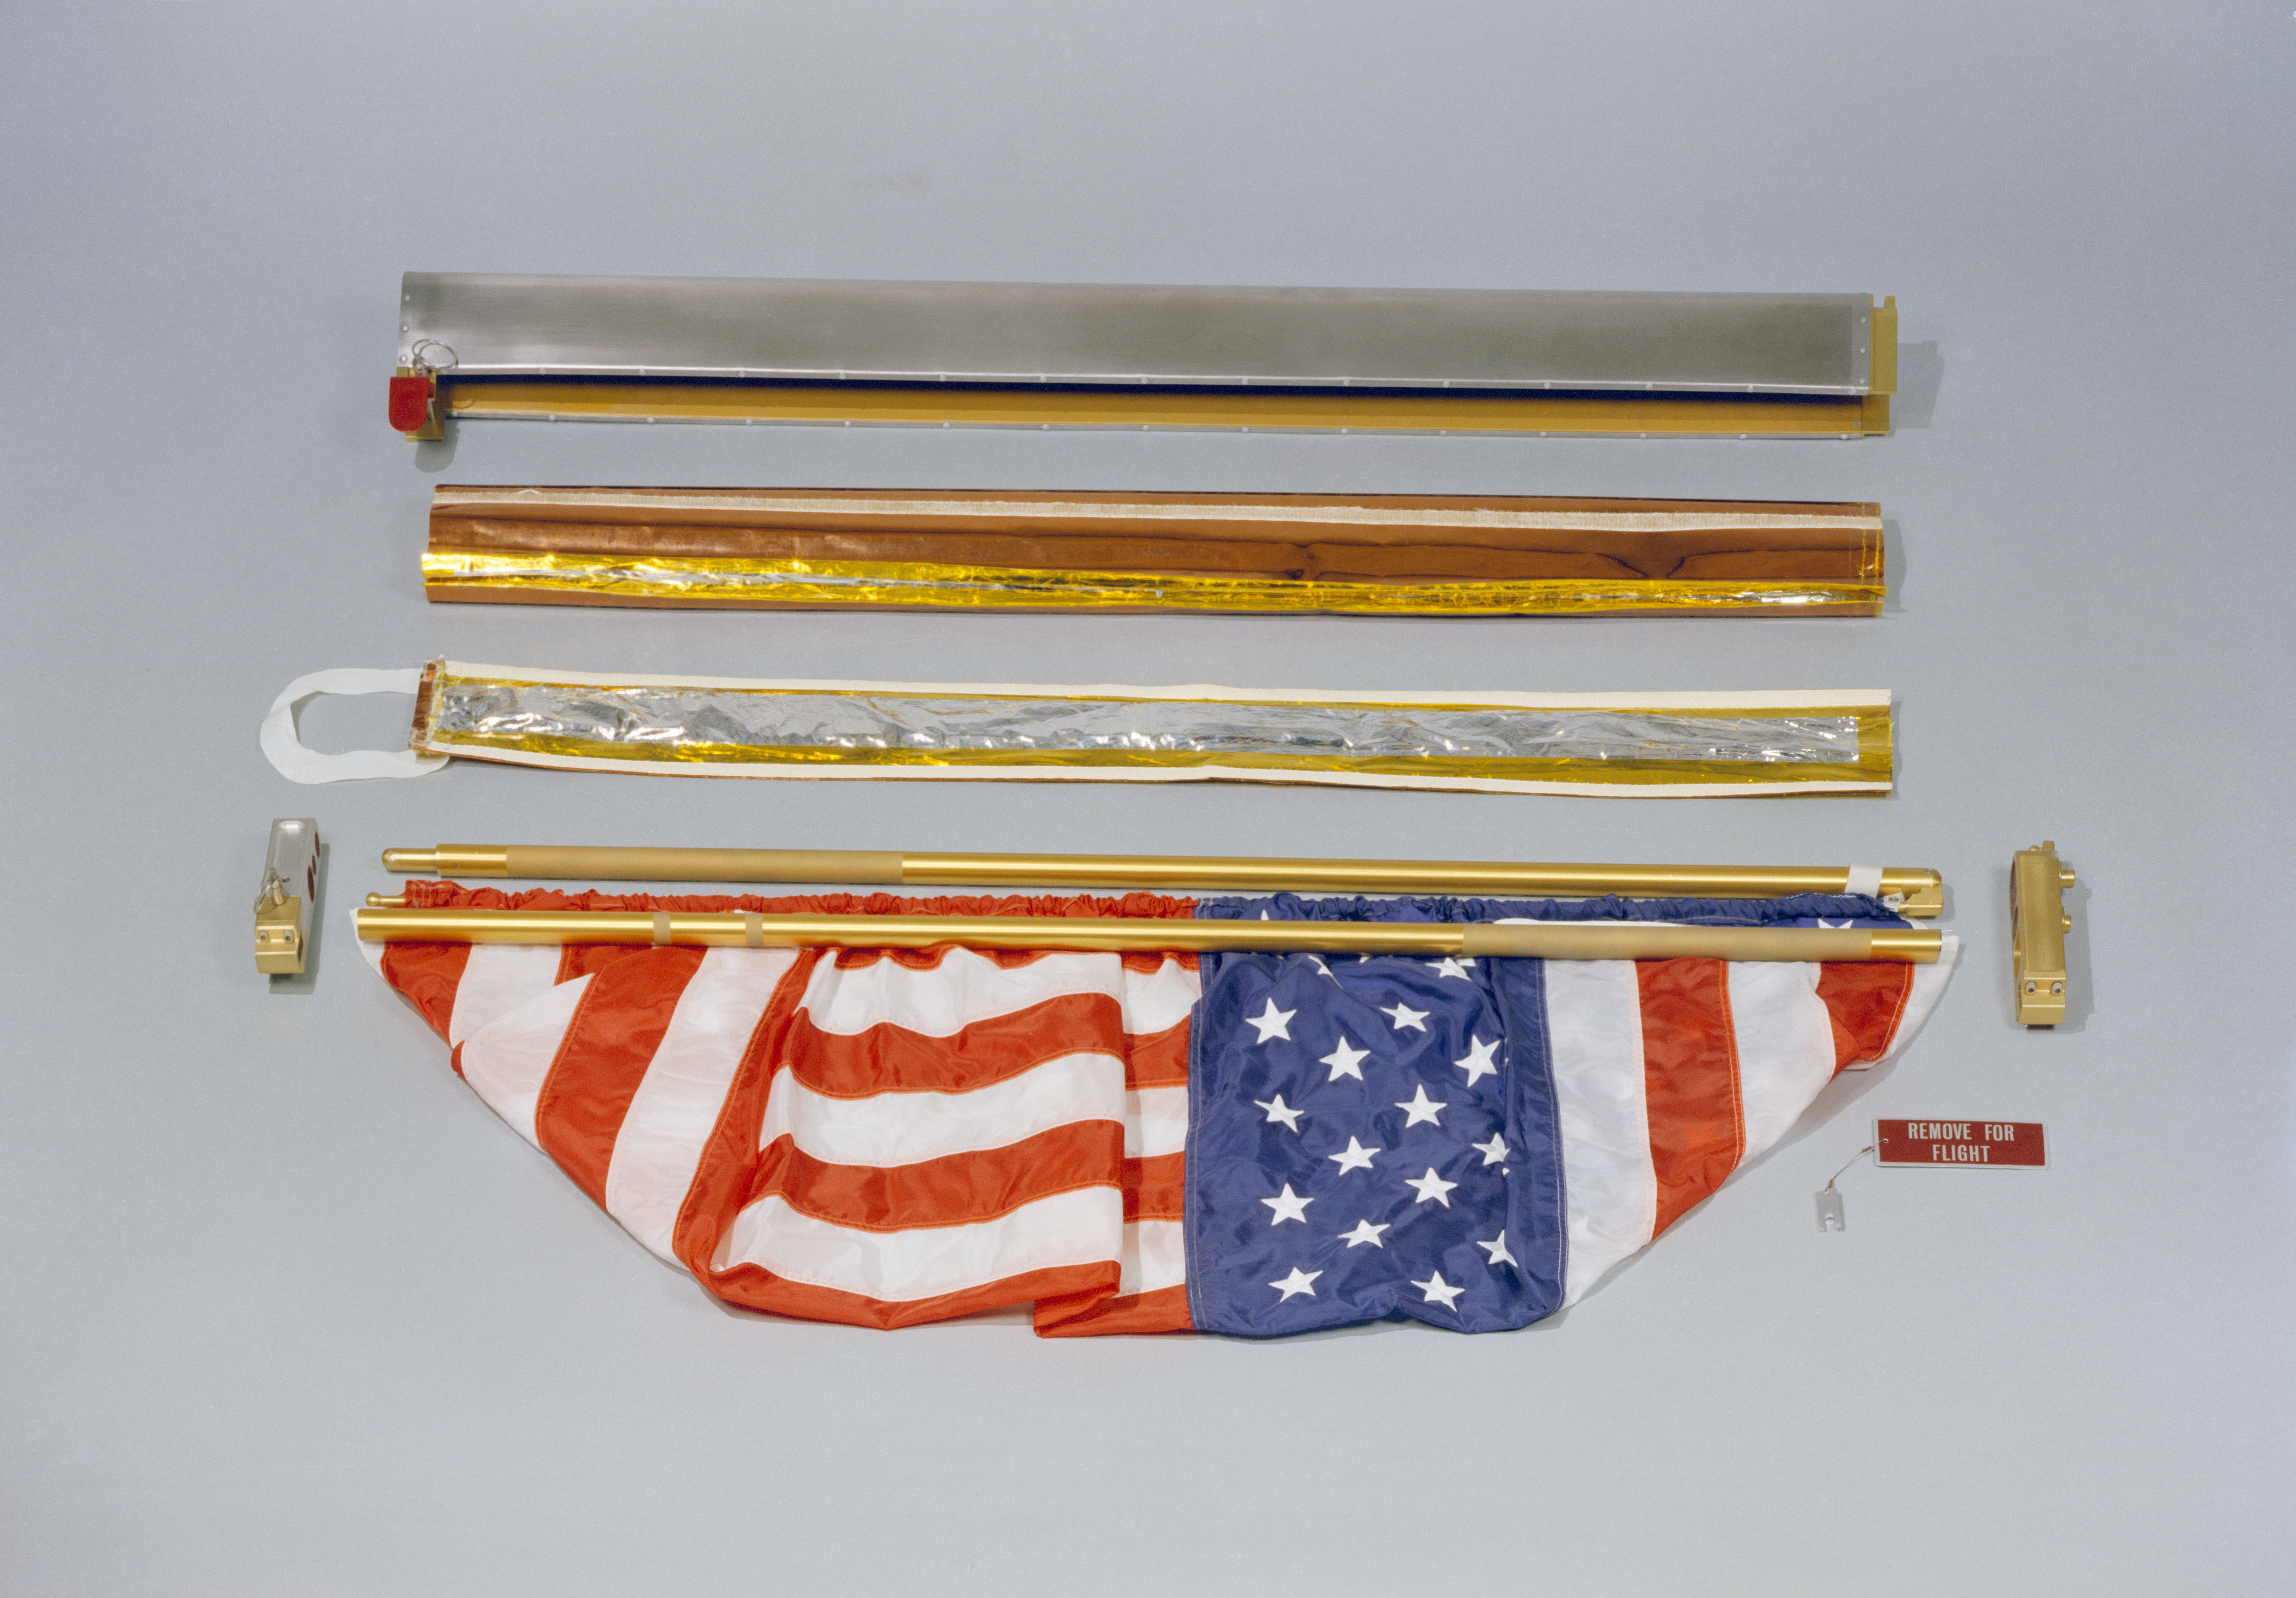
Anne Platoff's article about the Apollo 11 flag gives two different sizes for the flag: 3 x 5 ft (91 x 152 cm) and 28 x 54 inches (71 x 137 cm). Standard proportion for a US flag of width (W) are length = 1.9 W, stripe width = W/13, and star field (union) area width = 7W/13. A hem was sewn into the top of the flag for insertion of the crossbar that would support the flag. During deployment, Neil and Buzz were unable to fully extend the crossbar.
Comparison between the deployed flag in details from AS11-40-5875 (left and right) and a pre-flight photo (S69-38748, center) of the flag and staff. Photogrammetry done with EVA frames AS11-40-5886, 5875, and 5905 give distances in cm from the top of the staff to the bottom of the uppermost knurled section (110 cm), the top of the next knurled section (122 cm), the bottom of that section (151 cm) and the centers of the two, thin knurled bands (205 and 212 cm) just above the ground surface. The width of the flag from the top of the horizontal rod to the bottom of the flag at the point where is it attached to the staff is 83 cm. The average width of four stripes near the bottom of the flag is and five and the top were also determined. (Click on the image for a larger version.)
The following table compares the locations of well-defined features on the flag staff determined photogrammetrically for the deployed flag with measurements made on the pre-flight photo, S69-38748. Because we do not have a means of determining actual lengths in the pre-flight image, the comparison is done in terms of distances from the top of the staff scaled to the distance from the top of the staff to the bottom of the second long knurled section. The relative distances agree quite well and indicate that they are accurate to about ± 2 cm.
Deployed flag from photogrammetry
Preflight image S69-38748
Location
Distance from top (cm)
Relative distance from top
Relative Distance from top
Top
0
0.0
0.0
Bottom of 1st knurl from top
110
0.519
0.515
Top of 2nd knurl
122
0.575
0.566
Bottom of 2nd knurl
151
0.712
0.712
Upper Thin knurl
205
0.967
0.967
Lower Thin knurl
212
1.000
1.000
lunar surface
217
1.024
staff bottom
(235)
1.109
The following dimensional information can be derived from the photogrammetry and the comparisons
- The total length of the assembled staff is 235 ± about 2 cm)
- Neil and Buzz were able to get the staff about 18 cm (7 inches) into the ground. This is similar to the distance Buzz was able to hammer in the core tubes.
- Width of the flag from the top of the pole to the point where its corner is bound to the pole: 83 cm. This implies a stripe width of 83/13 = 6.38. The average width of the four stripes near the bottom is 6.68 ± 0.17; for the five near the top, 6.34 ± 0.54; and for all nine, 6.49 ± 0.43. The 83 cm width implies a flag length of 1.9 x 83 = 158 cm.
- During the deployment, Neil and Buzz told Houston they were unable to extend the rod to its full length. The photogrammetrically-determined length is 118 cm (from the end to the middle of the pole), which is 40 cm shorter than the inferred flag length.
4.4.2 Flag location and attitude
- Distance to the LM center: 10.7 m (± 0.2 m maximum, but more likely better than ± 0.1 m).
- Distance to the +Y pad center: 7.8 m.
- Distance to the TV camera tripod center: 14.3 m.
- Distance to camera stations inside the LM at the right (LMP) window, also
the approximate distance to DAC: 10.9 m (calculated from 5483 camera
coordinates).- Flag pointing azimuth: Relative to the axis with its origin at the center of the +Z footpad and passing through the center of the -Z footpad, the horizontal rod that supports the flag points 37.3 degrees to the right. Neil landed with the LM rotated 13.3 degrees counterclockwise from east-west, so the flag is pointing 24 degrees south of east.
- Flag pole east-west tilt: Using four EVA photos - 5884, 5905, 5920, and 5925 - hotogrammetry gives us the positions of the top and bottom of the flag pole and of the tip of the flag shadow. Trigonometry then gives the angle at the top of the pole between the pole and the line to the tip of the shadow as 73.2 degrees. If the pole were perfectly vertical, the angle would be 90 minus the solar elevation. At the times the four photos were taken, the solar elevations were 14.661, 14.763, 14.797, and 14.822, respectively. The average is 14.76 so that, in the case of a perfectly vertical pole, the angle at the top of the pole would be 75.24. The difference between that value and the photogrammetrically-determined value of 73.2 indicates that the pole was titled about 2 degrees to the west. During a post-flight press conference Neil said "We had some difficulty, at first, getting the pole of the flag to remain in the surface. In penetrating the surface, we found that most objects would go down about 5, maybe 6, inches and then it would meet with a gradual resistance. At the same time, there was not much of a support force on either side, so we had to lean the flag back slightly in order for it to maintain this position." With the flag pointing in an easterly direction, they would have tilted it in a westerly direction to get the center-of-mass closer to being over the bottom of the pole. The photogrammetrically-determined tilt is certainly in the right direction. Any north-south tilt would be small.
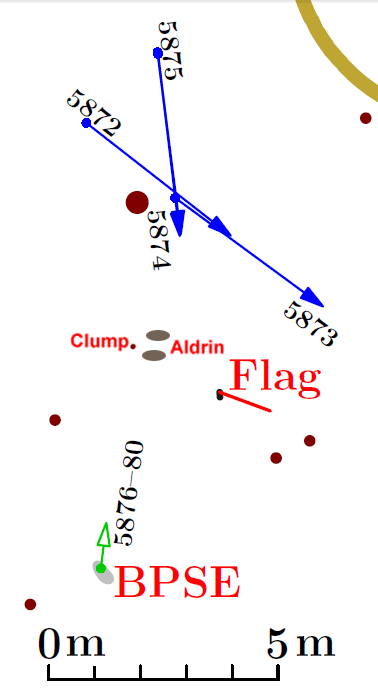
4.4.3 Buzz's location in AS11-40-5874 and 75
Detail from 5875 showing a small soil clump or rock behind Buzz's boots. Neil is about 6.2 meters from Buzz and about 7.5 m from the flag. (Click on the image for a larger version.)
The soil clump also appears in 5885 and 5905. Photogrammetry using the three images gives a location for the clump and, from that, Buzz's location.
Map showing Buzz's location when 5874 and 5875 were taken.
4.4.3 Buzz's location in AS11-40-59034.5 Craters
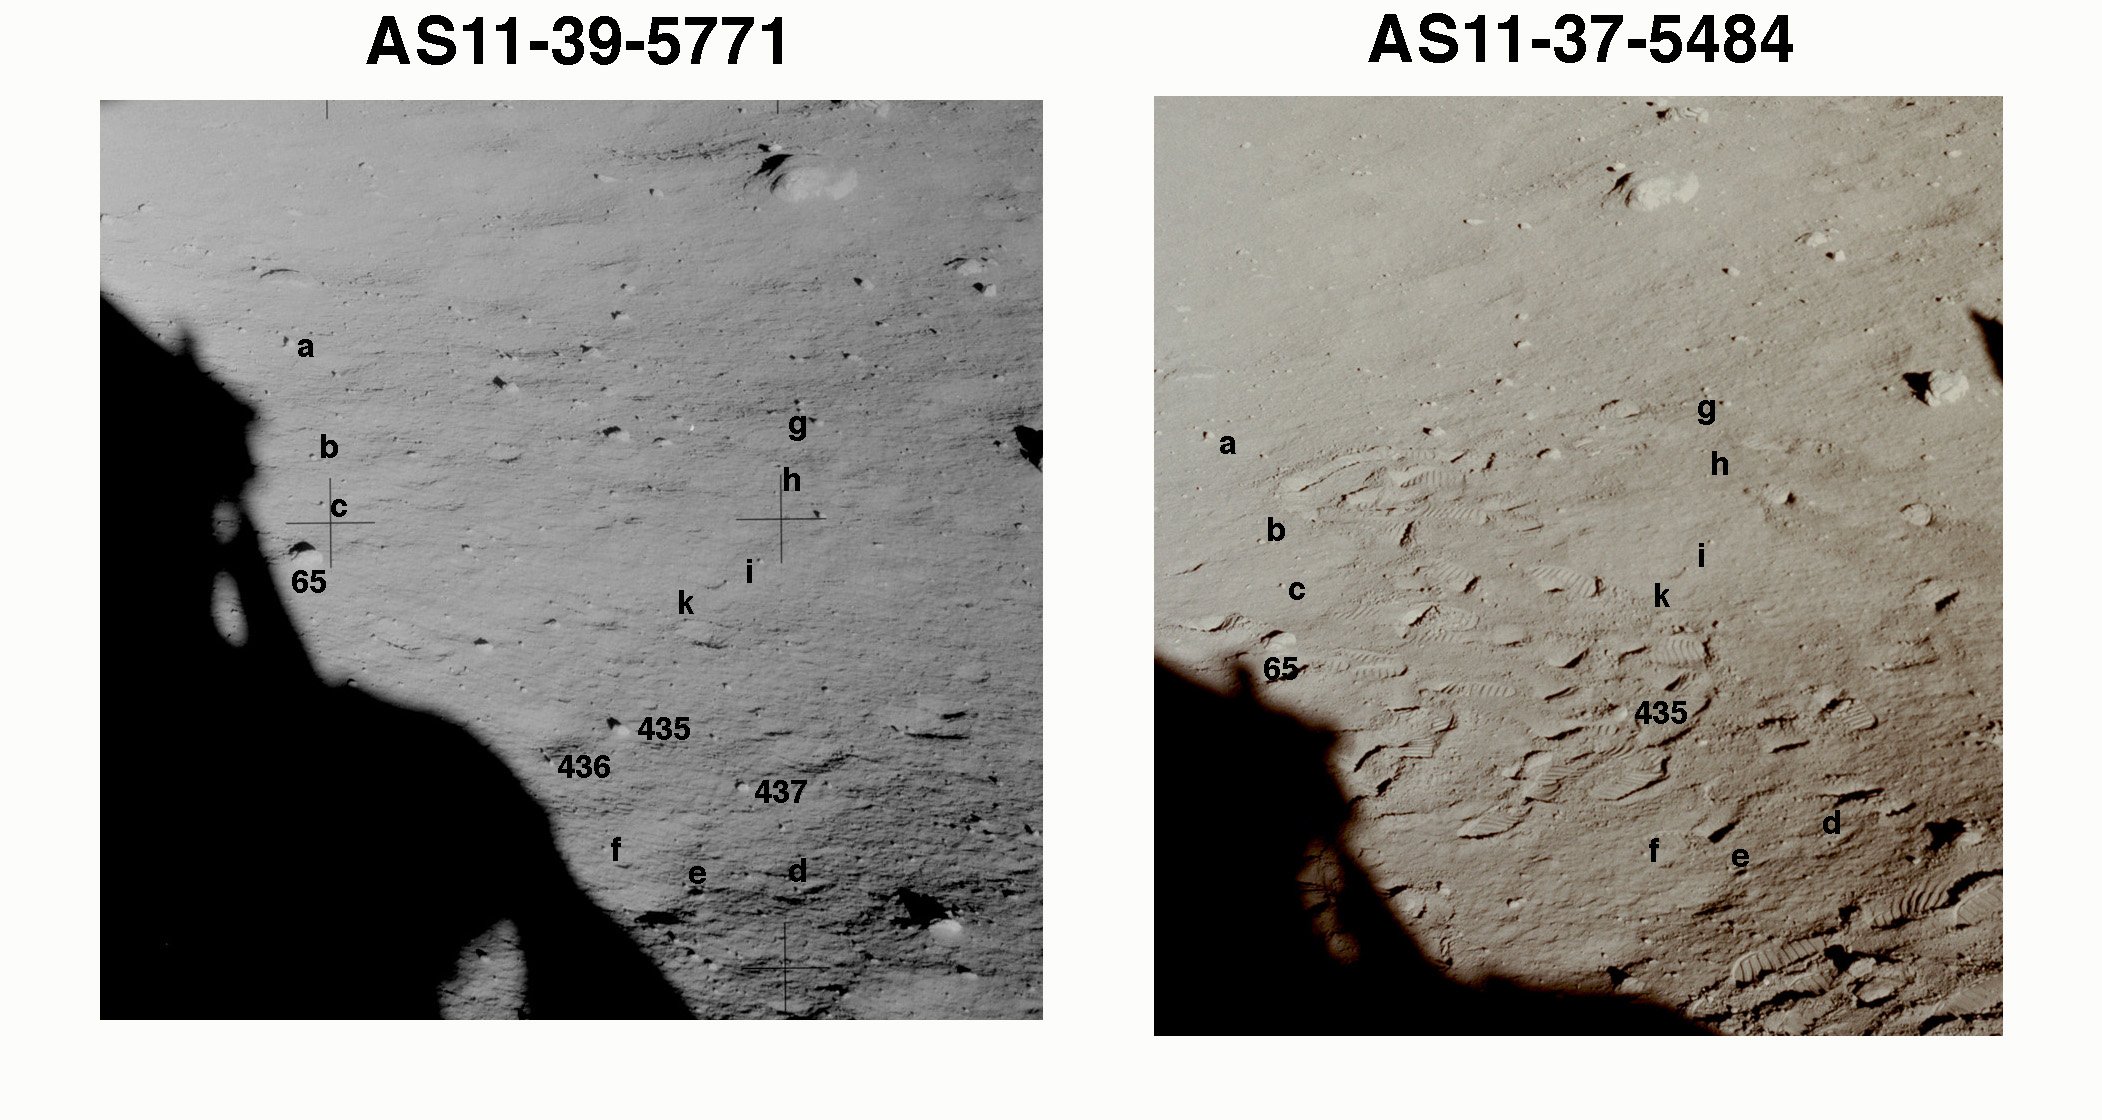
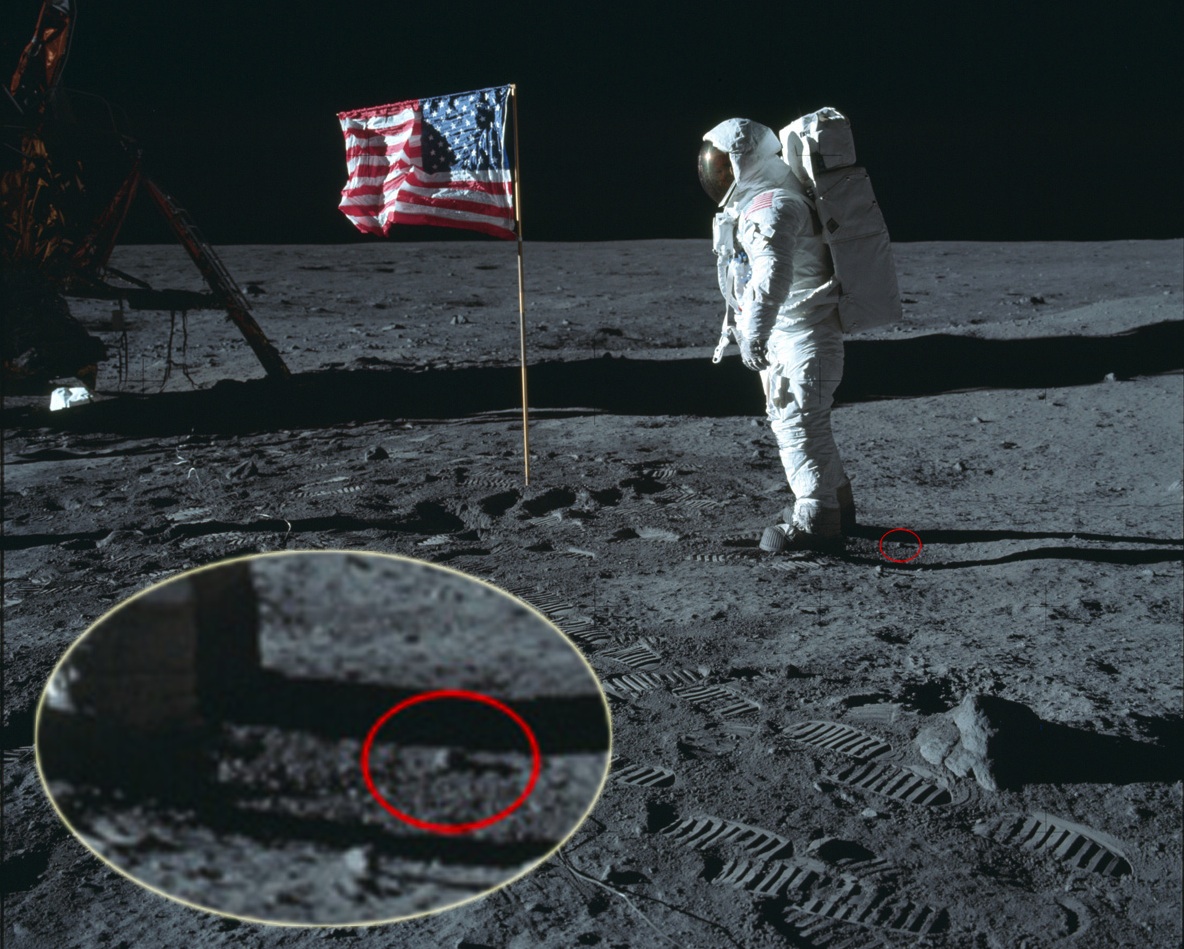
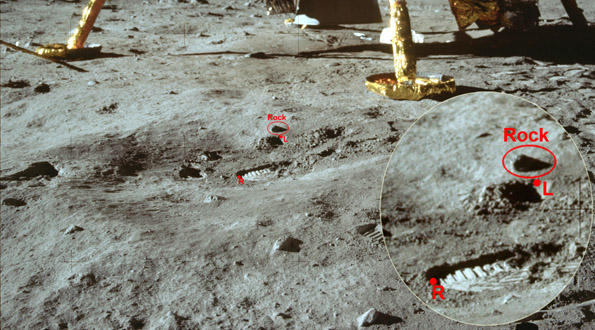
Labelled version of AS11-40-5903, showing Buzz coming out of a shallow crater toward Neil. Behind Buzz's right foot is part of a full boot print he made on the crater floor; the back of the heel print is marked in red. Because Buzz is walking, rather than running or hopping, as he comes up the inner slope of the crater, his weight is pressing his toes into the relatively soft soil of the slope. The toe of his left boot - marked in red - is making a deep imprint next to a small, distinctive rock. A full-resolution detail shows that Buzz is moving his right boot forward from the print he made of the floor of the crater, pushing some soil ahead with his toe. As his right leg comes forward, the left toe will sink deeper into the slope. (Click on the image for a larger version.)
Labelled detail from AS11-40-5915 showing the rock and boot-print features identified in 5903.
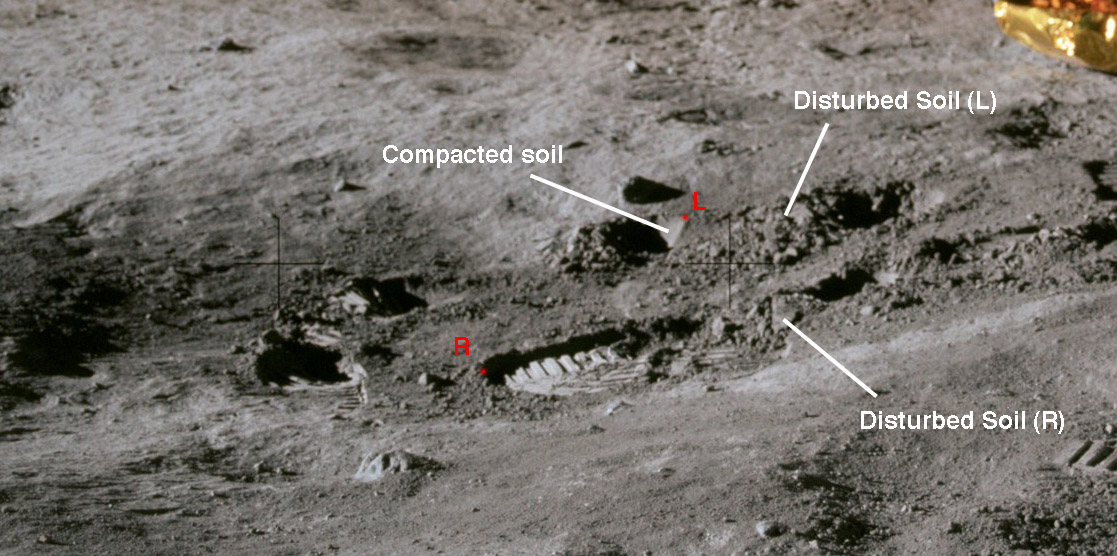
Labelled detail from AS11-40-5915 showing the boot prints Buzz made coming out of the small crater. The heel of the full right (R) bootprint at the bottom of the crater is marked in red. When Buzz stepped forward with his left leg onto the rising slope, the toe of his left boot (L) penetrated the soft surface and compacted the marked area. The approximate forward edge of that print is marked in red. As seen in 5903, as Buzz moved his right leg forward, he pushed some soil forward (to the right in this image). The disturbed soil is marked. There is also some disturbed soil downslope of his next left bootprint, which may be a combination of soil pushed forward as he moved his boot and soil displaced backward as his toe penetrated the surface.
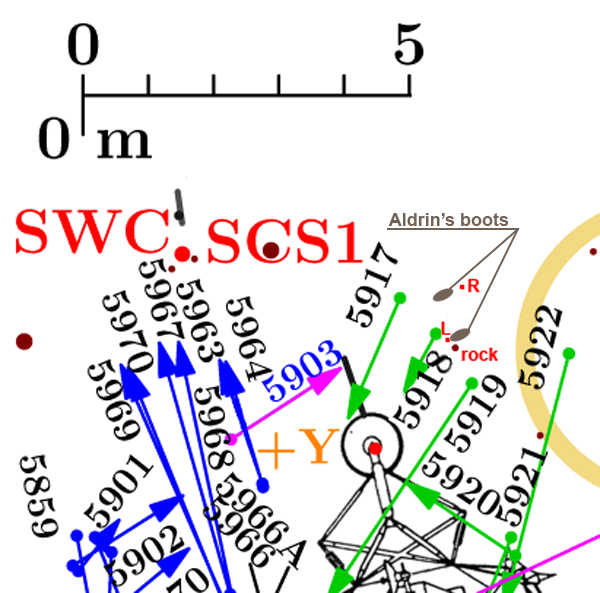
Locations of the rock and left-and-right bootprints determined photogrammetically from a number of EVA photos.
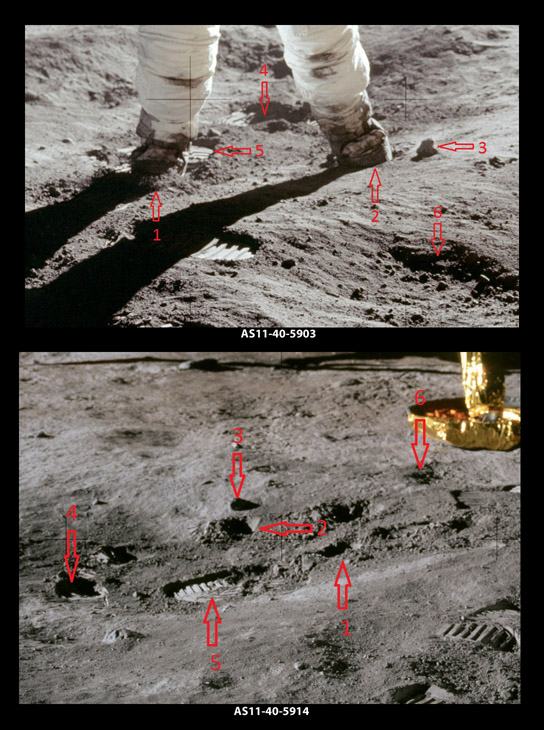
In 2013, Ulli Lotzmann did an independent comparison of 5903 and 5914 and identified the imprint of the toe of Buzz's right boot made when, shortly after 5903 was taken, he moved his left foot forward.
(Click on the image for a larger version.)
| Double
Crater plus nine small craters with rims that
are well-defined in the Hasselblad
images. (Click on the image for a larger
version.) |
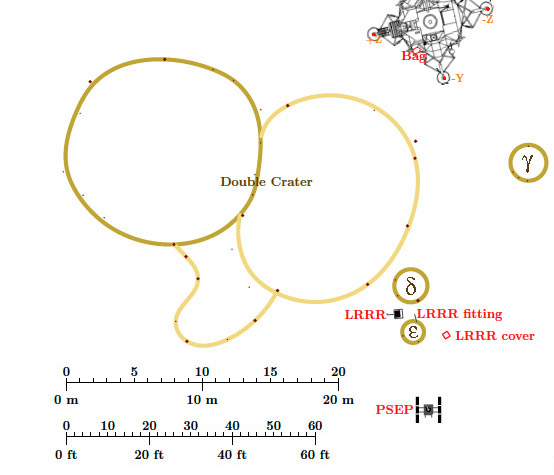
| Detail
of the photomap showing the benchmarks used
to define the complex rim of Double
Crater. Fourteen small rocks were used
to define the rim of the western (younger)
component; nine for the eastern (older)
component; and six for the small, irregular
southern component. |
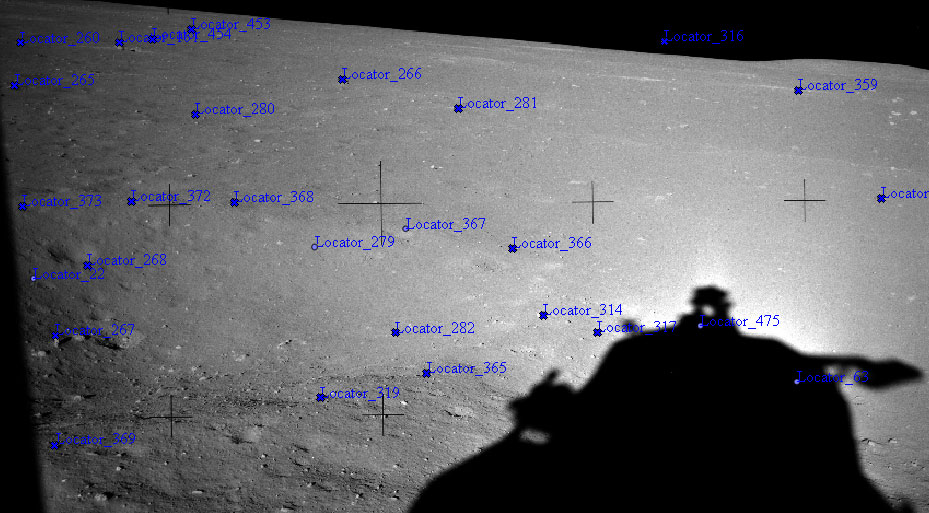
| Screen grab of IM display of benchmarks in AS11-39-5786. Some of these were used to define the western component of Double Crater and are labeled in the next figure. Note that, in the IM display, benchmarks are labelled as 'locators'. (Click on the image for a larger version.) |
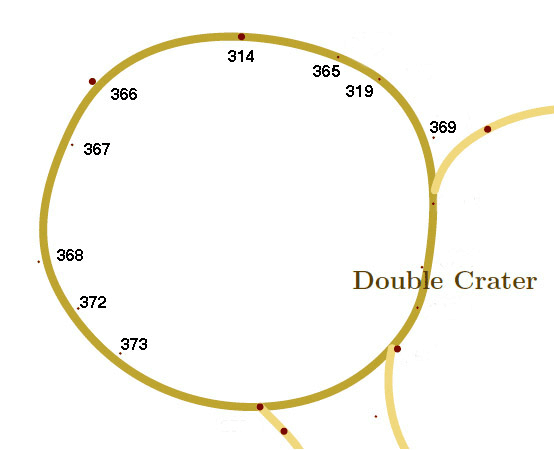
| Benchmarks
visible in AS11-39-5786 (previous figure) that
were used to define much of the rim of the
western component of Double Crater.
Placement of the rim is necessarily
subjective. |
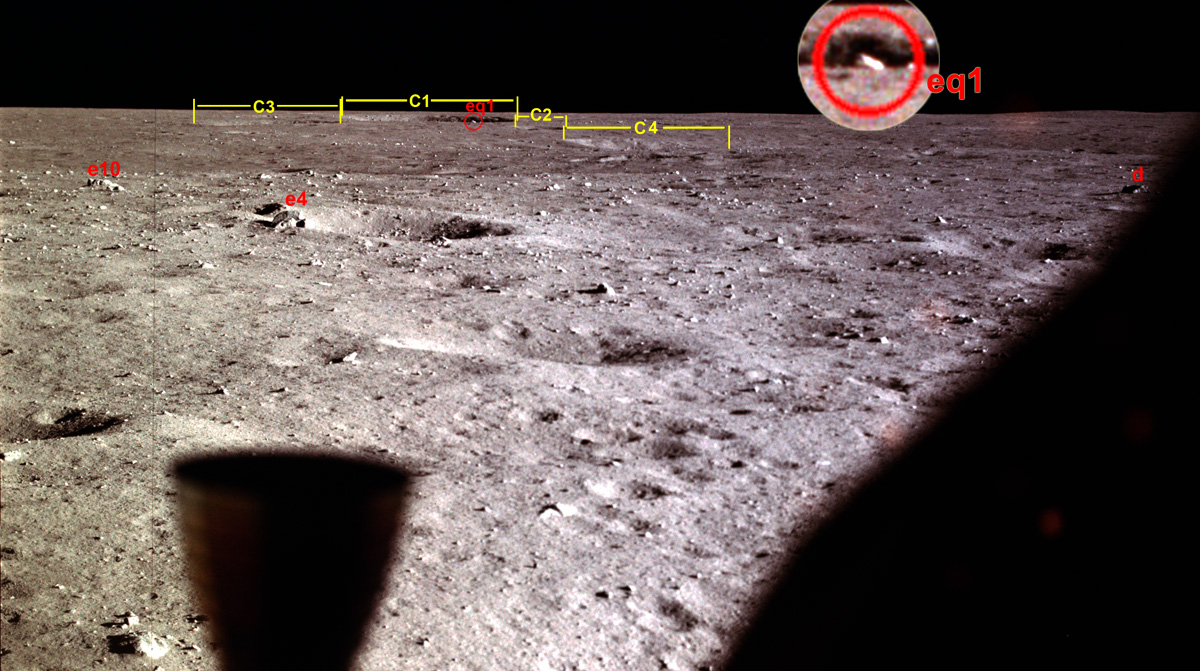
| Detail
from AS11-37-5513 showing the view to the
northwest over the plus-X thruster outside
Buzz's window. Two previously
identified boulders, e4 and
e10,
are labeled in the foreground. Four craters
ranging in size from 18 to 60 m are labeled in
the distance, along with boulder newly
identified boulder eq1, near crater C1. |

| Northwest
craters C1, C2, C3, C4 and boulder eq1
in an LROC detail from GoneToPlaid's
rectified version of M116161085R. Crater C5
is discussed in a following section.
Note, also, that eq1 is just
outside the south rim of C1. (Click on the
image for a larger version.) |
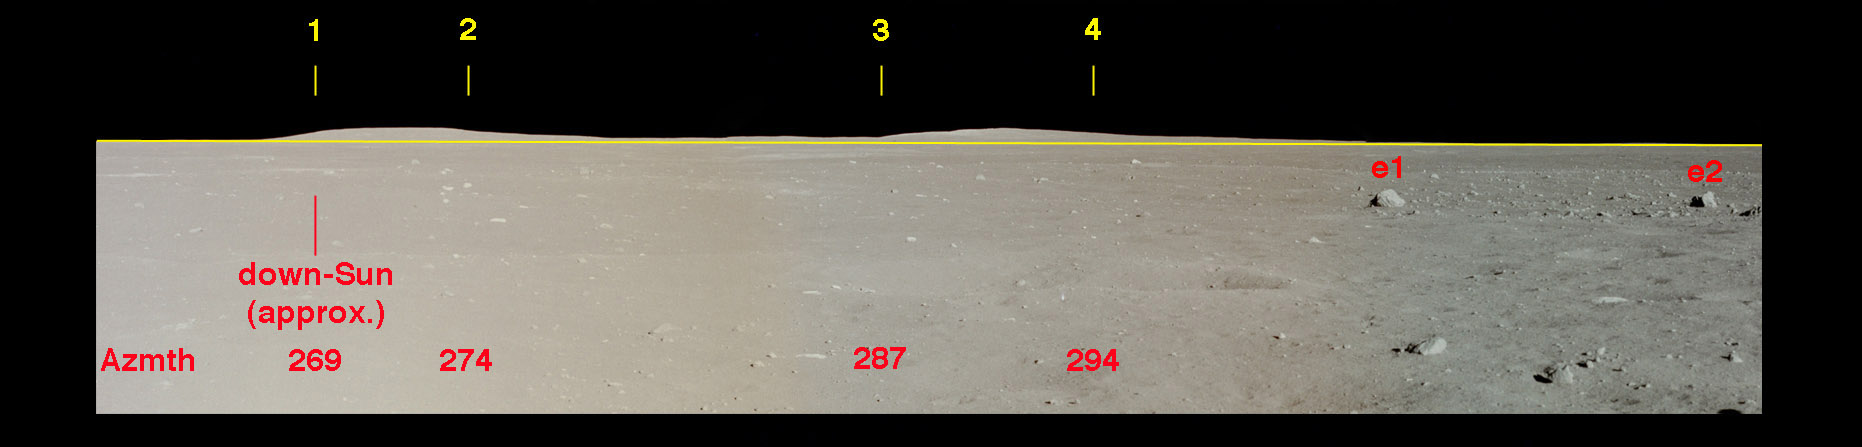
| Detail from Buzz's
post-EVA window pan showing two hills on the
western horizon. The horizontal yellow line
approximates the level horizon. Bounding
azimuths for each of the hills are indicated with
short, vertical lines and the numerical values are
given in red at the bottom. Note that there
is elevated ground between the two hills, perhaps
indicating that they are high points on the rim of
a large crater. (Click on the image for a
larger version.) |
| Lunar Orbiter image
5076-h3 with the yellow lines showing the bounding
azimuths from the LM of the two hills.
(Click on the image for a larger version.) |
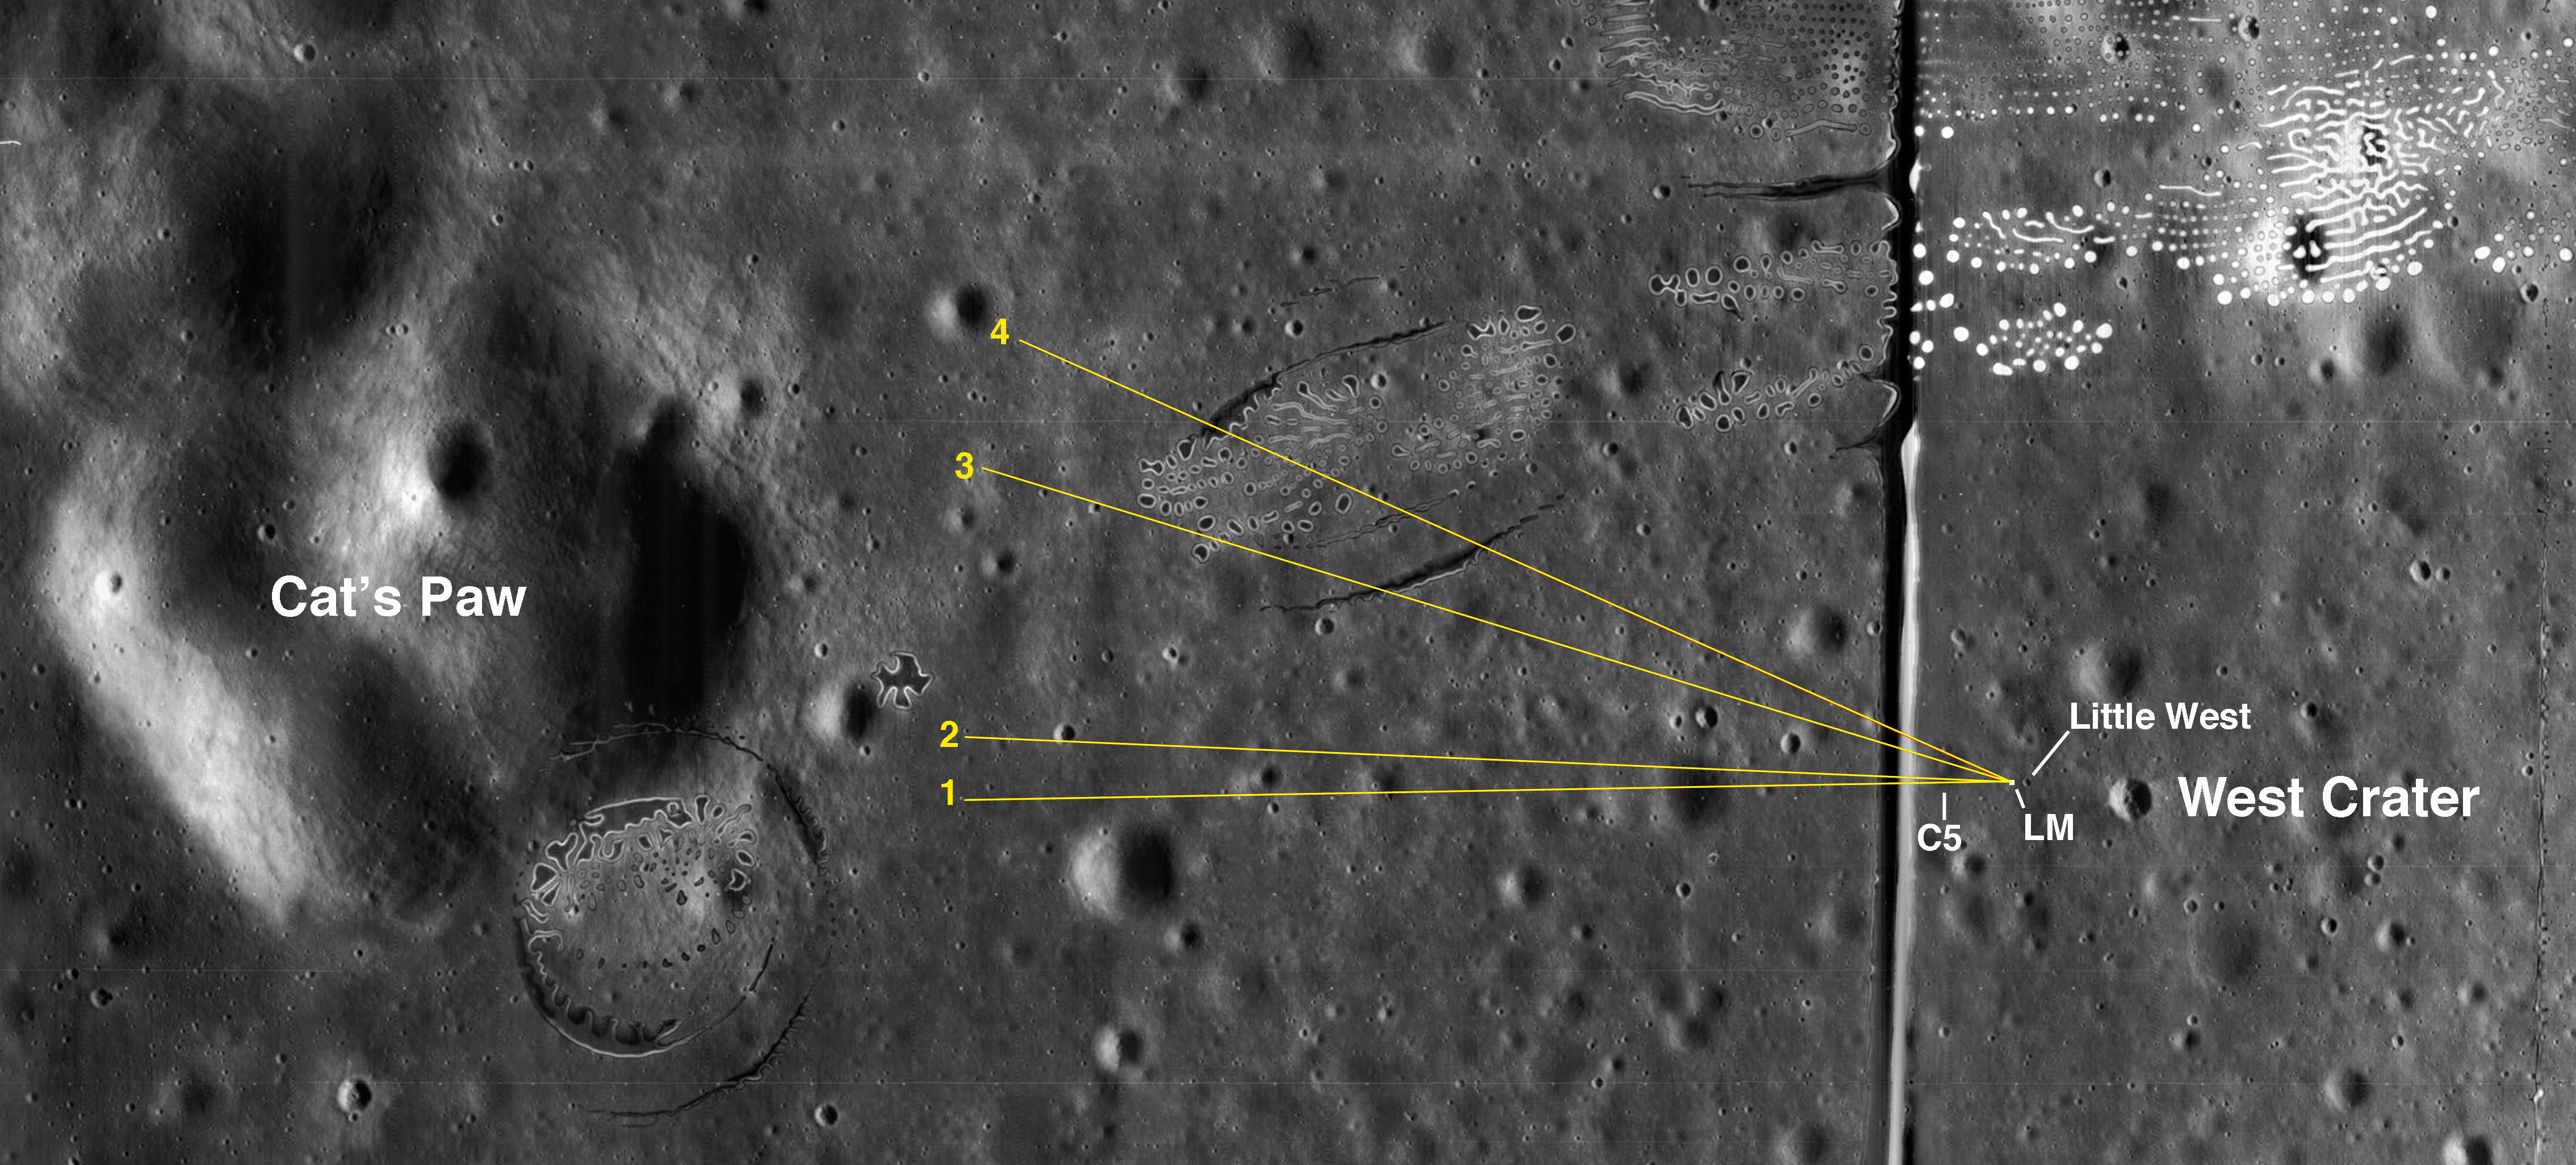
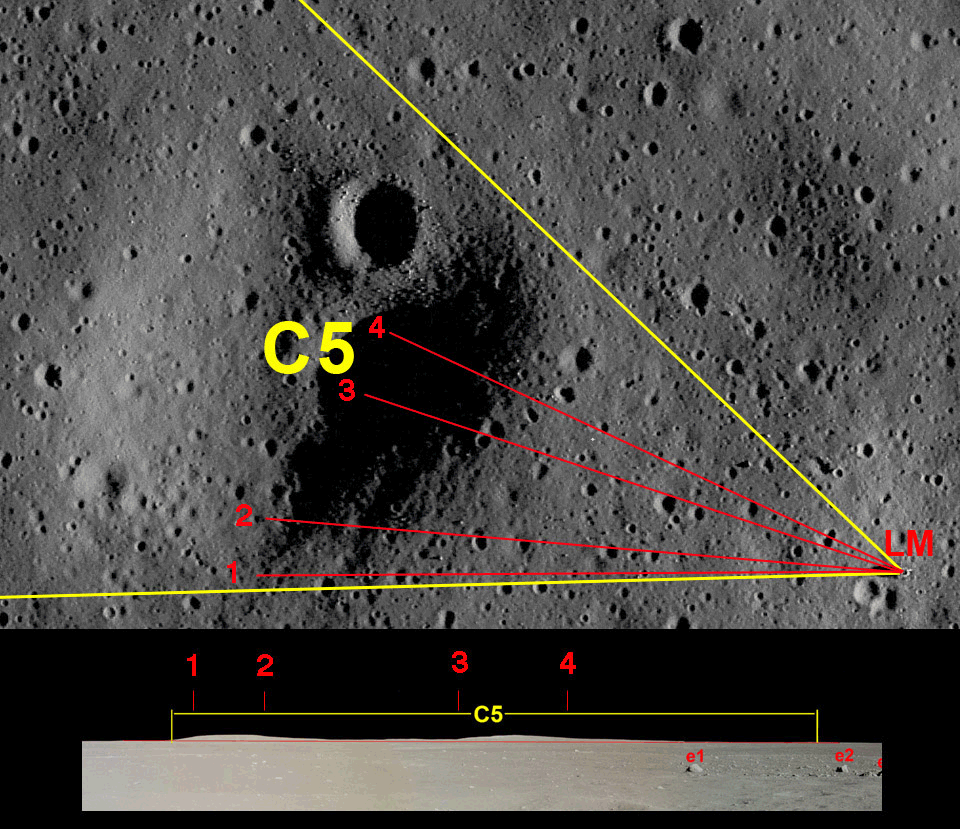
There are two candidate craters. The obvious one is
the crater complex named before the flight as the Cat's
Paw. With the Sun relatively low in the east, we see
rising ground in the azimuth bounds on the outer slopes of
the southeast and northeast portions of the near component
of the Cat's Paw rim closest to the LM. As can be
seen in the flown
copy of LAM-2, those patches of rising ground are
about 6 km from the LM. The near component has a
diameter of about 2 km. A second candidate is a crater
labeled C5 in the
Lunar Orbiter image and in a detail from
M116161085. C5 has
a diameter of ~200m and the near rim is ~200m from the LM.
In the view
from the LM, the hills on the western horizon are about
0.6 degrees high. At 200m distance, that corresponds
to a height of about 2 meters. At 6 km, the linear
height would be 60 meters. For a fresh crater, the
rim height (h) is related to the crater diameter as
h = 0.036
D1.014
when
both are given in kilometers (Lunar
Sourcebook, Table 4.1, p66). When fresh,
crater C5 had D = 0.2 km and h = 7 meters; and the
near component of the Cat's Paw had D = 2 km and h =
70 meters. While these numbers are only
approximate, they seem to argue against the
possibility that the hills on the western horizon at
Tranquility are portions of the Cat's Paw rim.
If the near component of the Cat's Paw was still
fresh, the rim would be visible from Tranquility at
would rise about 0.7 degrees above the horizon.
However, it would extend across 19 degrees of the
horizon at more or less uniform height. The
Lunar Orbiter images shows that, while the rim is
elevated, it has been subject to considerable impact
erosion. Compare its appearance with the small
fresh crater south of the Cat's Paw, near the bottom
of the image above, or with West Crater. In the
case of C5, the rim is heavily eroded but would only
need to have retained 2 meters of an original height
of 7 meters.
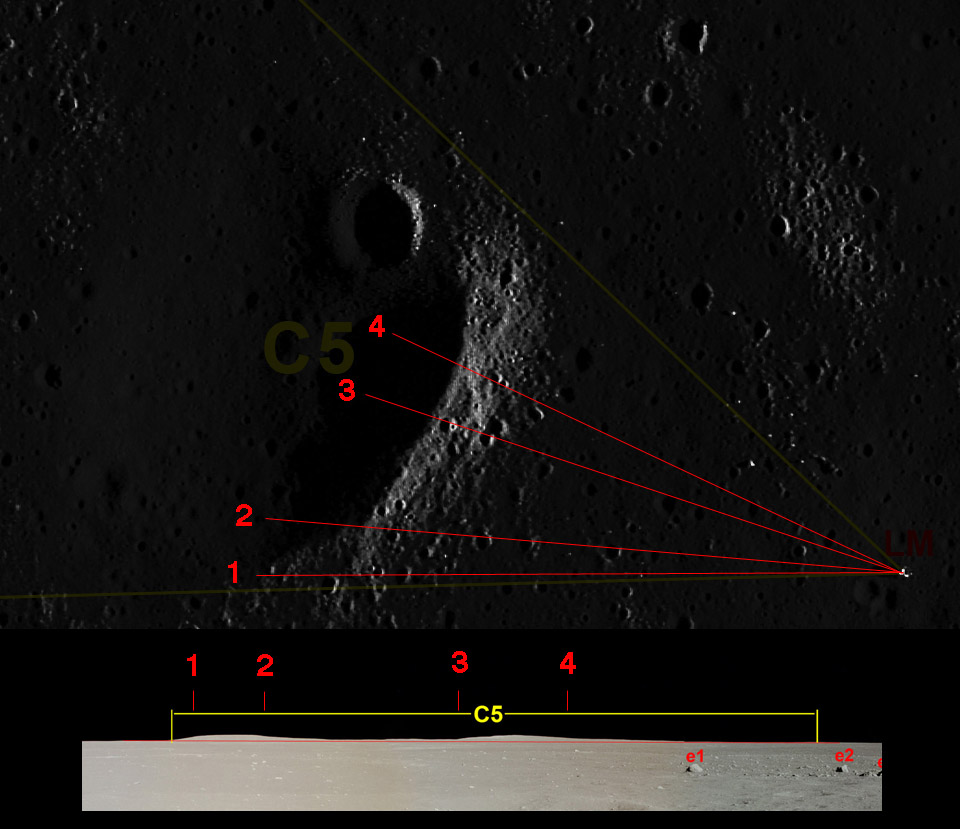
| Detail from GoneToPlaid's deconvolution of M132678405R, showing the east rim of crater C5 when the Sun was only 2 degrees above the western horizon. Although the LM is sunlit, the ground between the C5 eastern rim and the LM is in shadow, excepting only the eastern rims of fresh craters. See, also, an animation comparing this sunset view with the morning view from M116161085. |
Shadowing of
the ground between the eastern rim of C5 and the LM
indicates that the surface is sloping down to the
east. See the full
version of the deconvolution for context. It
seems likely that the northern hill is associated with the
C5 rim between azimuth lines 3 and 4. The case for
the southern hill is less clear.
Finally, we
have the following exchange between Neil and Buzz at LM
pitchover, about ten seconds into the ascent.
124:22:15 Aldrin: Very
smooth. Balance couple, Off. (Pause) (To
Houston) Very quiet ride. (To Neil)
There's that one crater down there. (Pause)
124:22:26
Armstrong (onboard): (Garbled) See if you can see the, er,
Cat's Paw. (Pause)
This
exchange can be interpreted to mean that, at 124:22:15,
after getting the DAC started about 6 seconds after
ignition, Buzz had a view into the crater associated with
the hills while, at 124:22:26, Neil realizes that he won't
have the Cat's Paw on his side of the LM and suggests that
Buzz look for it. If this interpretation is correct,
"that one crater" is C5.
Indeed, C5 nearly
fills the frame in the
first part of the ascent
video.
Of course, the DAC is pointing down at a steep angle, so
it is possible that Buzz is referring to another
crater. The near component of the Cat's Paw does
come into view in the DAC film (bottom two DAC frames)
starting at about 52 second.

| Comparison between
Lunar Orbiter image 5076-h3 and a selection of
frames from the Apollo 11 ascent film between 52
seconds after the start of the film clip and 1
min 11 sec. The frames are not evenly
spaced in time, but were chosen to include small
features that can be identified in both the
Orbiter images and in the ascent frames.
(Click on the image for a larger version) |
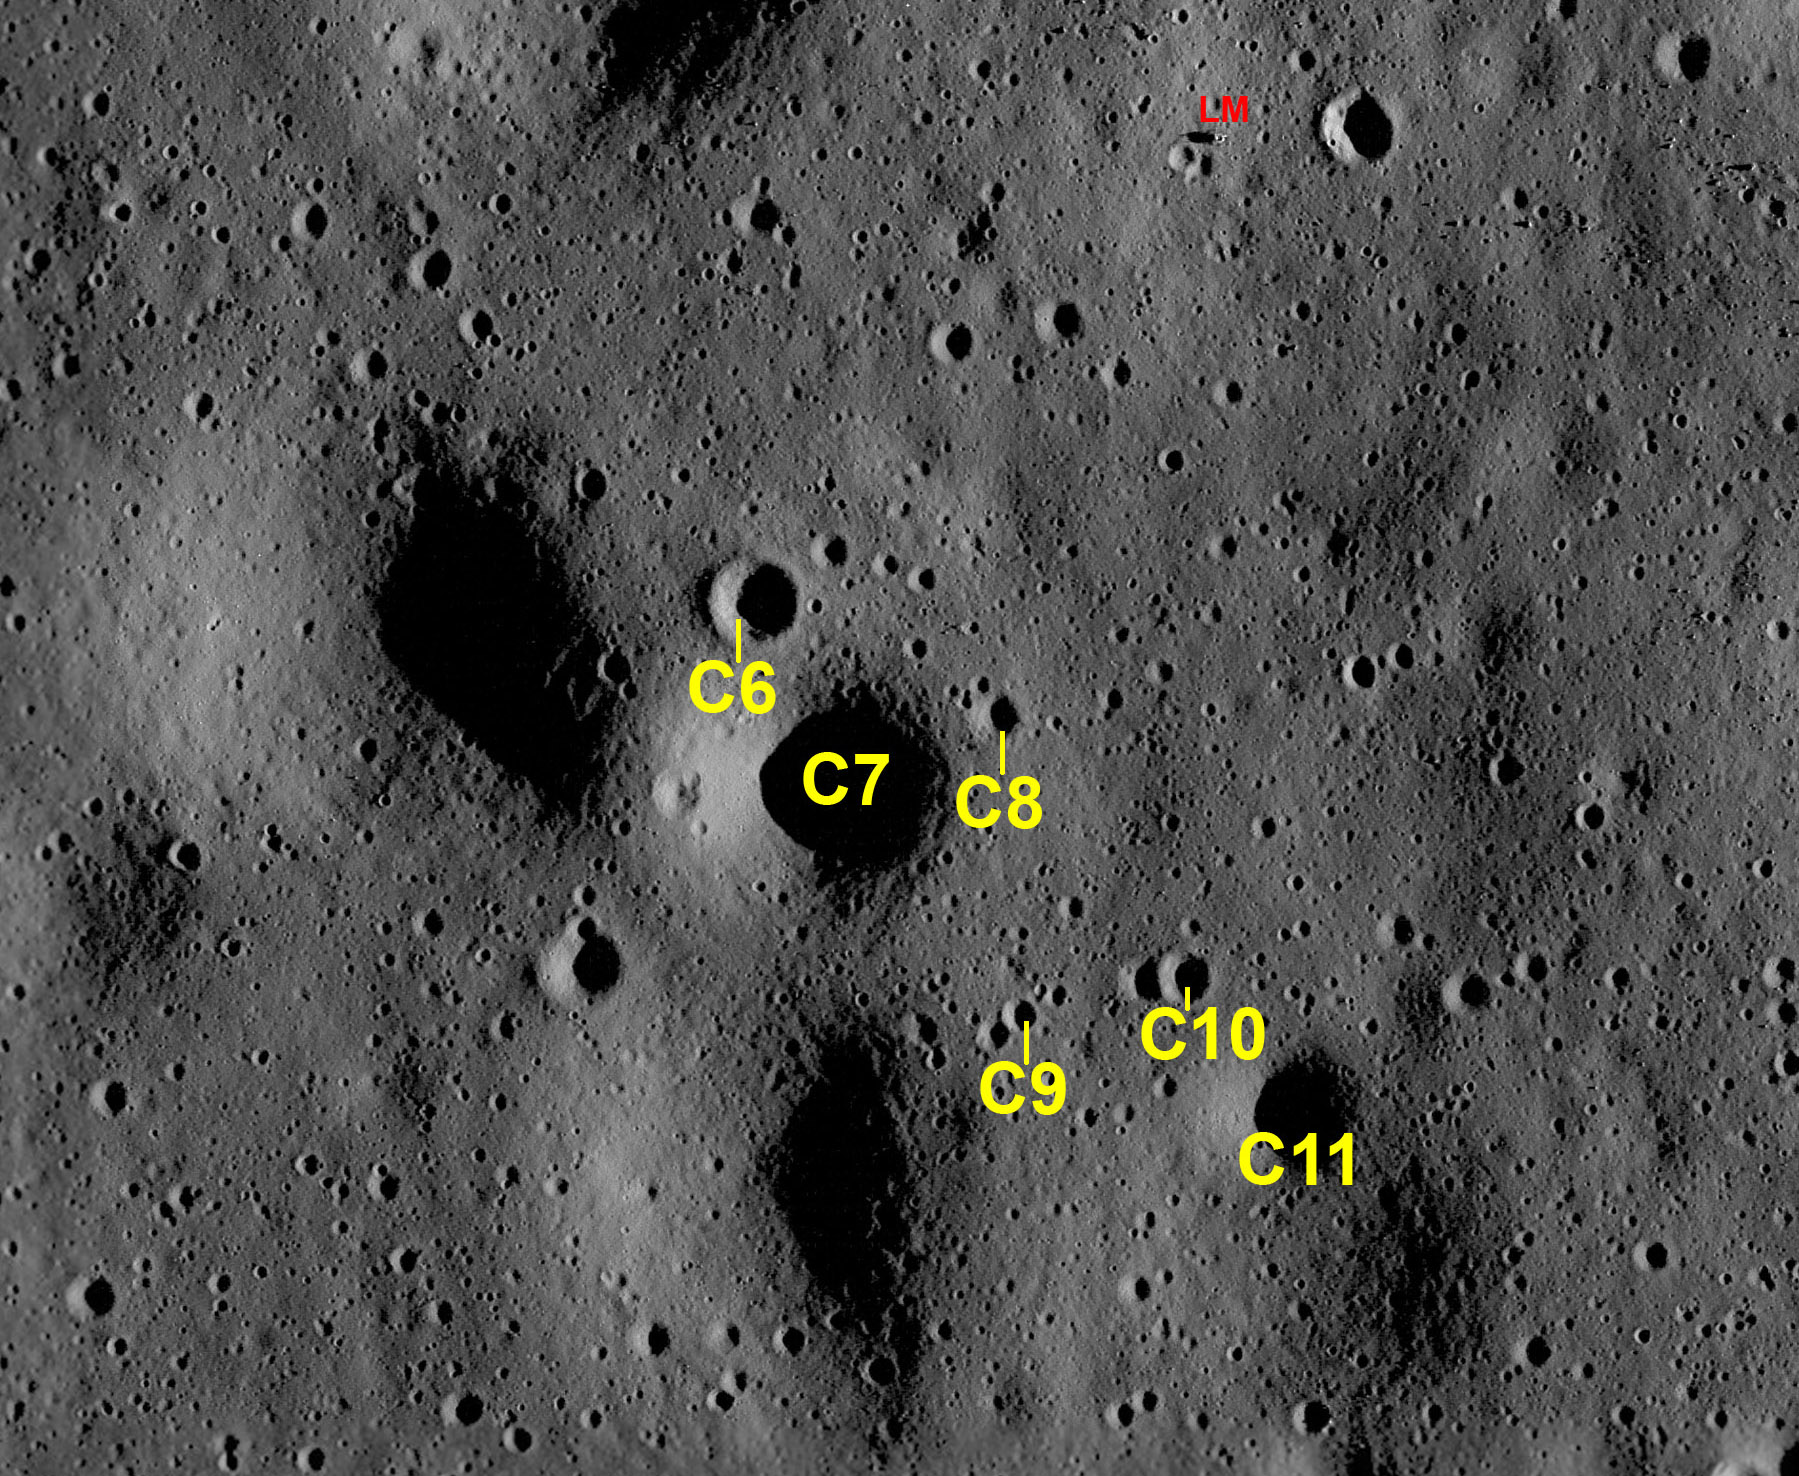
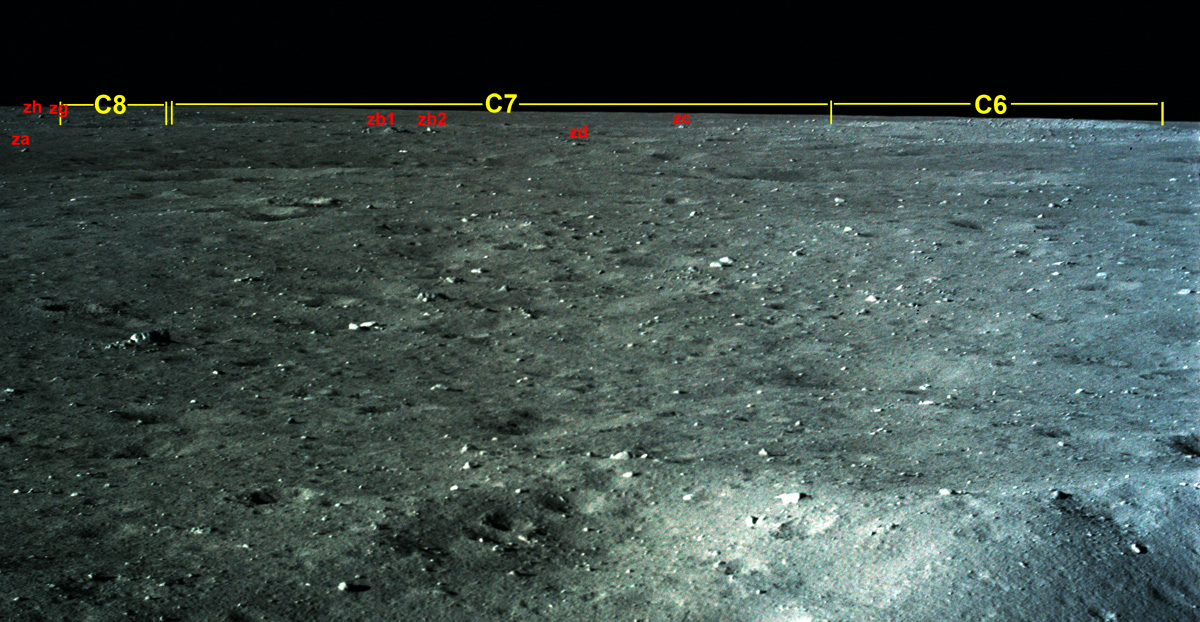
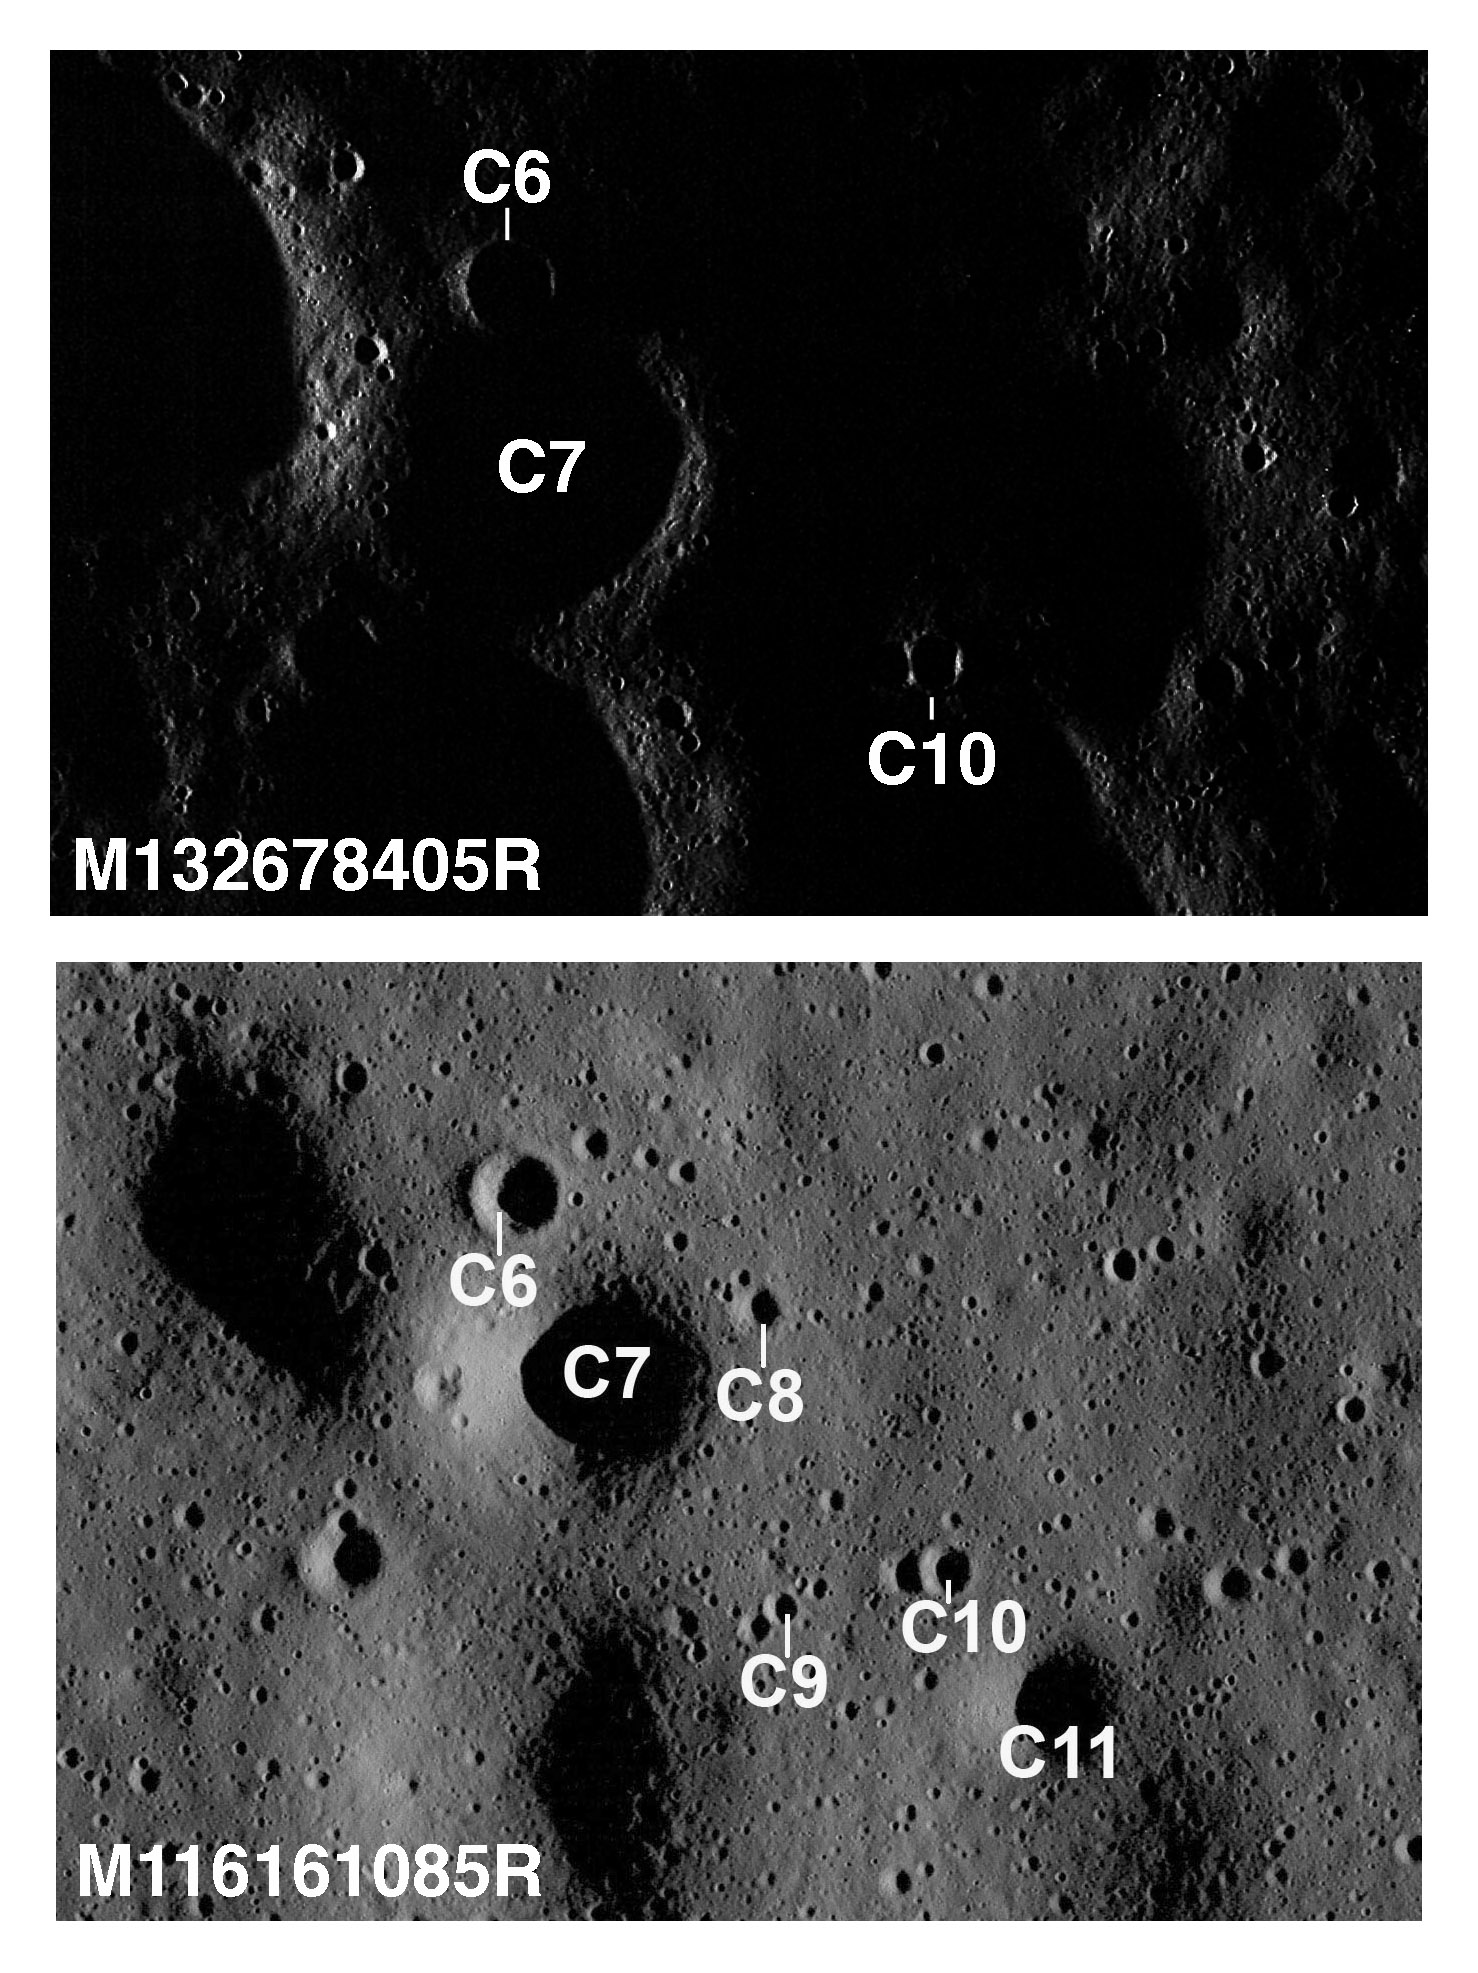
Craters C6 to C11 labeled in a detail from M116161085.
(Click on the image for a larger version.)
| Detail from
post-EVA photo AS11-37-5500 taken out Neil's
window. (Click on the image for a larger version.) |
As discussed in Section 3.6, boulders zb1, zb2, zc, and zc are just outside the rim of 140-m crater C7. The nearest part of the rim is about 310 meters southwest of the LM. The near part of the rim is seen against a background provided by the southwestern, inner wall of the crater, as can be seen in an animation made from post-landing photo AS11-37-5847.
C6 is a fresh, blocky rimmed crater ~300 m from the LM, with a diameter of about 45 m. Perhaps because C6 is on the outer slopes of both C7 and a larger crater to the west, the near rim of C6 is lower than the far rim, which gives us a good view of the numerous blocks on the southwest inner wall.
C8 is a ~22 m crater that appears to be on a broad level area on the northeast rim of C7.
from the LM. We can see a bit of the shadowed inner wall on the far side of C8.
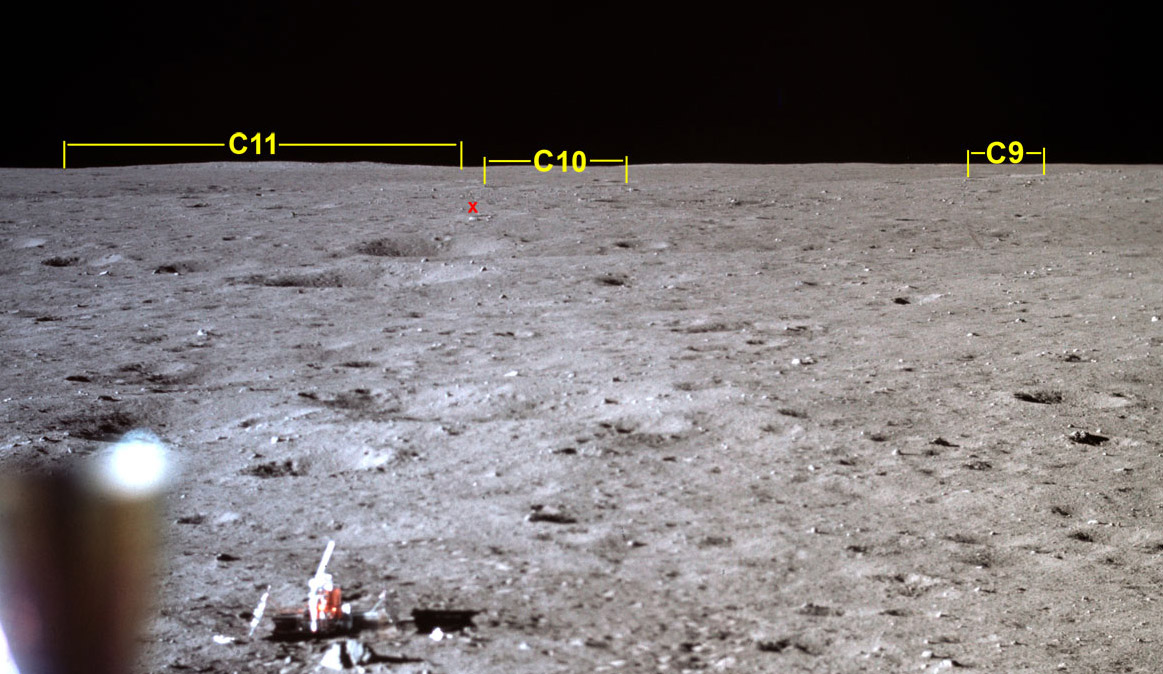
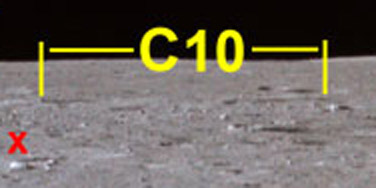
Detail from AS11-37-5550 showing craters C9, C10, and C11. Boulder x, in the middle distance, is ~221 m from the center of the LM, with width ~1.1 m and height ~0.4 m.
(Click on the image for a larger version.)
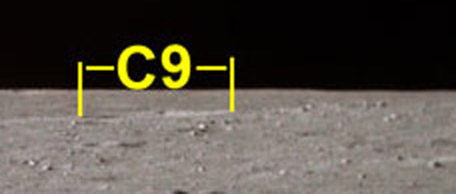
C9 is a fresh, sharp-rimmed crater on the outer, northeast flank of the large crater immediately south of C7. Diameter about 17 m and distant from the LM ~440 m. In the LROC detail, we see a similar-sized crater, sharp rimmed crater west of C9.
C9 overlaps this crater, indicating that C9 is younger. In a 2x-detail from 5550, the only possible sign of this crater are boulders on the local ridge line but, because the slope north of both craters is littered with rocks, it seems more likely that the rocks are ejecta from West Crater and that the crater overlapped by C9 is hidden by local terrain.
C10 is ~405 m from the LM, with a diameter of ~26 m. It is a fresh, sharp-rimmed crater and overlaps a slightly smaller crater on the west. Visibility in a 2x-detail from 5550 is marginal, Portions of the rim are illuminated in sunset image M132678405R.
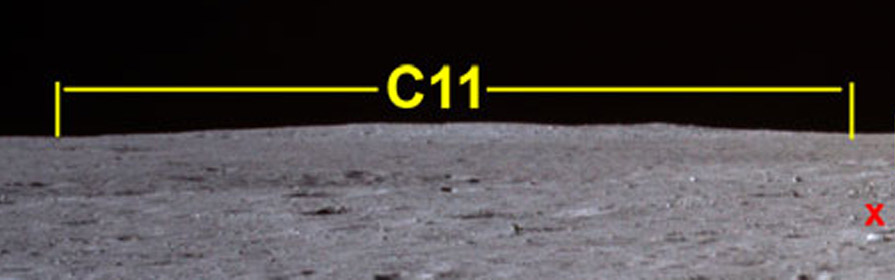
C11 is a large eroded crater with its near rim ~435 m from the LM and its diameter ~75m. We have a view of the inner, southern wall along most of its east-west extent. In a 2x-detail, the inner, southern wall is noticeably brighter than material closer to the LM.
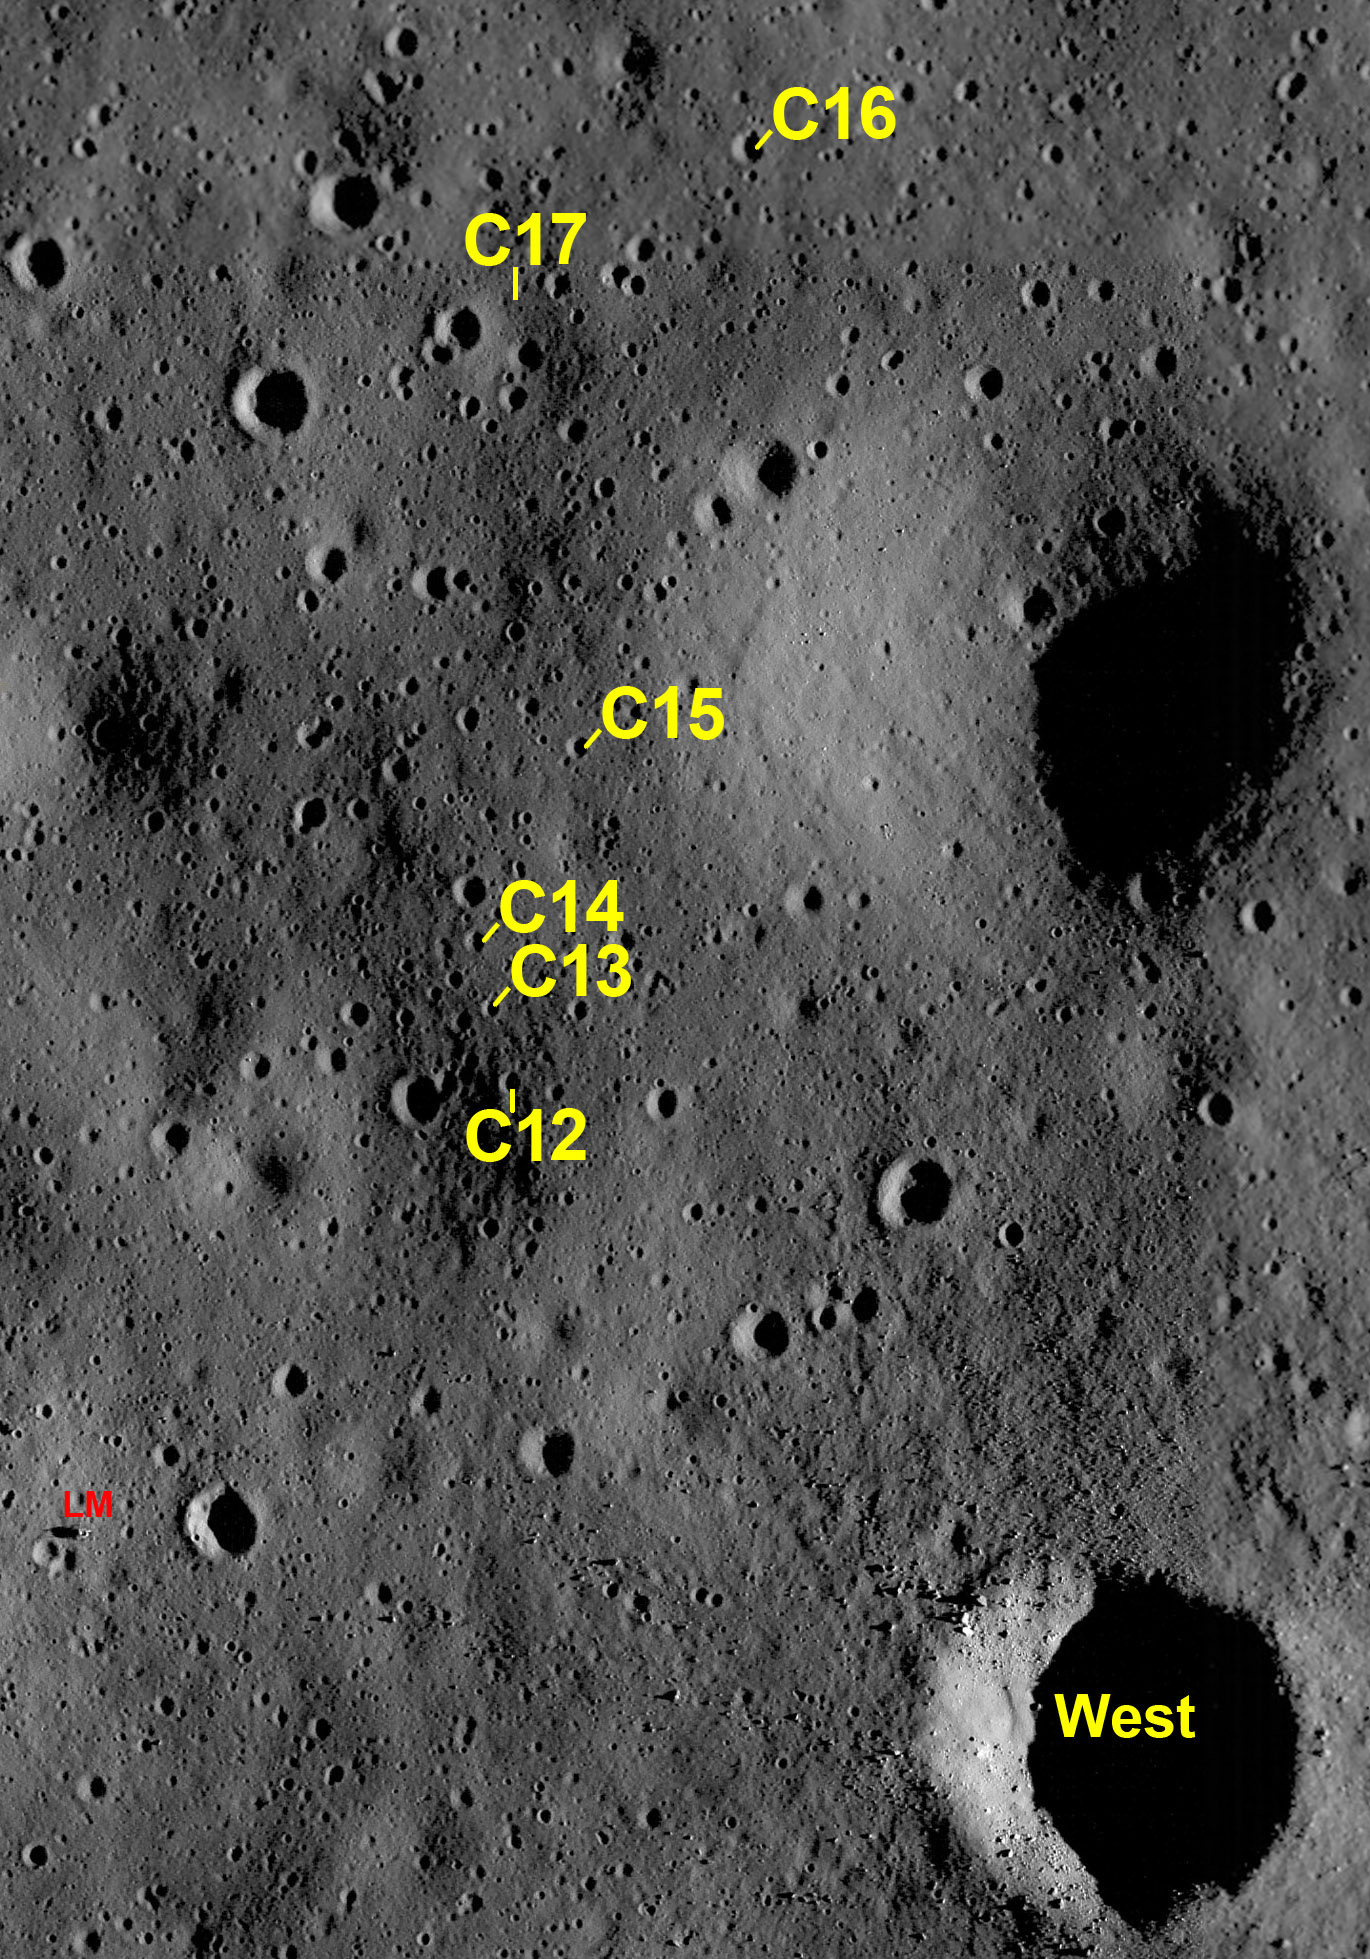
4.5.6 Craters Northeast of the LM visible in Pan 5
Detail from M116161085R showing craters C12-16.
(Click on the image for a larger version.)
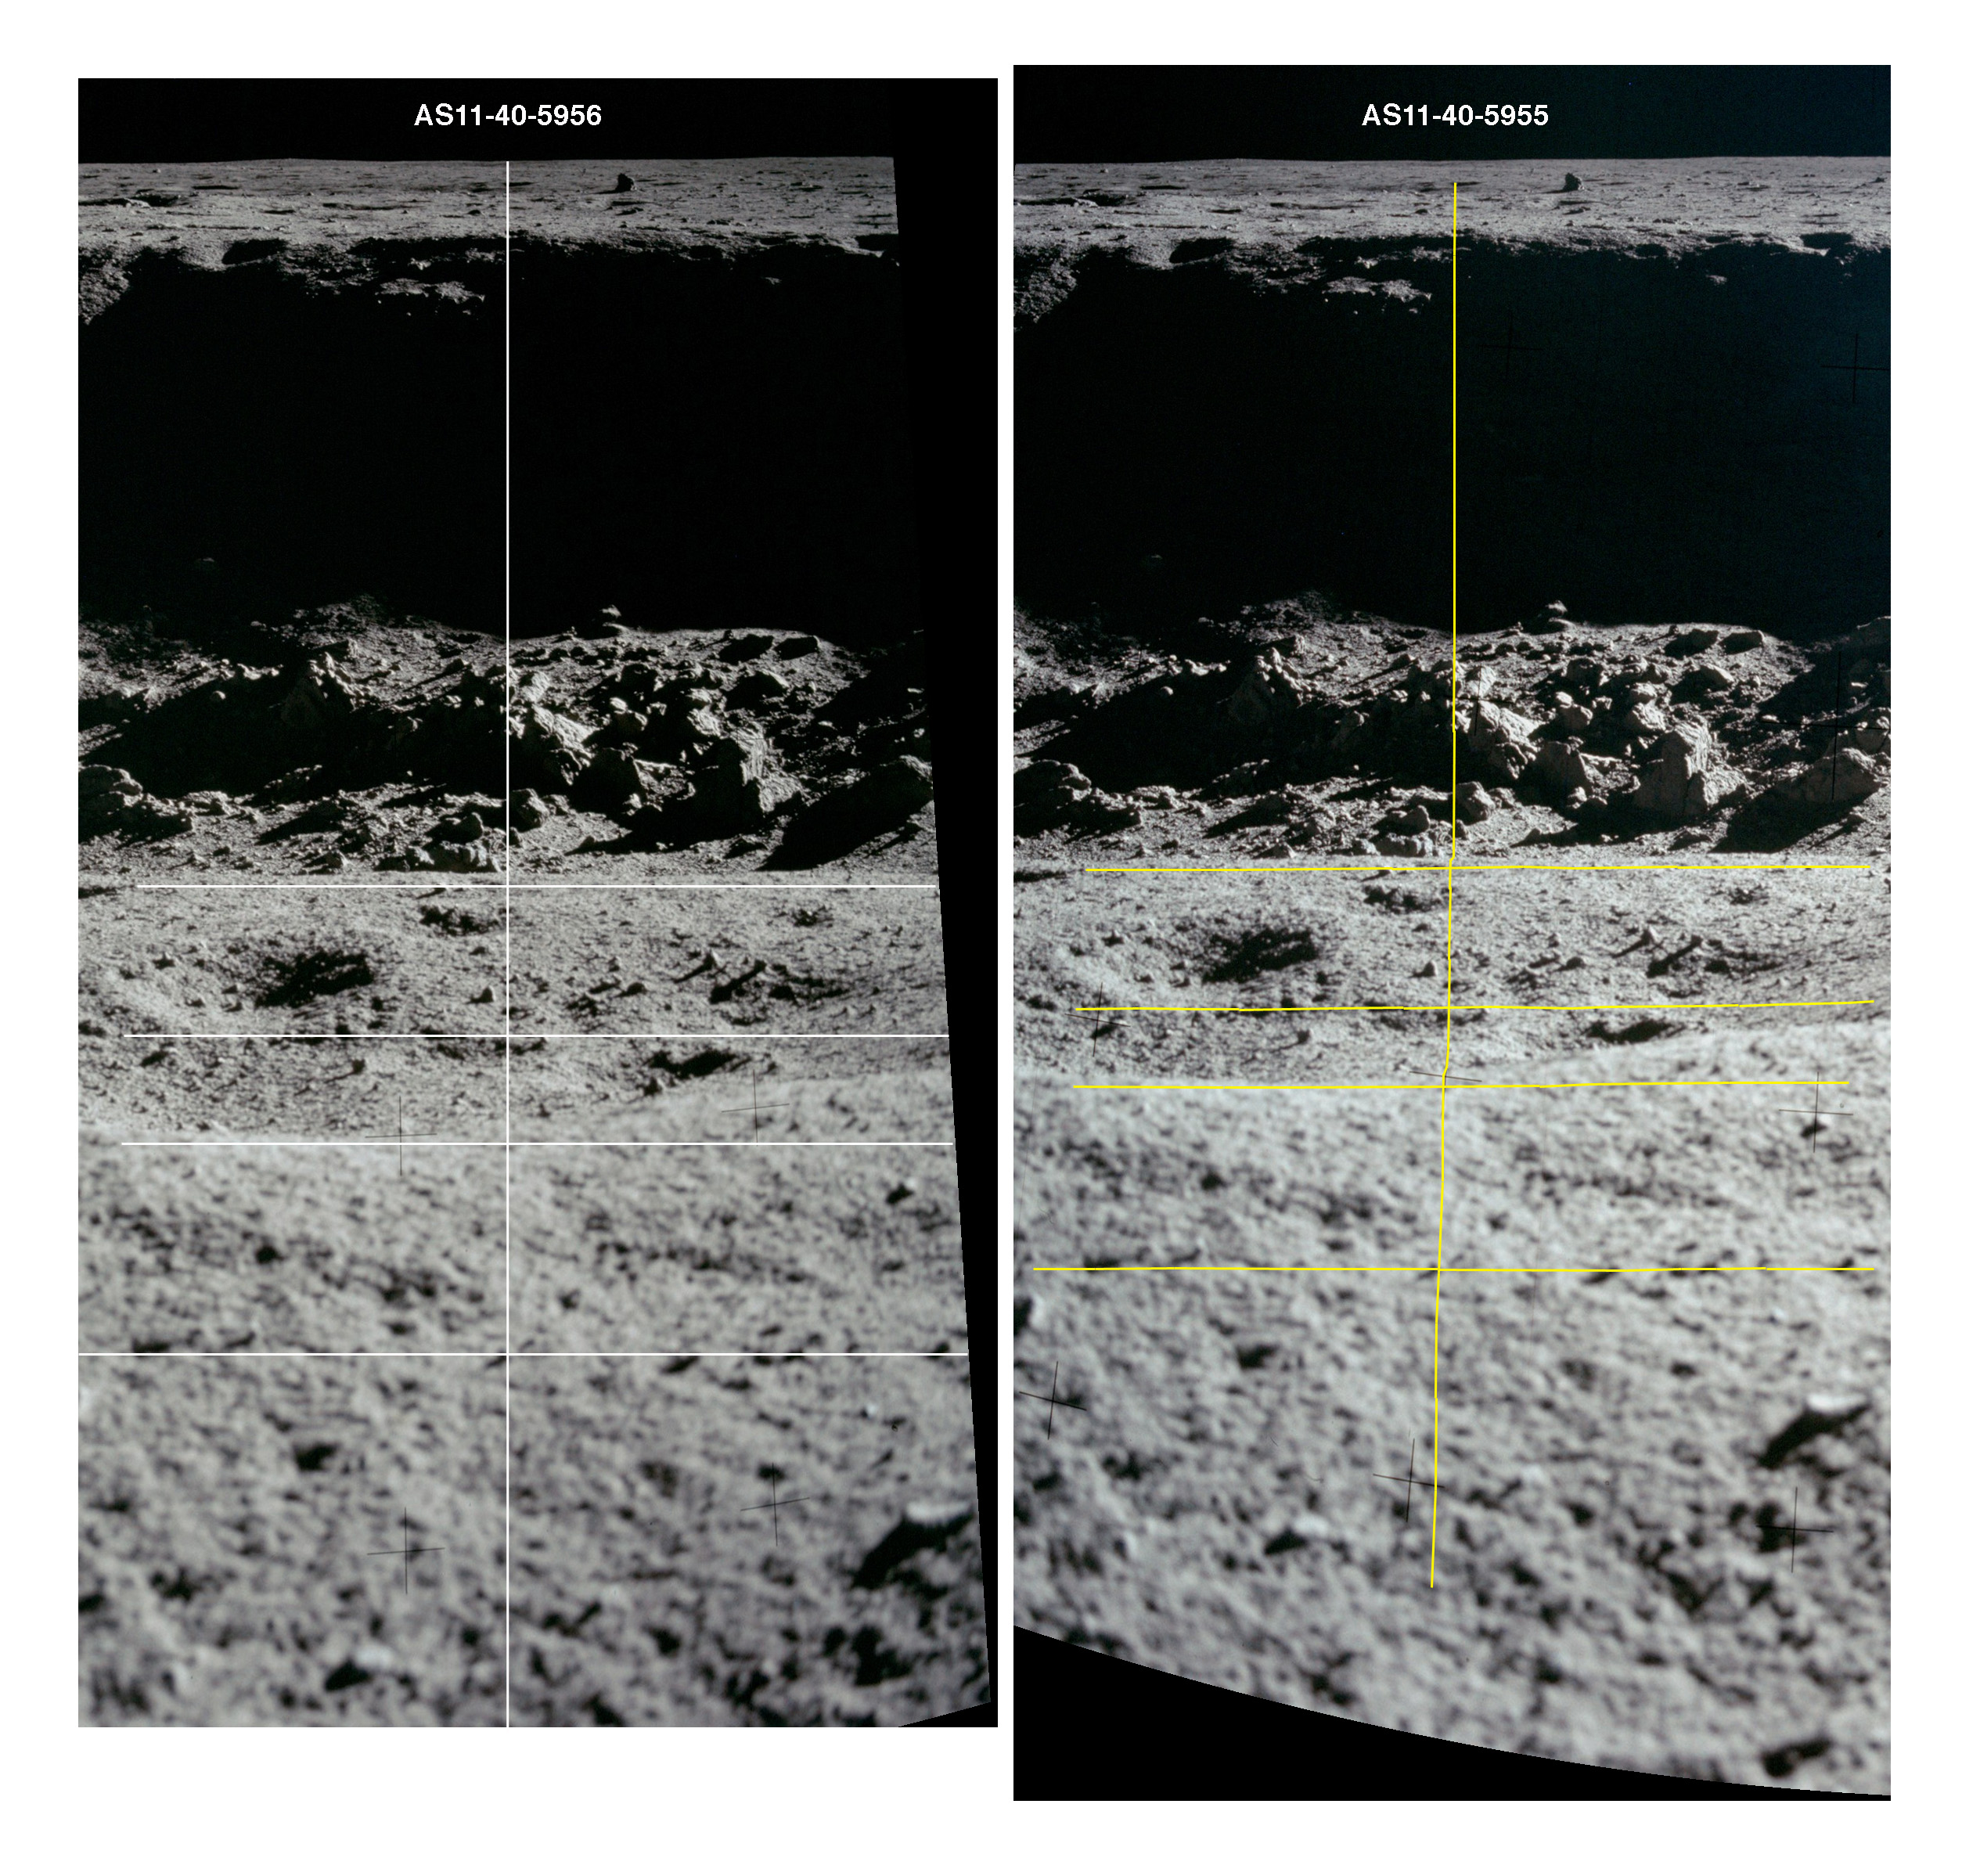
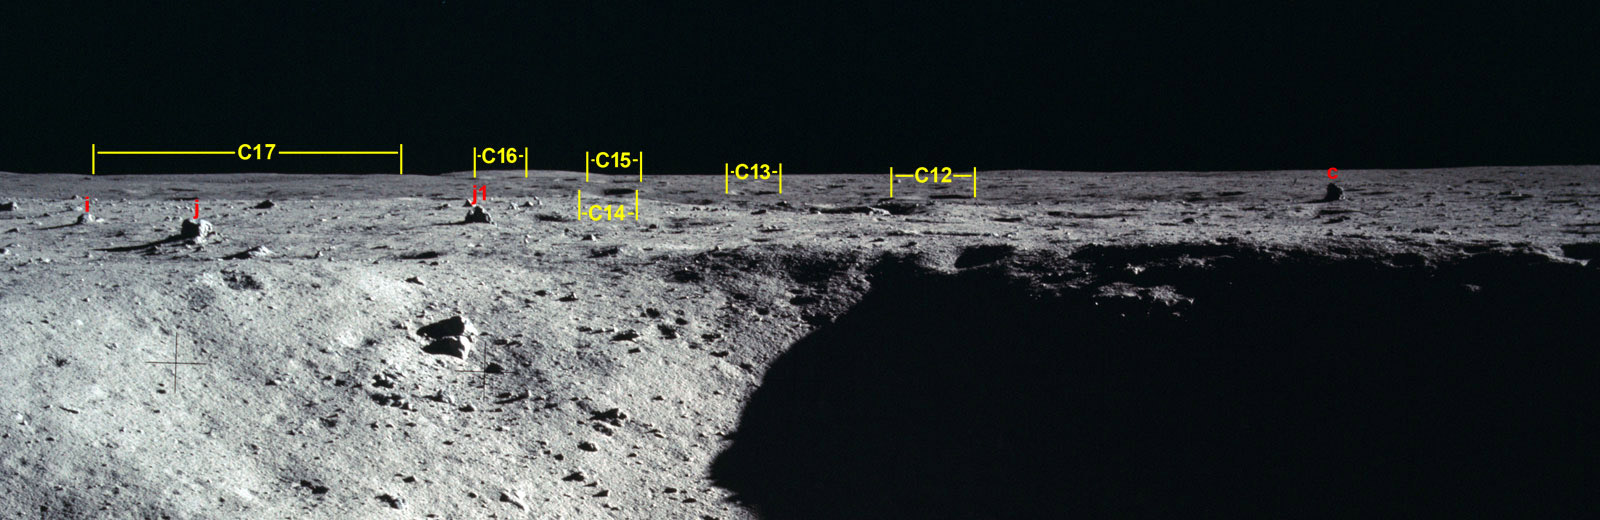
Detail from AS11-40-5956. This view to the NNE shows craters C12 to C17 from Neil's elevated position at the Pan 5 location on the southwest rim of Little West Crater. (Click on the image for a larger version that includes context.)
C12 is a 10-m crater ~300 m from the LM. It is just inside the rim of a very eroded, ~170-m crater. The near rim of the eroded crater is ~170 m from the LM. Most of the eroded crater is hidden by the rim of Little West.
C13 is a 9-m crater, ~320 m from the LM. In the LROC image, it appears to be farther from the center of the eroded crater and nearer the rim crest.
C14 is an 11-m crater, ~340 m from the LM. It is just outside the eroded crater.
C15 is a 12-m crater, ~450 m from the LM.
C16 is a 16-m crater, ~740 m from the LM.
C17 is a heavily-eroded, ~80 m crater ~580 m from the LM. From
the Pan V location, the northern rim appears to be higher than the southern rim, but this is probably a result of the generally rising ground in that direction. The LROC image shows a number of younger crater within C17. The largest has a raised rim and a diameter of ~25 m. It is just inside the northwest rim of C17.
4.5.7 Craters Near the LM Viewed from the Windows
All of these craters have been identified in comparisons between photos taken out the LM windows and GoneToPlaid's deconvolution of LROC image M116161085R. Parallaxes available in the window photography are too small to allow meaningful photogrammetry.
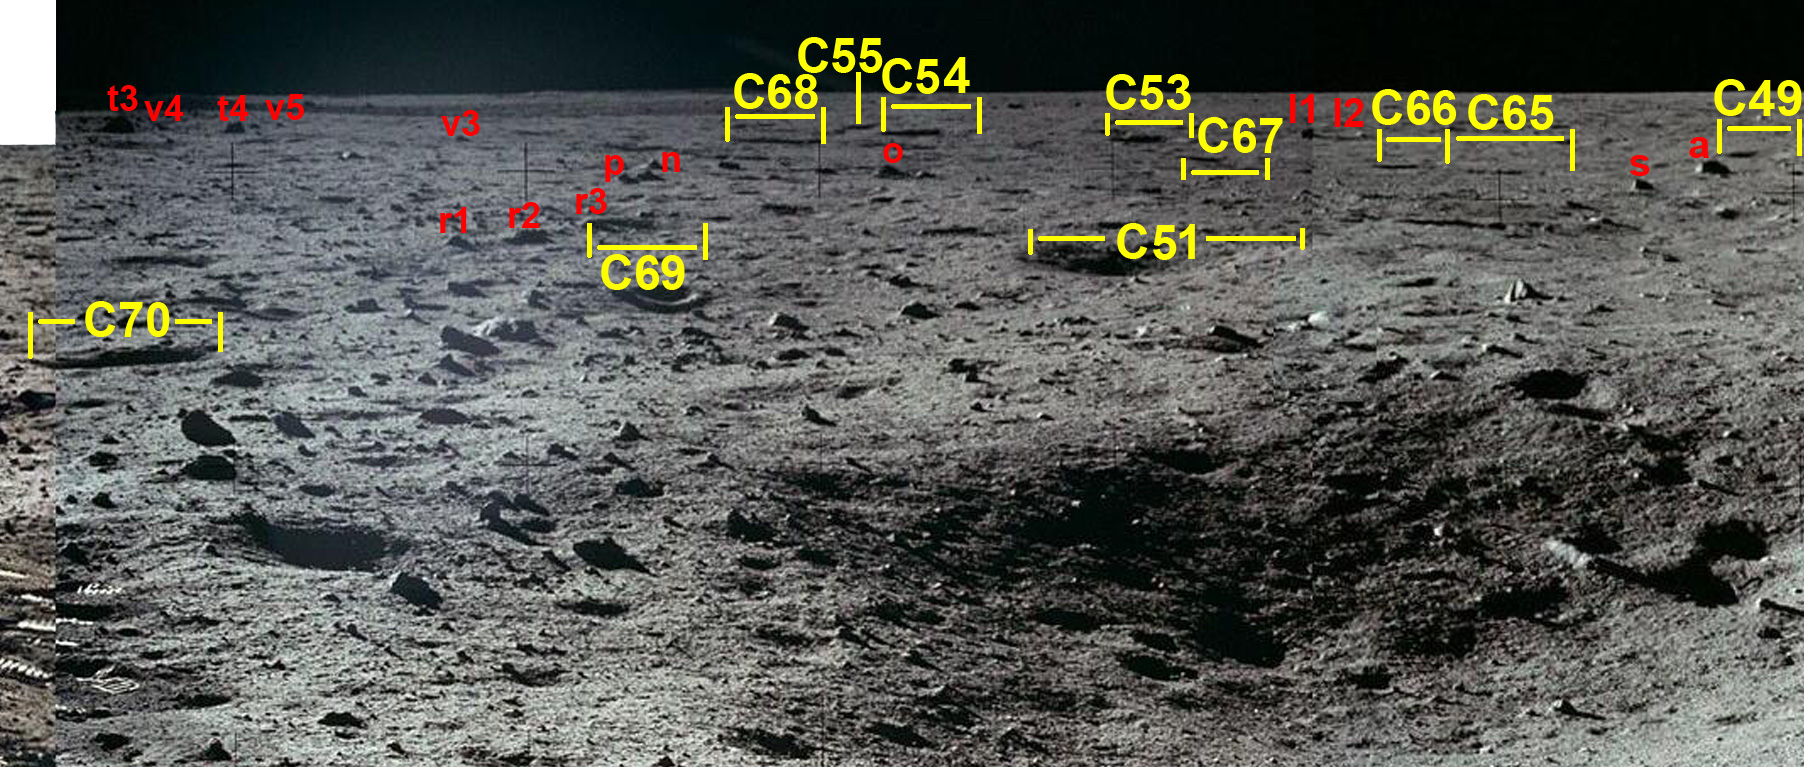
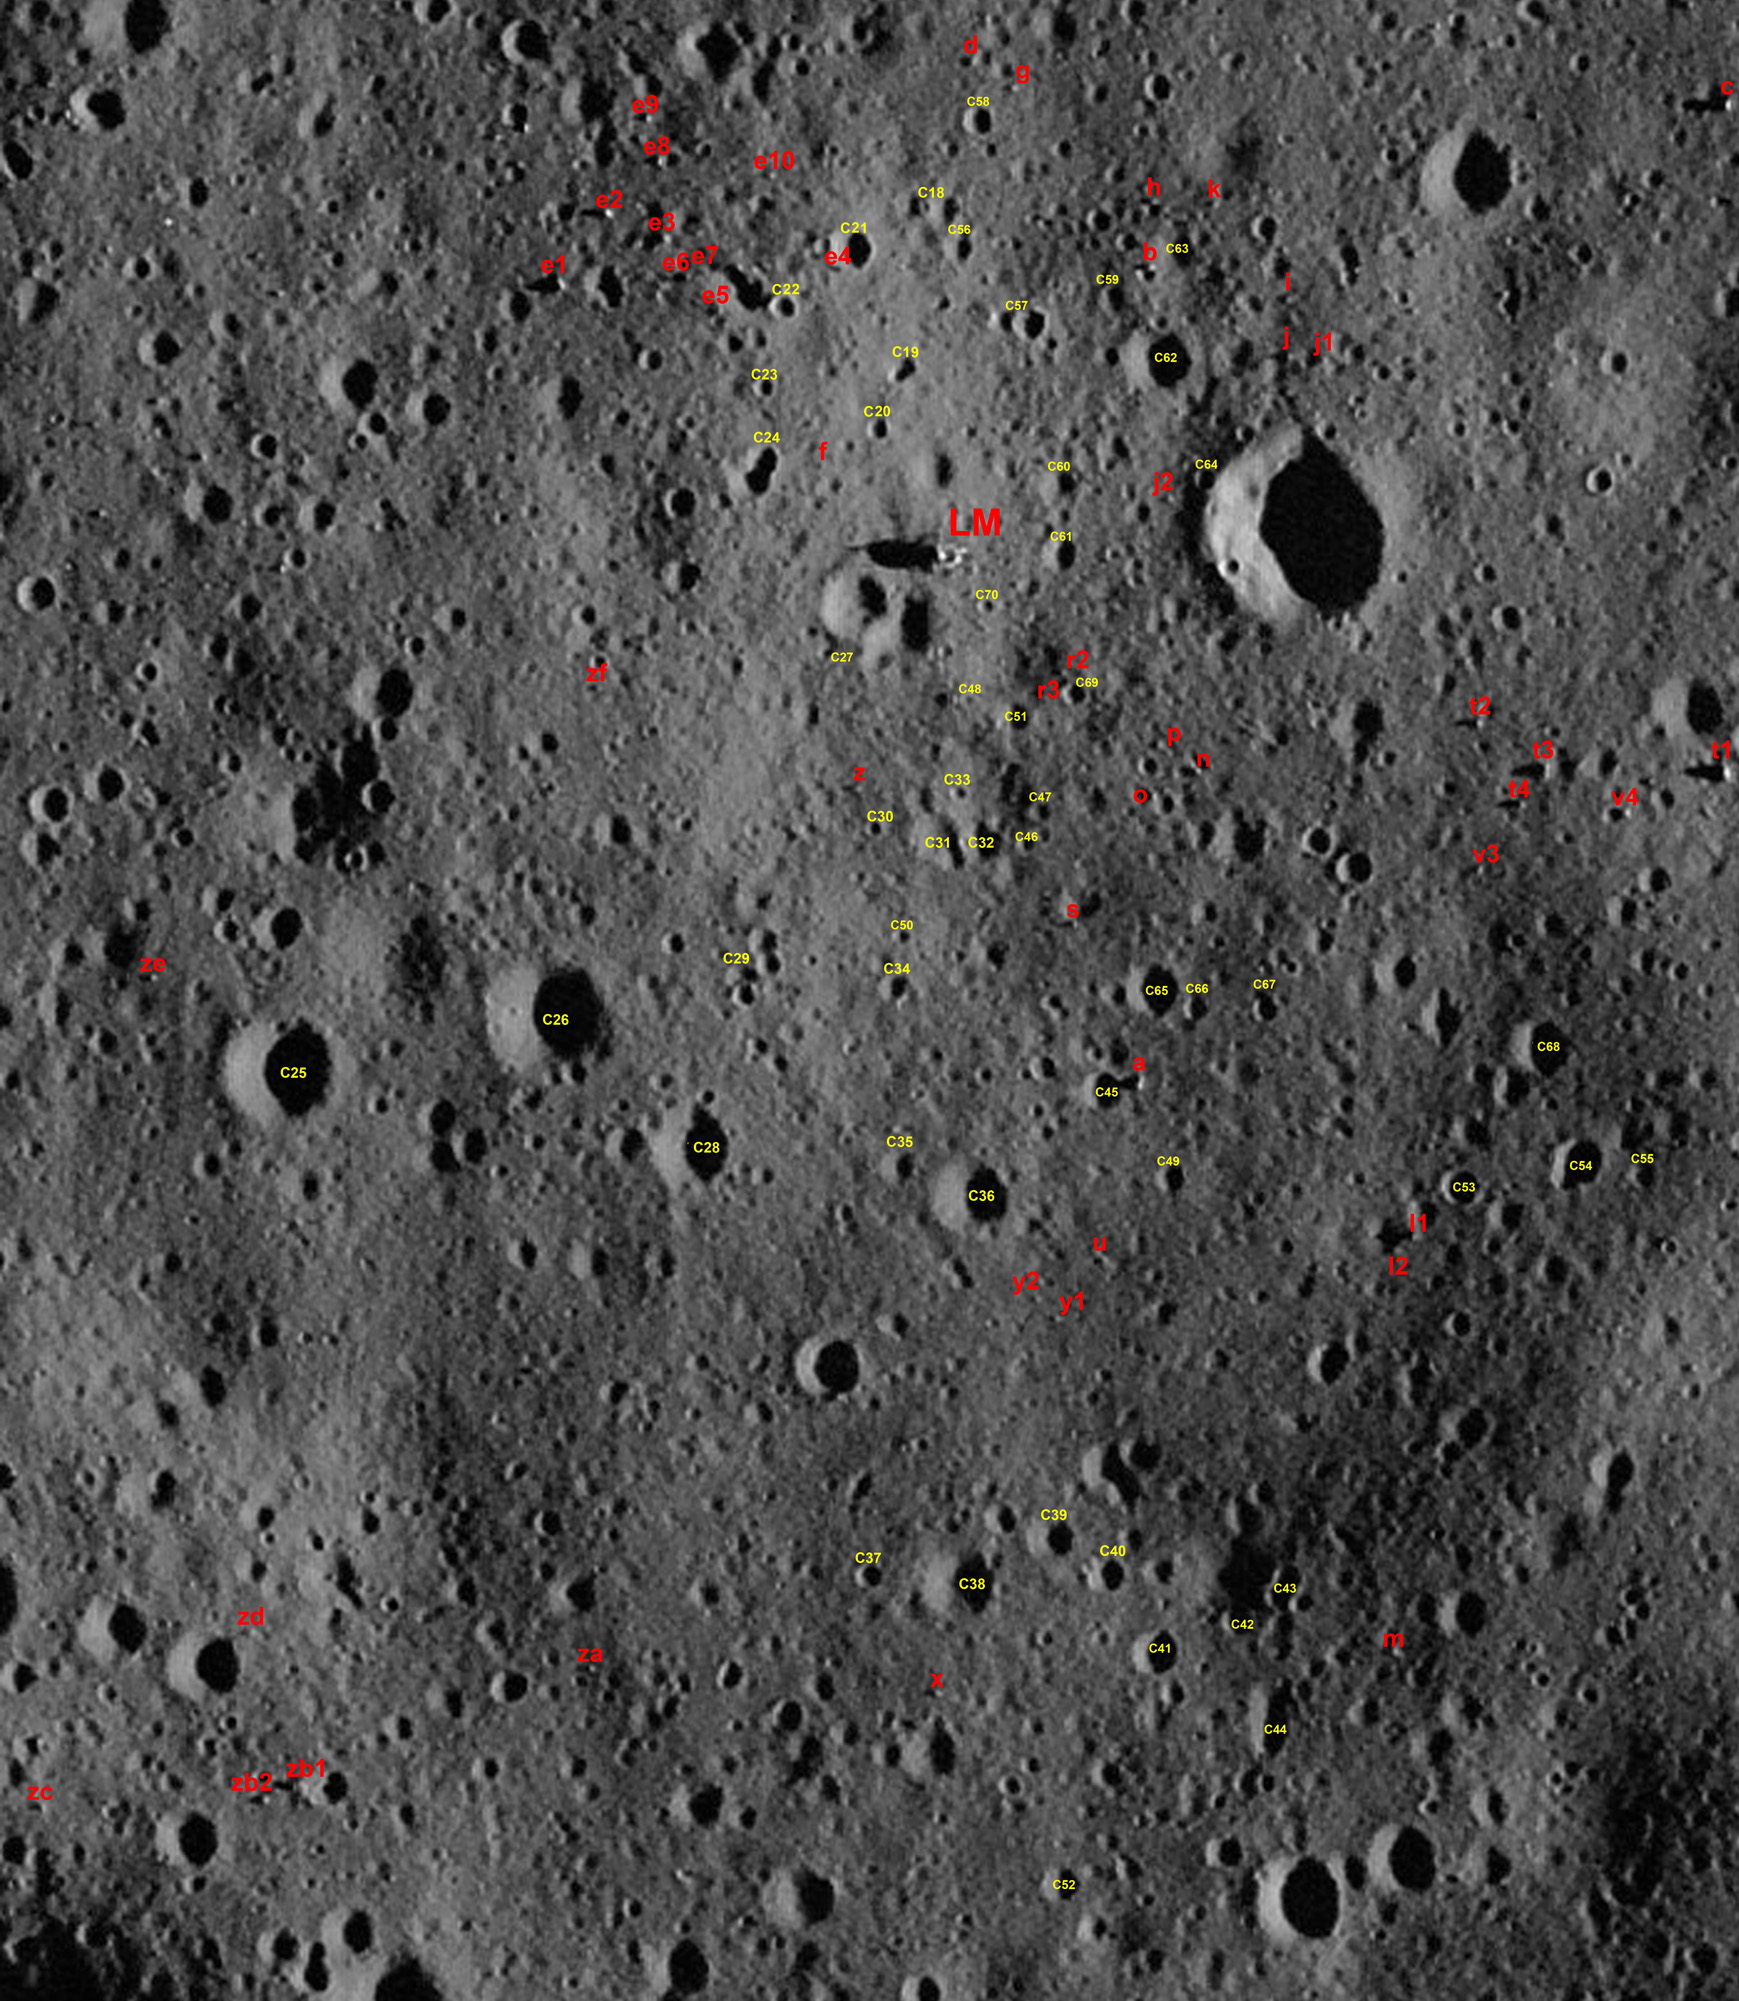
A version of ConeToPlaid's deconvolution of M116161085R with labels for craters C18 - C70 and selected boulders is linked here. Details from the LROC image and from the window photos are linked in the following table.
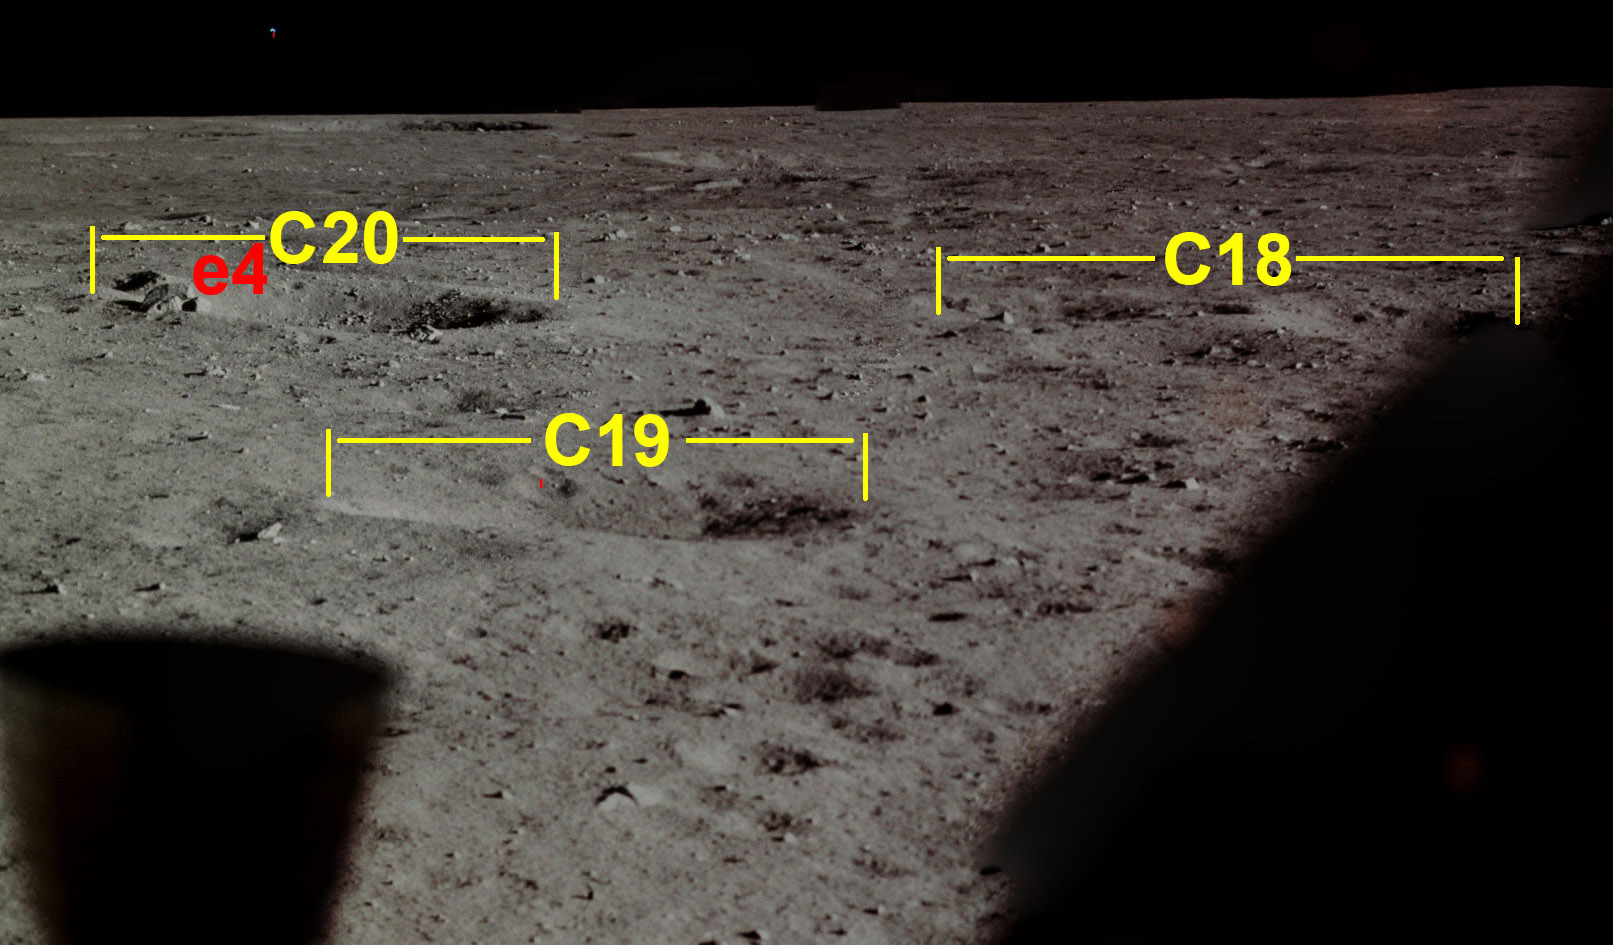
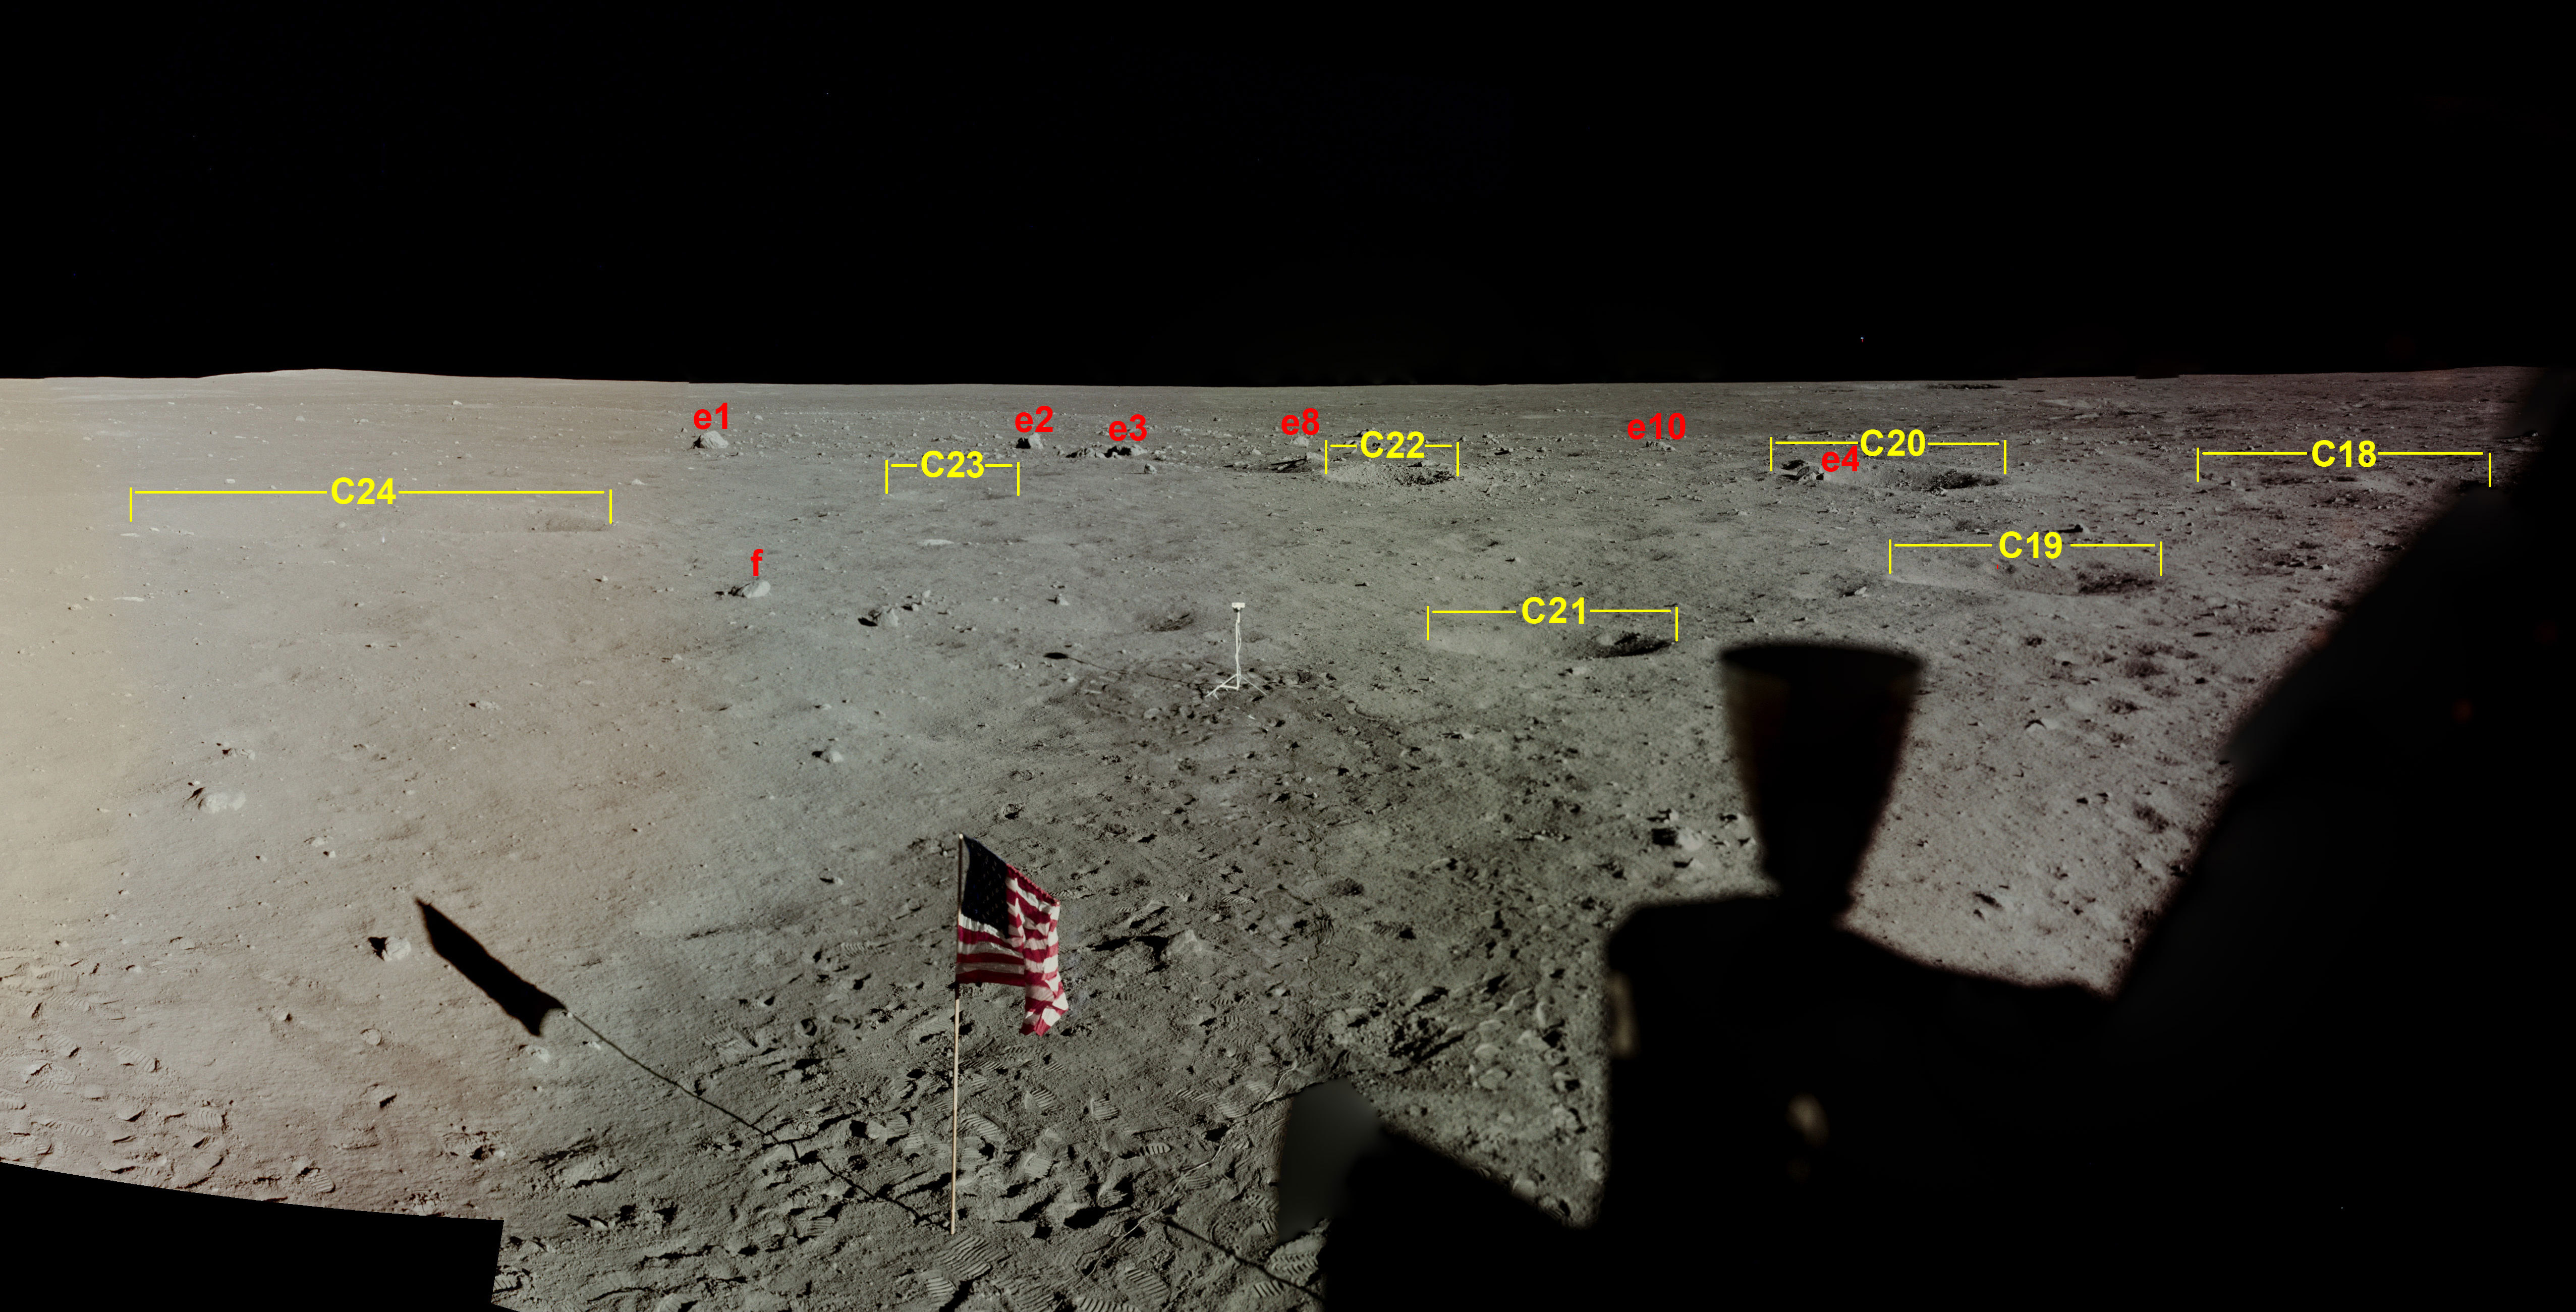
Crater
Diameter (m)
Distance (m) Window Notes
Window Photography
LROC Details
C18
6 (each)
65
LMP
tangent pair
C18-C20
C18-C24
C19 6 x 3
35
LMP
overlapping pair
C20 9 + 3.5
58
LMP crater with a small one overlapping western rim; e4 boulders on southwest rim.
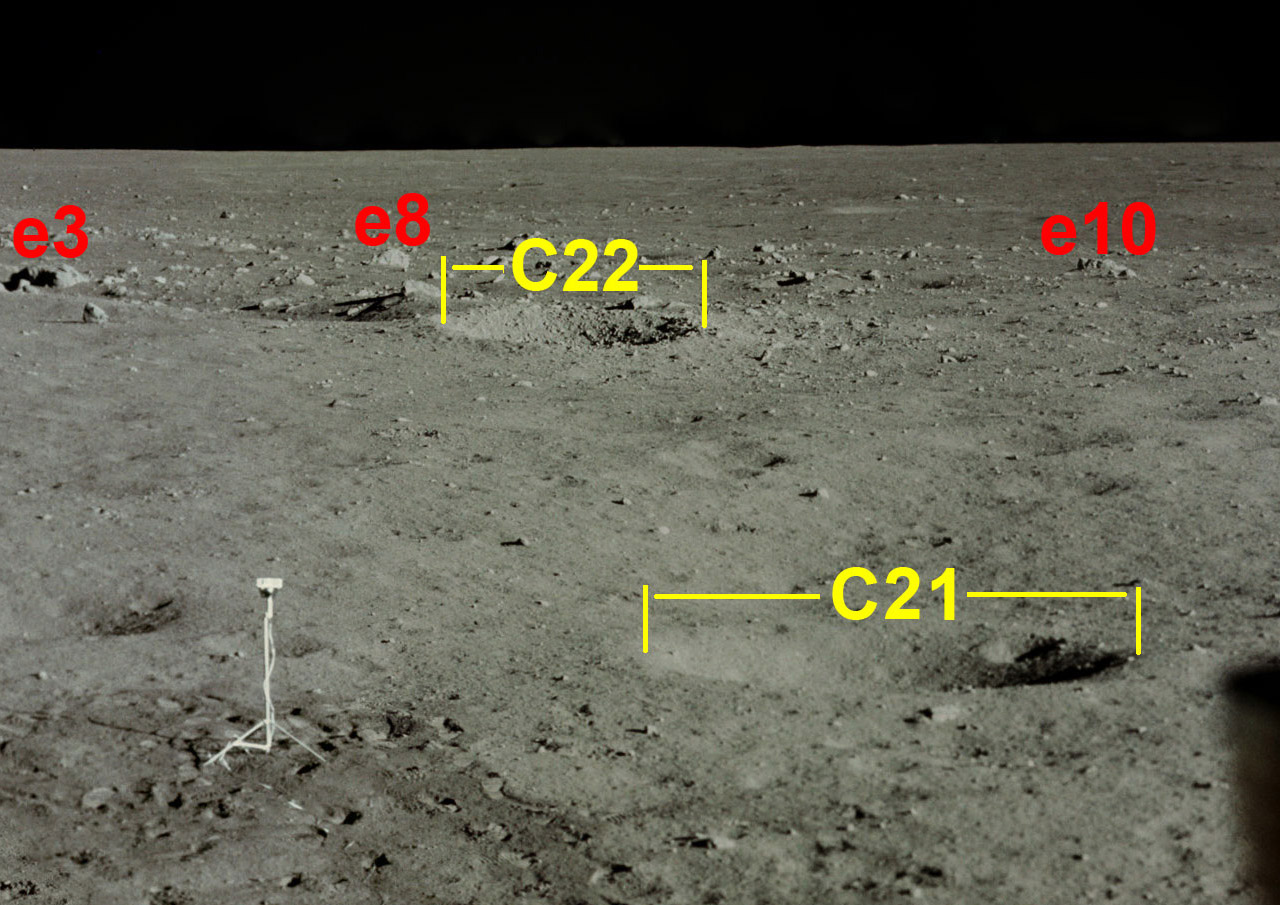
C21 5
26
LMP θ crater in the photogrammetric map
C21-C22
C22 5
55
LMP
"Fresh crater" in previous sectons
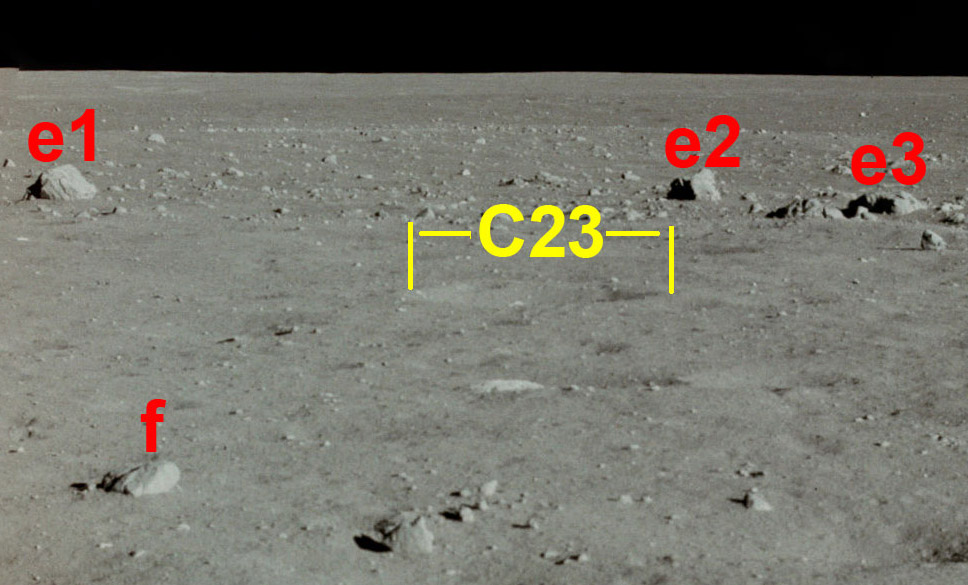
C23 4
47
LMP
C23
C24 7.5 + 5.5
38
LMP
Overlapping craters; larger component on the southwest
C24
C25 22
155
CDR
C25-C27
C25-C26 C26 23
105
CDR small rim craters visible in CDR photo 5743
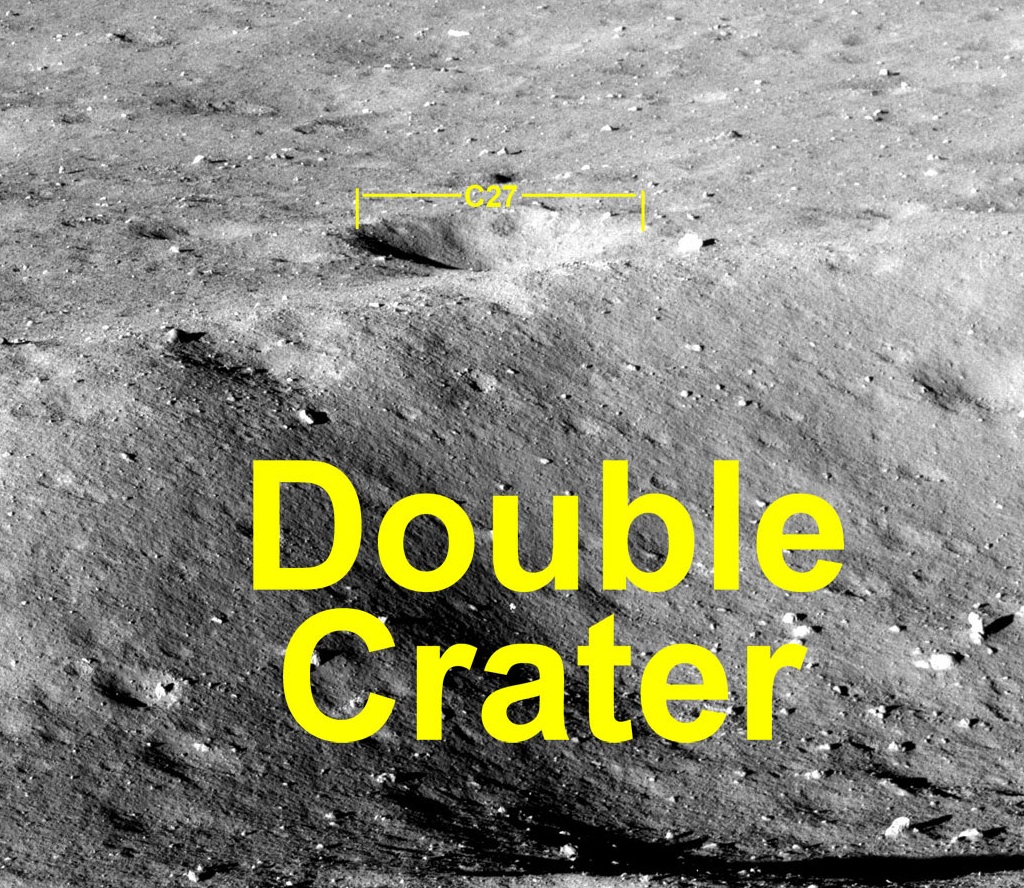
C27 3
28
CDR just outside southern rim of the western component of Double Crater
C27
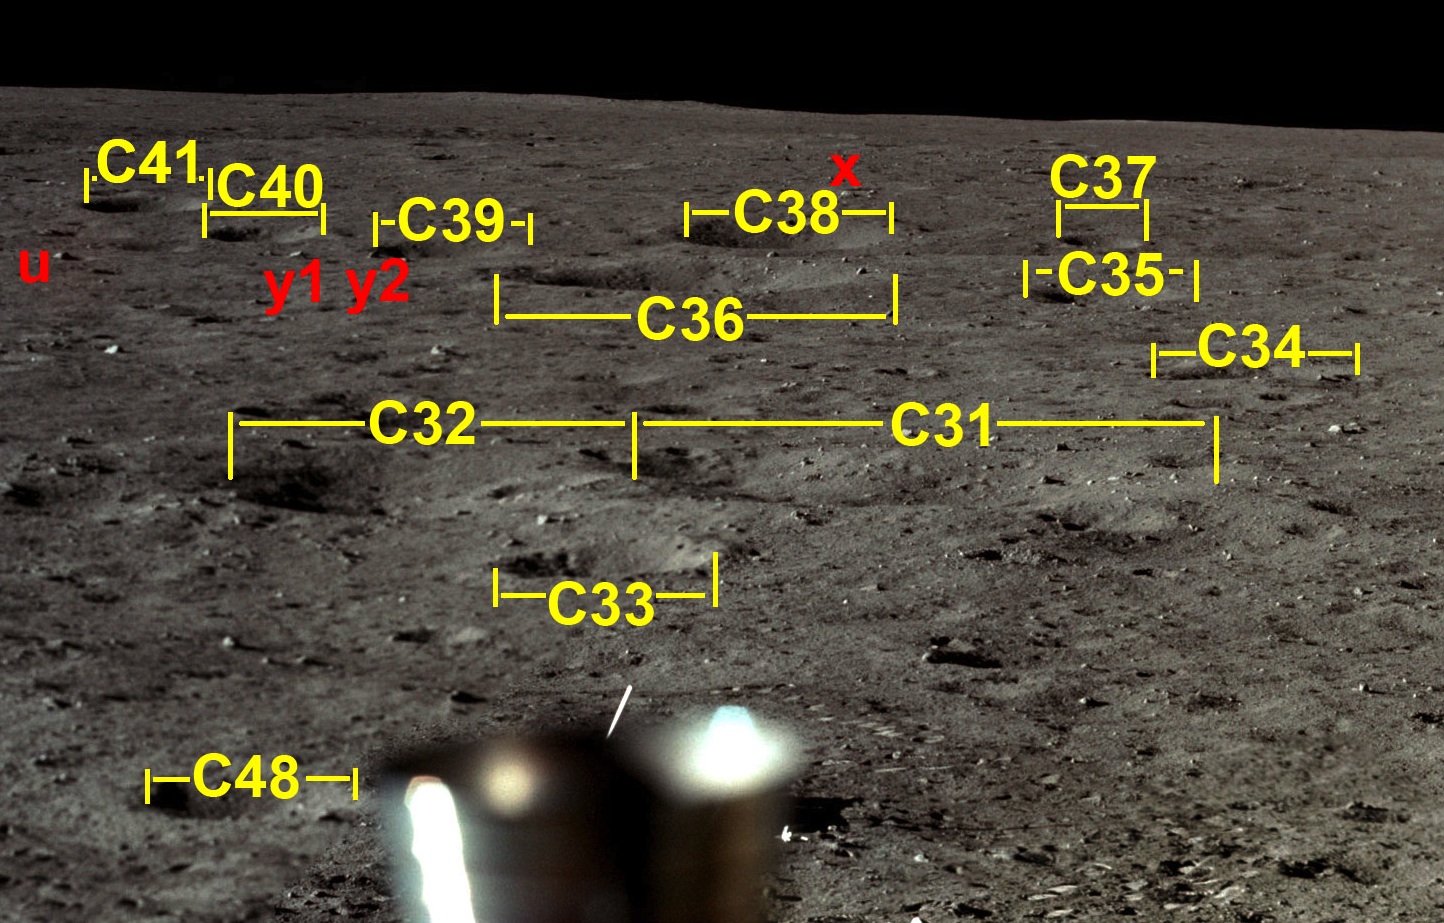
C27-C36
C28 16
115
CDR
C28-C30
C29 8 x 18
80
CDR cluster with two pairs of overlapping craters. The craters in each pair are oriented NNW-SSE. Each crater is 5-6 meters in diameter.
C30 3
53
CDR
C31 8 x 12
50
CDR two overlapping craters, northern component ~9 m, southern component ~5 m and younger
C31-C41 C32 6
50
CDR
C33 3
45
CDR
C34 5
45
CDR
C35 6
115
CDR
C36 16
115
CDR boulder gt12 is on the southeastern rim
C37 5
195
CDR
C37-C44
C38 14
195
CDR In the window photos, C36 appears to be very close to C38. The craters are actually 80 meters apart, with the ground between hidden by terrain rugae that manifests itself in the window photos by a clearly-visible separation line with C35 and C36 north of the line and C37 and C38 south of it. The same ruga hides a raised-rim, 13-m crater ~155 m from
the LM center, about midway between C35 and C37 and about its own diameter west of the line connecting them. In the LROC image, there is a prominent boulder on the southern rim of the hidden crater.
C39 9
190
CDR From CDR window, boulder y2 appears to be close to the eastern rim. In fact, C39 is more than 40 m
beyond y2. The area between y2 and C39 is hidden by the rugae.
C40 7
195
CDR Its eastern rim is slightly elevated.
C41 9
215
CDR A 4-m crater is just south and slightly east of C41, with about a 2 m separation between the rims. The small crater is also visible from the CDR window. Several craters are
hidden - or partially hidden - behind the rugae in an area with C40-C41 on the south and boulders y1- u on the north.
C42 6
210
CDR Sits near the bottom of a low area between dark ground the rises to the east and lighter ground that rises to the west. It is also in the southern rim of an old, 20-m crater.
C42-C49
C43 4 x 9
205
CDR Two overlapping craters on the eastern rim of the old, 20-m crater. Each of the craters has a diameter of 4-5 m.
C44 15 x 8
230
CDR Elongated feature that could be the result of (1) two or three separate impacts, possibly arriving nearly simultaneously from a single impact source or (2) a nearly tangential impact. (Impacts at all but the slowest speeds produce nearly circular craters unless the impact angle is very small.)
C45 7
105
CDR 2 meters west of boulder a.
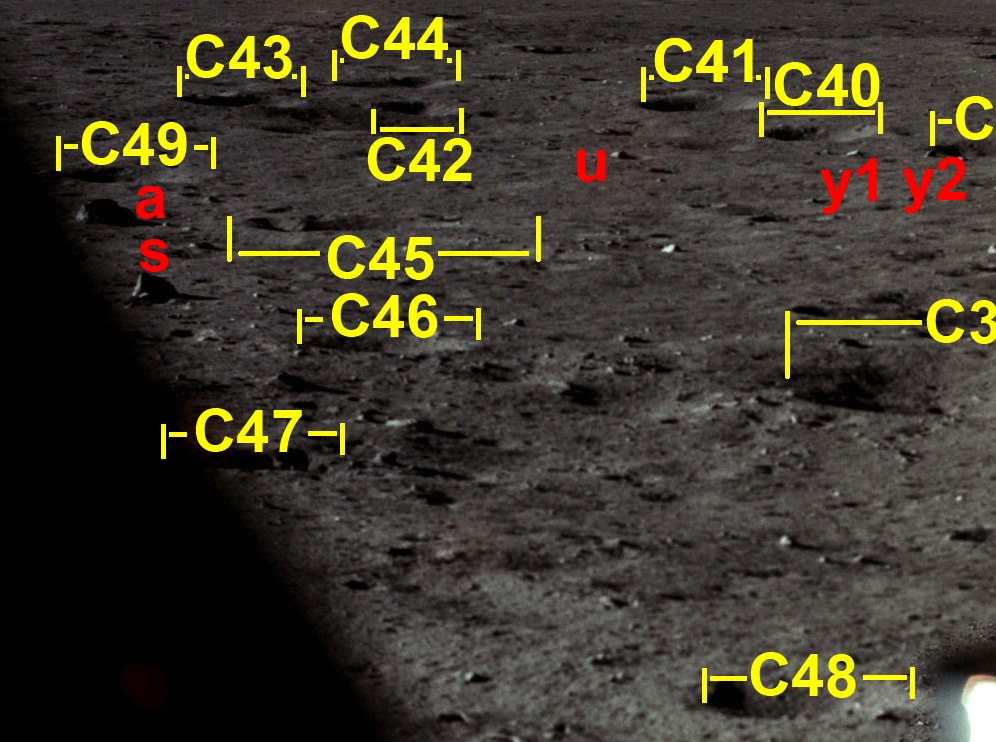
C45-C49
C46 3
55
CDR on the rim of the same depression as C31 and C32.
C47 4
50
CDR on the rim of the same depression as C31 and C32, partly hidden by spacecraft structure. C48 2
27
CDR less than 2 meters east of the PSE
C49 5
125
CDR
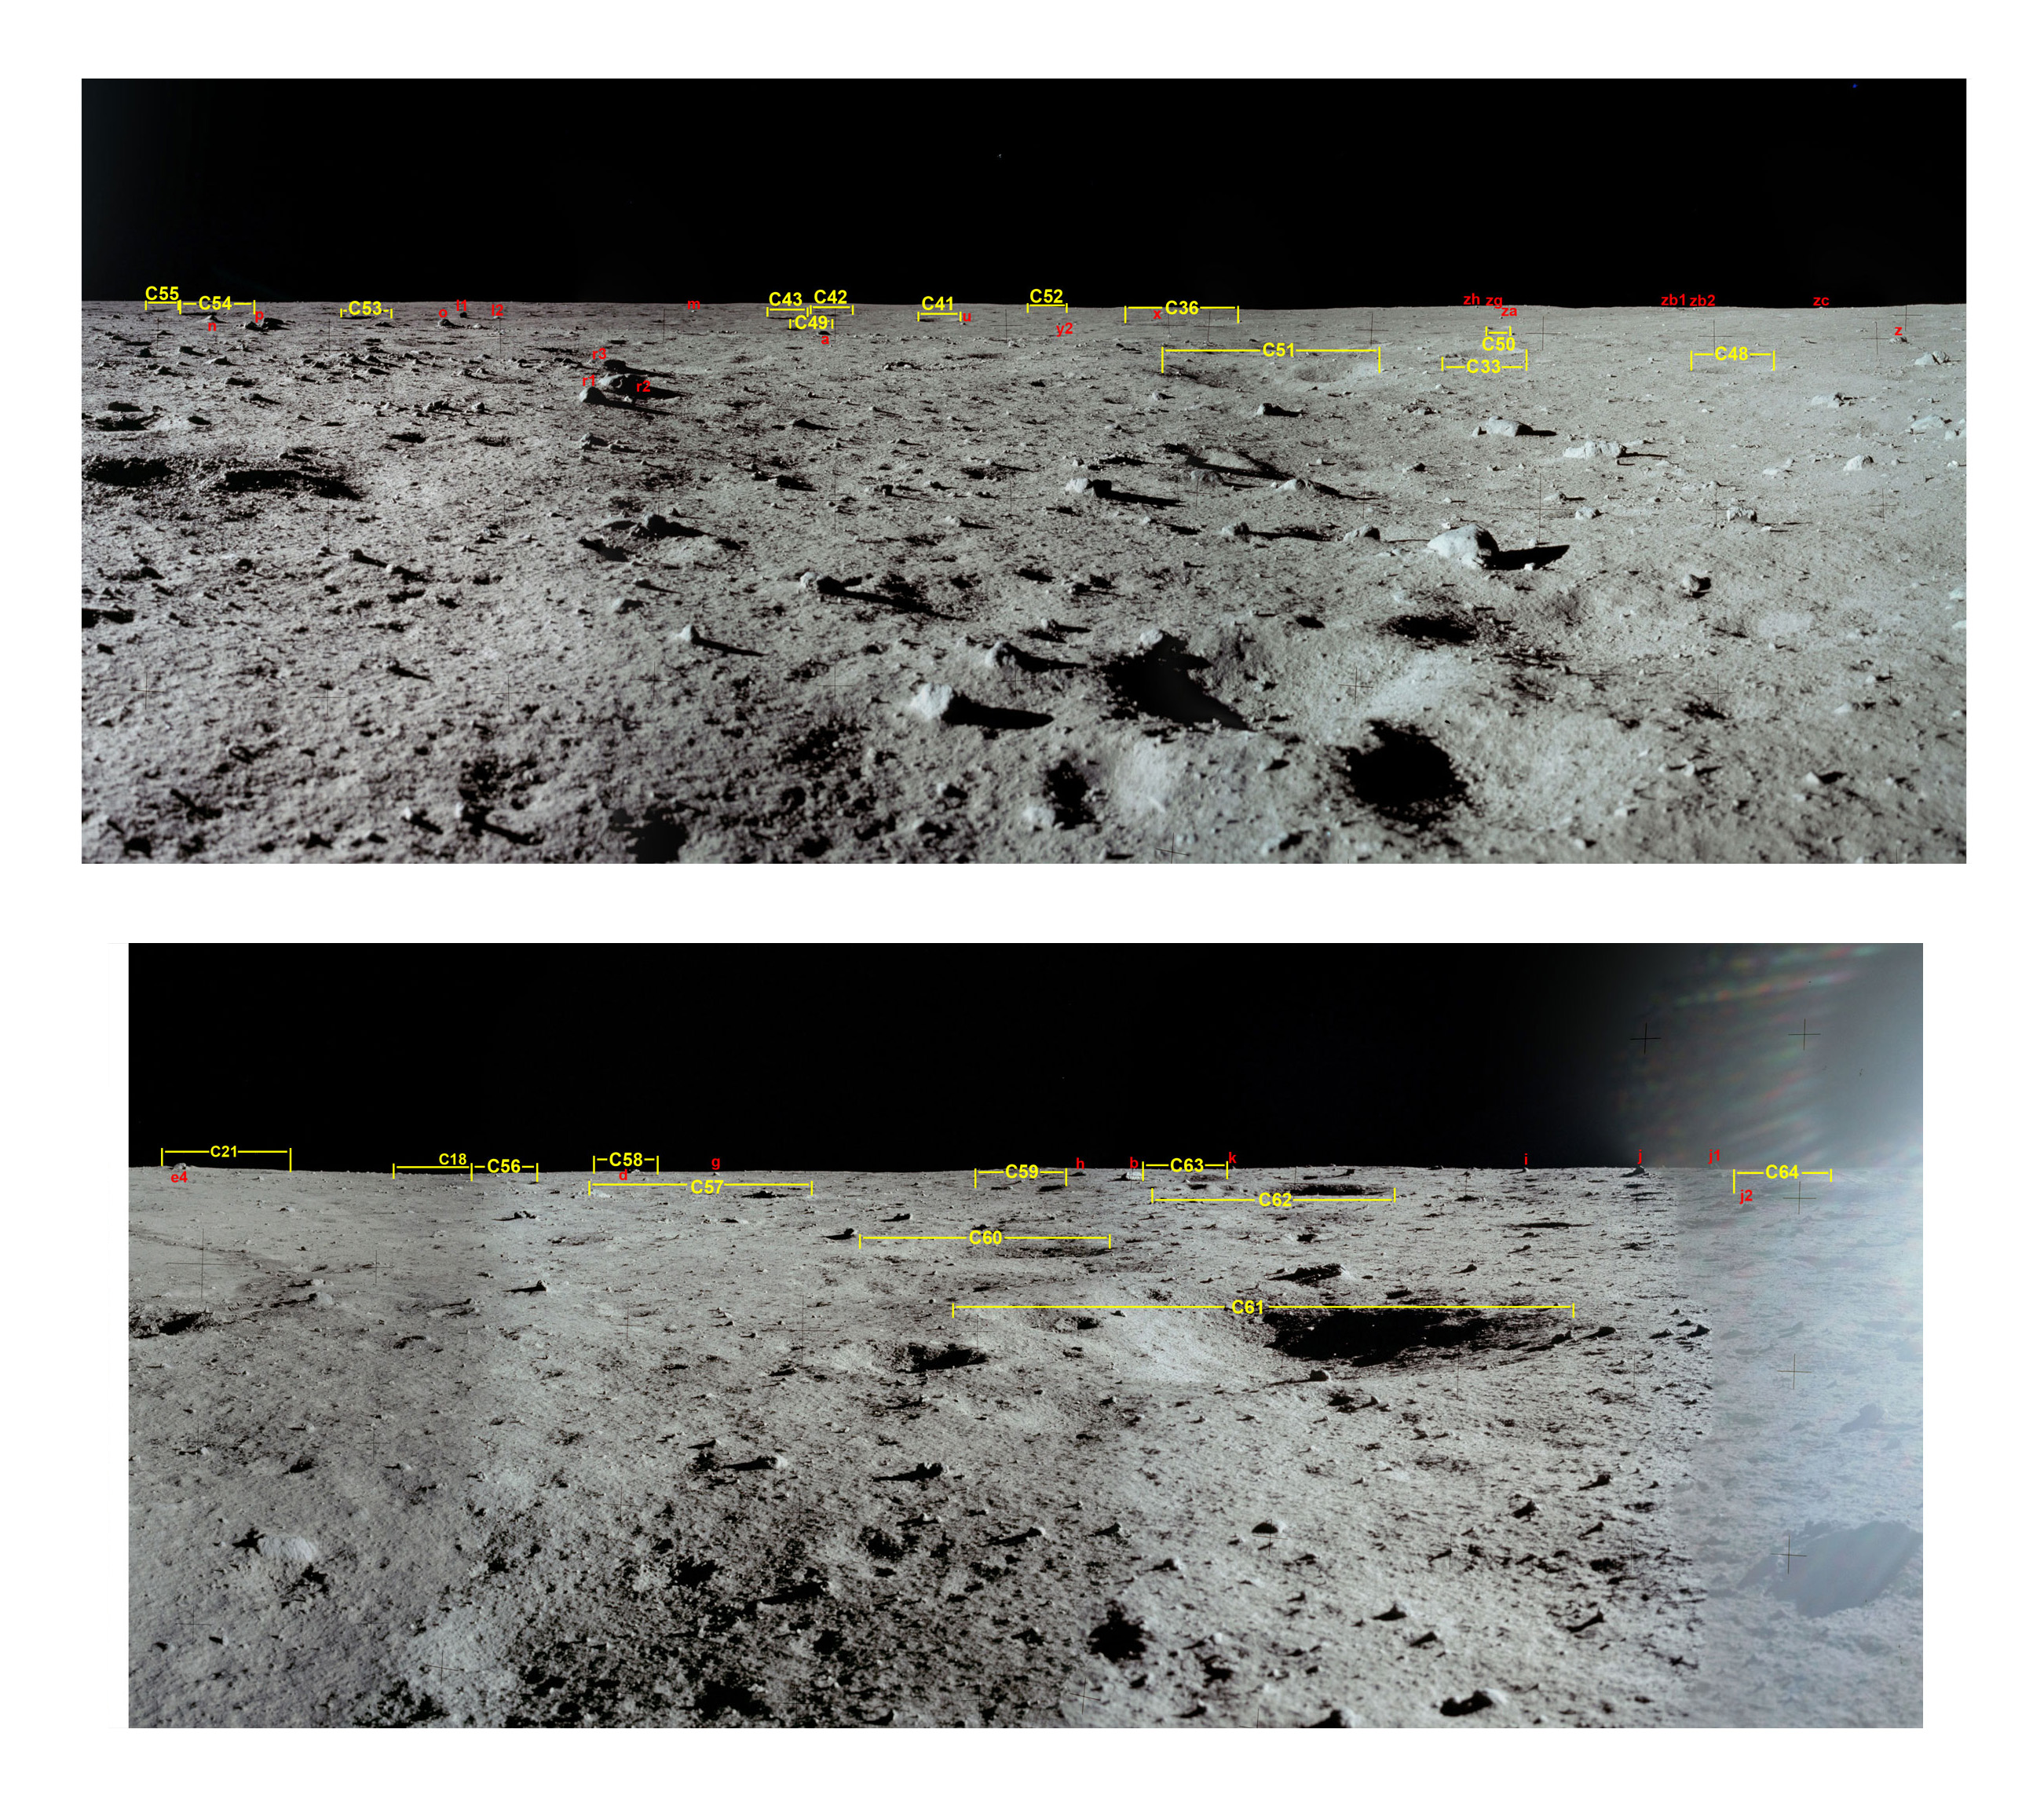
4.5.8 Craters in Pan 4
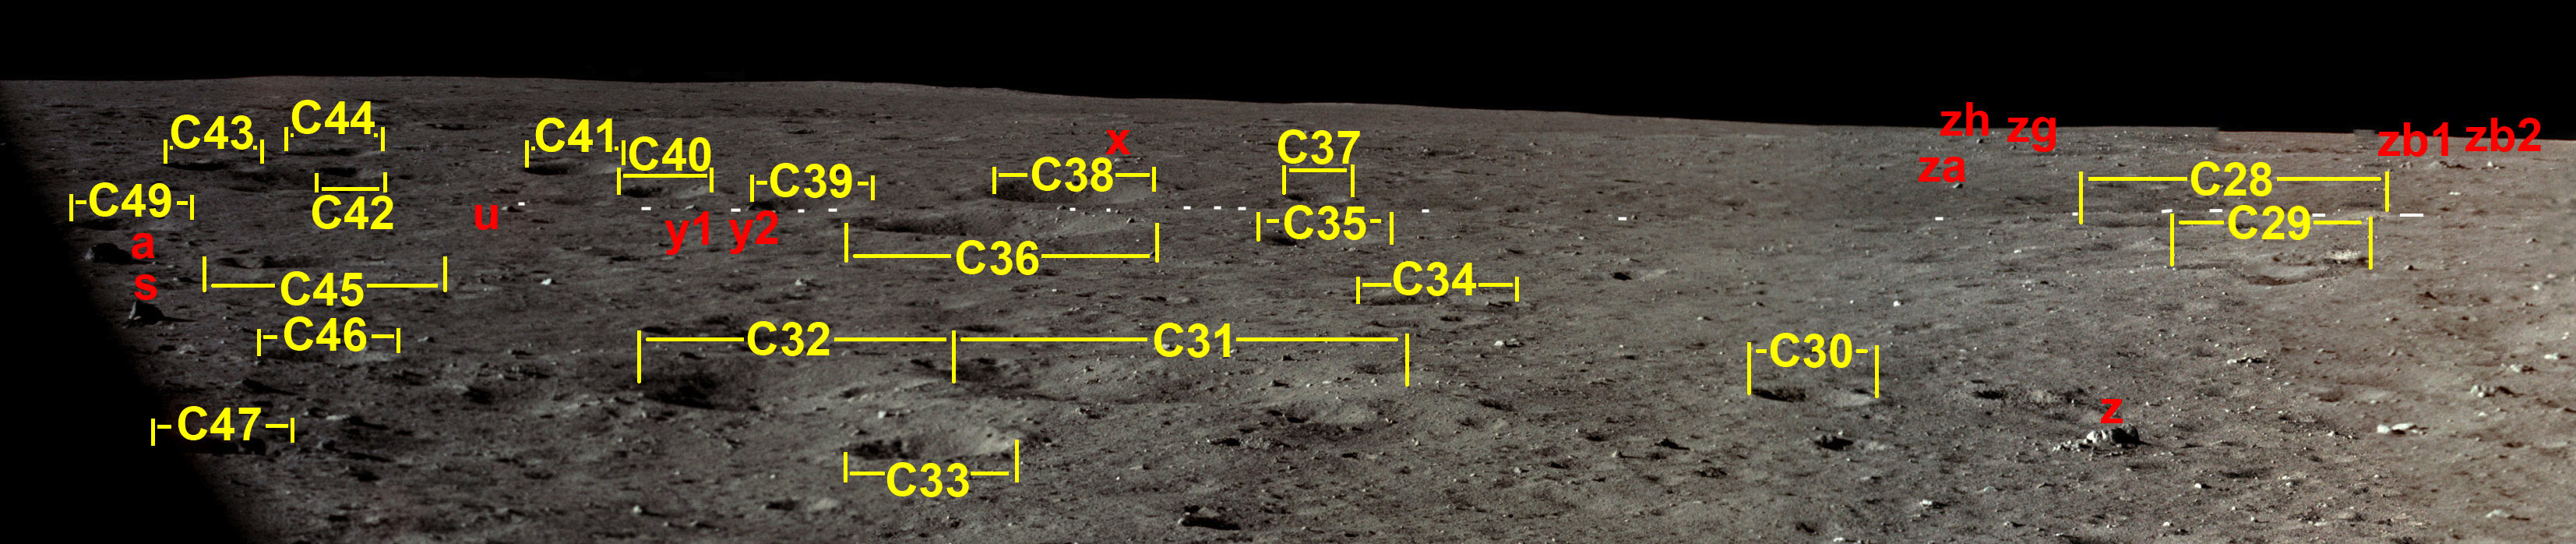
Craters visible in Pan 4, southeast (top) and northeast (bottom).
(Click on the image for a larger version)
Crater
Diameter (m)
Distance from LM center (m)
Notes
LROC detail
C50
3
75
~6 m to the north of C34, seen also from CDR window
C50-51
C51 6
32
Crater ι in the photogrammetric map; small, fresh crater on its western rim also seen in LROC image
C52 7
260
Seen also from CDR window
C52
C53 8
155
~20 north-east of boulder l1, 14 m from l2.
C53-55
C54 9
165
Has a second component (~5 m in diameter) on the southwest side. ~14 m east of C53.
C55 5
180
6 meters east of C54
C56 5 55
C18 is just beyond it to the north
C56-64
C57 7
50
It has an ~5 m component adjacent to the western rim. The southern rim is very steep, casting a deep black shadow into the crater. The shadow is quite noticeable in EVA photos, such as 5885/86 where it is just below the flag.
C58 7
80
~9 m south of boulder d, ~7 m south-west of g.
C59 5 x 6
55
slightly elongated N-S, 6 m southwest of boulder g. C60 ~6-7
25
slightly elongated, quite shallow
C61 7
25
halfway between LM and Little West
C62 13
50
18 m northwest of Little West, seen in many EVA photos and the descent film
C63 8
70
"shallow depression" is a better description than "crater", just northeast of boulder b.
C64 4
50
on the northwest outer wall of Little West
Craters visible in the southeastern part of Pan 2, including frames AS11-40-5888-9.
(Click on the image for a larger version.)
Crater
Diameter (m)
Distance from LM (m)
Notes
LROC detail
C65
10
90
13m north of boulder a
C65-67
C66 5
100
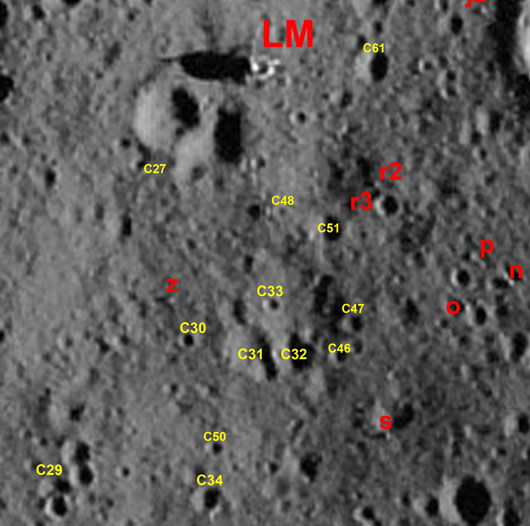
2-3m east of C65
C67 5
105
10m east of C66
C68 11
145
14m north of C54
C68
C69 5
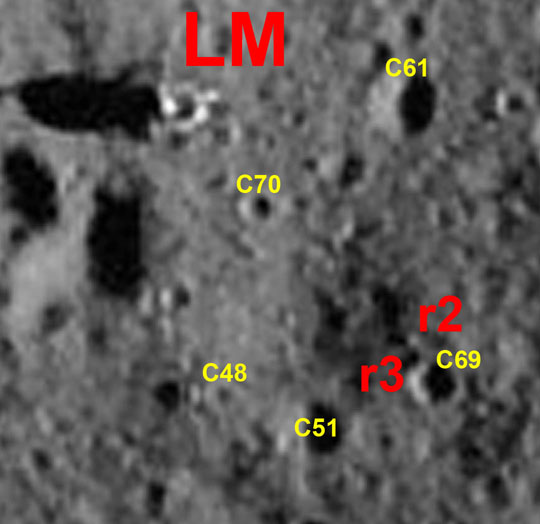
35
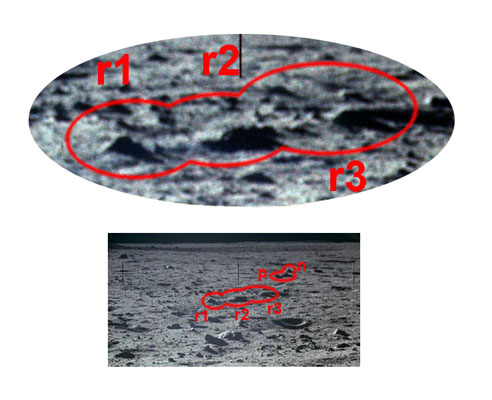
Boulders r1-r3 are near the rim
C69-70
C70 2
12 southeast of the LM center
Best seen in the foreground in 5942-44. There are astronaut bootprints on the west rim. These are visible in the Hasselblad images but not in any of the LROC images
5. Comparisons between the Photogrammetric Map and the LROC images
In principle, point-like benchmarks visible in the various
photographs would permit accurate placement of the camera
stations. If the scene is calibrated accurately, each
benchmark corresponds to a single point in the actual 3D
space. However, for the reasons discussed below, there are
few point-like benchmarks available in the scene. As a
result, calculated camera station locations and azimuths
have errors, and benchmark locations seen in multiple
photographs may be inconsistent from one photograph to
another.
1) Blurring. Objects chosen as benchmarks may be situated at
quite different distances from the camera. In some
images they may be out of focus. Blurring may also
occur if the object is in sun glare or if the camera moved
during the exposure. Blurring of objects chosen as
calibration benchmarks makes it difficult to place
calibration benchmarks correctly, they may be inadvertently
shifted from the right place in blurred photographs.
2) Lack of point-like benchmarks. Only a limited number of
point-like objects are available in lunar photographs, with
most of them being points on artifacts (sharp angles, tips
of antennas, etc.). However, construction of a scene with IM
requires calibration benchmarks dispersed more or less
uniformly over the plane of each photograph, so natural
benchmarks (mostly rocks) were used in large numbers. Since
most of rocks are not sharp, it is very difficult or nearly
impossible to find a specific point on a rock that may be
identified precisely in different photographs. Rocks look
very different in photographs taken from different
locations; and a portion of a rock visible from one location
may be hidden from other locations. The same problem often
arises with artifacts as well. Consequently, most benchmarks
can not be positioned with high accuracy. For many rocks
used as benchmarks, the uncertainty can be comparable to the
size of the rock in question.
3) Focal lengths are known only approximately. Focal length
of the Biogon f/5.6-60 mm lens used for EVA
photography is 61.1 mm. When astronauts focused to closer
objects, focal length of the lens became larger (fixed
values are 63.50~mm, 61.93~mm and 61.27~mm, they correspond
to fixed focusing distances of 5.3, 15 and 74 ft applied in
lunar cameras, but intermediate values are also possible).
The actual focal length for each photograph depends on the
actual focusing distance, which is not known exactly.
Focusing distance may be estimated from distance to objects
in sharp focus and from blurring of objects that are out of
focus, but this estimation is subject to error.
4) Lens distortions. Lens distortions are not of a great
importance, since distortions of the Biogon lens are very
small.
5) Inexact reference distance basis. Since computed
coordinates of the two benchmarks used to determine the
reference distance basis contain uncertainties, the basis
itself also contains an uncertainty. This uncertainty
influences systematically all coordinates and distances
expressed in linear units.
The first four factors introduce unbiased errors into the 3D
model of the scene created during the calibration of the
cameras. The fifth factor introduces an unknown systematic
error. As a result, calculated positions of benchmarks and
cameras contain uncertainties.
Unfortunately, it is virtually impossible to account for
each source of uncertainty separately to estimate the
overall error of the scene, but we may get reasonable
estimations.
1) The uncertainty of the distance reference basis. There
are two diagonals between junctions of the primary struts.
The mean distance averaged over both diagonals was taken for
the reference basis. The difference between the measured
lengths was found to be ~1.25 cm. It is comparable to the
uncertainty of length measurements (see section 3, below)
which was found to be ~2 cm. Dividing 2 cm by the length of
the reference basis, we obtained the relative uncertainty of
the reference basis, it is ~0.34%. This is a systematic
error that it is present in all measured ranges and sizes.
For instance, a distance of 10 m may be measured with an
accuracy not better than ~3.4 cm.
2) Local vertical. The pole of the SWC experiment is close
to vertical and we used its direction as z-axis. To estimate
its deviation from the true vertical, we measured the angle
at its tip between the pole and the solar rays forming the
shadow of the tip. An average value of 72.9 deg was obtained
(this angle is measured with error since the solar elevation
angle slightly changed during EVA). If the pole had actually
been vertical, the measured value would have been 90 -
14.7 = 75.3 deg, 14.7 deg being the mean solar elevation
angle during EVA. The difference between 75.3 and 72.9 gives
an estimate of a 2.4 degrees western tilt of the pole. Since
the positioning accuracy of the ends of the SWC pole is
several centimeters, the uncertainty of this angle may be of
several degrees. Combining a measured northern inclination
of 2 deg of the
SWC pole with respect to the LM and 0.5 deg southern tilt of the
LM (from the navigation system's alignment data), we
obtained the northern tilt of the SWC pole of 2.5 deg. So
the total tilt is approximately 4 deg. The coordinate
uncertainty in the horizontal plane caused by this tilt is
(1 - cos 4) * 100 % = 0.24 %. In the vertical direction, the
maximum uncertainty in elevations is sin 4 * 100% = 7%. This
error is large enough that the z coordinate cannot be used
for elevations. The error caused by this uncertainty is
systematic, i.e. it is present in all coordinates. It
influences mostly measurements of absolute distances from
the origin is relatively unimportant at distance small
enough that other errors dominate. For example, at a
distance of 100 m, the horizontal error is roughly 25 cm,
which is less than the size of most rocks of interest.
3) Comparison of measured and known lengths. We measured
lengths of several objects at distances up to ~30 m from the
center of the LM, and compared them to known values. In the
following table measured values are given together with
their known values (Actual), absolute differences (Δ), and
relative errors. In some cases, such as the dimensions of
the two PSEP solar panels, we give the largest difference
and the mean difference. In the table such measurements are
given in separate rows and labeled with "max. differ." and
"mean, n" where n is the number of measurements. All values
are in meters. It
is important to remember that determination of a length
requires the location of the end points, with both usually
visible in any one image. The result is that the
lengths are actually differential measurements and,
consequently, systematic errors may be unintentionally
eliminated. Accuracy estimations derived in this way
give the order of magnitude only.
Table: Comparison of
photogrammetrically measured and actual lengths
| Measured (m) |
Actual (m) |
|Δ| (m) |
Rel. Error |
|
| PSEP sol. pan.
length (max. differ.) PSEP sol. pan. length (mean, 4) PSEP sol. pan. width (max. differ.) PSEP sol. pan. width (mean, 4) |
1.874 1.867 0.323 0.328 |
1.861 1.861 0.330 0.330 |
0.013 0.006 0.007 0.002 |
0.7% 0.3% -2.1% -0.6% |
| LRRR array width
(max. differ.) LRRR array width (mean, 4) |
0.439 0.445 |
0.45 0.45 |
0.011 0.005 |
-2.4% -1.1% |
| SWC pole length SWC foil length (max. differ) SWC foil length (mean, 2) SWC foil width (max. differ) SWC foil width (mean, 2) |
1.481 1.325 1.325 0.286 0.295 |
1.5 1.30 1.30 0.30 0.30 |
0.019 0.025 0.025 0.014 0.005 |
-1.3% 1.9% 1.9% -4.8% -1.6% |
Some values in the table may contain additional
uncertainties. For instance, the height of the SWC pole over
the ground level may be smaller than the value in the table.
The following conclusions may be made from the table.
Relative errors are smaller for long objects and are larger
for shorter objects. That is the expected result, since the
role of positioning errors (which do not depend on measured
sizes) predominates. Absolute errors are within 2.5~cm for
all objects, but they may be reduced to less than 1 cm if
averaging over a number of measurements is performed. Two
factors should be kept in mind. First, each size measurement
includes two points, so uncertainties of coordinates of each
point may average. Second, size values are differentials, so
systematic errors proper to each point may vanish at size
measurements. The average absolute error in the table is
~1.5 cm, and we tripled this value (getting ~5 cm) to get a
conservative estimation of positioning errors of individual
points. A value of 2~cm may be used as estimation of
uncertainty of sizes.
To conclude, the following figures may be adopted as
reasonable estimations. The accuracy of single-point
coordinate measurements should be within ~ 5 cm in the
30-meter proximity from the LM, and we should also account
for a ~ 0.34% systematic error due to uncertainty of the
distance reference basis and ~0.24 error due to uncertainty
of the local vertical. For size measurements the uncertainty
of 2~cm may be adopted, and ~0.34% systematic error due to
uncertainty of the distance reference basis should also be
taken into account.
It should be pointed out that at larger distances from the
LM the photographic coverage of specific areas decreases,
parallaxes also become smaller, so the positioning accuracy
drops and the role of systematic errors increases. So at
distances ~100 m positioning errors may reach several per
cent. This fact is confirmed by identification of far
boulders visible in LROC photographs. Differences between
calculated positions and photographic locations of boulders
may reach in some cases 7% (being mostly within 4% limit) at
the range of 100 - 350 m.
6.3
Accuracy of camera station locations
It is not simple to estimate the accuracy of camera station
locations. There are no camera stations coordinates which
are known beforehand, so it is not possible to compare
calculated coordinates to known values.
Panorama stations may be used for such check, since each
panorama consists of a number of camera stations that should
be situated close to each other forming a predictable
pattern. We see that the Pans 1, 2, 3 stations are in
sequential arrays that are roughly circular. However,
the Pan 4 distribution is more irregular, with individual
cameras stations shifted as much as 1m from their expected
locations. Finally, the Pan 5 camera locations
contained a systematic error of about 6 meters, that has
been corrected using LROC data (see Section 2.1 for a
detailed discussion). The distributions of camera stations
within the individual panoramas demonstrate that positioning
errors are no more than ~1 m, and most have much
smaller errors. The stations with relatively large
errors are all related to photographs taken up-Sun or in
directions where nearby benchmarks are scarce.
Most other camera station locations should have errors much
less than 1 m. This is demonstrated by pairs and triples of
photographs made from the same location. An examination of
the maps shows that calculated camera locations nearly
coincide in the tetrad 5967-5970, in triplets 5867-69,
5897-99 and 5927-29, in doublets 5874/75, 5892/93, 5901/02,
5946/47, 5949/50, 5963/64; in all these cases azimuths of
successive photographs were similar, so the astronaut
remained at one place making these shots. In the pair
5920/21, the astronaut turned changing the camera azimuth
~100 deg, so the camera should have shifted. As it is
expected, a distance of ~30 cm between these camera stations
is present. It it interesting that the photographs contain
nearly no common features in the pair 5892/93 due to a large
tilt difference. However, calculated locations of the these
two camera stations differ only by ~10 cm.
These observations let us conclude that camera positioning
accuracy may reach ~0.1 m or even better if sufficient
details of the LM or other artifacts are within the image.
Nevertheless, accuracy may fall to ~1 m for cameras where
mostly distant rocks were used as benchmarks.
Accuracy of azimuths and tilts cannot be found directly as
well. The triplets and pairs mentioned above demonstrate
that relative camera rotations by fractions of degree may be
revealed (as in the case of 5874/75), but the figure of
absolute errors remains questionable. Nevertheless, there is
no reason to think that these errors are large, so a
conservative estimate of 2 deg may be adopted in the first
approximation.
