Apollo 13

Day 6, part 2: The Reactivation Checklist
Corrected Transcript and Commentary Copyright ©2020 by W. David Woods, Johannes Kemppanen, Alexandr Turhanov and Lennox J. Waugh. All rights reserved.
Last updated 2020-04-27
125:15:07 Brand: Aquarius, Houston. Over.
125:16:27 Brand: Aquarius, Houston. Over.
125:16:32 Lovell: Go ahead, Houston.
125:16:33 Brand: Jim, it's time for readings on the battery charging again. Request the Bat A voltage and the charger amps. Over.
125:16:43 Lovell: Okay. Stand by, Vance.
125:19:07 Lovell: Houston, Aquarius.
125:19:09 Brand: Go ahead, Jim.
125:19:12 Lovell: Okay. We have no more water in the potable tank. We tried to get some more out a few minutes ago, and there isn't any.
125:19:21 Brand: Okay. Understand you ran out of water in the CM potable tank.
125:19:27 Lovell: Affirmative.
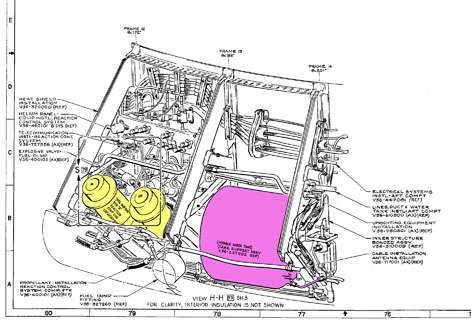
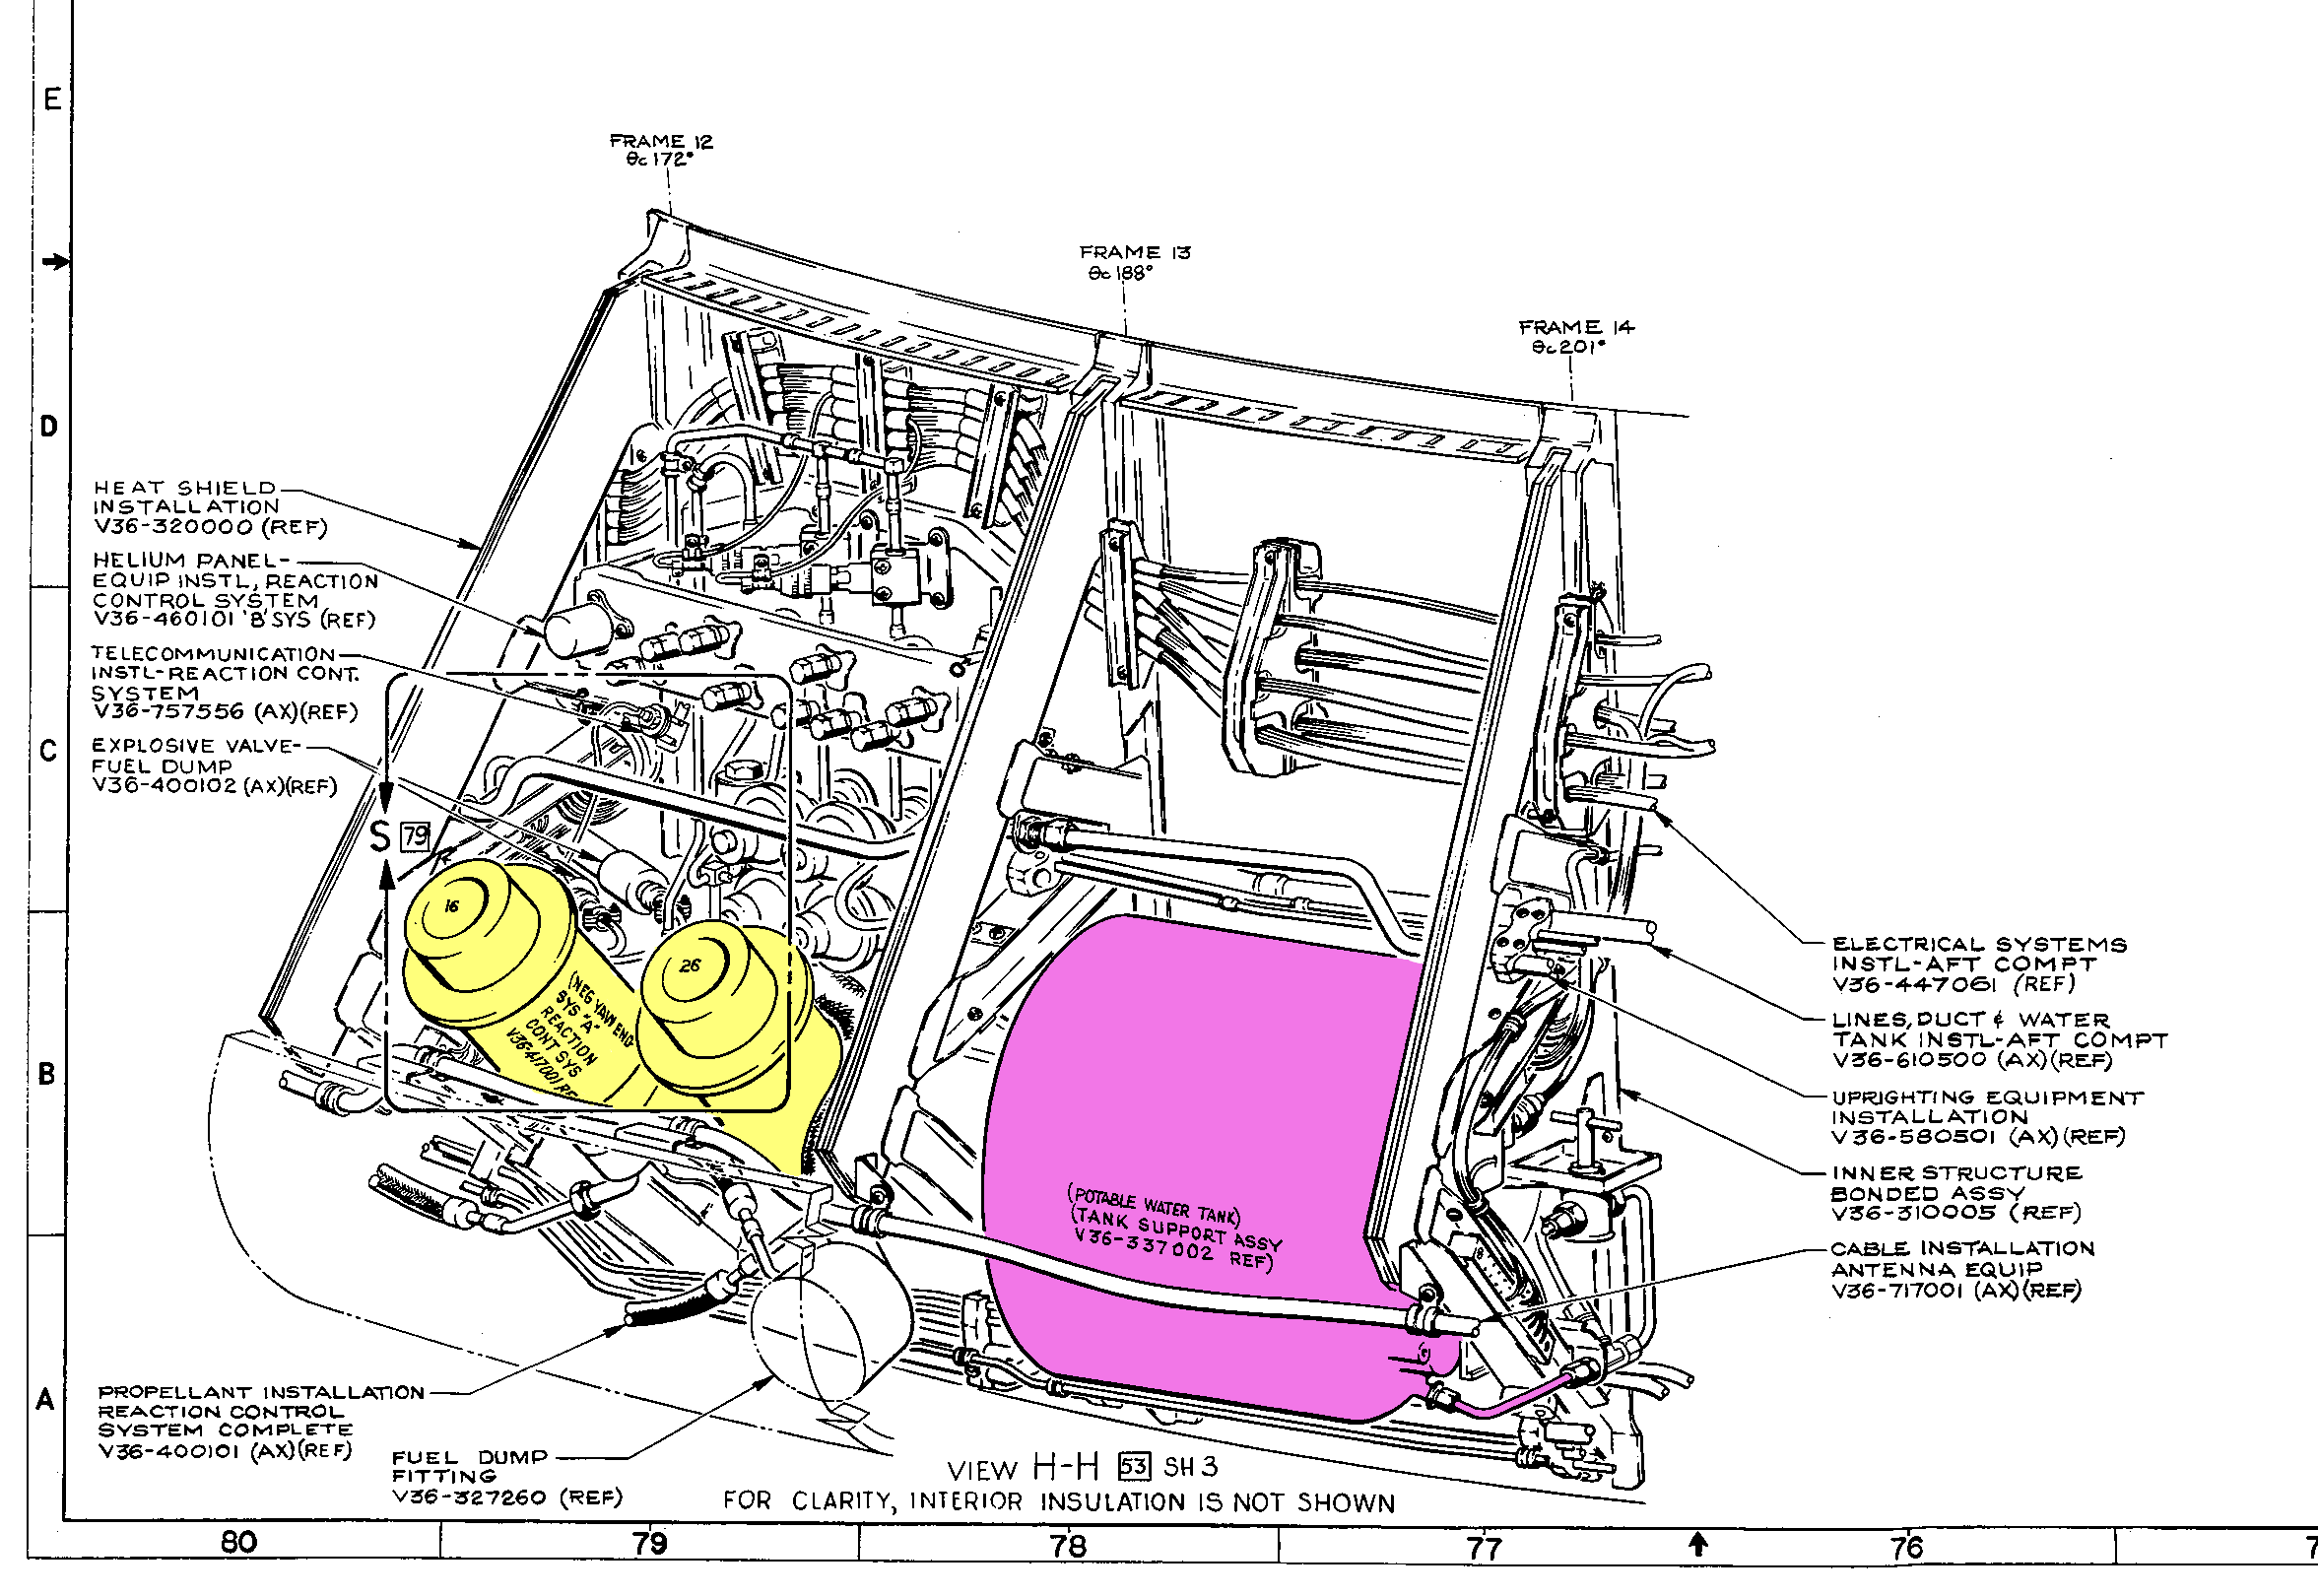
Diagram of the Command Module potable (drinking) water tank. It was located in the aft compartment of the spacecraft, outside the pressure hull.
This is Apollo Control at 125 hours, 24 minutes. We have an update now on the Lunar Module consumables lifetime. These figures include powering up the LM at 136 hours, 15 minutes Elapsed Time. Including that power-up, we have enough water for 30.7 more hours. The - enough oxygen for 140...
125:25:17 Brand: Aquarius, Houston. Over. [Long pause.]
...enough oxygen for 146 hours, and...
125:25:50 Brand: Aquarius, Houston. Over.
125:25:54 Lovell: Go ahead, Houston.
125:25:56 Brand: Jim, we - you were able to get those voltage - Bat A voltage and current readings?
125:26:02 Lovell: Oh, yes just a minute. Fred's - Fred's up there now.
125:26:05 Brand: Okay. And we're ready to read you the first checklist installment. This will - What we're going to readup is going to be a LM time line, a CSM time line, and checklist changes to conform with these. And right now I have the first installment of the CSM time line ready to read up. Over.
125:26:37 Lovell: Okay, Jack. I'm going to get - Vance, I'm going to get Jack on the line for that; and so stand by.
125:26:43 Brand: Okay. And he'll need a lot of paper. [Pause.]
125:26:50 Lovell: Okay. Volts are 39.5; amps, 1.24. Stand by.
125:27:01 Brand: Okay. We got it. [Long pause.]
Time remaining on the electrical power at 22½ hours, which would bring us to an Elapsed Time of 100...
125:27:28 Brand: Aquarius, Houston. [Long pause.]
...would bring us to an Elapsed Time on the electrical power of 147 hours, 30 minutes. The water remaining would bring us to Elapsed Time of 155 hours, 42 minutes.
125:27:50 Swigert: Okay, Vance. I'm on and ready to copy.
125:27:54 Brand: Okay, Jack. Wait 1. We want to get one into the hands of Flight and EECOM, and it'll take about a minute or 2. Sorry to wake you up for this, but take about a minute, and then we'll read it up to you.
And we have about 137 hours worth of lithium hydroxide left. Partial pressure of carbon dioxide in the Lunar Module now, is at 3 tenths of a millimeter of mercury. The 146 hours of oxygen left in the Lunar Module would bring us to an Elapsed Time of 271 hours. We're at 17 hours, 11 minutes away from entry into the Earth's atmosphere. Jim Lovell reported a short time ago, that the potable water tank in the Command Module has gone dry. There is enough of a pad in Lunar Module water, though that the crew would not have to go thirsty.
125:30:07 Brand: Aquarius, Houston.
125:30:12 Swigert: Okay, Vance. Go ahead.
125:30:14 Brand: Okay, Jack. Do you have any of that CM water - bagged water, left? Over.
125:30:22 Swigert: Negative. I went up and tried to repressurize the surge tank and get another shot of water, and was able to repressurize the surge tank okay, but there was no water that came out of the water tank.
125:30:36 Brand: Yes. We understand that there isn't any more in the potable tank, but we understood that you had put some water from that tank into bags, and I wondered if any of the bags were left.
125:30:48 Swigert: Negative.
125:33:42 Brand: Okay, Jack. Ready to copy?
125:33:49 Swigert: Okay, Vance. Ready to copy.
125:33:51 Brand: Okay. Start at EI minus 6½ hours. You're going to re - get LM PADs and CSM PADs, and I don't know if you want to copy them or not. This is something I can just read off to you. Over. Without you copying unless you especially want it.
125:34:19 Brand: Okay. LM pad, SM jettison...
125:34:25 Swigert: Okay. Go ahead, read which ones we're going to get.
125:34:28 Brand: Okay. I'll read them fast first here so you get a general idea. LM PAD, Service Module Jett attitude, Moon viewing attitude, Sun viewing attitude, and LM Jett attitude. The CM PADs are coarse align angles for LM attitudes during Moon and Sun sightings, coarse align angles for entry REFSMMAT, and CMC angles on entry REFSMMAT for LM Jett. Moon viewing, and entry. Okay. That - That's general PAD information. If you want, I'll read it slowly so you can copy it all down; otherwise, I'll go ahead. [Long pause.]
125:35:30 Swigert: I got - I was trying to copy it as you were reading it, Vance. The LM PAD are Service Module jettison attitude, Moon viewing attitude, Sun viewing attitude, and LM jettison attitude. Is that correct?
125:35:44 Brand: That's correct. Okay. I'll read the CM PADs now, slowly. Coarse align angles for LM attitudes during Moon and Sun sightings. [Long pause.]
125:36:21 Brand: Okay. The next coarse align angles for entry REFSMMAT. Okay. The next, CMC angles on entry REFSMMAT for (1) LM Jett, (2) Moon viewing, (3) entry. Okay. I'll stand by until you read that back.
The Command Module orientation at Entry REFSMMAT.
125:37:37 Swigert: Okay. The CSM pads will be coarse align angles for LM attitudes during Moon and Sun sightings. Coarse align angles for entry REFSMMAT. CMC - CMC angles on entry REFSMMAT for (1) LM Jettison, (2) Moon viewing, (3) entry.
125:38:07 Brand: Okay. That's correct. [Long pause.]
125:38:43 Brand: Okay, Jack. Going to hold up 1. All the hordes of people that devised this procedure are going to be coming into the room in a minute, and they'd like to hold up until everybody can listen in. [Long pause.]
125:39:24 Brand: Get that, Jack? [Long pause.]
125:39:50 Swigert: Okay, Vance. We're ready to go.
125:39:54 Brand: Okay. We lost you there briefly while you were in an attitude where we couldn't receive you. Jack, we'd like to hold off for about 5 minutes. We have some more people coming in to listen to this, and it took a lot of people to devise this procedure, and a few people have been testing it out, so we'd like to have them all on hand while we give you the rest.
125:40:21 Swigert: Okay. [Pause.]
125:40:28 Slayton: How's the temperature up there, Jack? You guys chopping wood to keep warm?
125:40:34 Swigert: Deke, it's about 51, I think, or 50 in the LM, and it's about - I don't know - 45 or little bit less in the Command Module.
125:40:49 Slayton: Oh, it's a nice fall day, huh?
125:40:54 Swigert: Yes, I tell you, we don't have to worry about chilldown.
125:43:30 Swigert: Okay, Vance. While we're waiting, do you have there also what I can expect ground to uplink me?
125:43:44 Brand: We'll have that, Jack, but - Stand by for that.
125:43:52 Swigert: Okay. [Long pause.]
125:44:08 Brand: Jack, probably - probably the thing to do is to give you all of the checklist, and it will include things like this. Then we'll have a big question and answer session afterwards, if that's okay by you.
125:44:24 Swigert: Okay. That sounds good.
125:46:52 Swigert: Okay, Vance. While we're waiting, just for your information, the Command Module has been stowed per your checklist with the exception of the two Hasselblad cameras. [Pause.]
125:47:11 Slayton: Roger. Got that, Jack. [Pause.]
125:47:22 Swigert: And the LM is pretty well stowed with the exception when we have yet to bring in the probe and the drogue. [Pause.]
125:47:31 Slayton: Roger. Got that. [Long pause.]
That's Deke Slayton talking to Jack Swigert.
125:47:55 Slayton: Relative to your water situation, Jack, we're going to have a pretty good hack on the LM here in the next few hours, and we anticipate letting you fill your own tanks before we transfer over, so you should be in reasonably good shape there.
125:48:12 Swigert: Okay. We have a number of juice bags all cut and ready to go, and we tried to get the water out of the Command Module about 20 minutes ago and found out that the Command Module's potable tank was empty. So we have no bags made up now, so we're dependent on LM water, PLSS water.
125:48:39 Slayton: Roger. If you feel like trying the PLSS, that's all excess, and you might want to try that at any time. I'm sure it'll taste like PLSS but you might as well try it. [Pause.]
125:50:28 Swigert: Okay, Deke. All the windows in the Command Module are heavily coated with water right now. So I don't know what kind of pictures we'll get out of them, but I'm going to try and clean them off and do the best I can with the 250-millimeter lens on the Hasselblad.
125:50:47 Slayton: Roger. That's why we have the top priority stuff in the LM. We figure you've got a much better chance of getting it through there.
125:53:24 Brand: Aquarius, Houston.
125:53:29 Swigert: Are you ready to send it up, Vance?
125:53:31 Brand: Jack, before we start reading the procedure, we'd like - We find that Bat A is topped off and in great shape. Like to switch over and top off Bat B some more. Give it 2 more hours of charging. Have about a seven- or eight-step procedure here to give you, if you want to copy that. We're switching before we start recording the entry procedures.
125:53:58 Swigert: Okay. Stand by and let me get out my other checklist. [Long pause.]
125:54:14 Swigert: Okay, Vance. Ready to copy.
125:54:19 Brand: Okay. Panel 3: switch Battery Charge to Off. Panel 5; Main Bus Tie Bat A/C to Bat A/C; CB Battery Charger, Bat A Charge to open; CB Battery Charger, Bat B Charge, Close. Next, panel 250; CB Bat B Power Entry/Postlanding to Close. Panel 5; Main Bus Tie, Bat B/C, off. Panel 3; Battery Charge to B. Advise; well, stand by. Jack, advise that we have a backout procedure for this, but we'll read that up to you later, in about 2 hours. And, also, that this procedure is a Delta to your - the first battery charging procedure that we gave you. In other words, it's a Delta from where you are right now. [Pause.]
125:57:10 Swigert: Okay. This is the procedure for charging Bat Baker. Panel 3; Bat Charge, Off; panel 5; Main Bus Tie, Bat A/C to A/C; CB Bat Charger, Bat A Charge, open; CB Bat Charger, Bat B Charge, Close. Panel 250; CB Bat B Power Entry and Postlanding, Close. Panel 5; Main Bus Tie, Bat B/C, to Off; Panel 3; Bat Charge to B. This is a Delta for the first battery charging procedure; you'll give me the backout procedure in a couple hours.
125:57:47 Brand: That's affirm.
125:57:51 Swigert: Okay. I'll put it in work right now, then come back and stand by to copy the rest of - well, I - not the rest - everything.
125:58:01 Brand: Everything is right. [Pause.]
125:58:13 Brand: You'd never believe how much this procedure's been massaged in the last day.
This is Apollo Control at 126 hours. Apollo 13 is 89,401 nautical miles from Earth. Velocity is 6,310 feet per second. Jack Swigert's in the process of discontinuing the charge on Battery A in the Command Module. And then they will hook up to Batt - the Command Module Battery B and will charge that for about 2 hours top it off.
126:02:41 Swigert: Okay, Vance. I put Bat Baker on charge; I don't think it quite had stabilized. It was reading 1.1 amps, 39.6 volts when I left up there. [Pause.]
126:03:02 Brand: Okay. We got that.
126:03:07 Swigert: Okay. I guess now is as good a time to start as any. [Long pause.]
126:03:21 Brand: Just a second, Jack.
126:04:45 Brand: Aquarius, Houston.
126:04:50 Swigert: Okay, Vance. You're kind of weak, but readable.
126:04:54 Brand: Jack, we're going to need readings on the Bat volt and charger amps about every 10 or 15 minutes for a while, so is there somebody else that can be reading them out while you're copying? Over.
126:05:10 Swigert: Yes. Jim will take a run up there. Freddo is sleeping right now. We're trying to get some sleep here, and Jim'll run up and take a look at voltage and current whenever you call.
126:06:34 Lovell: Houston, Aquarius.
126:06:37 Brand: Go ahead, Aquarius.
126:06:40 Lovell: Vance, we've got to realize that we've got to establish a work-rest cycle up here, so we just can't wait around here to just read procedures all the time up to the burn. We've got to get them up here, look at them, and then we've got to get the people to sleep. So take that into consideration when you get ready to uh, to send up the PADs.
126:07:01 Brand: I know, Jim. We're very conscious of that. We - we should be ready to go in about 5 minutes. That's all I can say. Stand by.
126:11:48 Brand: Aquarius, Houston.
126:11:53 Swigert: Okay, Vance. We're ready to go.
126:11:56 Brand: Okay. We need a - Sorry [laughter]. We need a readout. Volts and amps. [Pause.]
126:12:05 Swigert: Okay. In work.
126:12:10 Brand: And, might as well bring the Comm up to a higher fidelity for this long period of checklist reading. That requires, panel 16: CB Primary S-Band Power Amp, Closed. [Long pause.]
126:12:37 Swigert: Okay, Primary S-Band Power Amp closed now. How do you read?
126:12:40 Brand: Okay. And next step, panel 12: S-Band Function to Voice and Ranging Function to Ranging. [Long pause.]
126:13:25 Swigert: Okay, Vance. The S-Band Function is at Voice and the Ranging switch was at Ranging.
126:13:32 Brand: Okay. That makes it so we can hear you better, Jack. [Pause.]
126:13:41 Swigert: Okay. Can we - Since the first part of it, you're just going to read and I'm going to copy and we're going to have a question and answer period later, can we get started?
126:13:52 Brand: Okay. Procedure's coming back in again. Multicopies for distribution. And Ken's back. He's a local expert on this now, so we'll turn you over to him and he'll read it off.
126:14:07 Swigert: Okay. Stand by. I'll give you volts and amps. [Pause.]
Ken Mattingly will read the procedures.
126:14:14 Swigert: Okay. The voltage is 39.1; amps, 1.75.
126:14:20 Brand: Okay. [Long pause.]
126:14:43 Mattingly: Hello, Aquarius; Houston. How do you read?
Ken Mattingly at the CapCom station in Mission Control.
126:14:48 Swigert: Okay. Very good, Ken.
126:14:50 Mattingly: Okay. Let me take it from the top here. Just - there might be some overlap, but to make sure we're all on the same signal. We're starting off with a set of time line procedures that are going to give us - end up with the normal entry checklist. There will be some checklist changes into the book, but the bulk of what I have for you is the time line stuff. And it starts at 6 hours and 30 minutes prior to EI and assumes that we're getting LM power to Main B in the Command Module. I think you already have the numbers for the LM PADs and the Command Module PADs; I mean the types of PADs we'll be giving you. And if you have a question on what they'll be doing or what they're for, I can go over those now or when we get through.
126:15:42 Swigert: Okay. Yes, I'll make a little note there, and we'll discuss it when we get everything copied, huh?
Entry Sequence Checklist, page 1
126:15:50 Mattingly: All right. And the first item, then, after you get ready to start this checklist, is to install lithium hydroxide canisters and to stow ORDEAL. On panel 8, we want to turn the Floodlights to Fixed.
126:16:08 Swigert: Okay. Wait a minute. You're going too fast, here.
126:16:11 Mattingly: Okay. I'll tell you. I'll go line at a time and wait for your verification before I go on to the next one. I have panel 8, Floodlights, Fixed.
126:16:38 Swigert: Okay. Install LiOH canisters, stow ORDEAL, Floodlight, Fixed.
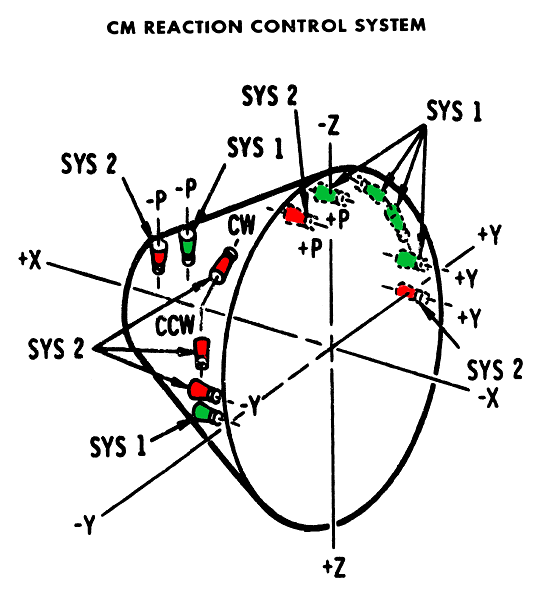
126:16:42 Mattingly: Okay. That's the panel 8 floodlights. Now we're going to take panel 5 and put the Floodlight rheostat to Flood and the LEB, that's panel 100, Floodlights are also going to Fixed. And the purpose of this is to balance up buses A and B.
126:17:05 Swigert: Okay. Panel 5; Floodlights; you want the rheostat on. Panel 100, Floodlights; you want Fixed.
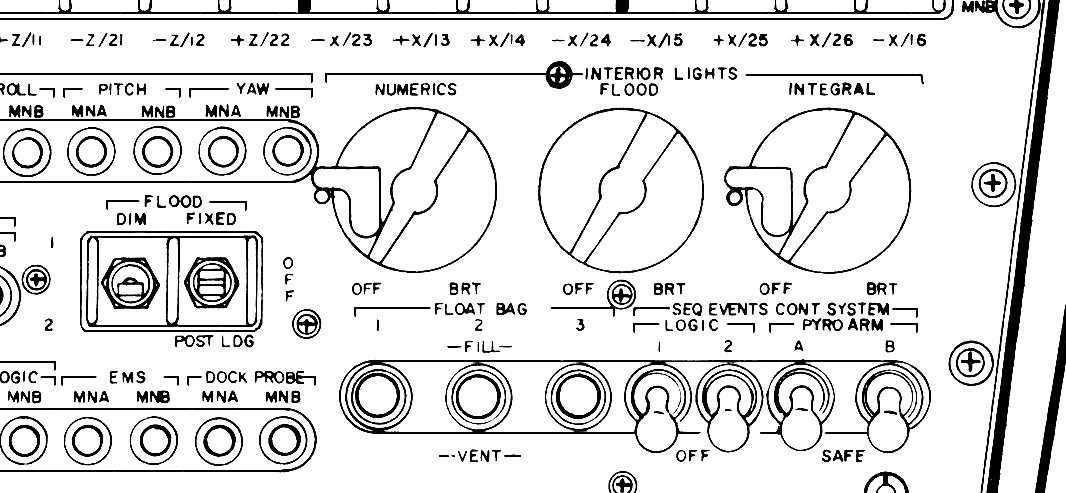
CM Panel 5. The rotating rheostats are used to turn on the interior lighting. Note the stoppers in the Numerics and Integral lighting that prevent them from being turned to full Off position. Scan via heroicrelics.org
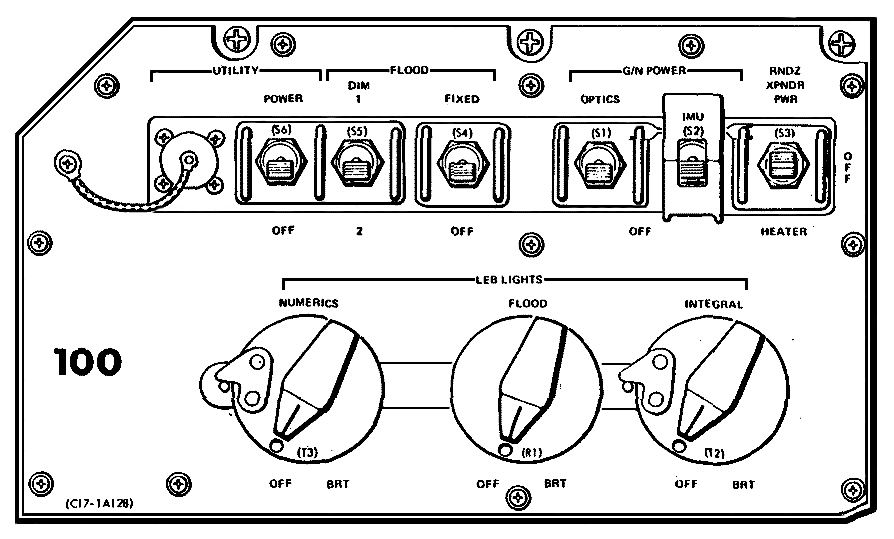
Panel 100. These rheostats are used to turn on the Lower Equipment Bay lights. The same panel contains the guarded switch to turn the IMU power on and off.
126:17:14 Mattingly: That's affirmative. Okay. On panel 8: circuit breakers EMS, Main A and Main B, that's two, open. [Long pause.]
126:17:47 Swigert: Okay. Panel 8: EMS Main A and Main B, Open.
126:17:51 Mattingly: Okay. On panel 250: circuit breaker Battery A Power Entry and Postlanding, Closed. [Long pause.]
126:18:14 Swigert: Okay. Panel 250: CB Bat A Power Entry and Postlanding, Closed.
126:18:20 Mattingly: Okay. The same for circuit breaker Battery B Power Entry and Postlanding. [Long pause.]
126:18:39 Swigert: Okay. Battery B Power Entry and Postlanding, Closed.
126:18:42 Mattingly: Okay. And add Battery C Power Entry and Postlanding. [Long pause.]
126:19:00 Swigert: Battery C Power Entry and Postlanding, Closed.
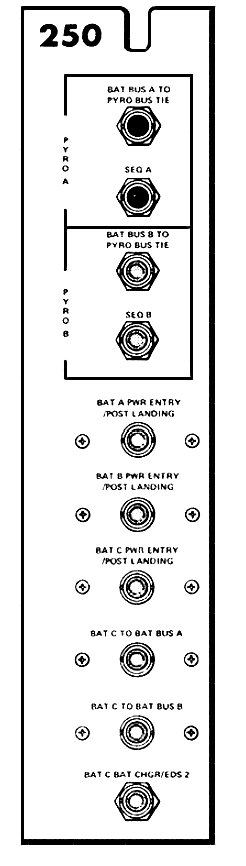
Panel 250. These circuit breakers are used to connect the pyro batteries and the Command Module main batteries to the power buses.
126:19:03 Mattingly: Okay. That's correct. On panel 5: circuit breaker Bat Charge, Battery A Charge, Closed. [Long pause.]
126:19:27 Swigert: Okay. Panel 5: CB Bat Charge, Bat A, Close.
126:19:32 Mattingly: Okay. And the same for circuit breaker for Battery Charge, Bat B/Charge, Closed. [Long pause.]
126:19:52 Swigert: Okay, Bat Charger, Bat B/Charge, Closed.
126:19:56 Mattingly: All right. Like to take Main Bus Ties, two of them, On and up. That's probably a verify. [Long pause.]
126:20:16 Swigert: Main Bus Ties A/C and B/C, On, verify.
126:20:21 Mattingly: That's correct. Circuit breaker Battery Relay Bus, Battery A and B, Closed. [Long pause.]
126:20:43 Swigert: Okay. CB Bat Relay Bus, Bat A, and Bat Relay Bus, Bat B, Closed.
126:20:49 Mattingly: That's affirmative. Circuit breaker EPS Sensor Signal, Main A and Main B, Closed. [Long pause.]
126:21:13 Swigert: EPS Sensor Signal, Main A and Main B, Closed.
126:21:18 Mattingly: Okay. On panel 275: circuit breaker Main A, Battery C, Closed. [Pause.]
126:21:37 Swigert: Okay, Ken. Wait on that one here. I'm just about to lose you here. Just - I've got to change Omnis.
126:21:42 Mattingly: Okay.
126:21:47 Swigert: Okay. Could you give me that one again, please.
126:21:50 Mattingly: All right. On panel 275: circuit breaker Main A, Battery C, Closed. [Pause.]
126:22:05 Swigert: Okay. Main A, Bat B, Closed on 275.
126:22:09 Mattingly: That's Main A, Battery C, Charlie.
126:22:15 Swigert: Main A, Bat C, Charlie.
126:22:20 Mattingly: That's affirm. No - Negative on Battery Bravo.
126:22:27 Swigert: Okay. Negative on battery Bravo. That's Main A, Bat Charlie, Closed.
126:22:32 Mattingly: Okay. Good. On panel 276: circuit breaker Instrumentation Power Control, 3 and 4, Open. [Pause.]
126:22:49 Swigert: Would you say that one again, Ken?
126:22:51 Mattingly: All right. On panel 276: circuit breaker Instrumentation Power Control, 3 and 4, Open. [Long pause.]
126:23:17 Swigert: Okay. Panel 276: CB Instrumentation Power Control, 3 and 4, Open.
126:23:24 Mattingly: That's affirmative. Okay. Panel 5: circuit breaker Essential Instrumentation Power, Main B, Closed. [Long pause.]
126:23:51 Swigert: Okay. On panel 5: [Garbled]
126:23:59 Mattingly: Okay. I'm sorry, Jack. Would you read that again, please?
126:24:03 Swigert: Okay. On panel 5: CB Essential Instrumentation Power, Main B, Closed, [Pause.]
126:24:10 Mattingly: Okay. That's correct. Primary Evaporator Water Control valve to Auto. [Pause.]
126:24:24 Swigert: This is on 382?
126:24:27 Mattingly: That's affirmative.
126:24:28 Swigert: Wha - Wha...
126:24:30 Mattingly: Okay, Jack. We want to put the Primary and the Secondary Evaporator Water Control valves to Auto.
126:24:37 Swigert: Okay. [Long pause.]
126:24:52 Mattingly: And, Jack, can you give us a readout on Bat B and the charger current? [Long pause.]
126:25:14 Swigert: Okay, Ken. That was the Primary and Secondary H
2O Control valves to Auto on 382.
126:25:20 Mattingly: That's affirmative, and did you copy about the readout on the battery and charger?
126:25:25 Swigert: Aw, yes. Jim's on his way up.
126:25:27 Mattingly: Okay. Thank you. All right, the next little step after your water control valves is to perform the CSM RCS preheat. We'll do that on page E/1-5, steps 35 and 37.
126:25:53 Swigert: Okay, Ken. We're having a problem with the Comm. You read now?
126:25:57 Mattingly: Yes, sir. Loud and clear.
126:26:04 Swigert: Okay. It's perform CM - CSM RCS preheat, and could you say again all after?
126:26:11 Mattingly: Okay. I'm referring to the entry checklist, page E/1-5, steps 35 and 37. [Long pause.]
126:26:33 Swigert: Okay. Perform CSM RCS preheat per entry checklist, page 1-5, steps 35 and 37.
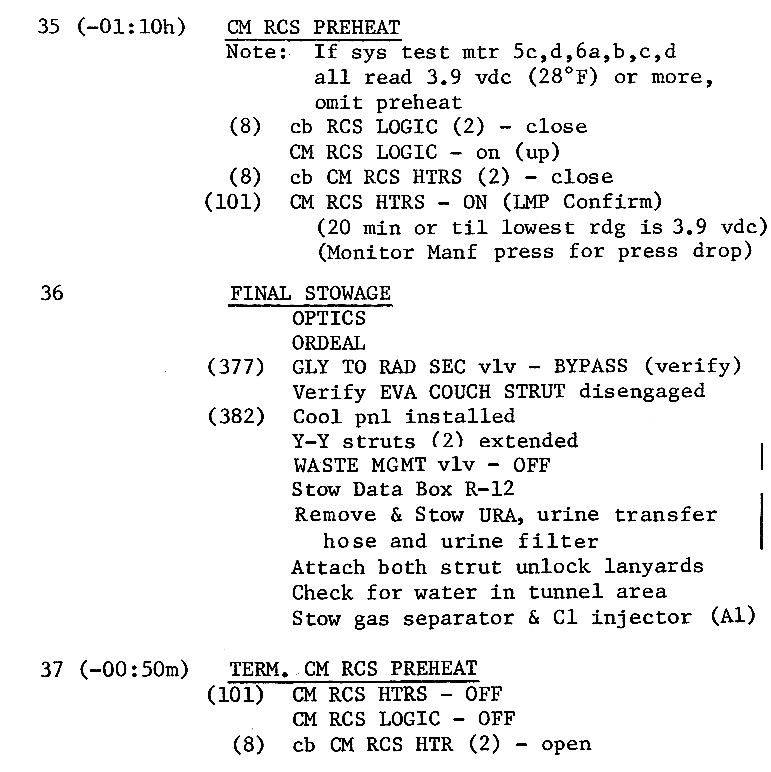
CSM RCS preheat sequence
The Command Module RCS jet arrangement.
126:26:43 Mattingly: That's affirmative. Now back to panel 5: circuit breaker Caution and Warning, Main B, Closed. [Pause.]
126:26:59 Swigert: CB Caution and Warning, Main B, Closed.
126:27:02 Mattingly: That's affirm. On panel 2: Caution and Warning Power to 1. [Pause.]
126:27:15 Swigert: Panel 2: Caution and Warning Power to 1.
126:27:20 Mattingly: That was Power to number 1, Jack.
126:27:26 Swigert: Caution and Warning Power to 1.
126:27:29 Mattingly: Okay. On panel 5: circuit breaker EPS Sensor Unit, DC Bus A and B, Closed. [Pause.]
126:27:50 Swigert: Okay, Ken. The Comm from you is awful weak - awful weak, I - I can't - it's CB EPS Sensor Unit. Say again, after that.
126:27:59 Mattingly: All right, Jack. That's CB EPS Sensor Unit, DC, that's Delta Charlie, Bus A and B, Closed. [Pause.]
126:28:16 Swigert: Okay. CB EPS Sensor Unit, DC Bus A and B, Close. And I'll give you the volts and amps.
126:28:27 Mattingly: Okay, that's correct. Go ahead.
126:28:29 Swigert: Okay. Volts are 39.1; amps, 1.5. [Long pause.]
126:28:45 Mattingly: Okay. On panel 3: Main Bus A and B, go to Reset and leave it in the center. [Long pause.]
126:29:06 Swigert: Okay, panel 3 - Stand by; got to change Omnis. [Long pause.]
126:29:19 Swigert: Okay. Main Bus A and B, Reset, then center.
The Reset/Off switches on Panel 3 are used to reset the undercurrent alarms in the main buses. Original scan via heroicrelics.org.
126:29:27 Mattingly: That's affirmative. Okay, now we're at EI minus 5 plus 05. And, as far as you're concerned, Jack, the Command Module is using this for information only. This will be the LM doing an Earth terminator AGS alignment; and at the time of 5 plus 05 is the time they'll be going ahead and releasing their ball. And this will be covered in the LM checklist; it'll be uplinked after this one. At EI minus 5, we perform midcourse number 7. Over. [Pause.]
126:30:16 Swigert: Okay. At EI minus 05:05, the LM is making an Earth-terminator align; and at EI minus 05:00, we perform MCC-7.
126:30:27 Mattingly: That's correct. At the completion of midcourse 7, the LM will maneuver to a separation attitude. And this attitude will be sent up on one of the PADs that you're going to get before all the sequence starts. And it'll be flown to the LM ball angles on that PAD.
126:30:47 Swigert: Okay. Understand.
Entry Sequence Checklist, page 2
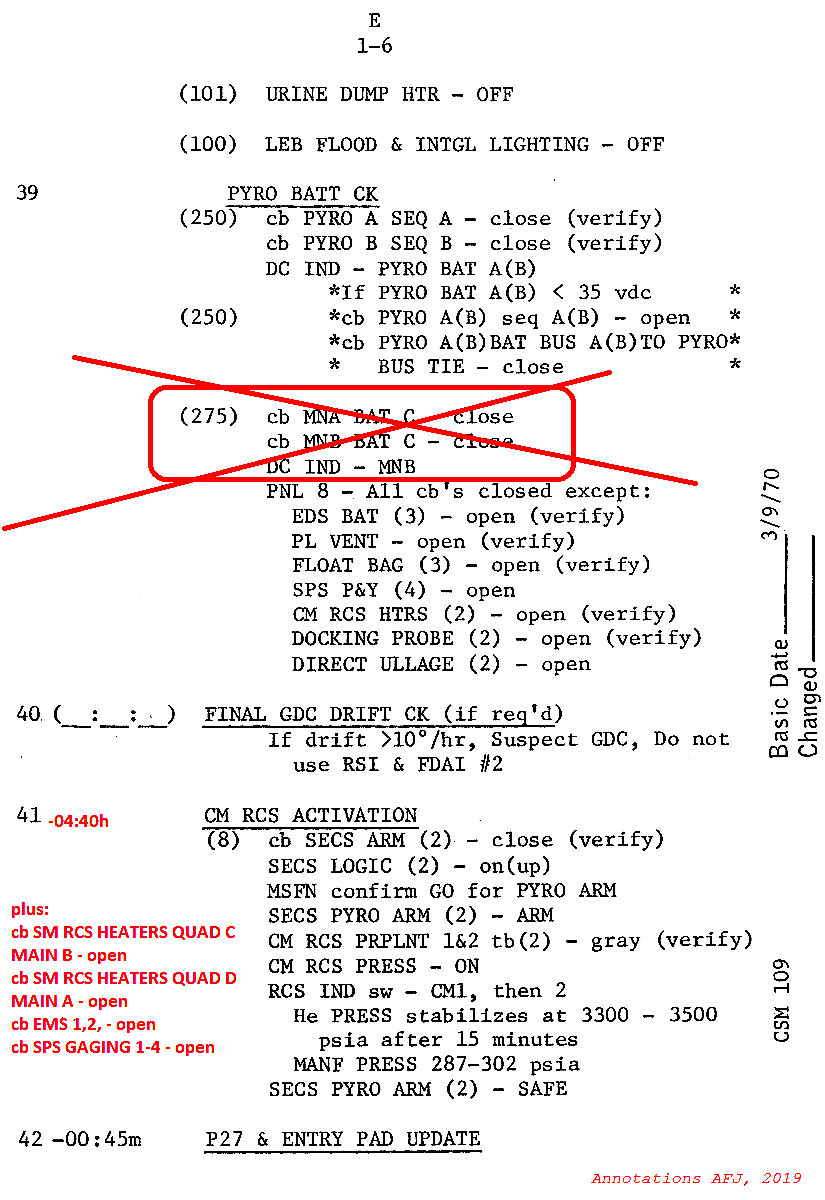
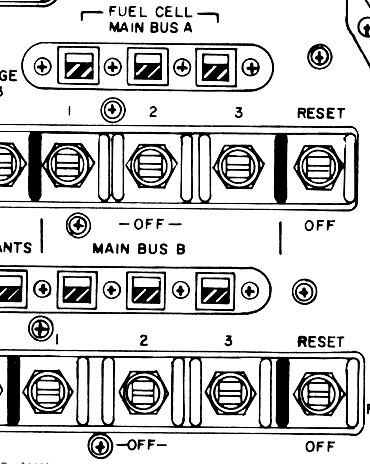
126:30:50 Mattingly: All right. At EI minus 4 plus 40, we want to perform page 1-6, step 39 of the entry checklist.
126:31:07 Swigert: Ken, I - I didn't, get it. We had to change Omnis again. Could you say it - the EI minus 4 dash - or 04:40, we do something.
126:31:15 Mattingly: Okay. And at that time, you'll want to perform step 39 of page E/1-6. Over. [Pause.]
126:31:31 Swigert: Okay. Perform step 39 of entry checklist page E/1-6.
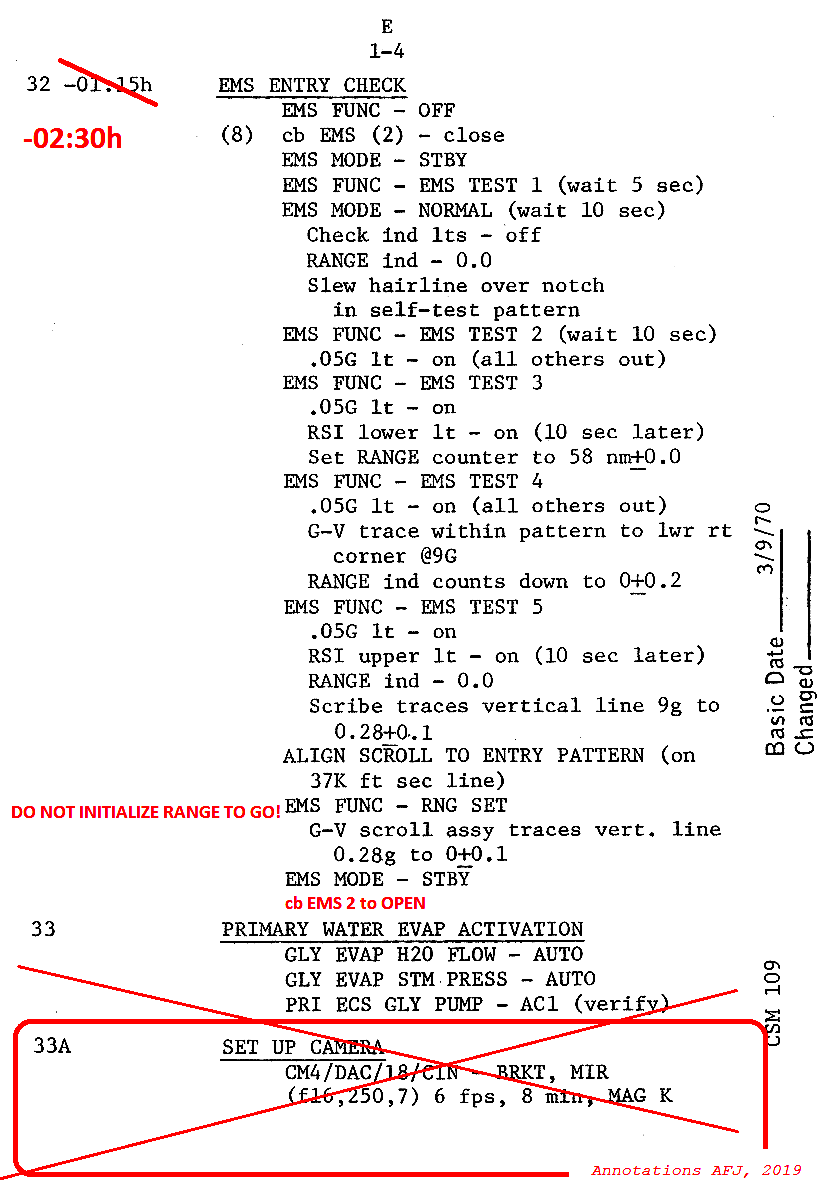
Step 39 is a check of the two small pyro batteries that supply electric charge to the sequential systems. Once the crewman verifies that the breakers are closed, they will then check their voltage from the DC voltage indicator on Panel 3 - the same one they've been using to check their battery charge status as of late. If the voltage is not within nominal limits, the pyro battery will be taken off the line and instead they will tie the battery buses in to provide sequential power from the main batteries instead.

The two pyro batteries are located in the Lower Equipment Bay, adjacent to the main batteries and the AC inverters and the battery charger. They supply 0.75 amp-hours each, and are not recharged.
126:31:39 Mattingly: That's correct. Okay. The next is the Command Module RCS activation, and that's step 4-1 of page E/1-6. [Long pause.]
126:32:13 Swigert: Okay. The next is perform CSM - or CM RCS activation for step 4-1 of page E - E/1-6.
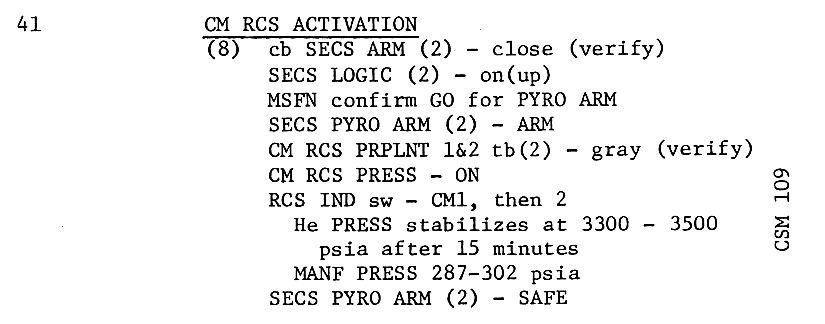
The sequential system is enabled once again, this time so that explosive isolation valves in the CM RCS can be fired to open the propellant feed lines. After a quick pressure check using a switch to change the RCS displays to show the status of the Command Module System instead of the Service Module RCS system, the sequential systems are secured again.
126:32:28 Mattingly: That's correct. [Long pause.]
126:32:41 Mattingly: All right, Jack. The next is at EI minus 4 plus 30. We want to verify that the LM is configured for Command Module RCS hotfire. [Long pause.]
126:33:08 Swigert: Okay. Verify LM configure for RCS hotfire at EI minus 04:30.
126:33:16 Mattingly: That's correct. Now to panel 5: circuit breaker G&N IMU Heater, Main B, Closed. [Long pause.]
126:33:41 Swigert: Okay. Panel 5: CB G&N IMU Heater, Main A and Main B, Closed.
126:33:49 Mattingly: That's negative, Jack. That's Main B only. [Pause.]
126:33:59 Swigert: Okay. Main B only.
IMU heater breakers on panel 5. Scan via heroicrelics.org
126:34:02 Mattingly: I'm sorry, I lost you that time. Say it again.
126:34:08 Swigert: Okay. Let's repeat it. Stand by. Cut out. We've really got a strange attitude, so this is why we are having the Comm problem. Panel 5: CB G&N IMU Heater, Main B, Closed.
126:34:24 Mattingly: That's affirmative. On panel 1: Rotation Control Power, Normal. That's two of them, to AC/DC. [Pause.]
126:34:42 Swigert: Okay, panel 1: RHC, Normal, two to AC/DC, two controllers.
126:34:48 Mattingly: That's correct. On panel 7: SCS, Logic Power 2/3, On.
126:35:03 Swigert: SCS, Logic Power 2/3, On, panel 7.
126:35:09 Mattingly: That's affirm. Back to panel 2: RCS Command, On. [Pause.]
126:35:20 Swigert: Panel 2: RCS Command, On.
126:35:25 Mattingly: That's correct. Now the Command Module RCS check per step 4 of page E/2-1. [Long pause.]
126:35:44 Swigert: Okay. Perform the Command Module RCS check per step 4, page 2-1.
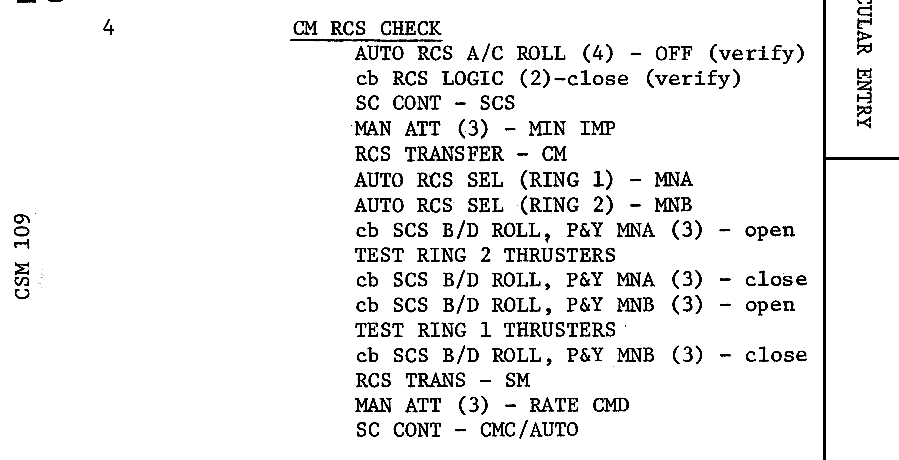
Step 4 accomplishes the previously mentioned test firing of the Command Module RCS jets. The test will be performed with the spacecraft control mode set to Stabilization Control System, and using the Rotational Hand Controller for the firing commands.
126:35:49 Mattingly: That's correct. Okay, at this point, we want to lock the rotation hand controllers. [Long pause.]
126:36:09 Swigert: Okay. After that, lock both rotation hand controllers.
126:36:14 Mattingly: That's affirm. On panel 8: Sequential, Pyro Arm, two to Arm. [Long pause.]
126:36:37 Swigert: Okay. Panel 8: set Pyro Arm, two, to Arm. Do I get a MSFN Go for that?
126:36:43 Mattingly: That's negative, Jack. We haven't powered up any of the downlink at this time. You'll be doing this and the Command Module RCS pressurization both by yourself.
126:37:00 Mattingly: Okay. Now, the next event is going to be the separation of the Service Module, and these are some LM steps, but so that you will know what is going on, I'll read them to you. The LM will do a LM plus-X of one-half foot per second. Then you'll be hitting the CM SM Sep, On and up, on their command. As soon as we are free of the Service Module, the LM will do another LM minus-X for 0.5 feet per second. This is called the push-pull maneuver. I think it was described this afternoon. [Pause.]
126:37:46 Swigert: Yes, Ken. It was, I heard about it.
126:37:49 Mattingly: Okay. I just wanted you to know that's the sequence you're in. Okay. At the completion of that, we go back to panel 8, and it's Sequential, Pyro Arm, both of them, to Safe. [Long pause.]
126:38:16 Swigert: Okay. Panel 8: Seq Pyro Arm, two, to Safe. [Pause.]
126:38:28 Mattingly: Okay. And following this, we take Sequential, Logic, two, to Off. [Pause.]
126:38:43 Swigert: Okay. Logic, two, to Off.
126:38:48 Mattingly: I'm sorry, Jack. I'll have to ask you to repeat that. [Pause.]
126:38:58 Swigert: Okay. Panel 8: Seq Logic, two, to Off. Are they On now, Ken? I don't remember turning them - I guess that's part of one of the other sequences, huh? That we turned them On?
126:39:08 Mattingly: That's affirm. The reason we're turning the logic off, Jack, is a power savings. So we'll be turning them off, and I'll be getting them back on when we go to get off of the LM; and then turn them back off, then we'll be turning them on prior to entry. Just so you know what's coming.
126:39:25 Swigert: Okay, real fine.
126:39:28 Mattingly: Okay. Then following this, the LM will pitch up to acquire the Moon - Excuse me, they're going to pitch up and acquire the Service Module and photograph, and they'll be using the ACA for rotations from now on. And you may see the LM out of window number 5 at the same time they pitch up to acquire it. [Long pause.]
126:40:02 Swigert: Okay. The LM pitches up, acquires the Service Module and photographs it, and I should expect to find - might possibly see the Service Module out of window 5.
Entry Sequence Checklist, page 3
126:40:12 Mattingly: That's affirmative. Okay, now we're down to EI minus 3 hours, or the next time-event, and the LM starts a maneuver to what we call the Moon-view attitude. This maneuver is designed to place the Command Module optics pointing with zero zero at the Moon, and it will be flown to on the LM ball angle. [Long pause.]
126:40:57 Swigert: Okay, the LM maneuvers to the Moon-viewing attitude which would place the Moon in the center of the Command Module optics with them at zero zero.
126:41:08 Mattingly: That's affirmative. Okay, now we're going to panel 5, and it's circuit breaker G&N, Computer, Main B, Closed. [Pause.]
126:41:21 Swigert: Okay. Panel 5: CB G&N, Computer, Main B, Closed.
126:41:35 Mattingly: That's affirmative. Now you're going to come up with a 37 Enter 06 Enter most likely on the computer. And what we want to do is to put the computer to standby; if you come up with a 37 06, you'll have to do an Enter in order to get the code 62. If it's got 62 on it, you can do a Proceed until the DSKY blanks. You might remember that the AC is still off at this time so you won't be getting the Standby status light, and your cue that the computer is indeed in standby is when the DSKY goes blank.
126:42:16 Swigert: Okay. You're saying that I will probably get a Program 06 with a Verb 37 Enter flashing.
126:42:27 Mattingly: I expect that you -
126:42:28 Swigert: Enter 06.
126:42:29 Mattingly: I expect you are...
126:42:30 Swigert: Say again, Ken.
126:42:32 Mattingly: Yes. We think that you're going to come up with a 37 06 already on the DSKY. If you do, do an Enter and that should take you to the code 00062, which is the request for standby. And when you get that, hit Proceed until the DSKY blanks. If you come up with something else, that's where we want to end up anyhow. With either, when you get the code 62 when it comes up, just do a Proceed on it.
126:43:05 Swigert: Okay. Is there anything else I could get?
126:43:12 Mattingly: I don't believe so, Jack. That's one that when you get to that step, if you do get something else, we will be standing by to see what you see. The whole scheme is to go to standby.
126:43:23 Swigert: Will you be getting it on downlink?
126:43:25 Mattingly: No, sir. We don't have that powered up yet.
126:43:29 Swigert: Okay. I'll yell to Jim, and Jim will give you a call.
126:43:33 Mattingly: Okay. The basic thing, Jack, is just to get the computer in standby to save power.
126:43:41 Mattingly: And we need another Battery B readout. [Long pause.]
126:43:56 Swigert: Okay. He is on his way. Go ahead.
126:43:58 Mattingly: Okay. Now, we're at EI minus 2 plus 30; we're going to panel 5: circuit breaker Essential Instrumentation, Main A, Closed. [Pause.]
126:44:20 Swigert: Okay, CB Essential Instrumentation, Main A, Closed.
126:44:25 Mattingly: That's correct. Now circuit breaker G&N, IMU Heater, Main A, Closed. [Pause.]
126:44:42 Swigert: CB G&N, IMU Heater, Main A, Closed.
126:44:47 Mattingly: That's correct. CB LM Power-1 and -2, open. [Pause.]
126:45:01 Swigert: CB LM Power-1 and -2, open.
126:45:05 Mattingly: That's correct. CB G&N, Computer, Main A, Closed. [Long pause.]
126:45:22 Swigert: CB G&N, Computer, Main A, Closed.
126:45:26 Mattingly: Okay, Jack. And that's correct. I got it out of sequence. Would you put that Computer, Main A, ahead of LM Power? [Long pause.]
126:45:51 Swigert: Okay, Ken. That's CB G&N, Computer, Main A, Closed, goes before CB LM Power-1 and -2, Open.
126:45:59 Mattingly: That's correct. Jack, what we're doing is we've had the LM powering Main B, and we've had all these particular loads on it, and we're getting ready to secure LM power so we wanted to make sure that essential things like the computer, the platform, and all have dioded power supplies before we remove the LM power.
126:46:19 Swigert: Okay. Sounds good. Volts, 39.1; amps, 1.3.
126:46:28 Mattingly: Okay. Thank you. All right, now panel 275: circuit breaker Main B, Battery Bus B, Closed. [Pause.]
126:46:48 Swigert: Panel 275: CB Main B, Bat Bus B, Closed.
126:46:53 Mattingly: That's correct. Circuit breaker Inverter Power 1, 2, and 3, Closed. [Pause.]
126:47:08 Swigert: CB Inverter Power 1, 2, and 3, Closed.
126:47:13 Mattingly: That's correct. On panel 5: circuit breaker Battery Relay Bus, Battery A and B, Closed. [Pause.]
126:47:33 Swigert: CB Bat Relay Bus, Bat A and B, Closed.
126:47:38 Mattingly: That's correct. Circuit breaker Inverter Control 1, 2, and 3, Closed. [Pause.]
126:47:54 Swigert: CB Inverter Control 1, 2, and 3, Closed.
126:48:00 Mattingly: That's correct. On panel 3: AC Inverter 1, Main A. [Pause.]
126:48:13 Swigert: Okay. Panel 3: AC Inverter 1 to Main A.
126:48:19 Mattingly: That's correct. Now, AC Inverter 1, AC Bus 1, On. [Long pause.]
126:48:38 Swigert: Okay. AC Inverter 1 to AC Bus 1 to On.
126:48:45 Mattingly: That's correct. And we're going to also put AC Inverter 1, AC Bus 2, On. [Long pause.]
126:49:04 Swigert: Okay. AC Inverter 1 to AC Bus 2, On.
126:49:09 Mattingly: That's correct. Back to panel 5. Circuit breaker EPS Sensor Signal, AC 1 and 2, Closed. [Pause.]
126:49:27 Swigert: Stand by, Ken. I'm going to switch Omnis here. You got cut out.
126:49:30 Mattingly: Roger. [Pause.]
126:49:37 Swigert: Okay. Could you repeat that, please?
126:49:38 Mattingly: Okay. On panel 5: circuit breakers EPS Sensor Signal, AC 1 and 2, Closed. [Pause.]
126:49:56 Swigert: Okay. CB EPS Sensor Signal, AC 1 and AC 2, Closed.
126:50:04 Mattingly: That's correct. Circuit breaker EPS Sensor Unit, AC 1 and 2, Closed. [Long pause.]
126:50:21 Swigert: Okay. CBS - CB EPS Sensor Unit, AC 1 and AC 2, Closed.
126:50:29 Mattingly: That's correct. And circuit breaker Caution/Warning, Main A, Closed. [Pause.]
126:50:41 Swigert: CB Caution/Warning, Main A, Closed.
126:50:45 Mattingly: That's correct. On panel 3: AC Inverter, AC Bus 1 and 2, Reset and back to the center. [Long pause.]
126:51:09 Swigert: AC Inverter, Bus 1 and 2, Reset then center.
126:51:15 Mattingly: That's correct. On panel 225: circuit breaker Flight Bus, Main A and Main B, Closed. [Pause.]
126:51:35 Swigert: Okay, panel - Okay, CB, Flight Bus, Main A and Main B, Closed.
126:51:47 Mattingly: That's correct. CB CTE, Main A and Main B, Closed. [Long pause.]
126:52:05 Swigert: CB CTE, Main A and Main B, Closed.
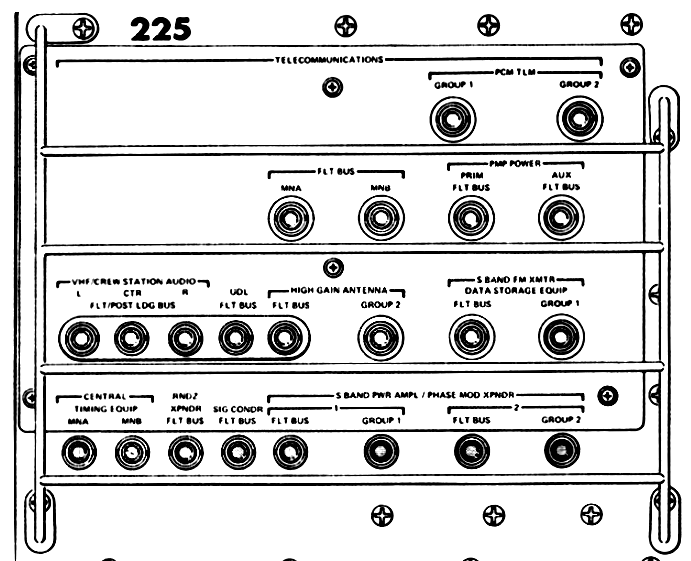
Panel 225 in the Command Module has circuit breakers that supply power to the communications equipment.
126:52:10 Mattingly: That's correct. On panel 4: Telcom, Group 1, AC1. [Pause.]
126:52:23 Swigert: Telcom, Group 1, to AC1.
126:52:27 Mattingly: And Telcom, Group 2, to AC2. [Pause.]
126:52:38 Swigert: Telcom, Group 2, to AC2.
126:52:41 Mattingly: That's correct. On panel 3: S-Band Normal, Transponder, to Primary. [Pause.]
126:52:56 Swigert: S-Band Normal, Transponder, to Primary.
126:53:00 Mattingly: That's correct. We want to take Power, SCE, to Normal. [Pause.]
126:53:12 Swigert: Power, SCE, to Normal.
126:53:14 Mattingly: All right, and Power, PMP, to Normal. [Pause.]
126:53:24 Swigert: Power, PMP, to Normal.
126:53:27 Mattingly: That's correct, and Up Telemetry, Command Reset to Reset and then Normal. [Long pause.]
126:53:47 Swigert: Up Telemetry, Command Reset to Reset, then Normal.
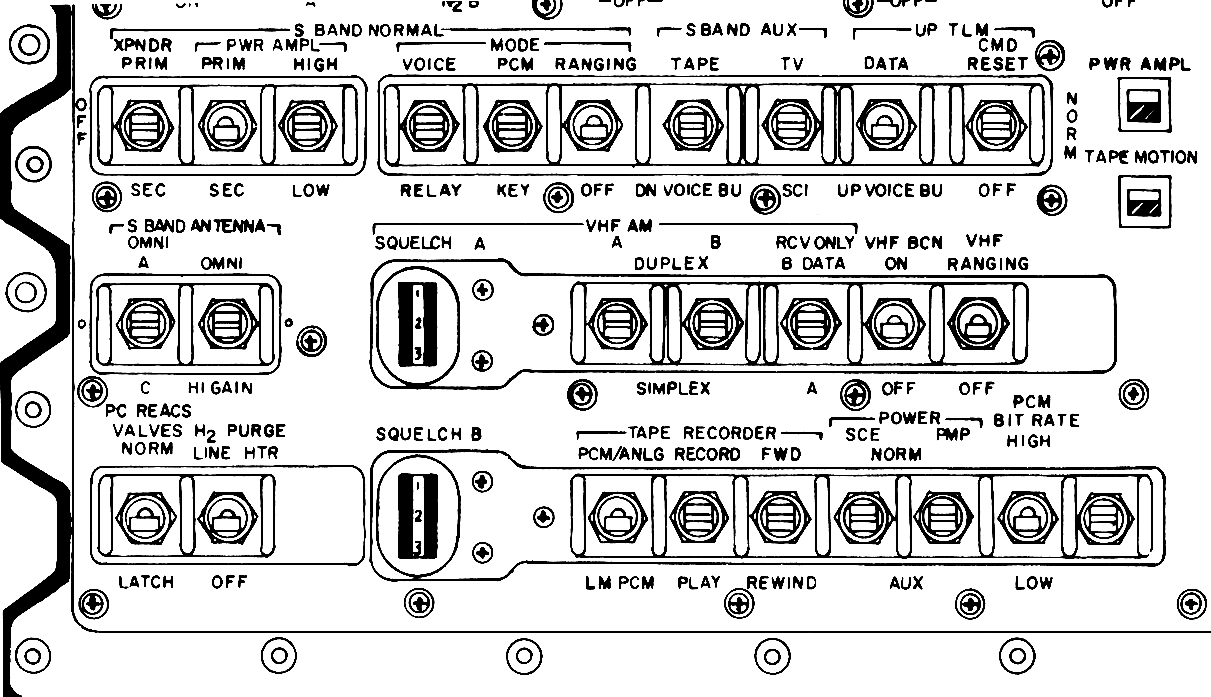
Bottom of Panel 3 contains the majority of the radio system control switches. Original scan via heroicrelics.org.
126:53:51 Mattingly: Okay. On panel 2: Up Telemetry, CMC, to Accept. [Pause.]
126:54:05 Swigert: Up Telemetry, CMC to Accept.
Entry Sequence Checklist, page 4
126:54:09 Mattingly: On panel 275: circuit breaker Flight/Postlanding, Main A and Main B, Closed. [Pause.]
126:54:26 Swigert: A panel 275: CB Flight/Postlanding, Main A and Main B, Close.
126:54:33 Mattingly: That's correct. And configure for Comm on panels 6, 9, and 10. [Long pause.]
126:54:51 Swigert: Okay. [Long pause.]
126:55:04 Swigert: Okay, are you with me.
126:55:06 Mattingly: All right. I assume you got that. Panel 5: circuit breaker IMU, Main A and Main B, Closed. [Pause.]
126:55:23 Swigert: CB IMU, Main A and Main B, Close.
126:55:28 Mattingly: That's correct. Circuit breaker Optics, Main A and Main B, Closed. [Pause.]
126:55:41 Swigert: Okay. CB Optics, Main A and Main B, Close.
126:55:46 Mattingly: That's correct. CB G&N, Power, AC1 and AC2, Closed. [Pause.]
126:56:01 Swigert: CB G&N, Power, AC1 and AC2, Close.
126:56:06 Mattingly: That's correct, and the G&N Power switch to AC2. [Pause.]
126:56:18 Swigert: Okay, G&N Power switch to AC2.
126:56:22 Mattingly: That's correct. Now we want to perform the CMC powerup per the CSM G&C checklist, G 2-2. [Long pause.]
126:56:44 Swigert: Perform CMC powerup per the G&C checklist, page 2-2.
126:56:50 Mattingly: That's correct. Perform the EMS check, step 32 of the entry book, page 1-4. [Long pause.]
126:57:16 Swigert: Okay. Perform the EMS check per step 32 per the entry checklist, page 1-4.
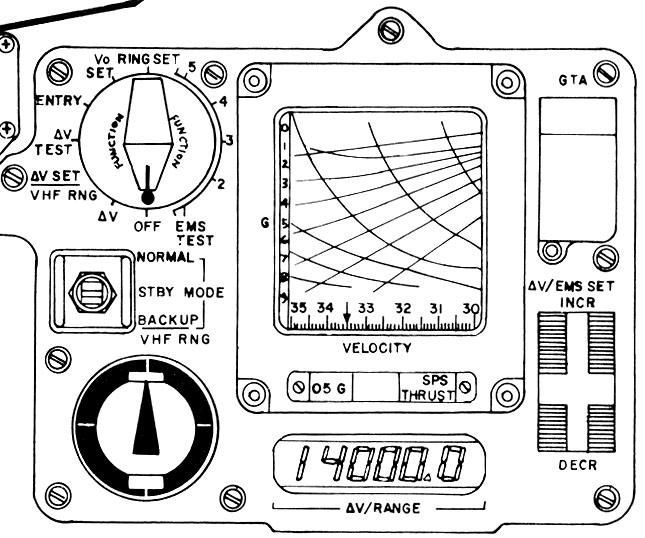
Entry Monitoring System. During reentry, it will be used to display various parameters, including the range to go and a Mylar film strip window that tracks their atmospheric trajectory. Scan via heroicrelics.org
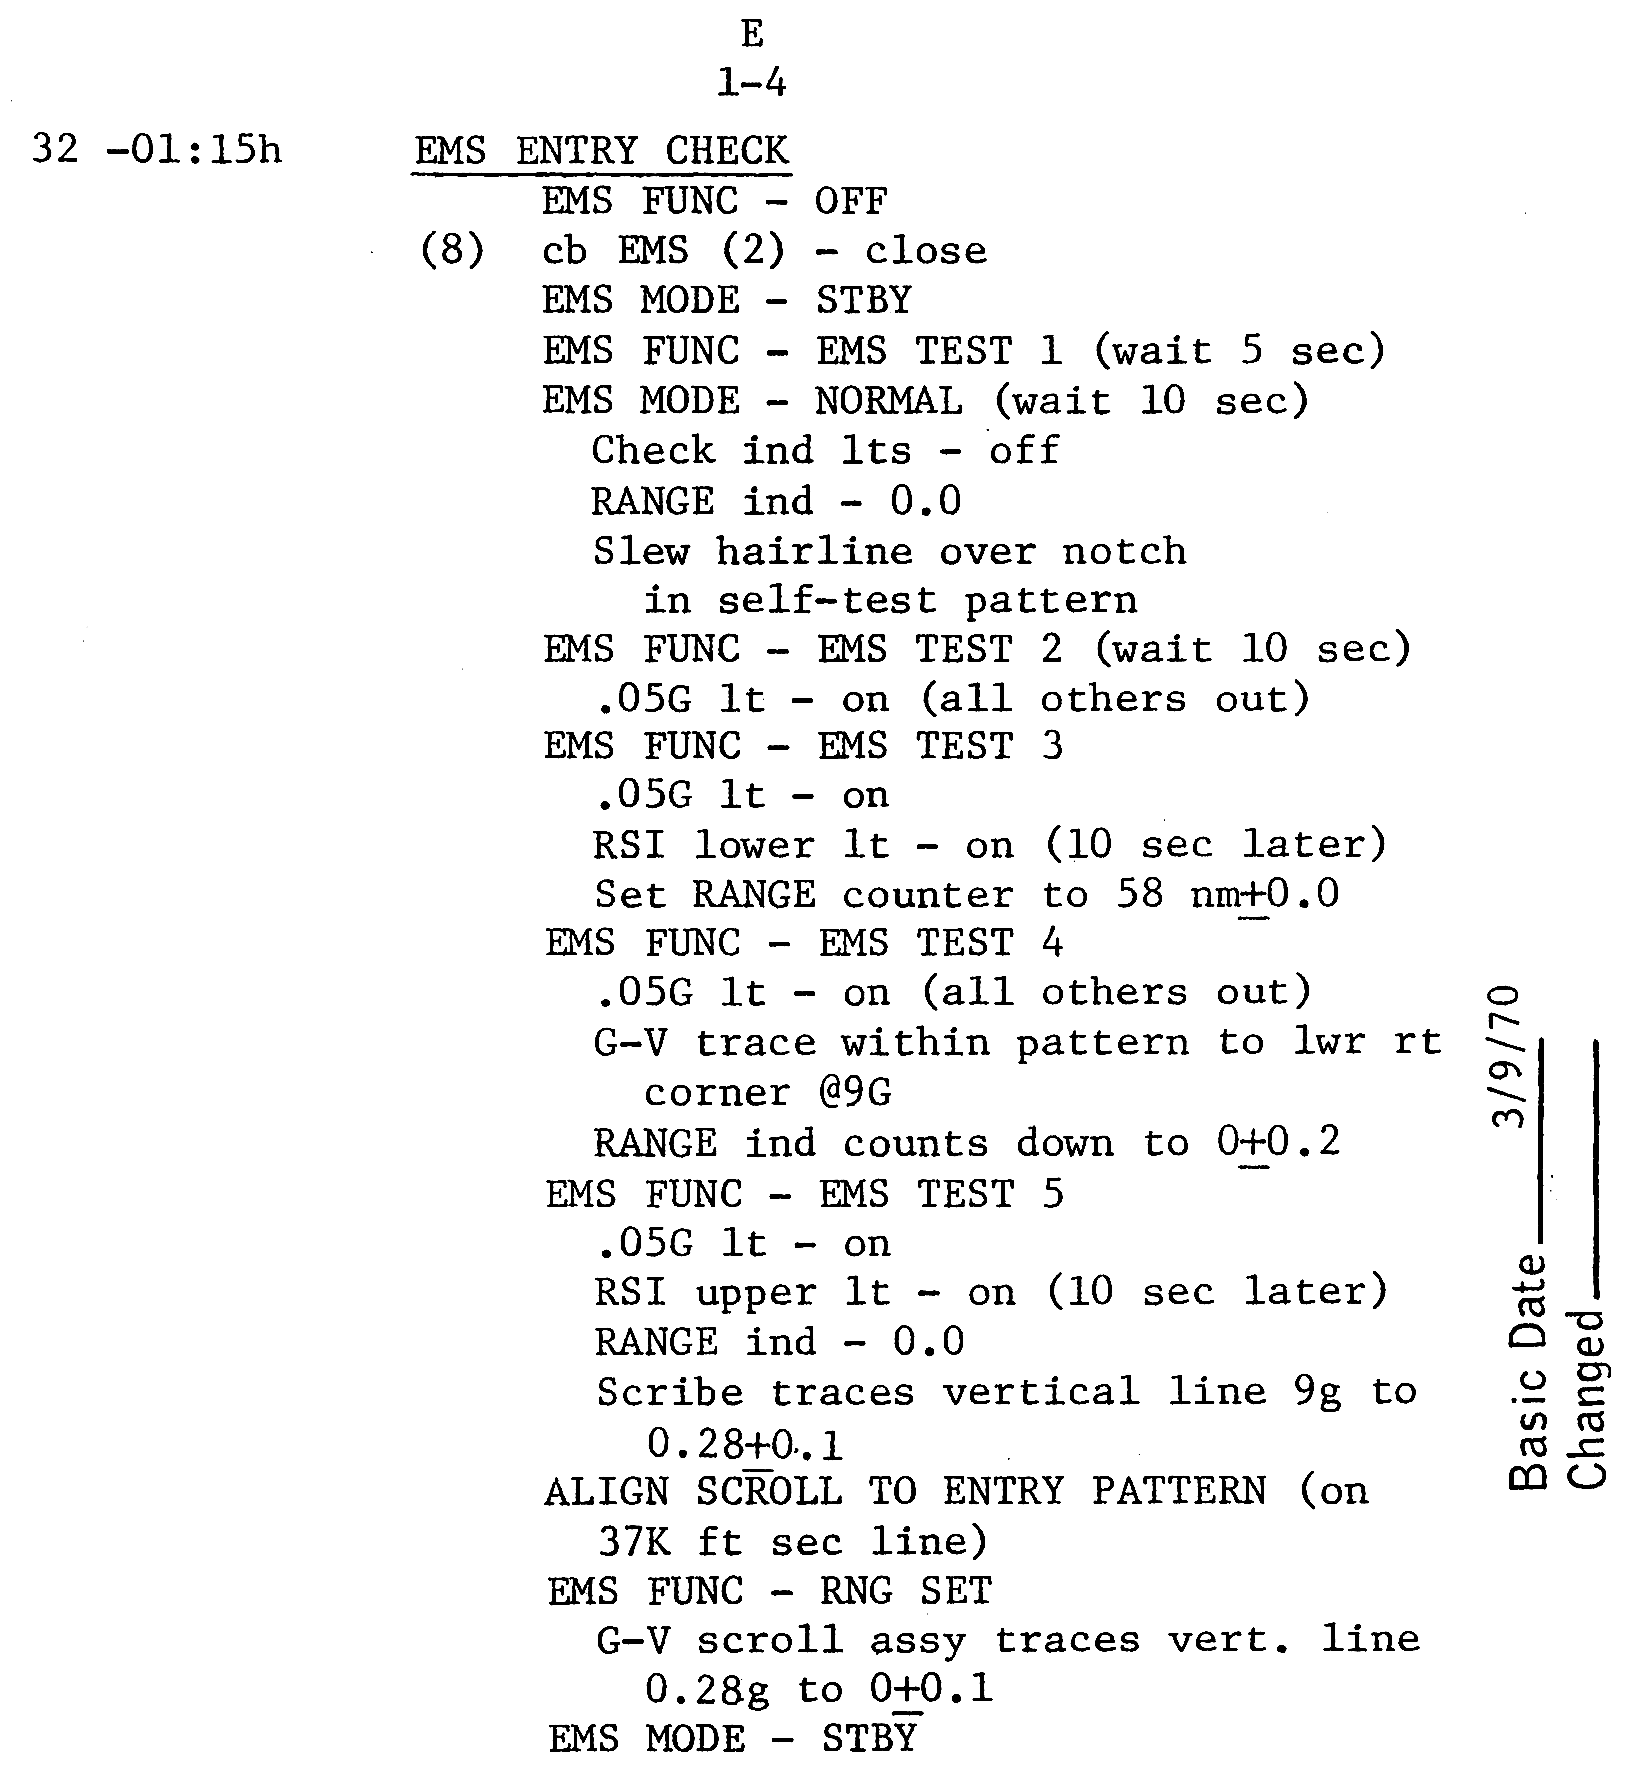
Next follows a test of the various components of the EMS accessible via the rotating mode selection knob on the panel.
126:57:26 Mattingly: That's correct. Okay, now the ground is going to give you a P27 update, at EI minus 2 plus 15. That's a - that's a time that you need to be configured to accept up telemetry. And what they're going to give you on a P27 update will be a clock increment, a state vector; they'll give you a Verb 66; they'll give you two REFSMMATs, there'll be a actual and a preferred; and the entry target load. Now, if you'd like to copy those, I can take it a little slower.
126:58:13 Swigert: No, I've got them. They are going to give me a clock Delta, state vector, Verb 66, two REFSMMATs, and an entry target load.
126:58:20 Mattingly: That's correct. Okay, and then we'll do...
126:58:24 Swigert: There isn't much else they could give me, is there, Ken?
126:58:28 Mattingly: No, not very much. How about IMU powerup according to the G&C checklist, G/2-1. [Long pause.]
126:58:50 Swigert: Okay. Perform IMU powerup per G&C checklist, page 2-1.
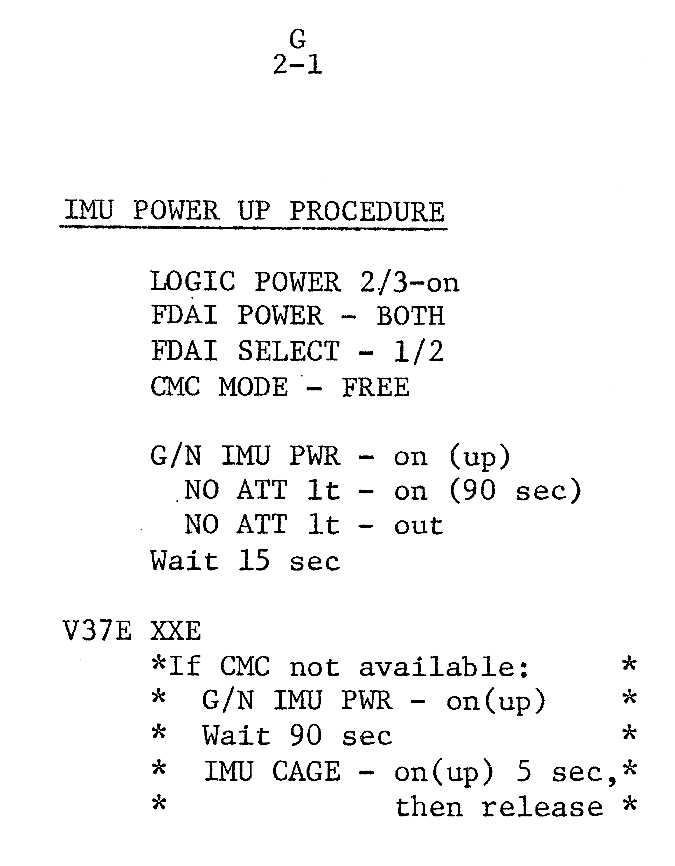
After turning on the Logic Power and powering up the FDAI 8-balls, the CMC will be set to Free, meaning that the computer will not attempt to sense or control the spacecraft attitude. Afterwards, it is a matter of flicking the power switch and waiting for 90 seconds for the IMU platform to come back up. the No Att warning light going out on the DSKY is their cue that the platform is ready to be set up.
126:58:58 Mattingly: That's correct. And while you are there, you can do the optics powerup on G/2-3. [Long pause.]
126:59:21 Swigert: Perform the optics powerup per page 2-3.
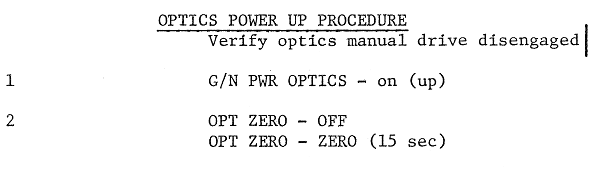
The optics powerful consists of hitting the power switch and ensuring that the optics are zeroed ie. placed into their neutral position.
126:59:25 Mattingly: That's correct; and on panel 229: circuit breaker Timers, Main A, Closed. [Long pause.]
126:59:46 Swigert: Okay. Panel 229: CB Timer, Main A, Closed.
126:59:52 Mattingly: That's correct. And the next thing you will do will be to set the mission timer and what we've done is to only turn on the mission timer on the MDC. And you'll probably have to wait here until they get through with the uplink so you can have the computer.
127:00:10 Swigert: Okay. Set it from the CMC, huh?
127:00:13 Mattingly: That's affirm. Okay. Now, we are getting ready to start the alignment sequence, and are you familiar with the general sequence of events we're going to use, Jack?
127:00:29 Swigert: How do you mean? We are going to make an alignment on the Moon and on the Sun; other than that - I didn't get any - I wasn't on the headset when the general information was passed up, so if there was any more than that, I didn't get it.
127:00:45 Mattingly: Okay. Basically, that is correct. Let me just run through it hand-waving type for a minute, and then I'll read you the steps. I think it will make more sense. The scheme is that the LM can fly to a set of ball angles that will point your optics at the Moon. Now, at any time, in any attitude that we happen to be at, if you can look in the telescope and recognize star patterns sufficient that you believe you can make an alignment all on your own, that's the place we'd like to break off and let you go ahead and take over with your own alignment. However, we are giving you a procedure which will give you things we know you can see in the telescope without worrying about any reflections or anything of that nature, and it's not intended that this procedure has to be followed past the point where you know you've got good definition of star patterns in your telescope. If you need to go on, we'll maneuver, take a look at the Moon, we'll take a mark there, and then we'll maneuver with the LM/FDAI angles again and take a look at the Sun, and get yourself another mark on the Sun and that will complete the alignment. Now, the alignment scheme is that we are going to give you a set of angles that you can coarse align the ball through when the LM is pointing you at the Moon. Now, this set of angles will agree with the REFSMMAT that you have in as a nominal REFSMMAT in your CMC. You can coarse align to that, set a drift flag and REFSMMAT flag, and you'll have a good platform and we'll be within a couple of degrees of a good alignment. And, if we have to, we could break off at this point and go ahead with an entry; however, in an attempt to get a good platform, we are going to have you then do a P52 option 1, and what you are going to find in the option 1 slots is the entry REFSMMAT. You'll come up with the Noun 22 values, and we intend to go ahead and coarse align the ball to the entry REFSMMAT attitude, and then we'll go ahead and take marks through a normal P52 sequence. So that's the general scheme that we are going to use. If you think you have a handle on that, I will go ahead and read you the steps.
127:03:11 Swigert: Okay. Well, let me ask a question. The LM maneuvers to a set of Moon-viewing angles. Okay, at this time, I am going to do a P52, is that right? With the planet option?
127:03:29 Mattingly: The first thing we are going to do is to coarse align the platform and get it inertial, based on the REFSMMAT that you have in the present slot inside the CMC. We'll then go - and do a P52, option 4 - Correction, option 1.
127:03:48 Swigert: Okay - That's after the LM gets established at the attitude. Jim says I'm here at the Moon-viewing attitude, I do a Verb 41 Noun 20 to the set of angles that you're going to give me in the PAD.
127:04:00 Mattingly: That's affirmative...
127:04:01 Swigert: And then I enter the P52.
127:04:03 Mattingly: That's correct.
127:04:04 Swigert: Okay. Then I enter the P52 and that's an option 3, right?
127:04:11 Mattingly: The P52 will be done as an option 1. The only reason you have the other REFSMMAT inside the computer is that in order to set the REFSMMAT flag, you need some relative orientation.
127:04:22 Swigert: Okay. I see. I do a P52 option 1, and when do I set the REFSMMAT flag and the drift flag?
127:04:33 Mattingly: That will be before entering P52. I am going to give you this procedure in detail.
127:04:38 Swigert: Okay. All right. Let's go at it. Maybe it'll all fall out and I won't have any questions. Go ahead.
127:04:45 Mattingly: Okay. I'm ready to start reading again. We start with a Verb 41 Noun 20. [Long pause.]
127:05:08 Swigert: Okay. When the LM is in the Moon-viewing attitude, I do a Verb 41 Noun 20, Enter.
127:05:14 Mattingly: That's right. And you'll put in the attitudes that you'll get from one of the PADs, and this will be for the coarse align angles when the LM is at the Moon-viewing attitude. Then when they're all squared away, I tell you they have the right attitude; we then pick up again with a Verb 40 Noun 20, Enter. [Long pause.]
127:05:45 Swigert: Okay. Verb 40 Noun 20, Enter when Moon is - the LM is satisfied that they're at the Moon-viewing attitude.
127:05:53 Mattingly: That's correct. Now we're going to set the REFSMMAT and drift flags according to the G&C checklist, page G/7-1, steps 3 and 4. [Pause.]
127:06:15 Swigert: Okay. Set the REFSMMAT flag for G&C 7-1, steps 3 and 4.
Page 7-1 from the Command Module Guidance and Navigation checklist offers the quick reference to how to set the REFSMMAT and drift flags.
127:06:20 Mattingly: That's correct. Now Verb 37, Enter; 52, Enter; option 1. [Pause.]
127:06:33 Swigert: Verb 37, Enter; 52, Enter; option 1.
127:06:36 Mattingly: That's correct. And we'll do the coarse align. [Pause.]
127:06:49 Swigert: Okay. Perform the coarse align function.
127:06:53 Mattingly: Okay. Now when it gets back to the mark routines, we want to take a mark on the Moon. [Pause.]
127:07:06 Swigert: Okay. Mark on the Moon with the crosshairs in the center. Is that right?
127:07:10 Mattingly: That's affirmative. Okay. When that's complete, the LM will maneuver to the Sun-viewing angle for attitude. And when they get there, you take a mark on the Sun using the Sun filter and the telescope; and, again, we're marking on the center.
127:07:39 Swigert: Okay. Now, let me ask you a question. Is the first mark on the Moon made with the - are all these made with the telescope and not the sextant?
127:07:49 Mattingly: If - I'm not sure right offhand what the angular size of the Moon is, Jack. If you can get it in the sextant; that's the best thing to do, but you may have to go into the telescope in order to define the center. Either one's acceptable.
127:08:04 Swigert: Okay. If I can define the center through the sextant, do it that way. And if I can't, use the telescope.
127:08:10 Mattingly: That's affirmed. We know you're going to use the telescope on the Sun. [Pause.]
127:08:23 Mattingly: Okay. You ready to press on?
127:08:29 Swigert: I'm ready.
127:08:30 Mattingly: Okay. Just reminded we owe somebody a Bat B voltage.
127:08:37 Swigert: Okay, another volts and amps coming up.
127:08:40 Mattingly: All right. Thank you. And this left us in P52 with two marks, and we'll go ahead and torque the Noun 93s. [Long pause.]
127:09:03 Swigert: Okay. [Garbled] torque the Noun 93s, after the two marks.
127:09:08 Mattingly: Okay. So that gives us a good platform. Now the LM will maneuver to the jettison attitude, and the only thing of significance here is that you want to watch to make sure that the path they choose to go to the jettison attitude avoids gimbal lock on your own platform. [Long pause.]
127:09:38 Swigert: Okay. The LM maneuvers to the jettison attitude and I just monitor the maneuver and yell at Jim if he gets near a gimbal lock.
127:09:46 Mattingly: That's affirmed. Okay, and then the LM will go to a Max dead band attitude hold in the jettison attitude. [Long pause.]
127:10:04 Mattingly: Okay. The LM goes to Max dead band attitude hold.
127:10:09 Mattingly: Okay. Now we're ready to go back to work. The next thing we'll do is to continue to powerup procedures. Do you have any further questions on that alignment, Jack?
127:10:18 Swigert: No. No. I think - I think it's all self-explanatory now.
127:10:23 Mattingly: Okay. The one thing that everybody would like for you to understand is we certainly don't insist on using the Moon and the Earth; if you find you have good stars, why use them. However, this alignment is more than adequate to give us a good guided entry.
127:10:40 Swigert: Okay. If I get a set of good stars, do I start right out to a basic P51 and a P52 option 1?
127:10:50 Mattingly: That's affirmative.
127:10:55 Mattingly: Okay. Now, we're ready to go to work on panel 275. And it starts with a circuit breaker Main A...
127:11:01 Swigert: Wait - wait just a minute. Wait just a minute. I owe you some volts and amps.
127:11:06 Mattingly: Okay. All right.
127:11:09 Swigert: Okay. Volts are 39.4, amps, 1.25.
127:11:15 Mattingly: Okay. I thought maybe your meter was stuck before.
127:11:20 Swigert: No. [Laughter.]
127:11:24 Mattingly: All right. You ready to go back to 275? Have a circuit breaker Main A, Bat Bus A, Closed. [Long pause.]
127:11:42 Swigert: CB Main A, Bat Bus A, Closed.
127:11:45 Mattingly: That's correct. And circuit breaker Main B, Bat C, Closed. [Pause.]
127:11:57 Swigert: CB Main Baker, Bat Charlie, Closed.
Entry Sequence Checklist, page 5
127:12:00 Mattingly: Okay. That's correct. Now we're up to EI minus 1 plus 30. And at this time, we're going to proceed with the closeout and hatch installation. [Long pause.]
127:12:30 Swigert: Okay. Closeout and hatch installation at EI minus 01:30.
127:12:35 Mattingly: That's right, Jack, and we're going to close the LM hatch, and we'll make the dump valve in the LM hatch closed.
127:12:51 Swigert: Understand you're going to close the dump valve, now on the LM hatch, right?
127:12:56 Mattingly: That's correct.
127:12:57 Swigert: Okay. This is a change from what we had understood previously.
127:13:01 Mattingly: That's correct.
127:13:03 Swigert: I'm - Personally, I'm happy to see it, but that's good.
127:13:06 Mattingly: Okay. That's one vote on your side. Okay; and we're going to go ahead and do the - use the decal to perform the hatch installation, and we'll start on the hatch integrity check. [Long pause.]
127:13:39 Swigert: Okay. Per the decal, perform the hatch installation and start on the hatch integrity check.
127:13:49 Mattingly: That's correct.
127:13:53 Swigert: Okay, Ken. One thing I think that - I don't know whether anybody - the decal don't take into account the fact that we still have the umbilicals connected. At what point in time should they be removed?
127:14:10 Mattingly: Okay, Jack. That doesn't matter. We're going to be separating the tunnel upstream of those umbilicals, and you can leave them right there. [Pause.]
127:14:24 Swigert: Okay. Does it make any difference if we disengage - the LM - We have pulled the circuit breakers LM Power-1 and -2, so if we choose to disconnect these umbilicals, there's no harm, right?
127:14:41 Mattingly: That's right. No sweat. John Aaron's just saying that they may be hot. He's checking on it, so how about holding a decision on that and let me come back to you?
127:14:59 Mattingly: Okay. And let me tell you what we're going to do since we told you a different story this afternoon on this tunnel. We're actually going to vent the tunnel down so that we end up with about 1½ to 2 psi absolute in the tunnel. And this will give us a Delta-P of 3. So we'll do our hatch integrity check at the same time we're venting the tunnel down.
127:15:24 Swigert: Okay. It sounds good.
127:15:26 Mattingly: Okay. Now let me give you some plumbing switches here. Let's take the Surge Tank Oxygen valve to On. [Long pause.]
127:15:45 Swigert: Surge Tank O
2 to On.
127:15:48 Mattingly: All right. Take the Main Regs, two, Open. [Pause.]
127:15:59 Swigert: Main Regs, two, to Open.
127:16:02 Mattingly: Okay. And the Water And Glycol Tank Pressure, the Pressure valve and the Relief valve to Both. [Long pause.]
127:16:20 Swigert: Okay, Water And Glycol Tanks Pressure and Relief valve to Both.
127:16:26 Mattingly: That's correct. And Emergency Cabin Pressure valve to Both. [Long pause.]
127:16:40 Swigert: Emergency Cabin Pressure to Both.
127:16:43 Mattingly: That's correct; and the Suit Demand Regs to Both. [Pause.]
127:16:55 Swigert: Suit Demand Regs to Both.
127:16:58 Mattingly: That's correct. Okay, now we're going to panel 5: circuit breaker ECS Transducers, Pressure Group 1 and 2, Main A and Main B. That's four circuit breakers, Closed. [Long pause.]
127:17:26 Swigert: ECS Transducers, Group 1 and 2, Main A and Main B, four, to Close.
127:17:32 Mattingly: That's correct. Okay, now. Circuit breaker ECS Transducer, Temperature, Main A and Main B, that's two of them, Closed. [Pause.]
127:17:51 Swigert: CB ECS Transducer, Temperature, Main A and Main B, Closed.
127:17:57 Mattingly: That's correct. On panel 4: Primary ECS Glycol Pumps, one, to AC 1. [Pause.]
127:18:13 Swigert: Primary ECS Glycol Pumps to 1, AC1.
127:18:17 Mattingly: That's correct. Okay, then we'll finish going back to the tunnel vent, and verify the LM/CM Delta-P and make sure it's been holding pressure. And we'll come back again and rehash all of the hatch integrity check and tunnel vent procedures with you. The next thing I want to read off is the EI minus 1 plus 20. We'll go to panel 7: BMAG number 1 Power to Warm Up. [Pause.]
127:19:11 Swigert: BMAG number 1 Power to Warm Up.
127:19:15 Mattingly: That's correct. Then at EI minus 1 plus 10, we'll perform SCS powerup per checklist, page G/2-4. [Pause.]
127:19:35 Swigert: Okay. Perform SCS powerup per G&C checklist, page 2-4.
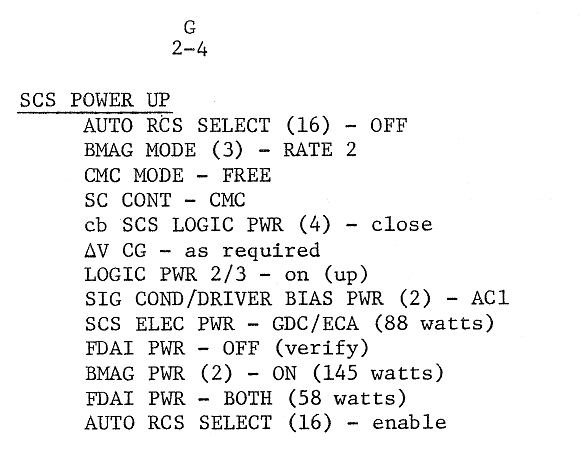
GN Checklist page 2-4.
127:19:42 Mattingly: That's correct. Okay, on panel 4: Suit Compressor Number 2 to AC1. [Pause.]
127:19:58 Swigert: Suit Compressor 2 to AC1.
127:20:01 Mattingly: That's correct. Spacecraft Control to SCS. [Long pause.]
127:20:20 Swigert: Spacecraft Control to SCS.
127:20:23 Mattingly: Okay. And your Manual Attitude switches, as you desire. We're coming up on jettison of the LM, so that's just like separation.
127:20:44 Mattingly: Okay. And we'll do a GDC align. [Long pause.]
127:21:01 Swigert: Okay. Perform a GDC align.
127:21:03 Mattingly: Okay. On panel 8: Rotation Control Power, Direct, 1 and 2, Main A/Main B. [Long pause.]
127:21:29 Swigert: Okay. These are circuit breakers, Rotation Control Power, Direct, 1 and 2, Main A and Main B, Closed? [Pause.]
127:21:42 Mattingly: Okay, Jack. I wasn't thinking switch. Let me verify that's a circuit breaker, too. I think we have to get both of them.
127:21:52 Swigert: Okay, there's those four circuit breakers over there, Ken. When you said panel 8, that's what I thought you were talking about. I don't think the circuit breakers are out right now, but why don't we just put - verify the circuit breakers and put the switches to Main A/Main B.
127:22:17 Mattingly: Okay, that's correct, Jack. Okay, at EI minus 1 hour, we're going to be doing the LM jettison; so just prior to that, we want to do a P47. [Pause.]
127:22:47 Swigert: Okay, say at about 1 minute prior to LM jettison, huh?
127:22:55 Mattingly: Yes, just something that's comfortable for you. [Pause.]
127:23:08 Mattingly: All right, after we've done that, we want to get panel 8, Sequential, Pyro Arm, two of them, On. [Long pause.]
127:23:25 Swigert: Okay. I get a Go fron MSFN for this?
127:23:32 Mattingly: Okay, John says we can watch it. [Pause.]
127:23:44 Mattingly: All right; the next thing is CSM/LM Final Sep, two of them, On, up. [Long pause.]
127:23:59 Swigert: CSM/LM Final Sep, two, On.
127:24:02 Mattingly: That's correct. Now we're going back to panel 8, and it's Sequential, Pyro Arm, two of them, to Safe. [Long pause.]
127:24:28 Swigert: Okay. Seq Pyro Arm, two, to Safe.
127:24:31 Mattingly: That's correct, and go back to P00. [Pause.]
127:24:42 Swigert: Okay. Go to P00.
127:24:44 Mattingly: All right. And now it's time to configure for single ring. [Long pause.]
127:25:00 Swigert: Okay. Configure for single ring RCS.
Entry Sequence Checklist, page 6
127:25:03 Mattingly: That's right, and since you're still an hour from EI, I guess it wouldn't hurt to use Minimum Impulse or something like that rather than the DAP, at least not until you get closer down. We'll have the DAP loads for you later. [Long pause.]
127:25:25 Swigert: [Garbled] - Okay.
127:25:26 Mattingly: Okay. And as soon as you've gotten yourself all set up with a good control mode, you want to maneuver to the entry attitude. [Pause.]
127:25:45 Swigert: Maneuver to entry attitude per the PAD.
127:25:47 Mattingly: That's correct. And we show EI minus 55, which really means when you get to the entry attitude, we have a sextant star check for you. And that will be on the PAD. [Pause.]
127:26:11 Swigert: Okay. Perform a sextant star check.
127:26:14 Mattingly: Okay. And I want to remind you to park the optics at 90 degrees of shaft. [Pause.]
127:26:20 Swigert: Okay. Say again why, Ken. I didn't understand that.
127:26:31 Mattingly: Okay, this is just a precaution, Jack. If we park the optics with a 90-degree shaft angle, that will line up the slits so it gives you the best airflow over that part of the heat shield and avoids a hot spot. If you don't remember it, I don't think it makes much difference. It's just good procedure.
127:26:55 Mattingly: Okay. And after you've got it parked wherever you want it, well, turn the Optics Power Off and stow the optics. [Long pause.]
127:27:14 Swigert: Okay. Optics Power, Off; stow the optics.
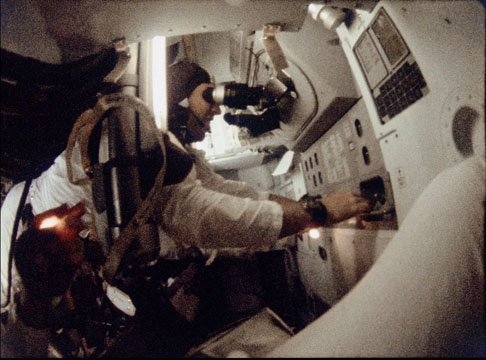
16mm DAC film capture from Apollo 8's magazine R showing then-CMP Jim Lovell at the optics station.
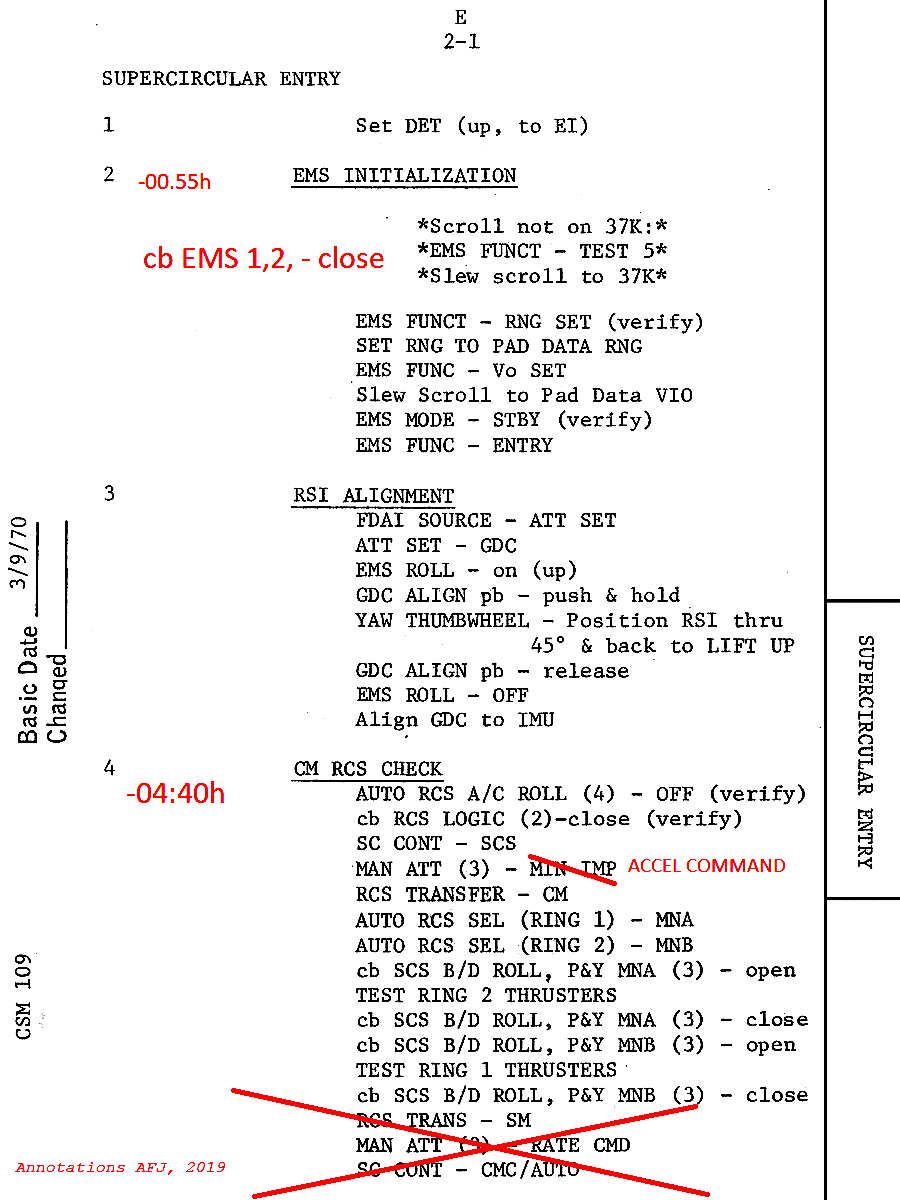
127:27:17 Mattingly: Okay, that's good, Okay. The next thing we'll do is to initialize the EMS and that's on entry checklist page 2-1, step number 2. [Pause.]
127:27:40 Swigert: Okay, perform EMS initialization per entry checklist page 2-1, step 2.
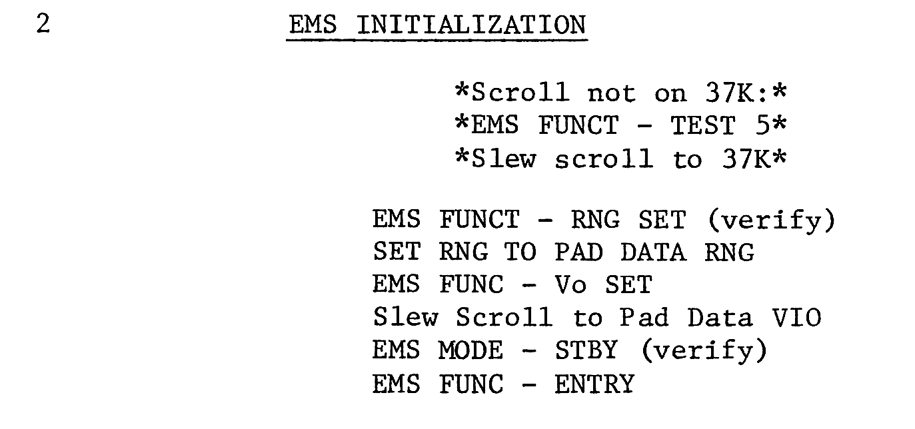
At this point, they will configure the EMS to display the parameters for their planned entry.
127:27:46 Mattingly: Okay, that's correct. Now we're coming up on EI minus 45 minutes, and we'll give you an entry PAD and a final state vector. [Long pause.]
127:28:12 Swigert: Okay, at minus 45, entry PAD and final state vector from MSFN.
127:28:17 Mattingly: Okay. Now we're going to perform what we call the Moon check. Rather than go into detail, if you already know what we're doing just say so; otherwise, I'll describe the use of the Moon-attitude set. [Pause.]
127:28:38 Swigert: Maybe you better describe it.
127:28:41 Mattingly: Okay, Jack. You remember everybody in the past has commented on seeing Moonset just a couple minutes prior to EI, and your horizon will probably be dark at the time that you get there; you're having an early morning entry; and coming in from the west, you'll still be looking at a dark horizon. So, just as a backup technique, just like you would track the horizon, we're going to give you an attitude which will be on the PAD so that you can look directly at the Moon. This is an inertial attitude; it won't be changing, and you'll put the 36-degree window line on the Moon, and then just sit there and watch it. And just prior to EI, the Earth will come up and occult it, and you will then have a good horizon check. And I have some times, and I'll give you that later. And if you just look at this thing now, at that point you can set the GDC or whatever you desire. And you will have a known attitude reference. It's just like a horizon check. [Pause.]
127:29:47 Swigert: Okay, I maneuver to the Moon check attitude; at which time I put the 36 window line on the Moon, and just prior to EI, the Earth will occult the Moon.
127:30:03 Mattingly: That's correct. And that corresponds to the same inertial attitude that you'd have on the back of your entry card where it shows the horizon attitude several minutes prior to EI; it's the same thing.
127:30:21 Swigert: Yes, that's that one at 17 minutes prior. Okay.
127:30:24 Mattingly: Okay, and we're just getting it in a little closer. Okay, the next item on the check - checklist here is an EI minus 40; we're going to panel 7, and it's BMAG Number 2 Power to Warm Up. [Long pause.]
127:30:49 Swigert: Okay, panel 7: BMAG Number 2 Power to Warm Up.
127:30:52 Mattingly: That's correct. Now, I'd like to verify the Surge Tank and Repress Packages are On. [Long pause.]
This is Apollo Control at 127 hours, 31 minutes. We've completed the shift handover in Mission Control. A change of shift briefing is scheduled to begin in about 15 minutes at 9 pm in the main News Center Auditorium, in Building 1...
127:31:13 Swigert: Verify Surge Tank and Repress Package are On.
127:31:16 Mattingly: That's correct. On panel 5: circuit breaker Environmental - Control System; Waste Water/Urine Dump Heater, two of them, Closed. [Long pause.]
127:31:44 Swigert: Panel 5: CB ECS, Waste H
2O/Urine Dump Heaters, two, to Close.
127:31:51 Mattingly: That's correct. Suit Compressor number 2 to Off. [Long pause.]
127:32:07 Swigert: Suit Compressor 2 to Off.
127:32:09 Mattingly: That's right, Jack, and what this - what we're planning to do in order to conserve power is we're going to run the suit compressor from an hour to this point at minus 40. And we'll be watching the PCO
2; if that thing's working, we'll turn it off at the earliest time that we have a good cabin, and then we'll just leave it off. And in the event that the PCO
2 gauge isn't working properly or something like that, well, we'll just go ahead and run it for this time frame.
127:32:40 Swigert: Okay, that sounds good.
127:32:43 Mattingly: All right. Now we're at EI minus 30. Sequential, Logic, that's two of them, to On, up. [Pause.]
127:32:57 Swigert: EI minus 30; Seq, Logic, two, On.
127:33:01 Mattingly: Okay, in panel 7: the BMAG number 2 Power to On. [Pause.]
127:33:13 Swigert: Okay, we - you only gave that 10 minutes for the warmup, huh?
127:33:18 Mattingly: That's okay.
127:33:22 Mattingly: All right, and FDAI Power to Both. [Pause.]
127:33:33 Swigert: FDAI Power to Both.
127:33:36 Mattingly: Okay. And we want to activate the primary evaporator. [Long pause.]
127:33:54 Swigert: Okay, activate the primary evaporator. All this time, Ken, what we've been getting our cooling? Right now, I think we have the radiators at Pull To Bypass.
127:34:03 Mattingly: That's correct. We started out that way, and we turned the glycol pumps on, and we're just circulating it internally. And we're counting on the Command Module being a heat sink; it's pretty cold soaked, and it looks like this is good enough. You got some relatively low heat loads...
127:34:21 Mattingly: ...and we'll keep watching the temps, and if we need it, why we'll start the evaporator early.
127:34:27 Swigert: Okay, that sounds good.
127:34:29 Mattingly: Do you believe it's cold up there?
127:34:33 Swigert: Yes, and we used to call the Command Module the bedroom and it's now the refrigerator.
127:34:38 Mattingly: Okay, just don't call it the freezer. Okay. At about EI minus 19, we get back into the standard entry checklist on page 2-2, where it starts with P61. [Long pause.]
127:35:04 Swigert: Okay, at EI minus 19, we get back into the entry checklist at page 2-2, where we start entering P61.

Entry checklist page 2-2
127:35:14 Mattingly: Okay, Jack. Now that's the - those are the timeline notes I had for you. I hate to tell you this, but I also have a couple of corrections to make to the entry checklist. They aren't corrections, they just are pieces of the entry checklist which will correspond to what I've written - already read to you. And I'm ready to go on that whenever you are. And Vance tells me you can get into the descent water for drinking now.
127:35:42 Swigert: We can get into the descent water for drinking, huh?
127:35:45 Mattingly: Aha.
127:35:47 Swigert: Sounds good.
127:35:48 Brand: Hey, go to it.
127:35:54 Swigert: Jim would like to know whether the descent water will be good until LM jettison? [Long pause.]
127:36:19 Mattingly: Okay, Jack. Looks like we're going to go on the ascent tanks at 128:30. And it looks like...
127:36:29 Swigert: Okay, understand. We are going...
127:36:30 Mattingly: ...you have plenty of water. I'm sorry we cut each other out; say again.
127:36:34 Swigert: Okay, yes. I was going to say, understand we're going to go on the ascent tanks at 128:30.
127:36:40 Mattingly: That's right; based on the current rate, that's what they predict and you can go ahead and drink the water. No sweat.
127:36:48 Swigert: Okay, real fine. And I've got the entry checklist out and I'm ready to copy; just give me the page.
127:36:54 Mattingly: Okay.
127:36:56 Brand: Jack, you're starting to sound like an LMP. [Pause.]
127:37:04 Swigert: I think I'm probably the only CMP that's ever witnessed an - a LM burn from inside the LM in - in space flight.
127:37:14 Mattingly: (Laughter) I hope it stays that way. Okay, Jack, we're starting on page 1-1.

Entry Checklist page E1-1, with modifications.
127:37:21 Swigert: Go ahead.
127:37:23 Mattingly: Okay, down in the middle of the page on line 9, we're just going to strike out the "Activate VHF for Comm checks," and line 10, "Verify the DSE." We're going to leave the DSE Off, and that's to save power, as is the VHF activation.
127:37:45 Mattingly: Okay, on page 1-2. At minus 2 hours, there's a title "Logic sequence" check; and we're deleting that entire sequence; that's included in what I read up to you.
127:38:03 Swigert: Okay, delete the logic sequence check at minus 2 hours there.
127:38:09 Mattingly: That's correct. And delete lines 23, 24, and 25. That means a maneuver to Supercirc entry attitude. Everything below that is deleted. [Long pause.]
127:38:33 Swigert: Okay. Delete lines 23 through 28.
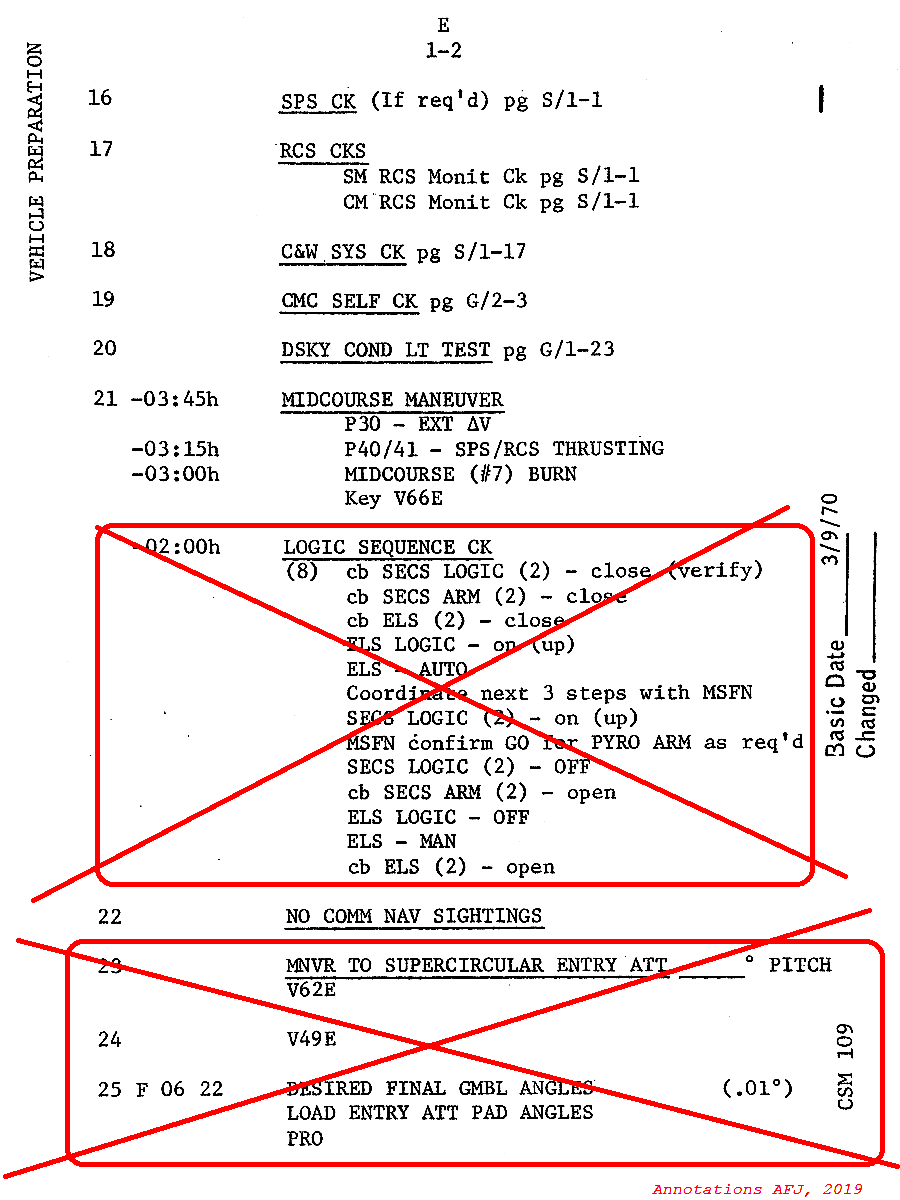
Entry Checklist page E1-2, with modifications.
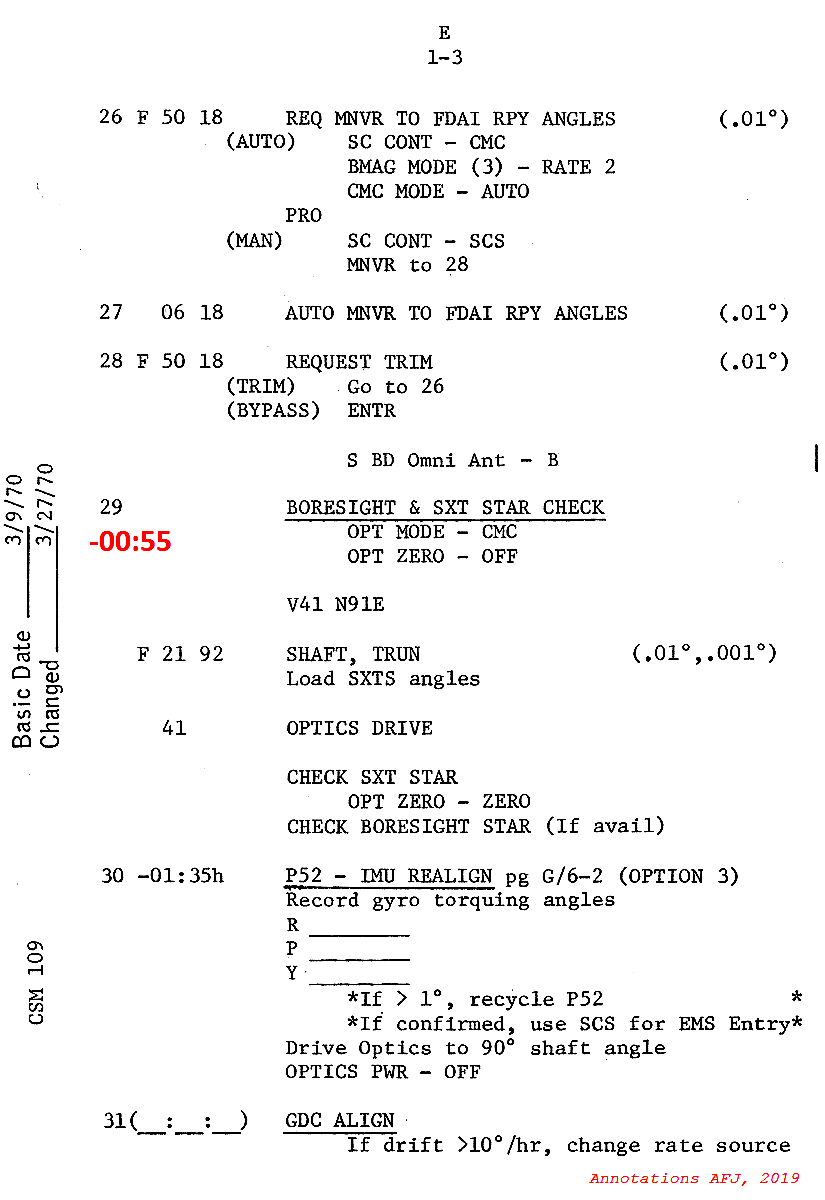
127:38:38 Mattingly: That's correct. You got ahead of me. All right, on line 29 on page 1-3, we're going to put in a time of minus 00:55. That's the time we gave you for the boresight check.
127:38:55 Swigert: Okay...
127:38:56 Mattingly: That's your sextant check, really. [Pause.]
127:39:05 Swigert: Got that.

Entry Checklist page E1-3, with modifications.
127:39:06 Mattingly: Okay, on the top of page 1-4; where it said "1 hour and 15 minutes" next to line 32, we're going to change that to "Minus 2 hours and 30 minutes".
127:39:22 Swigert: Okay, minus 02:30 opposite item 32.
127:39:25 Mattingly: Okay, down at the bottom of the EMS entry check right there where we are, the bottom line now reads, "EMS Mode to Standby." Well, just above that - like to remind you to put a remark, "Do not initialize the range to go." This is because you're going to come into the EMS entry check, you're going to run through all these things; then we're going to remove power from the EMS. And just didn't want you to get ahead of yourself and initialize the entry parameters, because you'll lose them when we power up. [Pause.]
127:40:00 Mattingly: And, after we go EMS Mode to Standby, like for you to add "Circuit breaker EMS, two, to Open." [Pause.]
127:40:19 Swigert: Okay, "CB EMS, two, to Open".
127:40:21 Mattingly: That's correct. And we want to delete this "Set up camera" that's listed on the bottom of the page. We're deleting that for power reasons. That's line 33 Alpha.
127:40:34 Swigert: Okay, we're way ahead of you. We already got it stowed.

Entry Checklist page E1-4, with modifications.
127:40:39 Mattingly: Okay. On the top of the next page where it says "Secondary water EVAP," just keep in mind we don't plan to use the secondary evaporators unless the primary fails. On line 35 on page 1-5, next to "Command Module RCS preheat," the time is now "Minus 06:30." [Pause.]
127:41:14 Swigert: Okay, "minus 06:30," and the voltage reading 3.9 still is good, right?
127:41:21 Mattingly: Okay, very good. Under "Final stowage," the first thing that's listed on line 36, page 1-5, is "Optics." And if you want to get started on your stowage, we'd like to leave the optics out, because we'll have the star check coming up quite a bit after this. The rest of that stuff can be taken care of at your convenience. [Pause.]
127:41:48 Mattingly: All right, still on page 1-5, line 37; the time is now "Minus 06:10." [Pause.]
127:42:03 Swigert: Got that.
127:42:05 Mattingly: Okay, and this is one time it looks like we might actually do the preheat, so that's the reason we want to make sure that we know that not more than 20 minutes of time on the preheat. We may not be able to watch it at that time because you aren't powered up. [Long pause.]
127:42:34 Swigert: Okay. Either 20 minutes or until 3.9 volts DC.
127:42:38 Mattingly: That's correct, Jack. And now let's go to page 1-6. And about one-third of the way down, it shows "Panel 275 CB Main A, Bat C, Closed," we want to strike off that line, the next two lines, and we're going to strike out "Main A, Bat C, Closed; Main B, Bat C, Closed;" and "DC Indicator, Main B."
127:43:11 Swigert: Okay. After that step on panel 275, strike out "CB Main A, Bat C; CB Main B, Bat C"; and "DC Indicators to Main B".
127:43:22 Mattingly: That's correct. Now under panel 8, it tells you to "Close all circuit breakers except," and I have four additions. The first one is CB Service Module RCS Heaters, Quad Charlie, Main B, open. [Long pause.]
127:43:50 Swigert: Service Module RCS Heaters, Quad Charlie, Main Baker, open.
127:43:55 Mattingly: Okay. And the same thing for Service Module RCS Heater, Quad Delta, Main A, open. [Pause.]
127:44:11 Swigert: Service Module RCS Heaters, Quad Delta, Main A, open.
127:44:15 Mattingly: That's correct. And Circuit breaker EMS, that's two of them, open. [Long pause.]
127:44:34 Swigert: CB EMS, two, to open.
127:44:36 Mattingly: All right. And the last is the circuit breakers for SPS GAGING, four of them, open. [Long pause.]
127:44:54 Swigert: SPS GAGING, four to open.
127:44:58 Mattingly: Okay. And how about our readout on the battery and that charger?
127:45:05 Swigert: Okay, Bat's at volts and amps.
127:45:09 Mattingly: That's affirmed. And let's go back to page 1-6, line 41. Let's put in a time "Minus 04:40".
127:45:20 Swigert: Minus 04:40.
127:45:22 Mattingly: That's correct. On page 2-1, line number 2, put in a time of "Minus 55 minutes".
127:45:44 Swigert: Okay, minus 55 minutes.
Entry Checklist page 2-1, with modifications.
127:45:47 Mattingly: Okay. And the first thing you want to do under "EMS initialization," is circuit breakers EMS, that's two of them, to Close.
127:46:01 Swigert: Okay. CB EMS, two, to Close.
127:46:04 Mattingly: That's correct. All right. Line 4 or step 4, where it shows "CM RCS check." That occurs at minus 04:30. [Pause.]
127:46:17 Swigert: Okay. Minus 04:30.
127:46:20 Mattingly: All right. Under "CM RCS checks," the fourth line down says "Manual Attitude, three, to Minimum Impulse." We'll have to use "Accel Command" and the reason for that, Jack, is we don't have the SPS powered up so there's no minimum impulse generator.
127:46:39 Swigert: Okay. Manual Attitude, three, to Accel Command.
127:46:42 Mattingly: That's correct. And on the same page 2-1, strike out the last three lines, starting with "RCS transfer to Service Module." [Pause.]
127:46:57 Swigert: Right. The last three lines are scratched out. We ain't got one of those things.
127:47:02 Mattingly: That's correct. Okay, let's flip to page 2-2 and strike out the first two lines.
127:47:11 Swigert: Okay. Now wait a second. I need to give you volts and amps, Ken.
127:47:14 Mattingly: All right. Go ahead.
127:47:19 Swigert: Okay. It's 39.6, 1.12.
127:47:25 Mattingly: Sounds like you're getting there. Okay. I believe we scratched out the first two lines on 2-2. Now, we're - right below that, it says "Separation checklist." So we're going to just delete that whole thing; it's included in the notes I gave you. [Pause.]
127:47:50 Swigert: Okay. It's included in the notations.
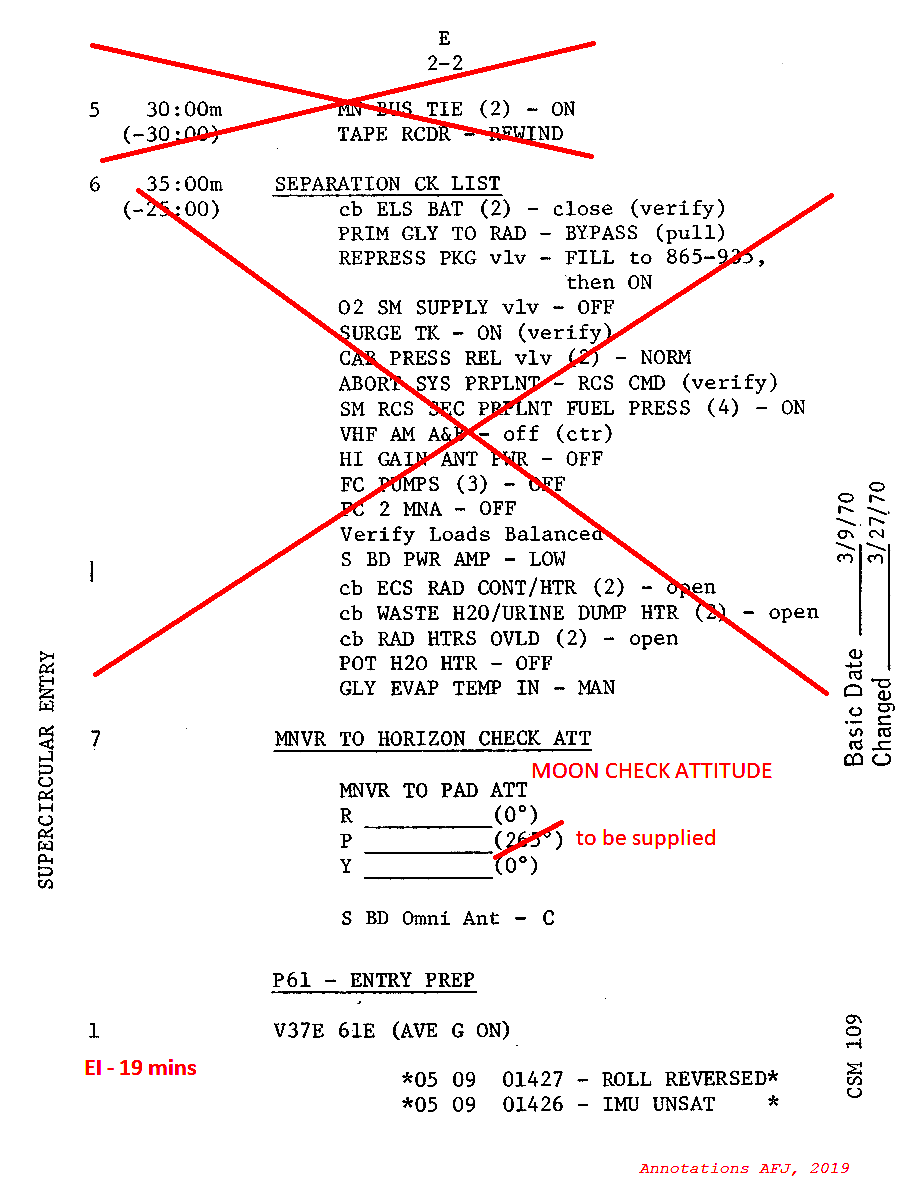
Entry Checklist page 2-2, with modifications.
127:47:55 Mattingly: All right. Line number 7. It says "Maneuver to horizon check attitude." We're going to call this the "Moon-check attitude" and this is the one we discussed, Jack. The angle of 265 is not correct. I'll have one of those for you first thing in the morning.
127:48:16 Mattingly: Okay. And at the bottom of the page, step number 1. That will be at EI minus 19 minutes, and we're off and running through a normal sequence of events. [Pause.]
127:48:32 Swigert: Okay. That sounds good. Ken, I guess if you've read this thing - Is it a comfortable time line? Any areas where you had problems with?
127:48:42 Mattingly: Jack, it is very comfortable. We've run it several times now and, in fact, it's being run right now, again. And we've run it both here at Houston and at the Cape. The only place where you might find that you need to stay ahead of things is during the platform-alignment period, when you're getting ready to close out the LM and then once you get into the Command Module and jettison the LM, why you're back on a very comfortable time. And, of course, we'll be watching and anything we can do, like keeping track of time for you, we'll remind you of that as we go along.
127:49:16 Swigert: Hey, that would be good - that would be good, Ken.
127:49:22 Mattingly: Okay. Let me emphasize, Jack, that 2½ hours is the earliest time we can start in on that powerup stuff. Everything else you can do the way you normally would, where you get as far ahead of the game as you can. But the 2½- hour time is based on saving Command Module consumables. And if you do that, why we're fat; we've got plenty of time to give you some fans on the water even. So that's the one point you don't want to start early on. I do have a couple of more lines to run through on the entry checklist and two pages in the G&C. And I think that will clean us up. [Long pause.]
127:50:14 Swigert: Okay, Ken. And G&C checklist now?
127:50:17 Mattingly: Let me finish a couple more things in the entry book. You still got that?
127:50:23 Swigert: Yes. Go ahead.
127:50:24 Mattingly: Okay. On - These are just cleanup items, Jack. On page 2-3, it lists how you separate, from the CM/SM Sep and all that, so, obviously, if we're on step 5 at 43 minutes down - that's all deleted. And that gets deleted all the way over onto page 2-4, up to the line where it says "15 minutes." And at that point, we pick back up and everything. From 15 minutes down is valid. [Long pause.]
127:51:07 Swigert: Okay. Delete item 5 down to the point where it says "Minus 15 minutes."
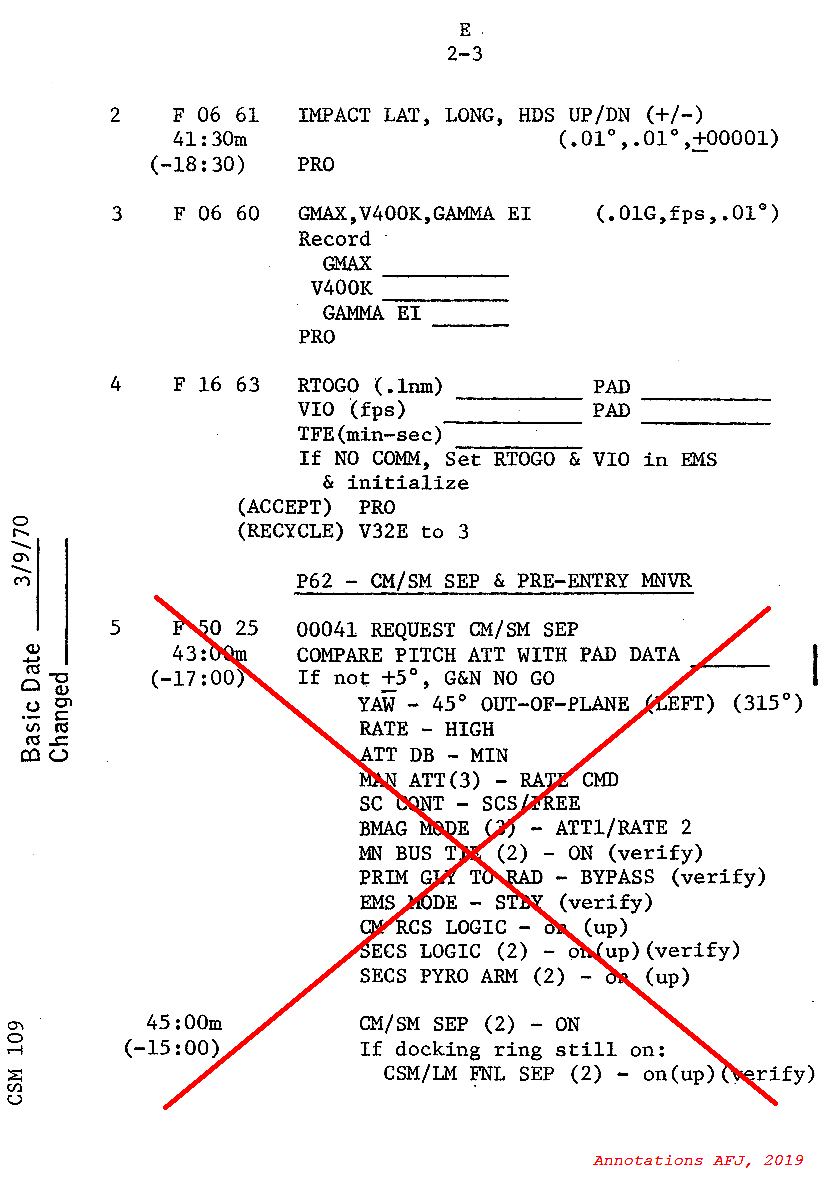
Entry Checklist page 2-3, with modifications.
127:51:14 Mattingly: That's correct, Jack. Okay, on page 2-5. The top line where we had "Horizon check," that's now the "Moonset check" and the time is approximately 57:37. And that's minus 02:23. And that angle that's listed in the book there - 177 - that's really a horizon time at 2 minutes; we'll have you - can look that up on the back of your entry cue card, and I'll look that number up again for you tonight.
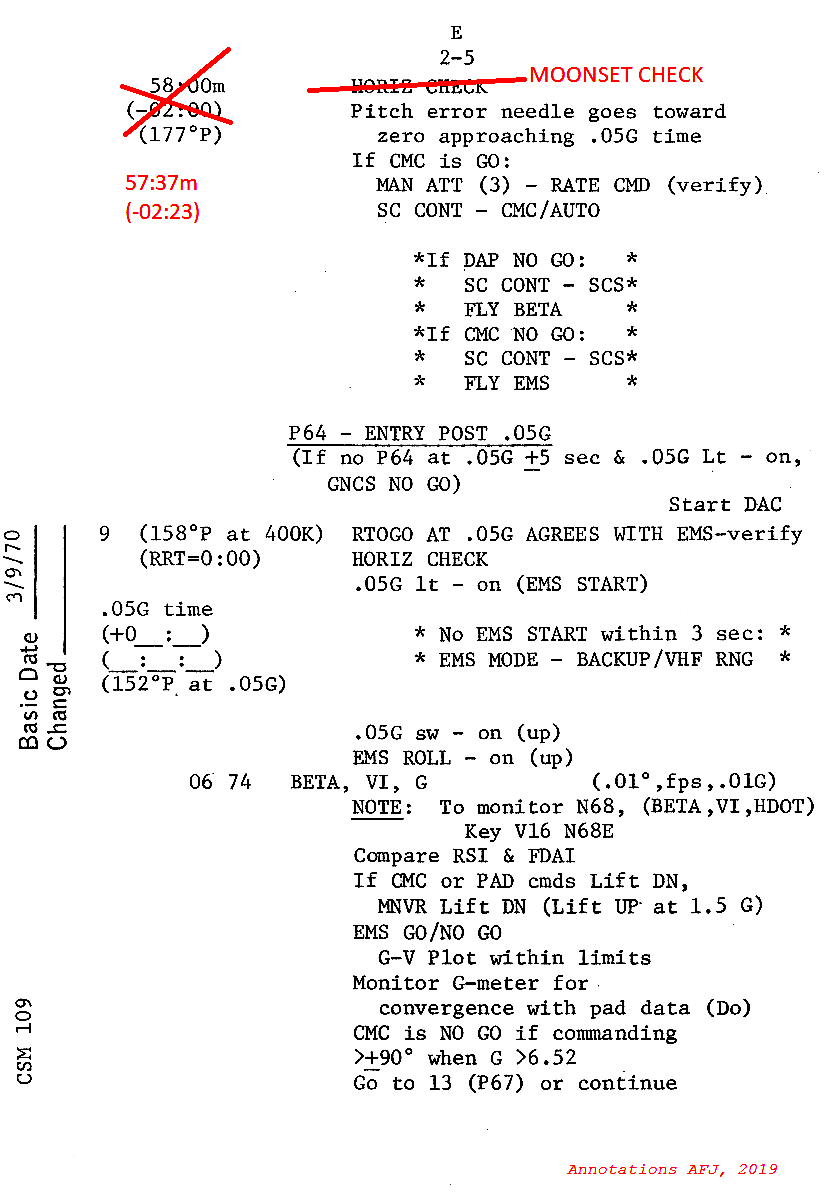
Entry Checklist page 2-5, with modifications.
127:52:01 Mattingly: Okay. Another thing is to remember when we begin blackout, which is around 0.05 g, and you can write this in your checklist wherever it's convenient; once we've lost Comm, we're going to go ahead and power down the SCE Power Off and the PMP Power Off. And we just want to do that after you lose Comm, which comes up around EI. Any time after that, go ahead and secure the PMP and the SCE power. [Long pause.]
127:52:42 Swigert: Okay. When Comm is lost, SCE Power Off, PMP Power Off.
127:52:47 Mattingly: That's correct, Jack, and that completes the entry checklist. Let's look at the G&C book. [Long pause.]
127:53:06 Swigert: Okay. Ready to copy.
127:53:08 Mattingly: Okay. Let's go to page 2-1. [Long pause.]
127:53:25 Swigert: Okay. Go ahead.
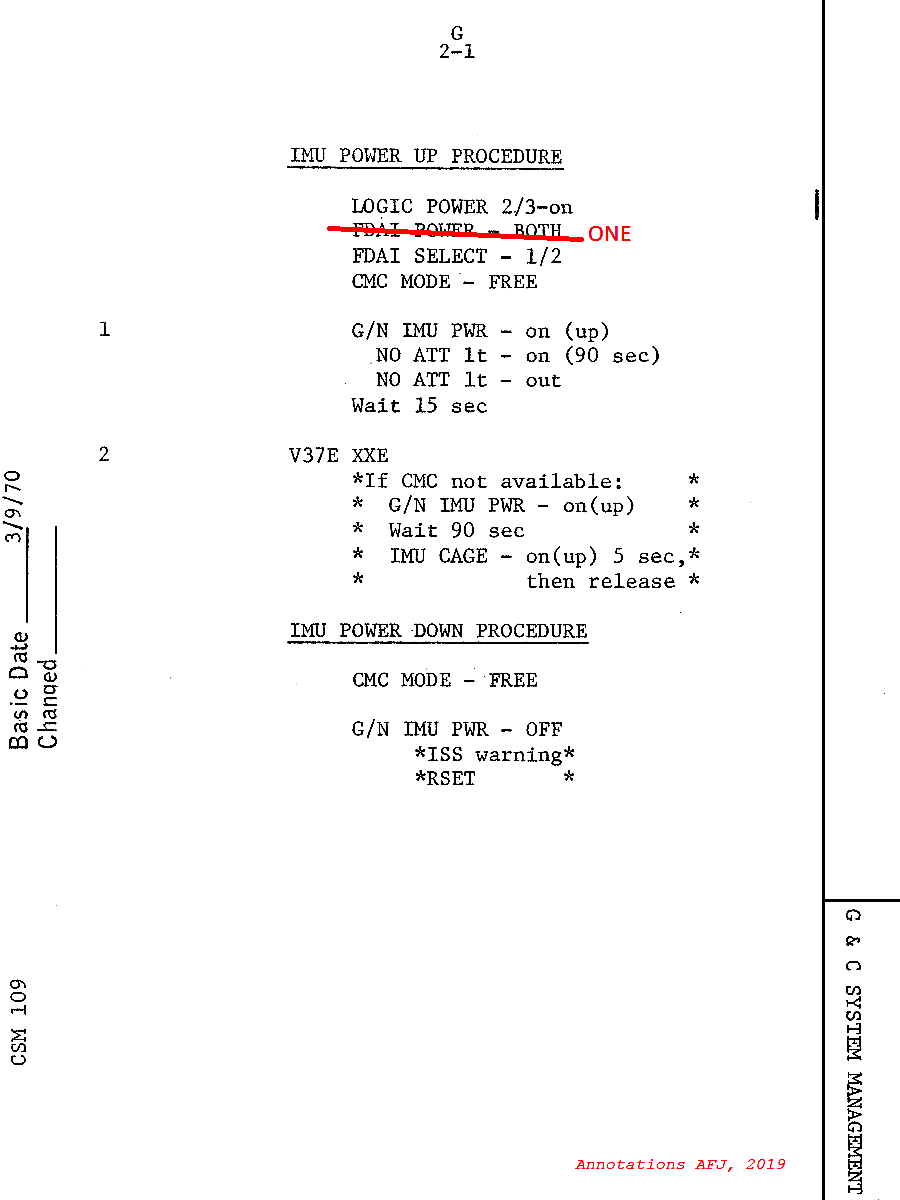
CM GC Checklist, page 2-1, with modifications.
127:53:27 Mattingly: Okay, Jack. The second line under "IMU powerup" says "FDAI Power to Both," and we're going to make that a "1." The reason we're doing that is, again, to conserve power. There's no reason to drive the second FDAI before we get that information to put on it.
127:53:48 Swigert: Okay. "FDAI Power to 1".
127:53:53 Mattingly: All right. That's correct. On page 2-2. [Pause.]
127:54:06 Swigert: Go ahead.

CM GC Checklist, page 2-2, with modifications.
127:54:07 Mattingly: Okay. Under CMC powerup, line - or step 2 says "Flashing 3700, Enter." The time we're going to use this, Jack, is going to be when you've just brought the computer up and it has a state vector in it that's way back many, many hours ago. So we want to do a Verb 96, Enter to stop the integration to keep it from just sitting there ambling along. And when the ground gives you a new state vector, why then we can go through P00 and we'll be back in business. [Pause.]
127:54:43 Swigert: Okay. You want me to go to Verb 37, Enter; 00, Enter; and then do Verb 96?
127:54:55 Mattingly: When you come up, I guess you're going to - once you get the CMC powered up, you're probably going to be going - you're going to come up in a flashing 37, and if you'll just do a Verb 96, Enter right there, that will take care of it.
127:55:09 Mattingly: All right. And the last one I have for you is on page 2-4. [Pause.]
127:55:23 Swigert: Okay. Go ahead.
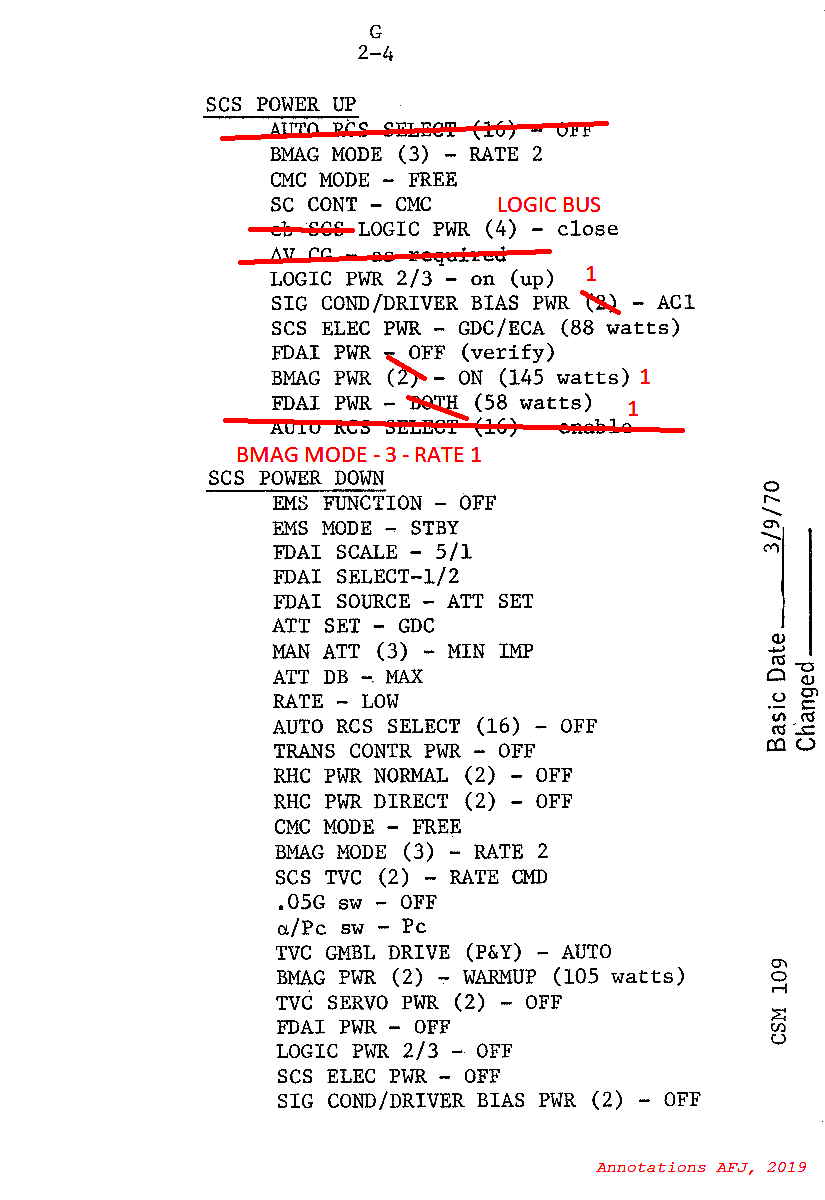
CM GC Checklist, page 2-4, with modifications.
127:55:24 Mattingly: Okay. Under the SCS powerup, the first line says "Auto RCS Select, 16, to Off." Okay. You can just delete that part. On the fifth line, it says "Circuit breaker SCS Logic Power," that's really "Logic Bus, four of them, to Closed." The Delta-V CG is not important since we are not burning the engine. The "Signal Conditioner/Driver Bias Power" lists "Two to AC 1." We are going to make that just one of them; make it "Signal Condition/Driver Bias Power, one, to AC 1." The "BMAG Power," which is the third line from the bottom, says "BMAG Power, two, On;" we are going to make that just one. We'll bring up number 1, and we'll make "FDAI Power, number 1" and the last line "Auto RCS Select, 16, enable," you can strike that off and replace it with "BMAG Mode, three of them, to Rate 1." You want to try reading that back? [Long pause.]
127:56:58 Swigert: Okay. Delete "Auto RCS Select, 16, Off." Change "CB Logic Power" to "Logic Thrust Power - CBS CS Logic Thrust, four, to Closed." Delete "Delta-V CG," coming down here "Signal Conditioner/Driver Bias Power, one, AC 1; BMAG Power, 1, to On," and it's the number 1 BMAG. "FDAI Power to 1; BMAG Mode, three, to Rate 1," deleting the "Auto RCS Select, 16, to enable".
127:57:34 Mattingly: That's correct. You've got them all, Jack. Very good. Thank you.
127:57:40 Swigert: Thank you. This does it, huh?
127:57:43 Mattingly: Yes, sir. Let's see - just a second - let me check on this hatch and integrity check; maybe I can tell you something about that. And I do have an answer to your LM power question about the umbilicals. The umbilicals will be unpowered according to the LM procedures, so if you'd like to disconnect them, you can.
127:58:04 Swigert: Okay. I think we will.
127:58:06 Mattingly: All right, sir. Okay, Jack, and they'd like us to stand by just a second.
127:58:19 Brand: Jack, would you get the Battery Charger, Off, please. And we'll send you...
127:58:25 Brand: ...the rest of that procedure later.
127:58:26 Swigert: You mean there's more? Okay, in work. Battery Charger is going Off.
127:58:34 Swigert: Okay, Vance. Okay - I don't think you've given me the backout procedure, have you, for the battery chargers?
127:58:43 Brand: That's negative. Wait. All we want to do, Jack, is say Battery Charge Off at the moment. We'll complete that procedure as soon as you are through with Ken completely. [Long pause.]
127:59:01 Swigert: Okay, Vance. The Battery Charger's Off, and I'm ready to continue with Ken.
127:59:06 Brand: Okay, Jack. And we'll get the backout to you after that.
127:59:13 Mattingly: Okay, Jack. It looks like we've closed up the loose ends here. Amazingly enough, out of all that stuff, it looks like we only generated one question on the floor, and we'll research that one. We'll even let you guess what it might have been. If you have any questions, after you mull it over, why, we're always available. Just ask us what you're thinking about.
128:00:40 Swigert: Okay. That's what we're going to do. We're going to wait until the LM people get theirs, and then we're going to discuss it and coordinate things here, and make sure that - that we don't have any interface problems. And, if we have any more questions, we'll be coming back at you.
128:00:55 Mattingly: Okay. We did run the thing integrated, so we think we've got all the little surprises ironed out for you.
128:01:04 Swigert: I hope so because tomorrow is examination time.
128:01:08 Mattingly: Roger.
128:01:09 Lovell: Ken, this is Jim.
128:01:11 Mattingly: Yes, sir.
128:01:12 Lovell: Appreciate the work you've done, and Jack says that it's going to be hard to beat his record about saving SM RCS fuel all the way there and back.
128:01:22 Mattingly: I can't do much about that.
128:01:25 Mattingly: Some people will do anything to set a record.
128:01:32 Slayton: Hey, Jim, you even did good on Service Module fuel this time.
128:01:40 Swigert: Yes. We're coming back with full load almost of both RCS and SPS, that's - That's pretty much of a record. [Pause.]
128:01:56 Swigert: Okay. Did you want to put Freddo on, or somebody to copy the LM - the LM side of the house. [Pause.]
128:02:08 Brand: Hey, Jack. Don't wake him up yet. Stand by 1.
128:02:13 Swigert: He's - He's awake. [Long pause.]
128:02:30 Brand: Hey, Jack. We'll give you this battery charging backout procedure, and then Deke says you ought to get some sleep. You're going to need it tomorrow.
128:02:44 Swigert: Okay. I'm ready to copy the backout procedure.
128:02:47 Brand: Okay. Panel 3: Battery Charge, Off - you've already done that, Jack - next AC Inverter, Inverter 2 Off: Panel 5: Main Bus Tie Bat B/C to Bat B/C. Huh? Yes, it's up - the up position. Panel 250: circuit breaker, Bat A Power Entry/Postlanding to open; circuit breaker, Bat B Power Entry/Postlanding, open, Panel 5: CB Battery Charger Bat B Charge, open. Okay. I'll let, you read that back, Jack. [Pause.]
128:04:09 Swigert: Okay. Bat Charge, Off; AC Inverter 2 to Off; Main Bus Tie, Bat B/C to, on up. Panel 250: CB Bat A, Power Entry And Postlanding, open. CB, Bat B, Power Entry and Postlanding, open, panel 5: CB Bat Charger, Bat B Charge, Open.
128:04:32 Brand: Okay. That's correct. Now, that gets you back to the place where you can back out of the - the big battery charging procedure, which you have. And I - I think you have the backout procedure for that, but I'd like to check with you. [Pause.]
128:05:00 Swigert: Okay. Stand by here. [Pause.]
128:05:12 Brand: Okay, Jack. Do you have that backout procedure in your hand there?
128:05:20 Swigert: Yes, I do, Vance.
128:05:22 Brand: Okay. Just to verify. It starts out panel 3, Battery Charge switch, Off; AC Inverter 2, Off; panel 5, Main Bus Tie, Bat A/C, on, up, et cetera.
128:05:40 Swigert: Roger. Continues CB Bat A, Power Entry/Postlanding, open; Inverter Power 2, Main B, open; and then you reverse the steps that you had for entering the procedure.
128:05:54 Brand: Yes, that's fine. Okay. And we have one other comment regarding the systems checklist, and stand by 1, and that'll - that'll wrap it up for us. Oh, a new item came in, Jack. We need to switch to ascent water, and I have a three-step procedure for you, if you're ready to copy. [Pause.]
128:06:27 Swigert: Okay. Jim will copy that.
128:06:32 Brand: Okay. Descent Water valve, Close. Ascent Water valve to Close, and Water Tank Select valve to Ascent. [Long pause.]
128:07:24 Lovell: Okay, Vance. Descent Water valve, Closed; Ascent Water valve, Closed; and Water Select Tank to Ascent. Is that correct?
128:07:34 Brand: Water Tank Select valve, Ascent. That's correct, Jim. [Pause.]
128:07:45 Lovell: And we'll proceed with that right now, and how about still drinking descent water? [Long pause.]
128:08:12 Brand: Jim, we understand that you should be able to continue drinking it. [Pause.]
128:08:24 Lovell: Okay. We switched to ascent water, but we'll probably have to have the descent water valve back open up again to drink water.
128:08:34 Brand: That's affirm. That's the one thing you'll have to do is, whenever you want to drink out of the descent tank, is open the descent valve - the Descent Water valve momentarily.
128:08:49 Lovell: Okay. And we are now on ascent water.
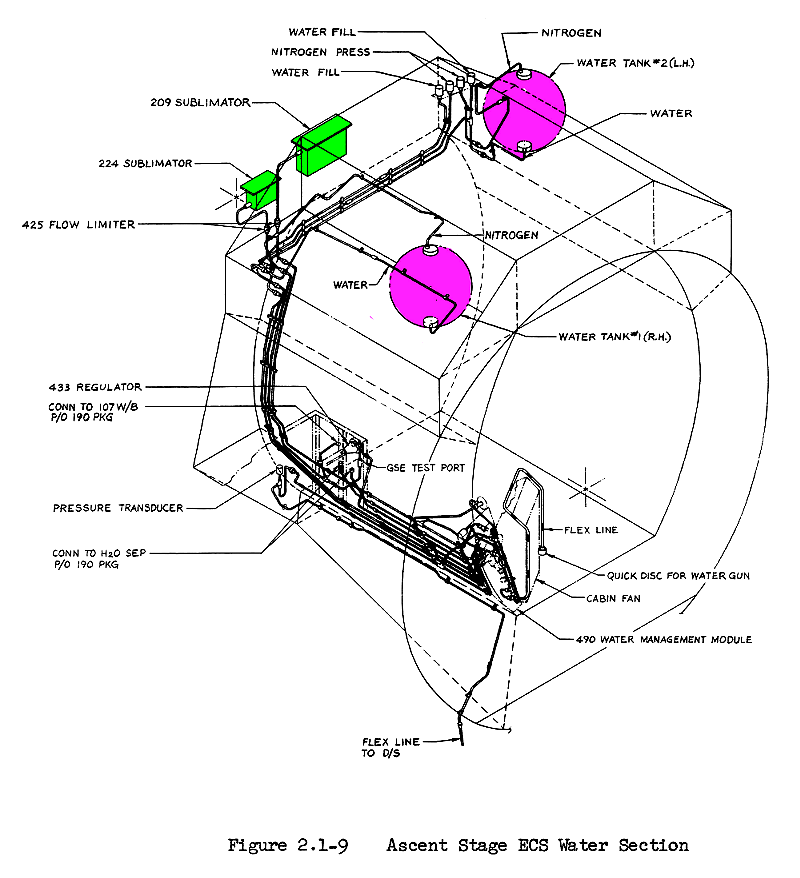
LM ascent stage water system consists of two nitrogen-pressurized spherical tanks located in compartments that flank the docking tunnel and the hatch.
LM water controls. They're located behind LMP's station. The procedure for changing the water tank being used is simple enough.
128:08:53 Brand: Okay; okay. And I need Jack back again, please.
128:09:02 Swigert: Okay, Vance. I'm here, and you have something in the systems checklist.
128:09:06 Brand: That's right. Refer to S/2-6. This - Really what we're talking about, Jack, is the hatch integrity check decal. And I think it'll be easiest, if you'll open to S/2-6 and I explain it to you. [Long pause.]
This page from the Apollo 11 Systems Checklist is equal to the page from Jack's own checklist, and shows the procedure for the hatch integrity check.
128:09:41 Swigert: Okay, Vance. I'm ready to copy.
128:09:44 Brand: Okay. This will - This just involves changes. Look down to the third line where it says "Tunnel Vent valve, Tunnel Vent for 30 seconds;" cross out "30 seconds" and cross out the two lines below that. In other words, "LM CSM Delta-P. Check Delta-P and recycle to Tunnel Vent." [Long pause.]
128:10:24 Swigert: Okay. You want me to delete "For 30 seconds".
128:10:34 Brand: That's affirm. And the two lines below "30 seconds." And actually the part of the fourth line there, which is "8½ minutes".
128:10:50 Swigert: Stand by. Can you read okay?
128:10:53 Brand: Yes. I hear you now.
128:10:55 Swigert: Okay. Delete the two lines below that, or the two and a half lines below that, also.
128:11:02 Brand: That's affirm. And now we have an addition to put in place of what we deleted. Stand by 1; the Comm's bad. How do you read?
128:11:14 Swigert: Roger. Loud and clear.
128:11:16 Brand: Okay. We want you to vent - tunnel vent until, and add the following, "Until LM/CM Delta-P is equal to 3.0 psid." [Pause.]
128:11:42 Swigert: Okay. "Until LM/CM Delta-P equals 3.0".
128:11:47 Brand: Okay. And that means that you'll have a pressure of 1.5 to 2 in the tunnel, absolute. That's...
128:11:58 Brand: That's a note.
128:12:01 Slayton: Jack, that's what we want to end up with ultimately is 1½ to 2 there on that tunnel and depending on the gage reading, but that should be about 3.
128:12:10 Swigert: Okay, Deke.
128:12:12 Brand: Okay, then, Jack. Continuing on, everything's okay until you get down to - on the next page, you get through "Verify O
2 Flow Indicator no increase." We would like to delete everything below that, until the last step, which is Tunnel Lights, Off. So starting with "Before undocking only," delete all lines through "Tunnel Vent Valve to Tunnel Vent." [Pause.]
128:12:50 Swigert: Okay. Delete the section that says "Before undocking only" down to where it says "Tunnel Vent Valve to Tunnel Vent".
128:12:57 Brand: Yes, through that.
128:13:00 Swigert: Well, through that. Leave "Tunnel Lights, Off" is the only step remaining.
128:13:04 Brand: Roger. And just - That's a verify. [Pause.]
128:13:14 Swigert: Okay. Got that.
128:13:15 Brand: Okay. Really what this does for you, then, is it gives you a pressure - a tunnel pressure integrity - or a hatch pressure integrity - integrity check with a Delta-P of 3 psi between the tunnel and the cabin. And then you never go on to the steps of venting that on out. You just leave it in there for the time that you separate from the LM. And that gives you a shotgun Delta-V effect.
128:13:52 Swigert: Okay. Copy that.
128:13:54 Brand: Okay. I think that's all, but we're polling the house here to see if there's another comment for you. Stand by.
128:15:19 Brand: Aquarius, Houston.
128:15:23 Swigert: Go ahead, Vance.
128:15:24 Brand: Jack, that's it. Unless you have any more questions, why, everyone is hoping you'll hit the sack and get some rest.
128:15:34 Swigert: Okay. You want that battery backout procedure now to take that - to complete the remaining steps? [Pause.]
128:15:50 Brand: That's affirm, Jack. We request that you go ahead and finish out the backout completely until you get to square 1. Over. [Pause.]
128:16:04 Swigert: Okay. [Long pause.]
128:16:24 Lovell: Houston, Aquarius.
128:16:26 Slayton: Go ahead, Jim.
128:16:29 Lovell: Do you have any more updates for us?
128:16:32 Slayton: We've still got a LM update, but we strongly recommend that you and Jack work as hard as you can sleeping for about the next 5 hours. Fred can handle it.
128:16:42 Lovell: Okay. That's what we'll do. We'll put Fred on watch here, and Jack and I will take it easy, and if Fred copies the LM update, well, then we'll all start from fresh in the morning.
128:16:56 Slayton: You bet.